background image

Engl

ish

20

Preparations

1

In DISC mode, press 

SETUP

on the remote

control.

2

Press

/

¡

 /

 5 

/

 4 

on the remote

control to select your preferred option.

Move to “Video Setup Page” and press 

4

.

Move to “TV Type” and press 

¡

.

PAL

– Select this if the connected TV set is PAL
system. It will change the video signal of an
NTSC disc and output to PAL format.

NTSC

– Select this if the connected TV set is NTSC
system. It will change the video signal of a PAL
video disc and output to NTSC system.

Multi

– Select this if the connected TV set is
compatible with both NTSC and PAL (multi
system). The output format will be consistent
with the video signal of the disc.

3

Select one of the options and press 

OK

on the

remote control to confrim.

Read and follow the instructions shown on

the TV  to confirm the selection ( if any ).

If a blank / distorted screen appears, please

wait for 15 seconds for the auto recovery.

To remove the menu

 Press 

SETUP

.

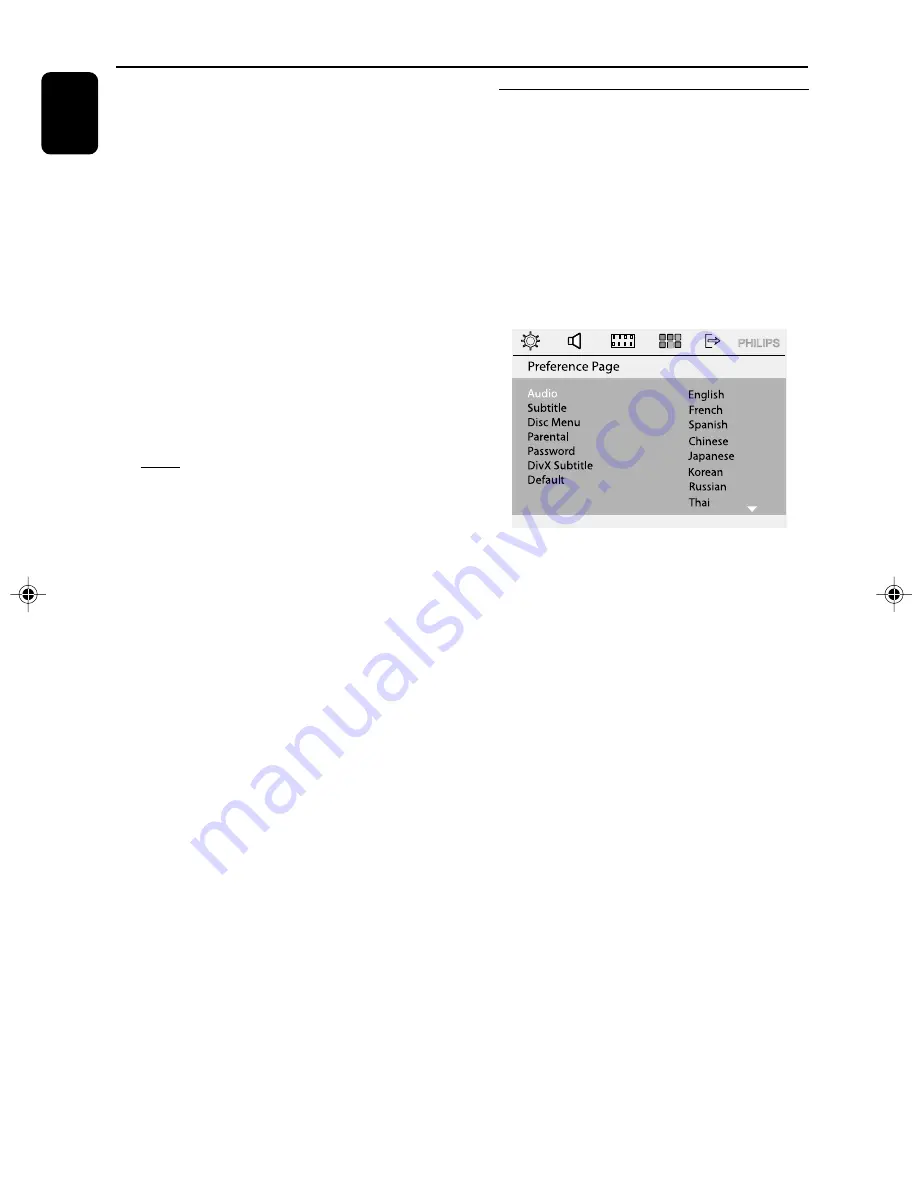
Step 3: Setting language

preference

You can select your preferred language settings
so that this DVD MINI HI-FI System will
automatically switch to the language for you
whenever you load a disc. If the language
selected is not available on the disc, the language
set by default will be used instead. But the menu
language of the DVD MINI HI-FI System cannot
be changed once selected.

1

In DISC mode, stop playback and press 

SETUP.

2

Press

/

¡

 /

 5 

/

 4

 on the remote

control to select your preferred option.

Move to ”Preference Page” and press 

4

.

Move to one of the following and press 

¡

.

– Audio (disc’s soundtrack)
– Subtitle (disc’s subtitles)
– Disc Menu (on screen menu)

3

Press

/


4

 to select a language and press 

OK

.

4

Repeat

steps 2~3

 for other settings.

To remove the menu

Press

SETUP

.

FWD397-98_UM ENG_0514

2008.5.14, 15:53

20

Summary of Contents for FWD397

Page 1: ...FWD397 DVD MINI HI FI System Register your product and get support at www philips com welcome ...

Page 2: ...2 CAUTION Use of controls or adjustments or performance of procedures other than herein may result in hazardous radiation exposure or other unsafe operation ...

Page 3: ...3 1 2 3 4 5 6 7 8 9 0 ...

Page 4: ...marks of Microsoft Corporation in the United States and or other counties Windows Media is a trademark of Microsoft Corporation DivX DivX Ultra Certified and associated logos are trademarks of DivX Inc and are used under license Official DivXR Ultra Certified product Plays all versions of DivXR video including DivXR 6 with enhanced playback of DivXR media files and the DivXR Media Format ...

Page 5: ...OMPATIBILITY WITHTHIS MODEL 525p AND 625p DVD PLAYER PLEASE CONTACT OUR CUSTOMER SERVICE CENTER This product incorporates copyright protection technology that is protected by method claims of certain U S patents and other intellectual property rights owned by Macrovision Corpora tion and other rights owners Use of this copyright protection technology must be authorized by Macrovision Corporation a...

Page 6: ...epeat play Shuffle play mode Repeating a section Programming favorite tracks 23 Playing in slow motion mode 23 Special DVD VCD features 24 25 Changing subtitle language Changing the pictures scales Changing sound track language Searching for a particular passage Displaying the disc information during playback Moving to another title chapter Viewing from another angle Playback control PBC Checking ...

Page 7: ...ect Selecting DBB effect Selecting MAX SOUND effect Volume control 39 Changing the volume level Switching off the volume temporarily USB Operations Compatibility of the USB connection on this MINI HI FI system 40 Supported Music type 40 Using a USB device 40 Geneal information on USB device 40 USB playback 41 Other Functions Dimming the display 42 Vocal 42 KARAOKE setup 42 Mic Mic Volume Echo leve...

Page 8: ...e theater technology Other features include Additional Component Connections Lets you connect other audio and audio visual components to the system so you can use the system s speakers Night mode Lets you compress the dynamic range reducing the difference in loudness between different sounds in Dolby Digital mode Parental control rating level Lets you set a rating level so that your children canno...

Page 9: ...ers table cloths curtains etc C B A B C Battery shall not be exposed to excessive heat such as sunshine fire or the like Cleaning the cabinet Use soft cloth slightly moistened with a mild detergent solution Do not use a solution ontaining alcohol spirits ammonia or abrasives Cleaning discs To clean a CD wipe it in a straight line from the center towards the edge using soft and lint free cloth A cl...

Page 10: ... speaker to any one pair of speaker terminals Do not connect speakers with an impedance lower than the speakers supplied Please refer to the SPECIFICATIONS section of this manual Connections Step 1 Placing speakers For best possible surround sound all speakers except subwoofer should be placed at the same distance from the listening position To avoid overheating of the system a safety circuit has ...

Page 11: ...nction through SETUP Connections Step 3 ConnectingTV set IMPORTANT You only need to make one video connection from the following options according to the capabilities of yourTV system S Video or ComponentVideo connection provides higher picture quality These options must be available on yourTV set Connect the system directly to theTV set Using Video In jack CVBS Use the composite video cable yello...

Page 12: ... not supplied to connect AUX IN L R jacks to the HEADPHONE jacks on theTV set With a diameter 3 5mm stereo jack Using an accessory RF modulator IMPORTANT If yourTV set only has a single Antenna In jack or labeled as 75 ohm or RF In you will need a RF modulator in order to view the DVD playback viaTV See your electronics retailer or contact Philips for details on RF modulator availability and opera...

Page 13: ...Connections Step 4 Connecting FM MW antennas Connect the supplied MW loop antenna to the MW jack Place the MW loop antenna on a shelf or attach it to a stand or wall Connect the supplied FM antenna to the FM jack Extend the FM antenna and fix its end to the wall For better FM stereo reception connect an outdoor FM antenna to the FM ANTENNA terminal Notes Adjust the position of the antennas for opt...

Page 14: ...theVIDEO IN jack on theVCR 4 Connect the system s LINE OUT R L jacks to the AUDIO IN jacks on theVCR This will allow you to make analog stereo two channel right and left recording To view DVD playback while recording You must connect the system to yourTV system using the S VIDEO as shown above or the Component Pr PbY video connection Step 7 Connecting digital audio equipment Recording digital Conn...

Page 15: ...on the system only to exit plug play mode 3 DISPLAY SCREEN to view the current status of the system 4 DISPLAY to view the time title or chapter information 5 MODE to select REPEAT or SHUFFLE function 6 2 to switch the system on or to Standby mode 7 TAPE to select tape mode 8 MAX SOUND to activate or deactivate MAX sound 9 USB DIRECT to insert a USB device 0 MP3 LINK to insert an MP3 device DISC TR...

Page 16: ...EP to view and set timer or to set the sleep auto off timer function MIC LEVEL 1 MIC LEVEL 2 to adjust the volume level of MIC1 2 MIC 1 MIC 2 to connect microphone jack 24 TAPE DECK 25 OPEN 5 to open or close the tape deck door CASSETTE KEYS ...

Page 17: ... root menu for DVD only to switch on or off the playback control mode forVCD SVCD toggle through File list Folder Playlist for MP3 WMA DivX 8 1 5 4 to select movement direction in disc contents menu system menu bar in tuner mode to tune to lower or higher radio frequency 1 in Disc mode press to fast reverse forward the disc 1 OK to exit or confirm the selection 9 O P in Disc USB mode press to skip...

Page 18: ...O OFF is displayed The system will switch to Standby mode Note Even if you remove the AC power cord and reconnect it to the wall socket the demonstration will remain off until you activate it again Functional Overview SUBTITLE to select desired subtitle MODE to select REPEAT or SHUFFLE function A B to repeat a specific section in the same track title SETUP to enter or exit the system setup page VO...

Page 19: ...atteries in combination Batteries contain chemical substances so they should be disposed of properly Preparations Step 2 Setting theTV set IMPORTANT Make sure you have completed all the necessary connections 1 Press DISC1 2 3 on the front panel or press DISC1 2 3 on the remote control 2 Turn on theTV set and set to the correctVideo In channel You should see the blue Philips DVD background screen o...

Page 20: ...ctions shown on theTV to confirm the selection if any If a blank distorted screen appears please wait for 15 seconds for the auto recovery To remove the menu Press SETUP Step 3 Setting language preference You can select your preferred language settings so that this DVD MINI HI FI System will automatically switch to the language for you whenever you load a disc If the language selected is not avail...

Page 21: ...is ready for loading Make sure the disc label is facing up For double sided discs load the side you want to play facing down Disc Operations Press OPEN CLOSE to close the disc tray LOADING will be displayed In the stop mode press DISC1 2 3 on the remote control repeatedly to select DISC1 DISC2 or DISC3 cyclially Some discs can play automatically For discs with Table Of Contents a menu may appear o...

Page 22: ...removed press 38 to resume playback from where you have stopped To cancel the resume mode Press 7 again or go into STANDBY mode or press OPEN CLOSE Note Resume information will be erased if you have changed the disc opened the disc tray changed source or disconnected the system from the power supply Selecting various modes Repeat play Shuffle play mode You can only select the Repeat play and Shuff...

Page 23: ...trol to access the next programming page 3 Once complete select Start on the screen and press OK to play the program 4 To stop playback press 7 once 5 To exit the programming mode select Exit in the menu and press OK Or press PROGRAM on the remote control to exit the programming mode For MP3 JPEG WMA 1 Press 5 4 to select a track picture on the disc menu then press PROGRAM to add the track picture...

Page 24: ...rmation menu Note Selecting a title or chapter might not be possible on certain discs Special DVD VCD features Changing subtitle language This operation only works on DVDs with multiple subtitle languages Press SUBTITLE to select the desired language Changing the pictures scales This operation only works on VCDs DVDs JPEGs DivXs with images ForVCD DVD DIVX Press ZOOM to change the zooming scale ZO...

Page 25: ...c with PBC function If PBC OFF the system will start playback automatically If PBC ON the PBC menu if available will appear on theTV screen for selection Use the numeric keys 0 9 to enter your choice Note This function is not available for DVD CD MP3 WMA Divx discs Checking the contents of DVD 1 Press TITLE RETURN on the remote control If the current title has a menu the menu will appear on the sc...

Page 26: ...6 types of scan effect for selection The selected scan effect will be displayed on theTV screen Kodak Picture disc 1 Load a Kodak Picture disc The disc reading time may exceed 30 seconds due to complexity of the directory file configuration 2 During playback press 9 12 thumbnail pictures will appear on theTV screen Example for the picture of disc menu Slide Show Prev Next 3 Press I2 or 3I to view ...

Page 27: ...e control to change the subtitle language lf the Divx has different audio tracks you can press AUDIO on the remote control to change the audio stream Use 1 on the remote control to perform fast reverse forward search To access or remove the menu Press MENU on the remote control again Helpful Hints Subtitle files with the following file name extensions srt smi sub ssa ass are supported but do not a...

Page 28: ... setup menu will appear on theTV screen 2 Use 1 to select one of the setup menu options and then press OK 3 Press 5 4 1 on the remote control to navigate in the menu 4 Press OK to confirm your selection Removing the menu Press SETUP again Note When the disc is under playing Preference Page can t be entered you need to press 7 twice then press SETUP to enter Preference Page Display Dim TV Display V...

Page 29: ... screen viewing A wide picture will display on the whole TV screen with a portion automatically cut off 4 3 Letter Box Select this if you have a conventionalTV set and your DVD is formatted for wide screen viewing Black bars appear on the upper and lower portions of the TV screen 16 9Wide Screen Select this if you have a wide screenTV set you must also set your wide screen TV to full size Video Se...

Page 30: ...videos DivX R VOD can only be played back on this system Improving the image for progressive scan video output setting This feature is only applicable when you have connected this system to a Progressive ScanTV system throngh the ComponentVideo jack Off Select this if a conventionalTV set is connect to yor system On To enjoy the full quality potential offered by progressive scan feature a progress...

Page 31: ...round sound with its full dynamic range On Select this to level out the volume High volume output will be softened and low volume output will be brought upward to an audible level This feature is only available for movies with Dolby Digital mode The TV screen will display below picture 3 Use the numeric keys 0 9 to enter your six digit code The password supplied by default is 000000 If you forget ...

Page 32: ...tral Europe Display central Europe fonts Cyrillic Display cyrillic fonts Default If RESET is selected all the items in the setup menu will be reset to default setting except Parental Setting and Password DVD Menu Operations Restricting playback by setting parental level Some DVDs may have a parental level assigned to the complete disc or to certain scenes on the disc This feature lets you set a pl...

Page 33: ...ed to install the radio stations With this feature you can install all the available tuner station automatically with one touch of button When AUTO INSTALL PRESS PLAY appears Press 38 on the system This until starts searching from the FM band followed by the MW band All the available radio stations with strong signal will be strored automatically When all the available radio stations are stored or...

Page 34: ...AM PROG will display 4 Press O P or numeric keys 0 9 to select the desired preset number 5 After selecting an address number press PROGRAM again to store the radio station Repeat steps 3 5 to store other preset radio stations Note If you attempt to store more than 40 preset radio stations FULL will be displayed This until exits presetting mode if no button is pressed within 20 seconds Selecting a ...

Page 35: ...errupting playback Press 8 to interrupt playback Stopping playback Press 70 to stop playback Rewinding or forwarding fast when playback is stopped 1 Press 1 or 2 Press 70 when you reach the desired passage General information on recording If you don t intend to record via the microphone unplug it to avoid unwanted recording source For recording only use tape of IEC type I normal tape The recording...

Page 36: ...rding To stop recording Press 70 on the system Disc synchro recording 1 Press DISC1 2 3 to select the disc mode You can record programmed tracks in the order you want 2 Press to start recording REC will flash but the first 7 seconds of the start passage will not be recorded Selecting another track during recording 1 Press 2 Press O or P to select another track 3 Press to resume recording To stop r...

Page 37: ...ress AUX MP3 LINK once or twice on the system or on the remote control to select AUX or MP3 LINK 3 To avoid noise distortion turn down the volume on your external device 4 Press the PLAY key on the connected device to start playback 5 To adjust the sound and volume use the sound controls on your external device and the FWD397 Notes You are advised not to listen to and record from the same source s...

Page 38: ... seconds to enter timer setting mode The source and timer digits will be light on the display panel 2 Press DISC1 2 3 USB orTUNER to select the desired source Before setting timer make sure the music source has been prepared DISC1 2 3 load the disc s USB insert a USB driver TUNER tune to the desired radio station 3 Press PRESET O P repeatedly to set the hour 4 Press SEARCH TUNING 1 repeatedly to s...

Page 39: ...cting MAX SOUND effect Press MAX SOUND on the system or MAX on the remote control to select MAX ON to achieve optimal sound When MAX SOUND is activated MAX ON will appear on the display for 3 seconds Press MAX SOUND on the system or MAX again to select MAX OFF to achieve optimal sound When MAX SOUND is deactivated MAX OFF will appear on the display for 3 seconds Volume control Changing the volume ...

Page 40: ... mp3 wma Music bought from on line music stores are not supported because they are secured by Digital Rights Management protection DRM File name extensions that end with the following are not supported wav m4a m4p mp4 aac and etc No Direct connection can be made from Computer USB port to the MINI HI FI system even you have mp3 files in your computer Using a USB device By inserting a USB device to ...

Page 41: ... unit 2 Press USB on the remote control or press USB on the system to access the device is detected When using multiple drives on a single card reader only one of the connected cards can be accessed The device numbers may vary with different card readers 3 Select the file and press OK to play Helpful Hints When the USB devices does not fit into the USB DIRECT a USB extension cable is re uired You ...

Page 42: ...ne when you play in DISC USB mode Score There are three levels of Scoring difficulty for Basic Intermediate Advance Select Off to turn off the karaoke scoring 1 Press 5 4 and 1 or on the remote control to navigate in the menu 2 Press OK to confirm your selection To remove Karaoke Setup Page Press KARAOKE again MIC Volume Echo Level Key Scroe 10 Off 10 00 Off Karaoke Setup Page 100 Full brightness ...

Page 43: ...fore connecting the microphone set the MiC LEVEL1 2 to the minimum level to prevent howling 2 Press DISC1 2 3 USB or AUX MP3 LINK to select the source to be mixed and start playback 3 Adjust the volume of the source through VOL control 4 Adjust the microphone volume through MiC LEVEL1 2 control please refer to Page 42 KARAOKE setup Notes Keep the microphone away from the speakers to prevent howlin...

Page 44: ...oding MPEG 2 MPEG 1 Video DAC 12 Bits Signal System PAL NTSC Video Format 4 3 16 9 Video S N 56 dB minimum CompositeVideo Output 1 0Vp p 75 Ω S Video Output Y 0 714Vp p 75Ω C 0 286Vp p 75Ω Audio DAC 24 Bits 96 kHz Frequency Response 4 Hz 20 kHz 44 1kHz 4 Hz 22 kHz 48kHz 4 Hz 44 kHz 96kHz MAIN UNIT Power Supply Rating 110 127V 220 240V 50 60HZ Power Consumption Active 60 W Dimensions w h d 265 310 ...

Page 45: ...t until the moisture condensed at the lens has cleared Replace or clean the disc see Maintenance Use a readable disc or correctly recorded format MP3 CD Select the appropriate video input mode on the TV set Check if theTV set is switched on Check the video connection Check if the system is securely connected Sometimes a slight picture distortion may appear This is not a malfunction Clean the disc ...

Page 46: ...Key value of KARAOKE setup is 0 If the system is in pause slow motion or fast forward reverse mode press 2 to resume the normal play mode Make sure the MP3 CD was recorded within 32 256 kbps bit rate with sampling frequencies at 48 kHz 44 1 kHz or 32 kHz If the signal is too weak adjust the antenna or connect an external antenna for better reception Increase the distance between the System and you...

Page 47: ...itle is assigned a title number enabling you to locate the title you want VIDEO OUT jack Jack on the back of the DVD System that sends video toTV Analog Sound that has not been turned into numbers Analog sound varies while digital sound has specific numerical values These jacks send audio through two channels the left and right Aspect ratio The ratio of vertical and horizontal sizes of a displayed...

Page 48: ...Printed in China CLASS 1 LASER PRODUCT FWD397 PDCC WP 0824 Meet Philips at the Internet http www philips com English ...

Reviews: