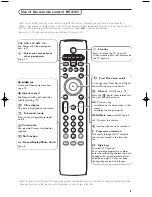


17
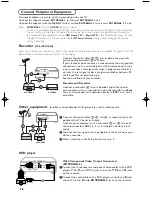
Multi channel Surround receiver
&
Connect the audio cable to the multi channel Surround receiver and
to
AUDIO OUT L
and
R
at the back of your TV receiver box
1
.
é
If you want the loudspeakers of your monitor to act as centre
speaker, also connect an audiocable to the multi channel Surround
receiver and to the
SURROUND SOUND CENTRE IN
at the back
of your TV receiver box
2
.
“
Select
Centre Input On
in the Source menu. See p. 9.
The loudspeakers of the monitor will now only produce centre
sound, the loudspeakers connected to the audio receiver will
produce Surround Sound.The volume has to be controlled via the
multi channel Surround receiver.
Note: No sound will be heard when a TV channel or external source is
blocked via the Child lock menu (see p. 12).
AUDIO OUT
L
R
1
2
CENTRE
17
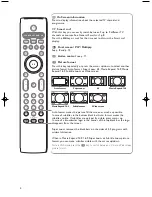
Side connections
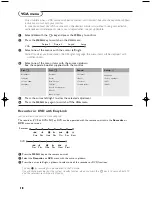
Camera or Camcorder
&
Connect your camera or camcorder as shown.
é
Connect to
VIDEO
2
and
AUDIO L
1
for mono equipment. For
stereo equipment also connect
AUDIO R
1
.
S-VHS quality with an S-VHS camcorder is obtained by connecting
the S-VHS cables with the S-video input
3
and audio inputs
1
.
Do not connect cable
2
and
3
at the same time. This may cause
picture distortion !
Headphone
&
Insert the plug into the headphone socket
L
as shown.
é
Press
¬
on the remote control to switch off the internal
loudspeakers of the TV.
The headphone impedance must be between 8 and 4000 Ohm. The
headphone socket has a 3.5 mm jack.
In the Sound menu select
Headphone volume
to adjust the
headphone volume.
S•VHS
VIDEO IN
AUDIO
L
R
1
2
3
See the separate supplied Cinema Link instruction manual.
Note: CinemaLink via the scart to cinch adaptor is NOT possible.
Attention: the sound info on screen will not correspond with the actual sound reproduction.
Cinema Link surround receiver
Press the
v
key on the remote control repeatedly to select
EXT1, EXT2, EXT3, EXT4, EXT5, FRONT
or
VGA
according to where you connected your equipment at the back or the front side of your receiver.
Remark : Most equipment (decoder, recorder) carries out the switching itself, when it is switched on.
To select connected equipment
See the separate supplied instruction manual with your monitor.
Connect your computer
1033.1 en 29-04-2003 19:32 Pagina 17


