background image

19

Connect Accessory  Devices

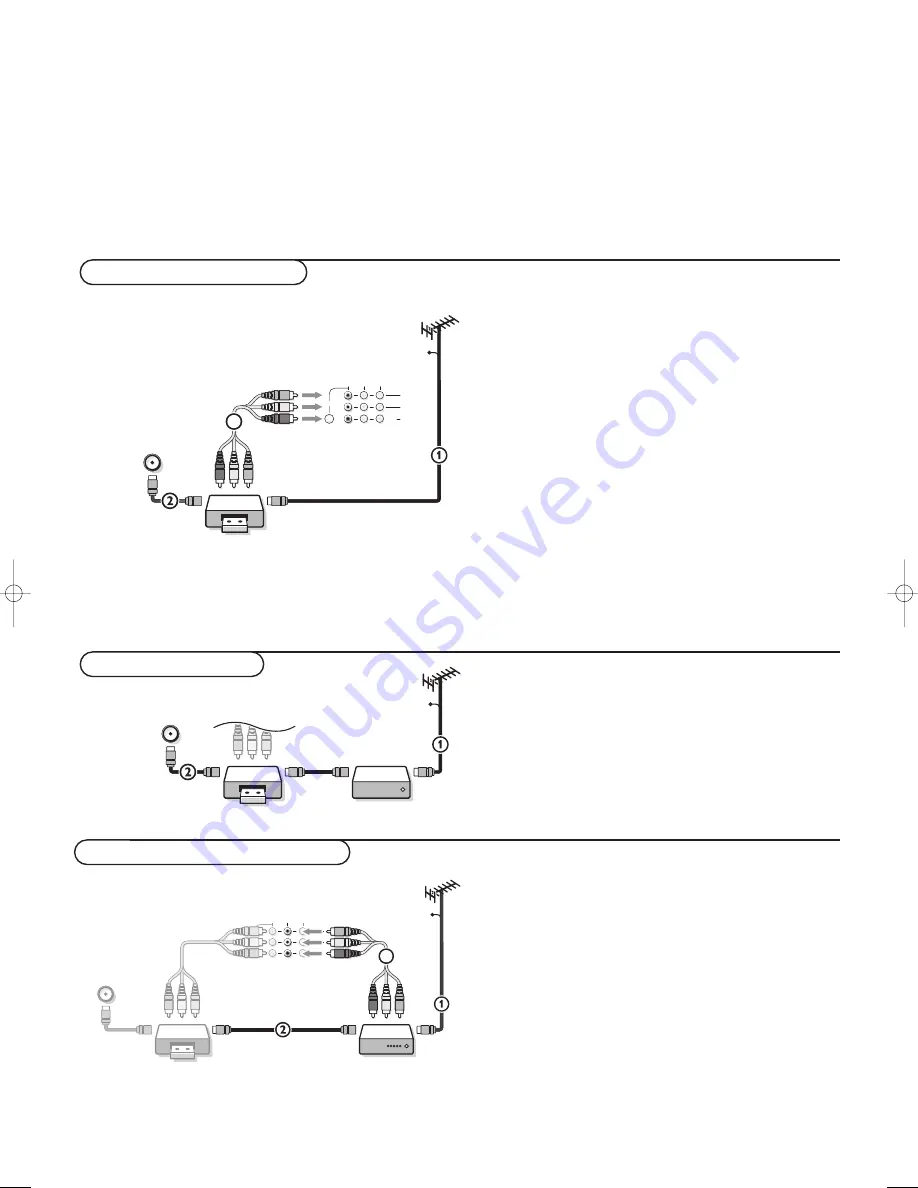
Note: Do not place your video cassette recorder too close to the
screen as some video cassette recorders may be susceptible for
signals out of the display.
Keep a minimum distance of 20” to the screen.

&

Connect the cable TV CABLE 

1

to the 

RF IN

socket of

your VCR.

é

Connect another RF cable 

2

from the output 

OUT

of

your VCR to the receiver’s 

ANTENNA./CABLE

jack.

Better playback quality can be obtained if you also connect
the Video, Audio Left and Right (only for stereo devices)
AV cables 

3

to the 

VIDEO

,

L

and 

R AUDIO

input 

AV1 IN

jacks.

The 

VIDEO OUT

connectors can be used for daisy

chaining or to record programs from your TV. See Record
with your VCR, p. 25.

If your VCR has an S-VHS video jack:

For improved picture quality, connect a S-video cable with
the 

S-VIDEO

input instead of connecting the  VCR to the

VIDEO

jack of 

AV1 IN

.

S-Video does not provide audio, so audio cables must still
be connected to provide sound.

Note: You can also connect your VCR to the AV3 IN jacks.

CABLE

VCR

R AUDIO

L AUDIO

VIDEO

AV 1

IN

OUT

OUT

IN

AV 2

IN

VIDEO

OUT

S VIDEO

3

ANTENNA / CABLE

&

Interconnect your VCR with an extra RF cable 

2

.

é

To obtain better picture quality, also connect the Video,
Audio left and Audio right (only for stereo devices)
cables 

3

to the 

VIDEO

,

L

and 

R AUDIO

input 

AV2

IN

jacks.

Note: AV

1

IN can handle CVBS and Y/C;

AV

2

IN CVBS;

AV3 IN CVBS and Y/C;

FRONT can handle CVBS and Y/C.

VCR with other AV peripherals

CABLE

VCR

R AUDIO

L AUDIO

VIDEO

AV 2

IN

OUT

AV 1

IN

VIDEO

OUT

S VIDEO

OUT

OUT

IN

OUT

IN

3

ANTENNA / CABLE

Connect Accessory  Devices

There is a wide range of audio and video devices that can be connected to your receiver.The following connection diagrams show
you how to connect them to the back or the front side of the receiver.

Note: In case of the monitor in a stand alone situation without the receiver box connected, see the instructions with the monitor.

CABLE

VCR

Cable Box

R AUDIO

L AUDIO

VIDEO

IN

OUT

IN

S VIDEO

OUT

IN

OUT

IN

ANTENNA / CABLE

Video Cassette Recorder

VCR and Cable Box

&

Connect the cable TV antenna 

1

to the cable box’s

IN

jack.

é

Connect the cable box’s 

OUT

jack to the VCR’s 

RF

IN

socket.

Proceed with the as above described procedure for
Video recorder, starting with step 

é

.

1009.6 am  31-03-2003  13:40  Pagina 19

Summary of Contents for FTR9955

Page 1: ...FlatTV FlatTV ...

Page 2: ...G Y Y CVBS B Pb Cb R Pr Cr V H VIDEO 2 AV2 VIDEO 1 AV1 VIDEO 3 AV3 CABLE AV3 IN AV5 IN AV4 IN VIDEO AUDIO AUDIO AUDIO R S VIDEO L R L R L G Y Y B Pb Pb R Pr Pr H V CENTER IN PC MAC IN MONITOR OUT L R AUDIO IN AUDIO OUT NO FUNCTION L R VIDEO L R L R L R AUDIO VIDEO AUDIO VIDEO AUDIO AV1 IN AV2 IN REC OUT 75 ANTENNA S VIDEO L R AUDIO OUT MAINS MAINS INLET 3 CVBS 1 CVBS 2 Y C VGA R Cr Pr Y Cb Pb Cr P...

Page 3: ...r P S Remember to get the most from your PHILIPS product you must return your Warranty Registration Card within 10 days So please mail it to us right now Know these safety symbols This bolt of lightning indicates uninsulated material within your unit may cause an electrical shock For the safety of everyone in your household please do not remove product covering The exclamation point calls attentio...

Page 4: ...ce or C The appliance has been exposed to rain or D The appliance does not appear to operate normally or exhibits a marked change in performance or E The appliance has been dropped or the enclosure damaged 17 Tilt Stability All televisions must comply with recommended international global safety standards for tilt and stability properties of its cabinets design Do not compromise these design stand...

Page 5: ...8 Store TV channels 9 Select TV settings 10 11 Installation Operation TV menu Picture menu 12 13 Sound menu 13 Features menu Closed Captions 14 Sleep Timer 14 Channels menu Channel List 14 Channel Lock 14 TV Ratings Lock 15 Movie Ratings Lock 16 Channel Remove 16 Dual Screen PIP FTR 9964 only 17 Multi PIP FTR 9964 only 18 Connect Accessory Devices Connecting accessory devices 19 22 Setting the Rem...

Page 6: ... cables between the receiver box and videorecorder and between videorecorder and antenna connector Insert the power cord supplied 3 into the MAINS at the back of the monitor and the power cord 4 at the back of the receiver Put both in the wall sockets with an AC power supply of 110 V Consult your local dealer if your AC power supply is different Please only use the power cord 3 supplied with the m...

Page 7: ...cursor up down Note In VGA mode press the q button to switch between a 4 3 or a Widescreen picture format In Dual Screen mode press the q button to switch between a full or a 4 3 letterbox picture format S Freeze Press the S button to activate de activate a frozen picture S Freeze Format FTR 9964 only This function is not available with a VGA or HD source See Settings menu General Freeze format p ...

Page 8: ...ton to exit the menus provided by universal devices like VCR SAT DVD INFO Display information Press this button to display when available information about the current channel and program or source The information display is divided in two zones The upper zone may present the local time and information on the current channel number name video and audio formats of the incoming signal CC availabilit...

Page 9: ...he cursor buttons up down left right The zoom window is reset after selecting another TV channel another display format or when another display format is selected automatically Zooming is disabled in Dual Screen VGA and HD modes Press the ZOOM O button again to deactivate the zoom function Auto Buttons To select predefined picture and sound settings Note The Auto buttons are disabled when a VGA so...

Page 10: ... at the control they wish to adjust Pressing a valid button on the remote control shifts focus from the current ball to the next one connected by a pipe in that direction Balls represent a branch of the menu hierarchy All menu items are represented by balls Each ball is identified with an identifying text label When items balls of a menu level are more numerous than can fit comfortably on the TV d...

Page 11: ...de Press the cursor right Note It is recommended to choose for the Automatic way of autoprogramming In case of difficulties in autoprogramming with the automatic method choose for Antenna or Cable whether antenna or cable signals are present When Antenna is selected the receiver will detect antenna signals and will search for all antenna TV channels available in your local area When Automatic is s...

Page 12: ... Continuing to hold the b button down will also cycle the TV through the various formats Dual Screen Large PIP Medium PIP Small PIP launching a new format after each second the button is hold Changing the format this way does not store the selected format Multi PIP format FTR 9964 only and not available for HD and VGA sources Multi PIP format allows you to view multiple channels or sources at one ...

Page 13: ...or down é Press the cursor right to enter Select your local time zone with the cursor up down Daylight saving Daylight saving time is automatically set by specially broadcasted signals This menu item allows you to disable the automatic setting of daylight saving time This is useful if you live in an area or state where daylight saving is not applied but you receive channels from other areas where ...

Page 14: ...T VCR AMP POWER SAT HD DVD CD a OK button to activate cursor to select adjustments switch main menu on off Tint not available for HD sources This control allows you to select the color mix hue of the picture Color temperature This control allows you to select from TV channels the color temperature of the TV picture Press the cursor right to enter the list é Select Normal Warm or Cool with the curs...

Page 15: ... the cursor up down Press the cursor left to return to the picture menu Auto picture settings will be set to Personal if the following settings are changed manually contrast brightness color sharpness dynamic contrast color enhancement or DNR Picture format not selectable for HD sources This menu item performs the same as the q button on the Remote Control See Use of the Remote Control p 5 Headpho...

Page 16: ...e the channel is currently locked You only have to enter your PIN code once while the menu is active Repeat to lock other channels Lock after This allows you to activate the childlock after a selectable time delay Select Lock after with the cursor down é Select On with the cursor right Press the cursor right again to select AM or PM Press the cursor right once again to enter the time Enter the tim...

Page 17: ...er have no rating information or have a rating of None When this is selected programs without a rating will be locked When an item on the age based list is selected all items below that item of the same group are locked as well When you select a content based rating all identical content based ratings in the younger age based categories are also selected TV Y appropriate for children of all ages w...

Page 18: ... been selected no other item is selected When any other item has been selected all ratings below are selected as well thus all movies with those ratings will be locked NR not rated G movies with a mild content suitable for all ages PG movies for which parental guidance is recommended They may contain a few racy or violent scenes or maybe some bad language PG 13 movies for which parental guidance m...

Page 19: ...reen Change TV channels in main screen auxiliary screen and PIP screen Press the channel up down button the digit buttons or the z button in order to change the TV channels in the highlighted screen Deactivating Dual Screen mode Press the b button again to return to a full main screen picture The TV tunes to the picture which was highlighted in Dual Screen mode Notes TV or Movie ratings When Dual ...

Page 20: ...ht is on one of the PIP screens it begins playing video and the other PIPs freeze The main screen always continues playing audio and video Note Multipip is disabled when a picture is being displayed from HD or VGA sources Pictures from a HD source will never been displayed in Multipip Display Format is disabled when Multipip is active Pressing the CH or the z button or the digit buttons changes th...

Page 21: ...UDIO L AUDIO VIDEO AV 1 IN OUT OUT IN AV 2 IN VIDEO OUT S VIDEO 3 ANTENNA CABLE Interconnect your VCR with an extra RF cable 2 é To obtain better picture quality also connect the Video Audio left and Audio right only for stereo devices cables 3 to the VIDEO L and R AUDIO input AV2 IN jacks Note AV1 IN can handle CVBS and Y C AV2 IN CVBS AV3 IN CVBS and Y C FRONT can handle CVBS and Y C VCR with ot...

Page 22: ...or AV3 IN jacks Satellite Receiver with a VCR VCR CABLE SAT R AUDIO L AUDIO VIDEO AV 1 IN OUT IN OUT SAT IN AV 2 IN VIDEO OUT S VIDEO OUT IN 5 3 4 ANTENNA CABLE DVD player with AV connectors Connect the AV cables to the DVD player s AV OUT jacks and to the receiver s AV2 IN jacks If your DVD player has an S VIDEO out put jack Connect the AV cables to the DVD player s AV OUT jacks and to the receiv...

Page 23: ...t your Set top Box to the AV5 input Connect a Set top Box with 2 Fh RGB output to the H V Y Pb and Pr jacks and to the L and R AUDIO jacks Connect a Set top Box with 2Fh Pr Pb Y output to the Pr Pb and Y jacks and to the L and R AUDIO jacks See also the manual of your High Definition Set top Box Note This television is designed to accept high definition signal standards 480p and 1080i as specified...

Page 24: ...ug into the headphone socket L behind the door at the front side of the receiver Press the center of the door to open é Press on the remote control to switch off the internal loudspeakers of the TV The headphone impedance must be between 8 and 2000 Ohm The headphone socket has a 3 5 mm jack In the SOUND menu select Headphone volume to adjust the headphone volume Note When a TV channel or external ...

Page 25: ...tes with the remote If after repeated attempts the code number method does not work for your accessory device try the Auto Search method following Auto Search method Turn on the desired device VCR Cable box etc é Press the desired mode button to select the device which you need to search Point the remote control toward the accessory device Stand at least six feet away from the front of the device ...

Page 26: ... supplied instruction manual with your monitor Select VGA with the SOURCE SELECT button é Press the MENU Ï button to switch on the VGA menu Select one of the menus with the cursor left right Note Only when you have chosen the US English language the menu items will be displayed with additional icons Select one of the menu items with the cursor up down See the separate booklet supplied with the mon...

Page 27: ...or AV source is blocked because of a rating set via the Channels menu see p 14 also the record output picture and sound are muted Record with your VCR Most of the audio and video devices from our range of products can be operated with the remote control of your TV Press the VCR DVD SAT HD CD CBL or AMP button according to the devices you want to operate with this remote control See Use of the remo...

Page 28: ...Burmester 0447 California Audio Labs 0056 Carver 0184 0206 0464 DKK 0027 Denon 0030 0900 Emerson 0332 Fisher 0201 0206 Garrard 0420 0447 Genexxa 0059 0332 Harman Kardon 0200 0184 Hitachi 0059 JVC 0099 Kenwood 0055 0217 0853 0064 0653 0708 Krell 0184 LXI 0332 Linn 0184 MCS 0056 MTC 0447 Magnavox 0184 0332 Marantz 0184 0056 0207 Mission 0184 NSM 0184 Nikko 0201 Onkyo 0128 0895 Optimus 0447 0059 0206...

Page 29: ...070 0088 0267 MGN Technology 0267 MTC 0027 0267 Magnasonic 0305 Magnavox 0062 0108 0027 0066 0176 Magnin 0267 Marantz 0108 0062 Marta 0064 Matsushita 0062 0189 0481 Memorex 0131 0074 0027 0064 0075 0062 0073 0267 1064 0334 0066 0236 1189 1289 Minolta 0132 0069 Mitsubishi 0070 0088 0075 0094 Motorola 0062 0075 Multitech 0027 0099 NEC 0065 0068 0094 0131 Nikko 0064 Nikon 0061 Noblex 0267 Olympus 006...

Page 30: ...e button on the remote control When no signal is detected the receiver automatically switches off the sound This is proper operation and does not indicate a malfunction Has the center mode been switched off Adjust the contrast color tint and brightness setting Try another auto picture setting Check the VGA connection Check the antenna connection Check whether the batteries are working Replace if n...

Page 31: ...of life directives We are paying a lot of attention to using environmentally friendly production methods Your new TV contains materials which can be recycled and reused At the end of its life specialized companies can dismantle the discarded TV to concentrate the reusable materials and to minimize the amount of materials that must be disposed Please ensure that you dispose of your old TV according...

Page 32: ...sound to be transmitted with the TV picture Natural Motion Philips Technology that makes movement on television less jerky and appear more natural NTSC analog video signals National Television Standards Committee format devised for TV broadcasting signals in the 1940s 525 lines 60 Hz On Screen Displays OSD Refers to the wording or messages generated by the TV to help the user with specific feature...

Page 33: ...ation will attempt to provide service although there may be a delay if the appropriate spare parts and technical manual s are not readily available MAKE SUREYOU KEEP Please keep your sales receipt or other document showing proof of purchase Attach it to this owner s manual and keep both nearby Also keep the original box and packing material in case you need to return your product BEFORE REQUESTING...

Page 34: ... vente la plus près de chez vous pour obtenir un service après vente rapide et efficace Si le produit est sous garantie il suffira de présenter une preuve d achat pour bénéficier d un service sans frais Pour les produits non couverts par la garantie contactez le center le plus près de chez vous Nota Si Ud reside en una de nuestras zonas para sucursales Philips de servicio al de fábrica ver directo...

Page 35: ... la recepción de productos necesitados de reparaciones comunicarse con el centro de servicio de fabrica mas cercano para estos lugares dentro de un radio de 80 a 120 km 50 a 75 millas del centro de servicio local ATLANTA Philips Factory Service 550 Franklin Road Suite F Marietta GA 30067 800 273 1501 TAMPA Philips Factory Service 1911 US Highway 301 North Tampa FL 33619 800 442 2027 SAN FRANCISCO ...

Page 36: ......

Reviews: