background image

30


EN

Play photo

Play photos as slideshow

This unit can play JPEG photos (

fi

 les with .jpeg 

or .jpg extensions).

Insert a disc or USB that contains the JPEG 
photos.

Press 

DISC

 or 

USB

.

  For a Kodak disc, the slideshow begins 

automatically.

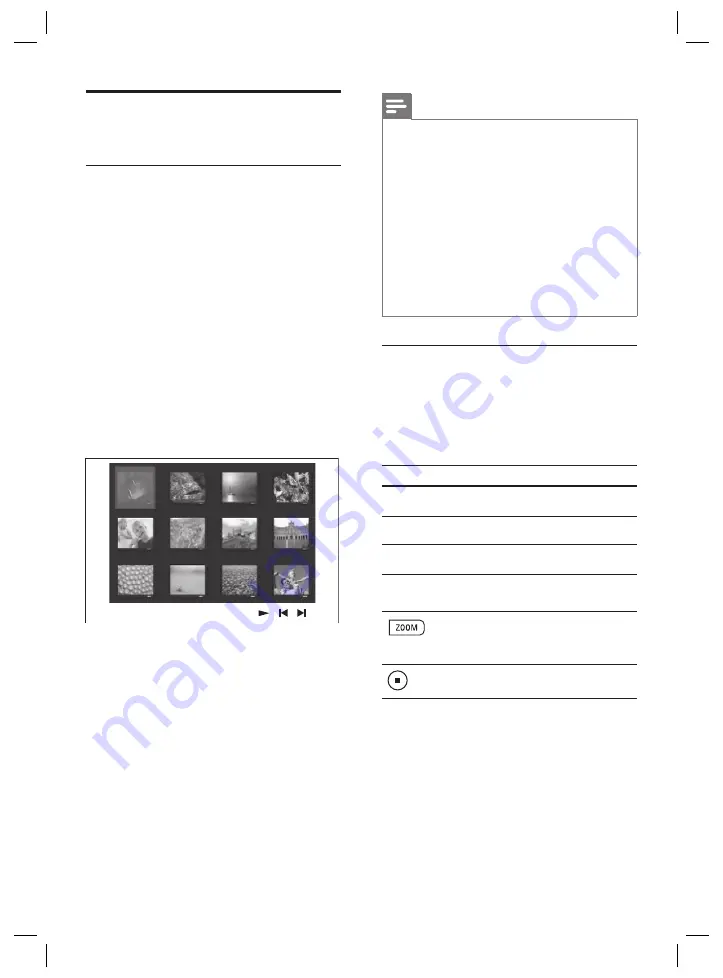
  For a JPEG disc, the photo menu is 

displayed.  

Select the folder/album you want to play.

To preview the photos in the folder/
album, press 

INFO

.

To go to previous or next screen 
display, press 

í

 / 

ë

.

To select a photo, press the cursor 
buttons.
To display the selected photo only, 
press 

OK

.

Press 

u

 to start slideshow play.

To return to the menu, press 

BACK 

.

 Note

It may require longer time to display the disc content 
on the TV due to the large number of songs/photos 
compiled onto one disc.
If the JPEG photo is not recorded with an ‘exif’ 
type 

fi

 le, the actual thumbnail picture will not be 

shown on the display.  It will be replaced with a ‘blue 
mountain’ thumbnail picture.
This unit can only display digital camera pictures 
according to the JPEG-EXIF format, typically used by 
almost all digital cameras.  It cannot display Motion 
JPEG and pictures in formats other than JPEG, or 
sound clips associated with pictures.
Folders/

fi

 les exceed the supported limit of this unit 

will not be displayed or played.

Control photo play

Play photo slideshow.

Use the remote control to control the 
photo. 

Button

Action

b

Skip to the previous photo.

B

Skip to the next photo.

v

Rotate the photo clockwise.

V

Rotate the photo anti-
clockwise.
Zoom in/ out.

Play will pause while in 
zoom mode.

Stop play.

1_fts6000_12_eng3_final.indd   30

1_fts6000_12_eng3_final.indd   30

2008-09-03   11:55:08 AM

2008-09-03   11:55:08 AM

Summary of Contents for Flaors 848390207

Page 1: ...ster your product and get suppor t at www philips com flavors FTS6000 EN Home Theatre System 5 IT Sistema Home Theater 49 1_fts6000_12_eng3_final indd 1 1_fts6000_12_eng3_final indd 1 2008 09 03 11 54 56 AM 2008 09 03 11 54 56 AM ...

Page 2: ... the terminal marked N or coloured black Connect the brown wire to the terminal marked L or coloured red Do not connect either wire to the earth terminal in the plug marked E or e or coloured green or green and yellow Before replacing the plug cover make certain that the cord grip is clamped over the sheath of the lead not simply over the two wires Copyright in the U K Recording and playback of ma...

Page 3: ...en S Klass 1 laseraparat Varning Om apparaten används på annat sätt än i denna bruksanvisning specificerats kan användaren utsättas för osynlig laserstrålning som överskrider gränsen för laserklass 1 Observera Stömbrytaren är sekundärt kopplad och bryter inte strömmen från nätet Den inbyggda nätdelen är därför ansluten till elnätet så länge stickproppen sitter i vägguttaget SF Luokan 1 laserlaite ...

Page 4: ... All Rights Reserved DivX DivX Ultra Certified and associated logos are trademarks of DivX Inc and are used under license Official DivX Ultra Certified product Plays all versions of DivX video including DivX 6 with enhanced playback of DivX media files and the DivX Media Format Windows Media and the Windows logo are trademarks or registered trademarks of Microsoft Corporation in the United States ...

Page 5: ...ing channel 20 Select menu display language 20 Turn on Progressive Scan 21 Activate EasyLink control 22 Select a play source 23 5 Play 24 Play from disc 24 Play video 25 Play music 29 Play photo 30 Play from USB device 31 Play from portable media player 32 Play from radio 32 6 Adjust sound 35 Control the volume 35 Select surround sound 35 Select a preset sound effect 35 7 Adjust settings 36 Genera...

Page 6: ...is prohibited 1 Important Safety and important notice Warning Risk of fire or electric shock Ensure that air can circulate freely through the ventilation holes on this unit Allow at least 5 10 cm clearance around the unit Never expose this unit to direct sunlight naked flames or heat Never place this unit on other electrical equipment Keep away from this unit during lightning storms Never remove t...

Page 7: ...dard protocol to share functionality with all HDMI CEC compliant devices over HDMI It enables the connected devices to control each other with a single remote control Note Philips does not guarantee 100 interoperability with all HDMI CEC devices USB direct and MP3 link Simply plug your USB device into the USB socket to play your MP3 WMA JPEG DivX files or plug your portable media player to the MP3...

Page 8: ...me level e Display panel f Disc compartment g OPEN CLOSE Z Open or close the disc compartment h FM radio antenna socket To connect radio antenna i AUX IN socket To connect audio output from other device to route its sound output to this unit j USB socket To connect USB flash drive USB memory reader or digital camera k MP3 LINK socket To connect portable audio player 1 2 3 4 5 6 8 7 9 10 11 1_fts60...

Page 9: ...io preset RADIO press and hold this button to start automatic radio preset d ZOOM Zoom in or out the picture on the TV e INFO Display the current status or disc information Display photo files in 12 thumbnails view f OPTIONS Access or exit Options menu this menu provides various setting options g u Play Pause Start or pause disc play RADIO start auto radio installation only available for first tim...

Page 10: ...arch RADIO press up or down to tune the radio frequency RADIO press left or right to start auto search n BACK Return to the previous display menu For DVD go to title menu For VCD version 2 0 or SVCD with PBC turned on return to the menu during playback o í ë Previous Next Skip to the previous or next title chapter track RADIO select a preset radio station p H Mute Mute or restore the volume q VOL ...

Page 11: ...y connections ensure that all the devices are disconnected from the power outlet Place the unit For optimum performance place this unit on top of a table or mount it on the wall Never place this unit in an enclosed cabinet Install this unit near the AC outlet where the AC power plug can be easily reached RIGHT LEFT 1 Place this DVD Home Theatre unit near to the TV Attach the table stand to the DVD...

Page 12: ...the HDMI IN socket on your TV Note The HDMI connector is only compatible with HDMI compliant TVs and DVI TVs Tips To optimise the video output see chapter Adjust settings Video Setup HDMI Setup for details This unit is HDMI CEC compatible It enables connected TV device to control each other over HDMI see chapter Activate EasyLink control for details Use a HDMI DVI adaptor in case your TV has only ...

Page 13: ...t video input socket on your TV may be labelled as Y Pb Cb Pr Cr or YUV This type of connections provide good picture quality Option 4 Connect to Video socket VIDEO IN VIDEO OUT 1 Connect a composite video cable not supplied from the VIDEO OUT socket on this unit to the video input socket on your TV Tips The video input socket on your TV may be labelled as A V IN VIDEO IN COMPOSITE or BASEBAND Thi...

Page 14: ...t cable supplied from the TO SUBWOOFER socket on this unit to the TO MAIN UNIT socket on the subwoofer 2 Connect the FM antenna supplied and FM extension cable supplied to the FM75Ω socket Extend the FM antenna and fix its ends to the wall 3 Connect the power cord when all the required connections are complete and you are ready to enjoy this DVD Home Theatre unit 1_fts6000_12_eng3_final indd 14 1_...

Page 15: ... To listen to the audio output from this connection press AUX MP3 LINK repeatedly until DI is displayed on the display panel Connect audio from cable box recorder game console AUX IN 1 Connect an audio cable supplied from the AUX IN socket on this unit to the AUDIO OUT sockets on the device Note To listen to the audio output from this connection press AUX MP3 LINK repeatedly until AUX is displayed...

Page 16: ... connection press AUX MP3 LINK repeatedly until MP3 LINK is displayed on the display panel Connect USB device 1 Connect the USB device to USB socket on this unit Note This DVD Home Theatre unit can only play view MP3 WMA DivX Ultra or JPEG files that are stored on such devices To listen to the audio output from this connection press USB 1_fts6000_12_eng3_final indd 16 1_fts6000_12_eng3_final indd ...

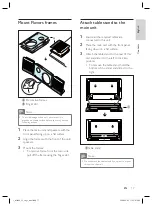
Page 17: ...it pull off the frame using the finger slot Attach table stand to the main unit 1 Ensure all the required cables are connected to this unit 2 Place the main unit with the front panel facing down on a flat surface 3 Attach the table stand to the rear of this unit and slide it to the left to lock into position To remove the table stand hold the bottom of the stand and slide it to the right C C table...

Page 18: ...plugs not supplied into the holes Use the supplied mounting guide for accurate screw positions Before you mount the speaker remove its stand by pressing on the catches A and pull it out A 3 Hook the DVD Home Theatre unit speakers firmly onto the screws Note The height of the screw positions is 23 5mm difference between the main unit and the speakers 1_fts6000_12_eng3_final indd 18 1_fts6000_12_eng...

Page 19: ...ource you wish to control by pressing the DISC USB RADIO or AUX MP3 LINK button 2 Then select the desired function for example í ë Navigate through the menu 1 Point the remote control directly at the remote sensor on this unit and select the desired function 2 Use the following buttons on the remote control to navigate through the on screen menus Button Action v V Move up or down b B Move left or ...

Page 20: ...setting if this unit is connected to a HDMI CEC compliant TV It switches automatically to the same OSD menu language as per your TV setting 1 Press DISC 2 Press OPTIONS General Setup menu is displayed 3 Press B 4 Press vV to select OSD Language in the menu then press B General Setup Screen Saver DivX R VOD Code Sleep Display Dim Disc Lock OSD Language English Deutsch Dansk Français Italiano Nederl...

Page 21: ... To proceed select OK in the menu and press OK The progressive setup is complete Note If a blank distorted screen is displayed wait for 15 seconds for the auto recover If no picture displayed turn off the progressive scan mode as follows 1 Press Z to open the disc compartment 2 Press b 3 Press AUDIO SYNC 7 To exit the menu press OPTIONS 8 You can now turn on the progressive scan mode on your TV se...

Page 22: ...One touch audio input switching System Audio Control This unit is able to render the audio signals from the active source It switches automatically to the corresponding audio input and output the sound from its speaker system Before you can enjoy this function you have to map the audio inputs to the connected devices You can use any HDMI CEC TV device remote control to adjust the volume Note To en...

Page 23: ...elect the correct device that connected to this audio input then press OK Repeat steps 8 9 to map other connected devices 10 To exit the menu press OPTIONS Select a play source On the main unit 1 Press SOURCE button repeatedly to select DISC FM AUX DI MP3 LINK DISC On the remote control Press AUX MP3 LINK repeatedly to listen to the audio output from the external device Press USB RADIO repeatedly ...

Page 24: ... the disc optical lens inside the disc compartment 1 Press Z to open the disc compartment 2 Insert a disc with its label facing out For double sided disc load the side to play faces out 3 Press Z to close the disc compartment and start disc play To view disc play turn on the TV to the correct viewing channel for this DVD Home Theatre unit 4 To stop disc play press x Tips If the password entry menu...

Page 25: ...ton repeatedly For VCD only forward play is possible Change video play 1 Play a title 2 Use the remote control to change the video play Button Action Change audio language Only applicable to discs with multiple audio language or channel Change subtitle language Only applicable to discs with multiple subtitle language Toggle through various repeat shuffle play mode or turn off repeat mode Repeat op...

Page 26: ...nu if the PBC mode is on 2 To preview the contents of the disc press DISC To exit the menu press DISC Select Digest Type Track Digest Disc Interval Track Interval Track Digest It plays the first few seconds of each track in a disc Disc Interval It divides the total disc time by six and plays the first few seconds of these intervals Track Interval It divides the current track by six and plays the f...

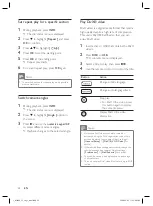
Page 27: ...utput Note If the volume control is not used within 5 seconds it resumes normal volume control function Quick skip play to a specific time 1 During playback press INFO The disc status menu is displayed 2 Select the current elapsed playing time in the menu then press OK TT Time title time CH Time chapter time Disc Time disc time Track Time track time 3 Press the number buttons to change the time wh...

Page 28: ...o that you can enjoy DivX video 1 Insert a disc or USB that contains the DivX videos 2 Press DISC or USB A contents menu is displayed 3 Select a title to play then press u 4 Use the remote control to control the title Button Action Change subtitle language Change audio language track Stop play For DivX Ultra video press this button again to display the contents menu Display DivX Ultra video inform...

Page 29: ...USB that contains the MP3 WMA music 2 Press DISC or USB A contents menu is displayed 3 Select a folder then press OK 4 Select a track to play then press u To return to the main menu press v until Previous folder is selected then press OK Note For CDs recorded in multiple sessions only the first session is played This unit does not support MP3PRO audio format If any special characters are present i...

Page 30: ...o one disc If the JPEG photo is not recorded with an exif type file the actual thumbnail picture will not be shown on the display It will be replaced with a blue mountain thumbnail picture This unit can only display digital camera pictures according to the JPEG EXIF format typically used by almost all digital cameras It cannot display Motion JPEG and pictures in formats other than JPEG or sound cl...

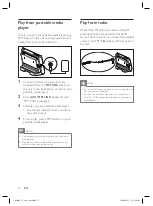
Page 31: ...ital camera that comply with the PTP standard USB flash drive or USB memory card reader to the USB socket on this unit 2 Press USB A contents menu is displayed 3 Select a file to play then press u For more information see chapters Play music Play photo Play video for details 4 To stop play press x or remove the USB device Tips If the device does not fit into the USB socket connect it through a USB...

Page 32: ...P button on your portable media player Note Control playback is only possible on your portable media player Stop play on the portable media player before you switch to other play media source Play from radio Check if the FM extension cable and the FM antenna has been connected to this DVD Home Theatre unit If not connect the supplied cables to the FM 75Ω socket and fix its ends to the wall Tips Fo...

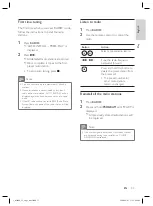
Page 33: ...ts RDS Radio Data System data the name of the radio station will be displayed Listen to radio 1 Press RADIO 2 Use the remote control to control the radio Button Action Select a preset radio station m M Tune the radio frequency backward forward Press and hold this button to delete the preset station from the preset list The preset number for other radio stations remain unchanged Reinstall all the r...

Page 34: ...adio station you wish to store To finetune the radio frequency press vV 4 Press PROGRAM If no action is carried out within 20 seconds after the above step it exits the preset mode 5 Press í ë or the number buttons to select a preset number to store 6 Press PROGRAM to confirm l h h d i i f 1_fts6000_12_eng3_final indd 34 1_fts6000_12_eng3_final indd 34 2008 09 03 11 55 10 AM 2008 09 03 11 55 10 AM ...

Page 35: ...ou play Video Music Descriptions CONCERT CLASSIC Flat and pure sound mode Ideal for listening to classical music and watching live concert DVDs DRAMA LOUNGE Moderate sound mode suitable for lounge music and watching dramas ACTION ROCK Enhanced low and high range for great sounding movie effects and atmosphere Great for action movies and rock pop music GAMING SPORTS Moderate mid range and surround ...

Page 36: ...s OPTIONS Disc Lock Set play restriction for a specific discs Before you start place the disc in the disc compartment maximum 40 discs can be locked Lock restrict access to the current disc The next time you want to play this disc or unlock it you need to enter the password Unlock all discs can be played Tips To set or change your password go to Preferences Password Themes Set the theme for wallpa...

Page 37: ...er to appear after 5 minutes of inactivity for example in pause or stop mode Off disable screen saver mode Sleep Switch to standby automatically after the preset time Off disable sleep mode 15 30 45 60 mins select the count down time before it switches to standby DivX R VOD Code Display the DivX registration code Tips Enter this unit s DivX registration code when you rent or purchase video from ww...

Page 38: ...ect this unit and TV with HDMI cable select the audio output setting for this connection All the sound is output through both your TV and this speaker system If the audio format on the disc is not supported it will be downmixed to two channel sound linear PCM Off disable audio output from your TV The sound is only output through this speaker system CD Upsampling Convert the music CD to a higher sa...

Page 39: ... NTSC system TV Multi for TV that is compatible with both PAL and NTSC TV Display Select the screen format according to how you want the picture to appear on your TV 4 3 Letter Box LB 4 3 Pan Scan PS 16 9 Wide Screen 4 3 Pan Scan for standard TV a full height screen display with the sides trimmed 4 3 Letter Box for standard TV a wide screen display with black bars on the top and bottom 16 9 Wide S...

Page 40: ...isplay setting to 16 9 Wide Screen HDMI Video select a video resolution that is compatible with your TV display capability Options Descriptions Auto It detects and selects the best supported video resolution automatically 480p 576p 720p 1080i 1080p Select a video resolution that best supported by your TV See your TVs manual for details Note If the setting is not compatible with your TV a blank scr...

Page 41: ...the correct device that connected to this audio input then press OK 1 2 3 Note Your TV and other connected devices must be compliant with HDMI CEC You must turn on the HDMI CEC operations on your TV devices before you can enjoy the EasyLink controls See your TVs devices manual for details Philips does not guarantee 100 interoperability with all HDMI CEC compliant devices Closed Caption Turn on or ...

Page 42: ... be changed from the disc menu To select the languages that are not listed in the menu select Others Then check the Language Code list at the back of this user manual and enter the respective 4 digit language code Parental Restrict access to DVDs that are unsuitable for your children These types of DVDs must be recorded with ratings To start press OK Select a rating level in the menu then press OK...

Page 43: ...password DivX Subtitle Select a character set that supports the DivX subtitle Standard English Irish Danish Estonian Finnish French German Italian Portuguese Luxembourgish Norwegian Bokmål and Nynorsk Spanish Swedish Turkish Central Europe Polish Czech Slovak Albanian Hungarian Slovene Croatian Serbian Latin script Romanian Cyrillic Belarusian Bulgarian Ukrainian Macedonian Russian Serbian Greek G...

Page 44: ...it and store onto a CD R or USB flash drive 6 Insert the CD R or USB flash drive to this Home Theatre unit 7 Press DISC or USB then follow the instruction on the TV to confirm update operation Note Do not remove the CD R or USB when software updating is in progress 8 Once software update is complete this unit turns off to standby automatically Note We recommend that you disconnect the power cord f...

Page 45: ... 4 Hz 20 kHz 44 1 kHz 4 Hz 22 kHz 48 kHz 4 Hz 44 kHz 96 kHz PCM IEC 60958 Dolby Digital DTS IEC60958 IEC61937 Radio Tuning range FM 87 5 108 MHz 50 kHz 26dB quieting sensitivity FM 22 dBf IF rejection ratio FM 60 dB Signal to noise ratio FM 60 dB Harmonic distortion FM 3 Frequency response FM 180 Hz 10 kHz 6dB Stereo separation FM 26 dB 1 kHz Stereo Threshold FM 29 dB USB Compatibility Hi Speed US...

Page 46: ... b Press AUDIO SYNC for progressive scan or SUBTITLE for TV Type 1 2 3 No picture on HDMI connection Check if the HDMI cable is faulty Replace a new HDMI cable If this happens when you change the HDMI video resolution you have to switch to its default mode Press Z to open the disc compartment Press b Press ZOOM 1 2 3 Warning Risk of electric shock Never remove the casing of this unit To keep the w...

Page 47: ...e is encoded according to the Home Theatre Profile with the DivX encoder Ensure that the DivX video file is complete The aspect ratio of the screen is not aligned with the TV display setting The aspect ratio is fixed on the DVD DivX subtitle are not displayed correctly Ensure that the subtitle file name is the same as the movie file name Select the correct character set Press OPTIONS Press B then ...

Page 48: ...ontents between different devices to prevent unauthorised copyright JPEG A very common digital still picture format A still picture data compression system proposed by the Joint Photographic Expert Group which features small decrease in image quality in spite of its high compression ratio Files are recognised by their file extension JPG or JPEG MP3 A file format with a sound data compression syste...

Page 49: ... 7666 Limburgan Limburger 7673 Lingala 7678 Lithuanian 7684 Luxembourgish 7666 Macedonian 7775 Malagasy 7771 Magyar 7285 Malayalam 7776 Maltese 7784 Manx 7186 Maori 7773 Marathi 7782 Marshallese 7772 Moldavian 7779 Mongolian 7778 Nauru 7865 Navaho Navajo 7886 Ndebele North 7868 Ndebele South 7882 Ndonga 7871 Nederlands 7876 Nepali 7869 Norsk 7879 Northern Sami 8369 North Ndebele 7868 Norwegian Nyn...

Page 50: ...lectronics N V All right reserved sgpjy_0837_EN_IT Numeri di telefono dell Assistenza Clienti Philips Italia 848390207 0 08 Al minuto 1_fts6000_12_back indd 94 1_fts6000_12_back indd 94 2008 09 03 5 48 30 PM 2008 09 03 5 48 30 PM ...

Reviews: