background image

12

• 

[Lock]

 - Restrict the access to the current 

disc. At the next time when you want to play 
this disc or unlock it, you need to enter the 
password.

• 

[Unlock]

 - Play all discs.

[OSD Language]

Select a language for on-screen menu.

[Sleep Timer]

Switch automatically to standby at the preset time.
• 

[Off]

 - Disable sleep mode.

• 

[15 Mins]

[30 Mins]

[45 Mins]

[60 Mins]

 - 

Select the countdown time for this product to 
switch to standby.

[Auto Standby]

Turn on/off the auto standby mode.
• 

[On]

 - Switch to standby after 15 minutes 

of inactivity (for example, in pause or stop 
mode).

• 

[Off]

 - Disable the auto standby mode.

[DivX(R) VOD Code]

Display the DivX

®

 registration code.

[Deactivation]

Deactivate the authorization to current user.

Note

Use this product’s DivX registration code when you rent 


or purchase video from www.divx.com/vod. The DivX 
videos rented or purchased through the DivX

®

 VOD 

(Video On Demand) service can be played only on the 
device to which it is registered.

Audio setup


1

 Press  .


»

[General Setup]

 menu is displayed.

2

 Press  to select 

[Audio Setup]

, and then 

press   to enter the submenu.

3


Select an option, and then press 

OK

.

4


Select a setting, and then press 

OK

.

To return to the previous menu, press 

• 

.

To exit the menu, press 

• 

.

1)  In the 

[Karaoke Scoring]

 option, select a level 

(basic/intermediate/advance).

2)  In the 

[Karaoke Idol]

 option, turn on the 

contest.

The song selection menu is displayed.


»

3)  Input a track (VCD/SVCD) or a title/chapter 

(DVD) as the first song. Up to 4 songs can be 
selected.

4)  Then select 

[Start]

, and press 

OK

 to start play 

selected songs.

After all the selected songs end, a contest 


»

result is displayed.

[Key Shift]

 – Adjust the pitch level that matches 

your voice.

[Vocal]

 – Select various Karaoke audio modes, or 

turn off original vocal.

7 Adjust 

settings

Note

If the setup option is grayed out, it means the setting 


cannot be changed at the current state.

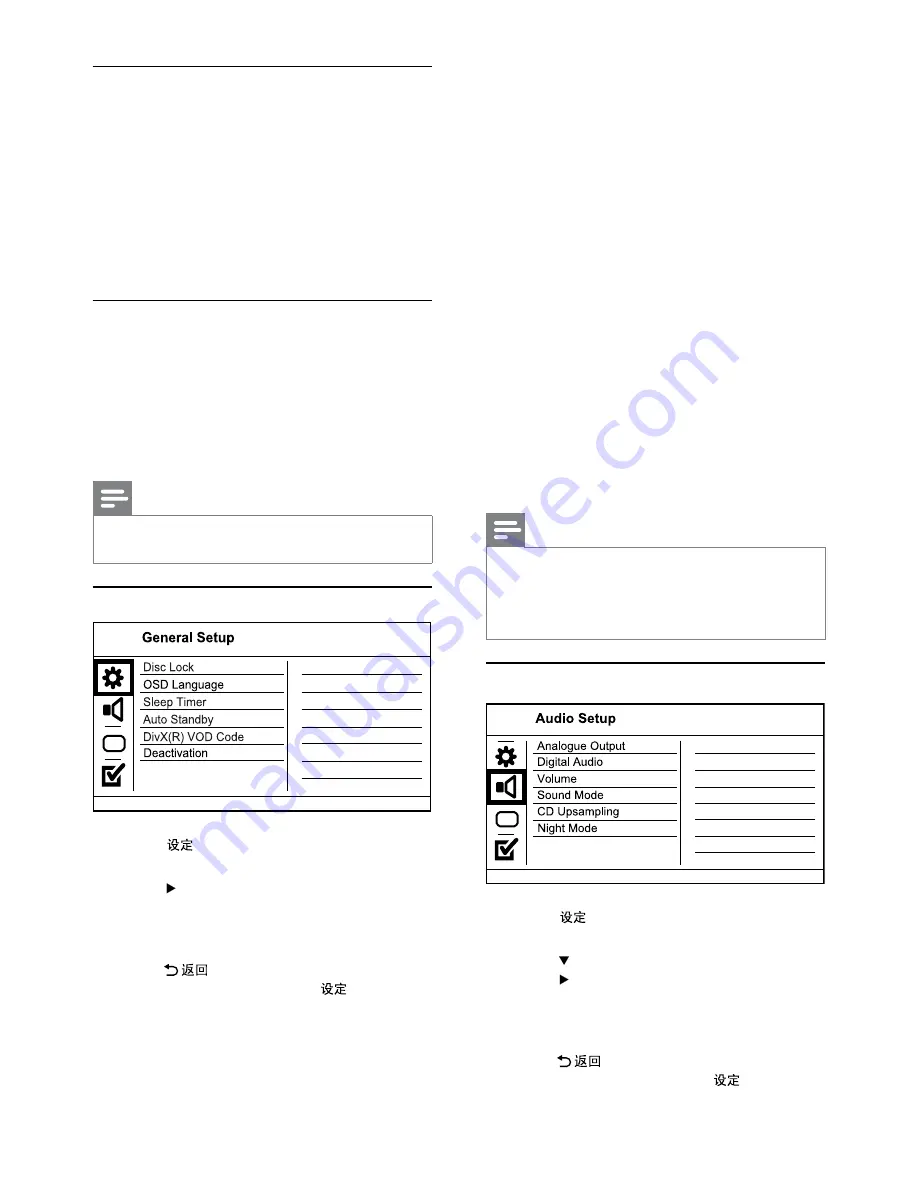
General setup


1

 Press  .


»

[General Setup]

 menu is displayed.

2

 Press  to enter the submenu.

3


Select an option, and then press 

OK

.

4


Select a setting, and then press 

OK

.

To return to the previous menu, press 

• 

.

To exit the menu, press 

• 

.

[Disc Lock]

Set the play restriction for a disc which is loaded in 
the disc compartment (maximum 20 discs can be 
locked).

EN

Summary of Contents for DVP3520K/93

Page 1: ...Register your product and get support at www philips com welcome DVP3520K EN User manual ...

Page 2: ......

Page 3: ... power 7 4 Get started 7 Prepare the remote control 7 Find theTV input channel 7 Select menu display language 7 Turn on progressive scan 8 5 Play 8 Play a disc 8 Play video 8 Play music 10 Play photo 10 6 Other features 11 Karaoke 11 7 Adjust settings 12 General setup 12 Audio setup 12 Video setup 13 Preferences 14 8 Additional information 15 Update software 15 Care 15 Specifications 16 9 Troublesh...

Page 4: ...tion Ensure curtains or other objects never cover the ventilation slots on the product Never place the product remote control or batteries near naked flames or other heat sources including direct sunlight Avoid high temperature moisture water and dust This unit must not be exposed to dripping or splashing Never place any object or items that can damage this unit e g liquid filled objects lighted can...

Page 5: ...on your purchase and welcome to Philips To fully benefit from the support that Philips offers register your product at www philips com welcome Playable media This product can play DVD DVD Video DVD R RW DVD R RW DVD R R DL Dual Layer Video CD SVCD Audio CD CD R CD RW MP3 media WMA media DivX media JPEG files Region codes You can play discs with the following region codes DVD region code Countries Ch...

Page 6: ...upplied to Pb Y Pr d Navigation buttons Navigate the menus Search fast forward or fast backward Search slow forward or slow backward e Return to the previous display menu f Skip to the previous or next title chapter or track g Mute or restore the volume h Numeric buttons Select an item to play i Select a subtitle language on a disc j Fit the picture display to the TV screen Zoom the picture in or ...

Page 7: ... channel Select menu display language 1 Press General Setup menu is displayed the TV OUT jack on this product the video input jack on the TV 2 Connect the audio cables supplied to the AUDIO OUT L R jacks on this product the audio input jacks on the TV Optional audio connections Connect the audio from this product to other devices to enhance sound Connect to digital amplifier receiver 1 Connect a co...

Page 8: ...slow backward search is not available Select an audio language or channel available on a disc 2 Select OSD Language and then press 3 Press to select a language and then press OK Turn on progressive scan Note To use the progressive scan feature you must connect a progressive scan TV with the component video jacks see Connect Connect audio video cables Option 1 Connect to the component video jacks f...

Page 9: ...language available on a disc Screen fit Fit the picture format to the TV screen Press repeatedly until the image is scaled to fit to the TV screen Toggle between screen aspect ratio and different zoom factor To pan through the zoomed image press the Navigation buttons Access the play options and display the current disc status Access DVD menu 1 Press to access the disc root menu 2 Select a play opti...

Page 10: ...displayed 2 Select a photo and then press OK to start the slideshow For a photo recorded with the exif format the display orientation is automatically optimized To display photos in color Fun Mode or in black and white Simple Mode press To preview the photos in thumbnail press To select a photo press the Navigation buttons Play DivX video DivX video is a digital media format that retains high qual...

Page 11: ... time to display the disc content on the TV due to the large number of songs photos compiled onto one disc If the JPEG photo is not recorded with an exif type file the actual thumbnail picture cannot be shown on the screen It is replaced by a blue mountain thumbnail picture This product can only display digital camera pictures according to the JPEG EXIF format typically used by almost all digital c...

Page 12: ...yed 2 Press to select Audio Setup and then press to enter the submenu 3 Select an option and then press OK 4 Select a setting and then press OK To return to the previous menu press To exit the menu press 1 In the Karaoke Scoring option select a level basic intermediate advance 2 In the Karaoke Idol option turn on the contest The song selection menu is displayed 3 Input a track VCD SVCD or a title ...

Page 13: ...Stereo For the stereo output Digital Audio Select a digital setting based on the digital amplifier receiver that is connected through the digital jack coaxial digital Digital Output Select a type of digital output All Support multi channel audio formats Off Disable digital output PCM Only Downmix to two channel audio format LPCM Output Select the LPCM Linear Pulse Code Modulation output sampling ra...

Page 14: ... no effect on such discs Preferences Parental Control Mp3 Jpeg Nav PBC Subtitle Audio Disc Menu DivX Subtitle Password 4 3 Letter Box For a 4 3 screen TV wide screen display with black bars on the top and bottom of the screen 16 9 For a wide screen TV display ratio 16 9 Progressive If a progressive scan TV is connected to this product turn on the progressive scan mode On Turn on progressive scan O...

Page 15: ...ially or anti static sprays intended for discs Clean discs Wipe the disc with a micro fibre cleaning cloth from the centre to the edge in a straight line movement PBC Turn on or off the content menu of VCDs SVCDs with PBC playback control feature On Display the index menu when you load a disc for play Off Skip the menu and start play from the first track Mp3 Jpeg Nav Select to display the folders or...

Page 16: ...he audio device stereo system amplifier receiver Ensure that the audio cables are connected to the audio input of the audio device Turn on the audio device to its correct audio input source No sound during DivX video playback The audio codec may not be supported by this product Specifications Note Specification and design are subject to change without notice Video Signal system PAL NTSC Composite vid...

Page 17: ...le name extension is correct The aspect ratio of the screen is not aligned with the TV display setting The aspect ratio is fixed on the disc DivX subtitles are not displayed correctly Ensure that the subtitle file name is the same as the movie file name Select the correct character set Press Select Preferences DivX Subtitle in the menu Select the character set that supports the subtitle 10 Glossary A...

Page 18: ...s substances or elements contained in electronic information products will not leak or mutate so that the use of these substances or elements will not result in any severe environmental pollution any bodily injury or damage to any assets This logo refers to the period 5 years during which the toxic or hazardous substances or elements contained in the battery will not leak or mutate so that the use...

Page 19: ... Lao 7679 Latina 7665 Latvian 7686 Letzeburgesch 7666 Limburgan Limburger 7673 Lingala 7678 Lithuanian 7684 Luxembourgish 7666 Macedonian 7775 Malagasy 7771 Magyar 7285 Malayalam 7776 Maltese 7784 Manx 7186 Maori 7773 Marathi 7782 Marshallese 7772 Moldavian 7779 Mongolian 7778 Nauru 7865 Navaho Navajo 7886 Ndebele North 7868 Ndebele South 7882 Ndonga 7871 Nederlands 7876 Nepali 7869 Norsk 7879 Nor...

Page 20: ... 2010 Koninklijke Philips Electronics N V All rights reserved DVP3520K_93_UM_V1 0_1008 ...

Reviews: