background image

7

g

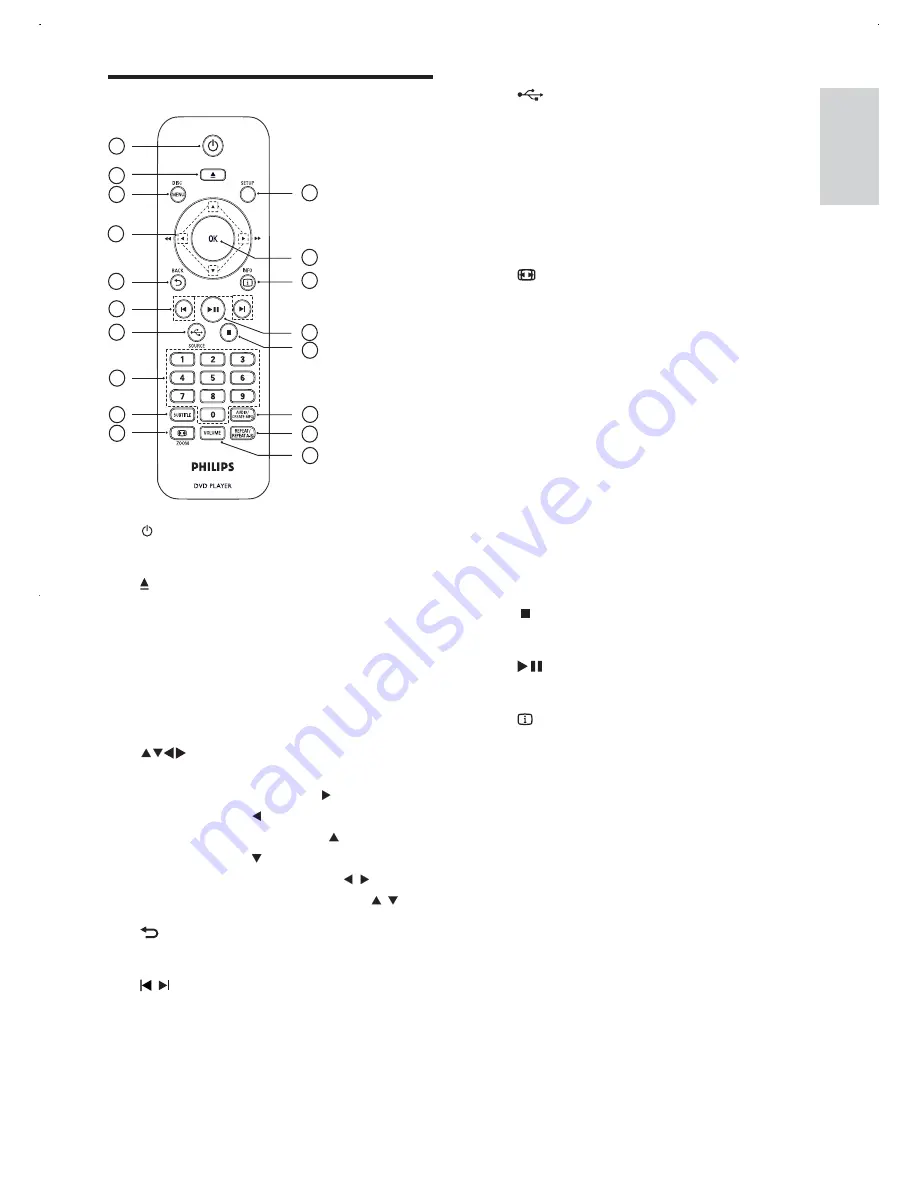
SOURCE

Select a source: disc, USB or FM 

‡

radio.

h

Numeric buttons

Select an item to play.

‡

i

SUBTITLE

Select a subtitle language on a disc.

‡

j

 ZOOM

Fit the piture display to the TV 

‡

screen.
Zoom the picture in or out.

‡

k

VOLUME

Adjust volume.

‡

l

REPEAT/REPEAT A-B PROGRAM

Select or turn off repeat mode.

‡

5HSHDWSOD\IRUDVSHFLÀFVHFWLRQ

‡

Program radio stations.

‡

m

AUDIO/CREATE MP3

Select an audio language or channel 

‡

on a disc.

$FFHVVWKHPHQXRIFUHDWLQJ03ÀOHV

‡

n

Stop play.

‡

o

Start, pause or resume disc play.

‡

p

 INFO

For discs, access the play options or 

‡

display the current disc status.
For slideshows, display a thumbnail 

‡

YLHZRISKRWRÀOHV

q

OK

&RQÀUPDQHQWU\RUVHOHFWLRQ

‡

r

SETUP

Access or exit the setup menu.

‡

Remote control

a

Turn on the unit or switch to standby.

‡

b

Open or close the disc compartment. 

‡

c

DISC MENU

Access or exit the disc menu. 

‡

Switch to the disc mode.

‡

For VCD and SVCD, turn on or off 

‡

PBC (playback control).

d

Navigate the menus.

‡

Search fast-forward (

‡

) or fast-

backward ( ).
Search slow-forward (

‡

) or slow-

backward ( ).
Tune to a radio station (

‡

/ ).

Adjust the radio frequency (

‡

/ ).

e

 BACK

Return to the previous display menu.

‡

f

/

Skip to the previous or next title, 

‡

chapter, or track.
Select a preset radio station.

‡

4

3

6

7

9

8

1

5

2

16

17

12

15

13

14

10

11

18

PROGRAM

English

EN

Summary of Contents for DVP3336

Page 1: ...DVP3336 Register your product and get support at www philips com welcome EN User manual ...

Page 2: ...nect 8 Connect video cables 8 Connect audio cables 9 Route audio to other devices 9 RQQHFW 86 ÁDVK GULYH 10 Connect power 10 4 Get started 11 Prepare the remote control 11 Find the correct viewing channel 11 Select menu display language 11 Turn on progressive scan 12 5 Play 13 Play a disc 13 Play video 13 Play music 15 Play photo 16 3OD IURP 86 ÁDVK GULYH 17 6 Listen to FM radio 18 Tune to a radio...

Page 3: ...k of overheating Never install the product LQ D FRQÀQHG VSDFH OZD V OHDYH D VSDFH of at least 4 inches around the product for ventilation Ensure curtains or other objects never cover the ventilation slots on the product Never place the product remote control or EDWWHULHV QHDU QDNHG ÁDPHV RU RWKHU KHDW sources including direct sunlight Only use this product indoors Keep this product away from water...

Page 4: ...tection technology must be authorised by Macrovision Corporation and is intended for home and other limited viewing uses only unless otherwise authorised by Macrovision Corporation Reverse engineering or disassembly is prohibited Trademark notice Manufactured under license from Dolby Laboratories Dolby and the double D symbol are trademarks of Dolby Laboratories Windows Media and the Windows logo ...

Page 5: ...ort that Philips offers register your product at www philips com welcome Feature highlights Screen Fit 9LHZ WKH PRYLH LQ IXOO VFUHHQ GLVSOD RQ DQ TV Progressive scan video Push the limits of standard resolution and SURYLGH D PRUH ÀOP OLNH 9 YLGHR GLVSOD RQ a TV screen Hi speed USB link 3OXJ D 86 ÁDVK GULYH WR WKH 86 MDFN WR HQMR WKH 03 0 3 LY ÀOHV UHDWH 03 ÀOHV RQYHUW DXGLR WUDFNV IURP DQ DXGLR LQ...

Page 6: ...he play options or display the current disc status For slideshows display a thumbnail YLHZ RI SKRWR ÀOHV q OK RQÀUP DQ HQWU RU VHOHFWLRQ r SETUP Access or exit the setup menu Remote control a Turn on the unit or switch to standby b Open or close the disc compartment c DISC MENU Access or exit the disc menu Switch to the disc mode For VCD and SVCD turn on or off PBC playback control d Navigate the ...

Page 7: ...of connection provides good picture quality Pb COMPONENT VIDEO IN Y Pr Pb COMPONENT VIDEO OUT Y Pr 3 Connect Make the following connections to use this product Basic connections Video Audio Optional connections Route audio to other devices Multi channel receiver LJLWDO DPSOLÀHU UHFHLYHU Analogue stereo system 86 ÁDVK GULYH Note Refer to the type plate at the back or bottom RI WKH SURGXFW IRU LGHQW...

Page 8: ... REAR R SUBWOOFER FRONT L REAR L CENTER MULTICHANNEL AUDIO IN DIGITAL IN COAXIAL DIGITAL OUT Option 2 Connect to video CVBS jack 1 Connect a composite video cable not supplied to the TV OUT jack on this product the video input jack on the TV Tip The video input jack on the TV may be labeled as A V IN VIDEO IN COMPOSITE or BASEBAND This type of connection provides standard picture quality Connect a...

Page 9: ...dy to be set up for use 1 Connect a coaxial cable not supplied to the COAXIAL jack on this product the COAXIAL DIGITAL input jack on the device Connect analogue stereo system 1 Connect the audio cables supplied to the AUDIO OUT FRONT L R jacks on this product the audio input jacks on the device RQQHFW 86 ÁDVK GULYH 1 RQQHFW D 86 ÁDVK GULYH WR WKH jack on this product Note This product can only pla...

Page 10: ...ess 3 Press to select a language then press OK Disc Lock OSD Language Sleep Timer Auto Standby DivX R VOD Code English General Setup 4 Get started Prepare the remote control 1 Open the battery compartment 2 Insert 2 AAA batteries with correct polarity as indicated 3 Close the battery compartment Caution Remove batteries if they are exhausted or if the remote control is not to be used for a long ti...

Page 11: ...o jacks see Connect Connect video cables Option 1 Connect to the component video jacks for details 1 Turn on the TV to the correct viewing channel for this product 2 Press SETUP 3 Press to select Video Setup 4 Select Progressive On then press OK A warning message is displayed 5 To proceed select Ok and press OK The progressive setup is complete Note If a blank distorted screen is displayed wait fo...

Page 12: ...urrent disc status 5 Play Play a disc Caution Do not place any objects other than discs into the disc compartment Do not touch the disc optical lens inside the disc compartment 1 Press to open the disc compartment 2 Insert a disc with its label facing up 3 Press to close the disc compartment and start disc play To view disc play turn on the TV to the correct viewing channel for this product To sto...

Page 13: ...ain to set the end point Repeat play starts Access DVD menu 1 Press DISC MENU to access the disc root menu 2 Select a play option then press OK In some menus press the Numeric buttons to input your selection AccessVCD menu The PBC playback control feature is available for VCD SVCD which can display the contents menu for you to select a play option The PBC is on by default in the factory Note See A...

Page 14: ...does not automatically start select a track to play To select another track folder press then press OK 3 To cancel repeat play press REPEAT REPEAT A B again Note The marked section for repeat play is only possible within a track title Play DivX video DivX video is a digital media format that retains high quality despite a high rate of compression You can enjoy DivX video on WKLV LY FHUWLÀHG SURGXF...

Page 15: ...P3 0 PXVLF ÀOHV DQG 3 SKRWR ÀOHV simultaneously Note To create a musical slideshow you must store WKH 03 0 DQG 3 ÀOHV RQ WKH VDPH GLVF 86 ÁDVK GULYH Note For disc recorded in multiple sessions only the ÀUVW VHVVLRQ LV SOD HG RU D 0 ÀOH WKDW LV SURWHFWHG E LJLWDO Rights Management DRM it cannot be played on this product This product does not support MP3PRO audio format For any special character tha...

Page 16: ...y press To stop music play press again 3OD IURP 86 ÁDVK GULYH This product plays views MP3 WMA DivX or 3 ÀOHV WKDW DUH VWRUHG RQ D 86 ÁDVK GULYH 1 RQQHFW D 86 ÁDVK GULYH WR WKH jack on this product 2 Press the SOURCE button A contents menu is displayed 3 If play does not start automatically select D ÀOH WR SOD For more information see the chapters Play music Play photo and Play video for details 4...

Page 17: ... VCR or other radiation source For optimal reception fully extend and adjust the position of the antenna 6 Listen to FM radio Tune to a radio station 1 Press SOURCE to slect radio 2 Press SRCH appears The radio tunes to a station with strong reception automatically 3 Repeat step 2 to tune to more stations To tune to a weak station press UHSHDWHGO XQWLO RX ÀQG WKH RSWLPDO reception Program radio st...

Page 18: ...can convert audio CDs LQWR 03 DXGLR ÀOHV 7KH FUHDWHG 03 DXGLR ÀOHV DUH VDYHG LQ WKH 86 ÁDVK GULYH 1 Insert an audio CD 2 RQQHFW D 86 ÁDVK GULYH WR WKH jack on this product 3 During disc play press AUDIO CREATE MP3 The MP3 creation menu is displayed 4 Select Yes in the menu then press OK 5 Select a conversion option in the OPTIONS panel then press OK repeatedly to select an item Option Description ...

Page 19: ...up menu is displayed 2 Press to select Audio Setup then press 3 Select an option then press OK Audio Setup Analogue Output Digital Audio Volume Sound Mode Speaker Setup CD Upsampling Night Mode 8 Adjust settings Note If the setup option is grayed out it means the setting cannot be changed at the current state General setup 1 Press SETUP General Setup menu is displayed 2 Press 3 Select an option th...

Page 20: ...evious menu press To exit the menu press SETUP Analogue Output Select an analogue setting based on the audio device that is connected through the analogue audio jack Stereo For stereo output LT RT For surround sound output through two speakers V SURR For analogue surround sound output from the main speaker Multi Channel For surround sound output through 5 1 channel receiver Digital Audio Select a ...

Page 21: ... ratio 16 9 Video Steup TV System TV Display Progressive Picture Setting 3 Press OK WR FRQÀUP DQG H LW Speakers Delay Sets the delay time for the center and rear speakers if they are placed closer to the listening position so that the sound output from all speakers reach the listening position at the same time 1 Press OK 2 Select a speaker then press to set the delay time 3 Press OK WR FRQÀUP DQG ...

Page 22: ... to play select 8 Some discs have ratings printed on them but are not recorded with ratings This function has no effect on such discs PBC Turn on or off the content menu of VCDs SVCDs with PBC playback control feature On Display the index menu when you load a disc for play Off Skip the menu and start play from WKH ÀUVW WLWOH Progressive If a progressive scan TV is connected to this product turn on...

Page 23: ... Password settings MP3 JPEG Nav Select to display the folders or display all the ÀOHV View Files LVSOD DOO WKH ÀOHV View Folders Display the folders of 03 0 ÀOHV Password Set or change the password for locked discs and play restricted DVDs 1 Press the Numeric buttons to enter RU WKH ODVW VHW SDVVZRUG DW Old Password ÀHOG 2 Enter the new password at New Password ÀHOG 3 Enter the new password again ...

Page 24: ...product to compare with the latest software if available at the Philips website Caution Power supply must not be interrupted during software upgrade 1 Press SETUP 2 Select Preferences Version Info then press OK 3 ULWH GRZQ WKH ÀOH QDPH WKHQ SUHVV SETUP to exit the menu 4 Visit www philips com support to check for the latest software version using the ÀOH QDPH IRU WKLV SURGXFW 5 Refer to the upgrad...

Page 25: ...26 dB 1 kHz Stereo Threshold FM 29 dB Connections Y Pb Pr output Cinch 3x Video output Cinch yellow Audio output L R Cinch white red Digital output 1 coaxial IEC60958 for CDDA LPCM IEC61937 for MPEG 1 2 Dolby Digital 10 Specifications Note 6SHFLÀFDWLRQ DQG GHVLJQ DUH VXEMHFW WR FKDQJH without notice Accessories supplied Remote control and batteries Audio Video cables User Manual Play media DVD Vid...

Page 26: ...it Dimensions w x h x d 360 x 37 x 209 mm Net Weight approximately 1 3 kg Power Power supply rating 110 V 240 V 50 60 Hz Power consumption 10 W Power consumption in standby mode 1 W DVHU VSHFLÀFDWLRQ Type Semiconductor laser InGaAIP DVD AIGaAs CD Wave length 655 nm DVD 790 nm CD Output Power 10 mW DVD 5 mW VCD CD Beam divergence 60 degrees E n glish EN ...

Page 27: ...ct No sound during radio play Ensure that the radio station is with optimal reception Turn the VOLUME knob on the main unit to adjust the volume 11 Troubleshooting Warning Risk of electric shock Never remove the casing of the product To keep the warranty valid never try to repair the product yourself If you have problems using this product check the following points before you request service If y...

Page 28: ...QDPH LV WKH VDPH DV WKH PRYLH ÀOH QDPH Select the correct character set Press SETUP Select Preferences DivX Subtitle in the menu Select the character set that supports the subtitle 7KH FRQWHQWV RI WKH 86 ÁDVK GULYH FDQQRW be read 7KH 86 ÁDVK GULYH IRUPDW LV QRW compatible with the digital receiver 7KH GULYH LV IRUPDWWHG ZLWK D ÀOH V VWHP which is not supported by this unit e g NTFS Poor radio rece...

Page 29: ... GHÀQLWLRQ or wide TV is 16 9 The letter box allows you to enjoy a picture with a wider perspective on a standard 4 3 screen D DivX Video On Demand 7KLV LY HUWLÀHG GHYLFH PXVW EH registered in order to play DivX Video on Demand VOD content To generate the registration code locate the DivX VOD section in your device setup menu Go to vod divx com with this code to complete the registration process a...

Page 30: ...585 Lao 7679 Latina 7665 Latvian 7686 Letzeburgesch 7666 Limburgan Limburger 7673 Lingala 7678 Lithuanian 7684 Luxembourgish 7666 Macedonian 7775 Malagasy 7771 Magyar 7285 Malayalam 7776 Maltese 7784 Manx 7186 Maori 7773 Marathi 7782 Marshallese 7772 Moldavian 7779 Mongolian 7778 Nauru 7865 Navaho Navajo 7886 Ndebele North 7868 Ndebele South 7882 Ndonga 7871 Nederlands 7876 Nepali 7869 Norsk 7879 ...

Page 31: ...32 Visit us on web at www philips com support or Call us on Tel No 1860 180 1111 BSNL MTNL 011 6600 1111 GSM WLL standard call rates apply Electronics ...

Page 32: ... 2009 Koninklijke Philips Electronics N V All rights reserved DVP3336_94_UM_V1 0 ...

Reviews: