background image

85

EN

Recording

Playback

Editing

Introduction

Connections

Basic Setup

Function Setup

Others

85

EN

EDITING DISCS

Making Edits Compatible
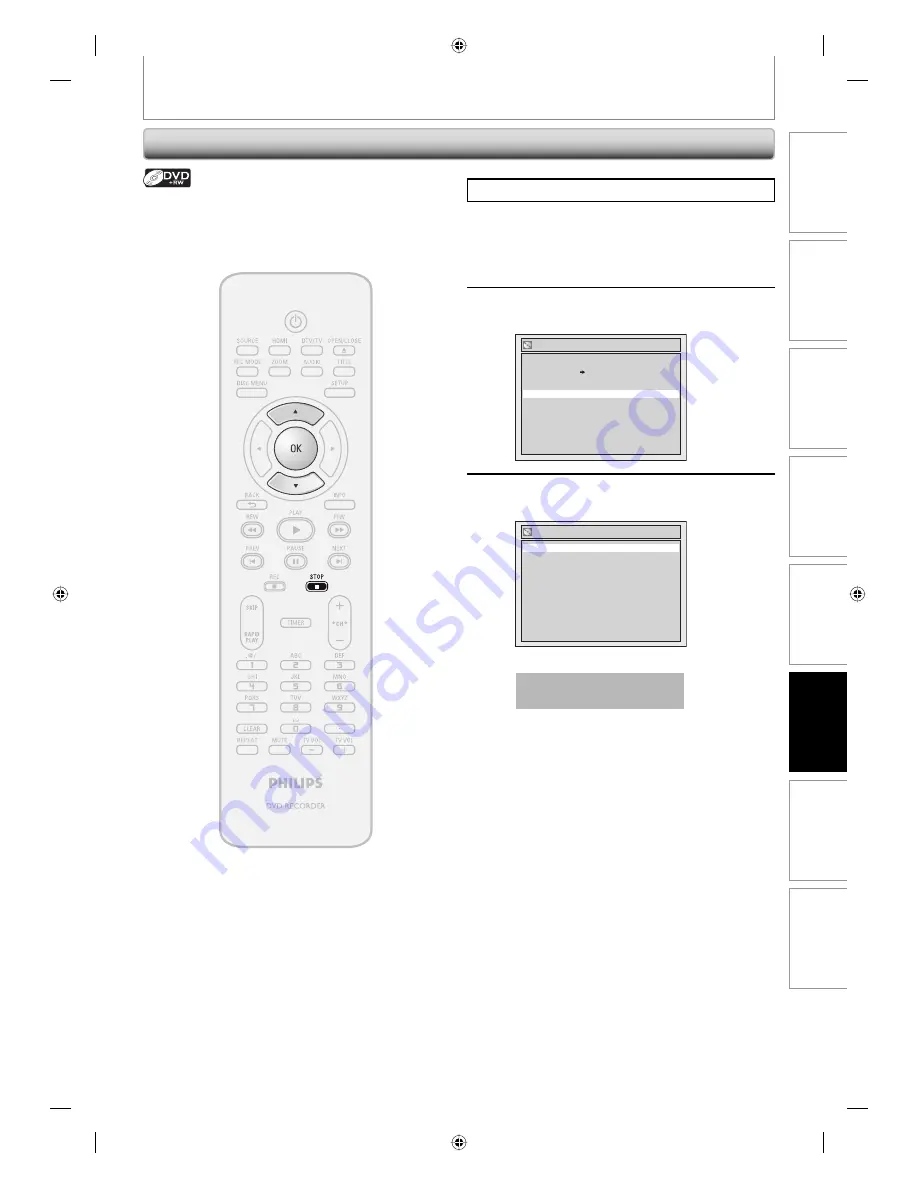
Press 

[STOP 

C

]

 if you are playing back a disc.

1

  Follow steps 1 to 2 in “Putting Name 

on Disc” on page 81 to display “Disc 
Edit” menu.

2

 Use [

K

 / 

L

] to select “Make Edits 

Compatible”, then press [OK].

Disc Edit

Disc Protect OFF       ON

Erase Disc

Make Edits Compatible

Edit Disc Name

3

 Use [

K

 / 

L

] to select “Yes”, then press 

[OK].

Make Edits Compatible

Yes

No

Data will be written onto the disc momentarily.

This operation may take a 

while to be completed.

If you have added or deleted chapters, or made chapters 
hidden, you must perform “Make Edits Compatible” to 
see those effects on other unit.

E7C40UD.indd   85

E7C40UD.indd   85

2007/01/15   11:20:18

2007/01/15   11:20:18

Summary of Contents for DVDR3505/37

Page 1: ...tefois si vous ne parvenez pas à résoudre votre probléme vous pouvez accéder à notre aide en ligne à l adresse www philips com usasupport ouformezle 1 800 661 6162 Francophone 1 888 PHILIPS 744 5477 Englishspeaking Veillezàavoirvotreproduità portéedemain etmodel serialnombre Gracias por escoger Philips Necesita ayuda inmediata Lea primero la Guía de inicio rápido o el Manual del usuario en donde e...

Page 2: ...For the safety of everyone in your household please do not remove product covering The exclamation point calls attention to features for which you should read the enclosed literature closely to prevent operating and maintenance problems WARNING To reduce the risk of fire or electric shock this apparatus should not be exposed to rain or moisture and objects filled with liquids such as vases should ...

Page 3: ...or C The appliance has been exposed to rain or D The appliance does not appear to operate normally or exhibits a marked change in performance or E The appliance has been dropped or the enclosure damaged 17 Tilt Stability All televisions must comply with recommended inter national global safety standards for tilt and stability properties of its cabinet design Do not compromise these design standard...

Page 4: ...o guarantee that interference will not occur in a particular installation If this device does cause harmful interference to radio or television reception which can be determined by turning the device off and on the user is encouraged to try to correct the interference by one or more of the following measures 1 Reorient or relocate the receiving antenna 2 Increase the separation between the device ...

Page 5: ...s not perform properly although you refer to the relevant sections and to TROUBLESHOOTING in this user manual the laser optical pickup unit may be dirty Consult your dealer or an Authorized Service Center for inspection and cleaning of the laser optical pickup unit Disc handling Handle the discs so that fingerprints and dust do not adhere to the surfaces of the discs Always store the disc in its p...

Page 6: ...TUNER SETTINGS 29 Switching Analog Mode Digital Mode 29 Channel Selection 29 Selecting TV Audio 30 DTV Closed Caption 32 Closed Caption Style 33 Recording INFORMATION ON DVD RECORDING 35 BEFORE RECORDING 36 Make Recording Compatible 36 Setting for Auto Chapter 36 BASIC RECORDING ONE TOUCH TIMER RECORDING 37 TIMER RECORDING 39 Hints for Timer Recording 42 OVERWRITING UNNECESSARY TITLE 43 Overwritin...

Page 7: ... Program Playback 68 Slide Show 68 DivX 69 DivX VOD 69 DivX Subtitle 69 SELECTING THE FORMAT OF AUDIO AND VIDEO 70 Switching Subtitles 70 Switching Audio Soundtrack 70 Switching Virtual Surround System 71 Switching Camera Angles 71 Reducing Block Noise 71 Editing INFORMATION ON DISC EDITING 72 Guide to a Title List 72 Editing Discs 72 EDITING DISCS 73 Deleting Titles 73 Putting Names on Titles 74 ...

Page 8: ...using the search function Search for a desired point on a disc by title chapter or time Virtual surround system You can enjoy stereophonic space through your existing 2 channel stereo system Playing back on MP3 Windows Media Audio JPEG DivX files You can enjoy MP3 Windows Media Audio JPEG DivX files which are recorded on CD RW R DivX files can also be recorded on DVD RW R or DVD RW R Playback Avai...

Page 9: ...IN jack E1 Use to connect external device with a RCA video cable 3 COMPONENT VIDEO OUTPUT jacks Use to connect a TV monitor with component video inputs with a component video cable 4 VIDEO OUT jack Use to connect a TV monitor AV receiver or other device with a RCA video cable 5 HDMI OUT jack Use an HDMI cable to connect to a display with an HDMI compatible port 6 AC Power Cord Connect to a standar...

Page 10: ...batteries AAAx2 matching the polarity indicated inside battery compartment of the remote control Note Incorrect use of batteries can result in hazards such as leakage and bursting Please observe the following Do not mix new and old batteries together Do not use different kinds of batteries together Although they may look similar different batteries may have different voltages Make sure that the an...

Page 11: ...on display Press to enter values for the settings in the main menu Press to enter title names 17 CLEAR button Press to clear the password once entered or to cancel the programming for CD or to clear the selecting marker number in the edit menu or to clear the pro gram once entered in the timer programming list etc 18 REPEAT button Press to display the repeat menu 19 MUTE button Limited to the Phil...

Page 12: ...D RW DVD RW is on the disc tray 3 Title track file and chapter mark Appears when indicating a title track file number Appears when indicating a chapter number 4 Displays the following Elapsed playback time Current title chapter track file number Recording time remaining time Clock Channel number Remaining time for one touch timer recording Selected HDMI OUTPUT mode 5 Appears in the afternoon with ...

Page 13: ...ear of your TV disconnect disconnect 1 1 1 2 IN OUT ANTENNA IN IN OUT OUT VIDEO OUT Y PR CR PB CB R L R L VIDEO IN S VIDEO ANTENNA COAXIAL HDMI OUT AV IN AV OUT COMPONENT VIDEO OUTPUT DIGITAL AUDIO OUTPUT PCM BITSTREAM rear of this unit AUDIO IN L R VIDEO IN VIDEO OUT R L AV OUT ANT IN VHF UHF antenna RF coaxial cable RF coaxial cable or rear of your TV RCA audio cable RCA video cable cable TV com...

Page 14: ...cords of the devices from the AC outlet 2 Make the connection as illustrated below 3 Set your RF modulator s channel 3 4 switch to either 3 or 4 whichever the TV channel is least used in your area If your RF modulator has a modulator antenna switch set it according to the manual supplied with the RF modulator 4 Plug in the power cords of the devices to the AC outlet 5 Turn on your TV and choose th...

Page 15: ...cannot record one channel while watching another channel RF OUT ANT IN IN OUT OUT VIDEO OUT Y PR CR PB CB R L R L VIDEO IN COAXIAL HDMI OUT AV IN AV OUT COMPONENT VIDEO OUTPUT DIGITAL AUDIO OUTPUT PCM BITSTREAM cable satellite box satellite dish e g cable TV company or rear of this unit rear of your TV AUDIO IN L R VIDEO IN VIDEO OUT R L AV OUT IN OUT ANTENNA VIDEO IN R L AV IN ANT IN RF coaxial c...

Page 16: ...otection system When Progressive Scan is set to ON no video signal will be output from the VIDEO OUT or S VIDEO OUT jack After you have completed the connections Switch the input selector on your TV to an appropriate external input channel Press a button on the TV s original remote control that selects an external input channel until the DVD recorder s opening picture appears Check your TV owner s...

Page 17: ...080i 480p 720p 1080i OFF 480p 720p 1080i 480p 720p OFF 480p 720p 480p 1080i OFF 480p 1080i 480p OFF 480p HDMI Mode and Actual Output Signals Press HDMI to select the HDMI output mode The output mode changes as follows every time HDMI is pressed OFF 480p 720p 1080i The HDMI mode that is not supported by display device will be skipped Cables not included Please purchase the necessary cables at your ...

Page 18: ...f channels and bit length maybe limited by the device that is connected Among the monitors that support HDMI some do not support audio output for example projectors In connections with device such as this unit audio signals are not output from the HDMI output connector When the set s HDMI connector is connected to a DVI D compatible monitor HDCP compatible with an HDMI DVI converter cable the sign...

Page 19: ...tal audio coaxial input jack digital audio coaxial cable DIGITAL AUDIO OUTPUT this unit Note The audio source on a disc in a Dolby Digital multi channel surround format cannot be recorded as digital sound by an MD or DAT deck By connecting this unit to a Dolby Digital decoder you can enjoy high quality Dolby Digital multi channel surround sound as heard in the movie theaters Playing back a DVD usi...

Page 20: ...n Display Menu GUIDETOON SCREENDISPLAYSANDMENUS DTV Program Guide English 1 2 A Day of Memories KABC A quarter century ago which may now qualify as the good old days of newspapering run of paper sales accounted for 80 percent of the industry s advertising revenues DTV 6 1 1 5 5 2 5 3 5 4 1 Broadcast station 2 Program title max 2 lines displayed 3 Audio language Other is displayed when the audio la...

Page 21: ...ormation CH 2 HQ 1Hr 1 01 Video Info 480p YCbCr Audio Info Bitstream 2 1 3 4 6 5 3 4 1 Indicates the resolution of the HDMI output image 2 Indicates the HDMI video format 3 Indicates the HDMI audio format 4 Indicates a channel number 5 Indicates a recording mode and possible recording time left 6 Indicates an operation status When HDMI setting is OFF will be displayed HDMI Information GUIDE TO ON ...

Page 22: ...only ON Slide Show 5sec Random Play 4 5 5 5 5 7 8 6 CD Playback Mode menu Disc Edit Finalize Disc Protect OFF ON Edit Disc Name 2 3 1 1 2 4 Disc Edit menu DVD R DVD R GUIDE TO ON SCREEN DISPLAYS AND MENUS Main Menu Press SETUP to display the main menu Then use K L to select a menu and press OK to display the menu These menus provide entries to all main functions of the unit 1 Required Settings To ...

Page 23: ...in your area Antenna When using antenna The channels broadcasted in analog TV and digital TV are automatically scanned and memorized Only the receivable channels in the area will be memorized Cable Analog When using basic cable The channels broadcasted in analog CATV are automatically scanned and memorized Cable Analog Digital When using basic cable The channels broadcasted in analog CATV and digi...

Page 24: ...it will start getting channels available in your area When aerial antenna is connected select Antenna When connected to CATV select Cable Analog or Cable Analog Digital To cancel the auto channel preset during scanning Press BACK or SETUP to cancel 5 When scanning is over press SETUP to exit To cycle through only the memorized channels use CH To select a channel directly including the ones not mem...

Page 25: ...set Channel If you are adding or deleting analog TV CATV channels go to ANALOG to continue If you are deleting digital TV CATV channels go to DIGITAL to continue Adding Deleting Channels CHANNEL SETTING You may want to add or delete TV channels if your channel lineup changes or if you no longer watch some channels Adding channel is only available for the analog TV channels Make sure You perform Au...

Page 26: ...s displayed in Manual Channel Preset menu The channel number displayed in the parenthesis is a virtual channel number Use CH to cycle through only the memorized channels You cannot use B for the digital TV channel selection Use the Number buttons to select a channel directly When a memorized channel is selected Add is checked and highlighted as a default When an unmemorized channel is selected Del...

Page 27: ...select Auto then press OK Auto Clock Setting OFF Manual Auto 5 Press SETUP to exit 6 Press STANDBY ON y y to turn off the unit This unit will search for the time only when the power is off Leave it off for several minutes to give this unit time to set the clock Auto Clock Setting This unit can set the time and date automatically by referring to a PBS station Make sure The antenna cable TV connecti...

Page 28: ...ct ON when currently utilizing the daylight saving time 1 Press SETUP 2 Use K L to select Clock then press OK Clock menu will appear 3 Use K L to select Clock Setting then press OK 4 Use K L to select calendar or time then press OK Clock Setting JAN 01 2007 MON 12 00 AM 5 Use B to select an item to set and use K L to select the contents to suit your preference then press OK Clock Setting JAN 01 20...

Page 29: ...r channel of the major channel will be displayed Note It may take up to 5 to 7 seconds to switch the digital TV channels In digital TV broadcasting 2 or more channels called minor channels are simultaneously broadcast on one main channel called major channel About digital TV broadcasting With its high definition broadcast digital broadcasting far surpasses analog broadcasting in both its picture a...

Page 30: ...n you record digital TV broadcasting the audio language you have selected will be recorded Note The timer recording for digital TV cannot record any audio language other than English Pressing AUDIO does not control external device audio When there is only one audio channel on the broadcast pressing AUDIO does not display anything TUNER SETTINGS This section describes how to switch the TV audio Whe...

Page 31: ... SETUP to exit Note on recording analog TV audio When you record an analog TV program available in second audio or stereo you have to select either Stereo or SAP in Required Settings menu beforehand Refer to the following table to check an appropriate setting Selected audio Broadcast audio Disc recording Audio output Stereo STEREO SAP STEREO STEREO STEREO STEREO STEREO MONO SAP MONO MONO MONO MONO...

Page 32: ...then press OK DTV CC Service1 Service2 Service3 Service4 Service5 Service6 OFF OFF Select if you do not want DTV CC This is the default Service 1 to Service 6 Select one of these before changing any other item in the closed caption menu Choose Service 1 under normal circumstances 6 Press SETUP to exit TUNER SETTINGS DTV Closed Caption Digital TV Digital TV has its own closed captions called DTV CC...

Page 33: ... OFF Font Style Font Size Font Opacity Edge Type Back Opacity Font Color Back Color Style1 Middle Solid NONE Solid White Black 5 Use K L to select ON then press OK User Setting ON OFF Font Style Font Size Font Opacity Edge Type Back Opacity Font Color Back Color Style1 Middle Solid NONE Solid White Black TUNER SETTINGS Closed Caption Style Digital TV Digital TV can also change the style of its clo...

Page 34: ...he displayed caption can be switched as below Edge Type Raised Depressed NONE L Shadow R Shadow Uniform Font Opacity Font opacity of the displayed caption can be switched as below Font Opacity Translucent Flash Solid Font Color Font color of the displayed caption can be switched as below Font Color White Black Transparent Green Blue Red Magenta Cyan Yellow Back Opacity Background opacity of the di...

Page 35: ...nteed You can play back DVD RW on most DVD players without finalizing However if you have added or deleted chapters or made chapters hidden you must perform Make Edits Compatible before being able to see those effects on other units Refer to page 85 for more details To play back discs other than DVD RW on other DVD players you will need to finalize Note This unit cannot record to CD RW or CD R All...

Page 36: ...ngs to the discs recorded by other units OFF Prohibiting additional record to the disc that has a title list created by other units 5 Press SETUP to exit Make Recording Compatible Setting for Auto Chapter You can set a specified time for chapter marks 1 Press SETUP 2 Use K L to select Recording then press OK Recording menu will appear 3 Use K L to select Auto Chapter then press OK 4 Use K L to sel...

Page 37: ...35 for the list of compatible discs 3 Press OPEN CLOSE A to close the disc tray It may take a while to load the disc completely When inserting a brand new DVD RW DVD RW the unit automatically starts to format If titles have been recorded on the disc the title list is displayed Press STOP C to exit the title list 4 Press REC MODE to select a recording mode Refer to Recording Mode on page 35 HQ 1Hr ...

Page 38: ...will be recorded as 4 3 When the unit clock has not been set the space for a date and time of title names will be blank When you record a TV program you have to select the TV channel audio beforehand Only the selected channel audio will be recorded Refer to Selecting TV Audio on page 31 for more details This unit cannot record in both stereo and SAP secondary audio program at the same time You can...

Page 39: ...st You can program the unit to record up to 8 programs within a month in advance Daily or weekly program recordings are also available Before recording make sure Set the clock before setting a timer programming Insert a recordable disc with enough recordable space Note If you have not set the clock yet Manual Clock Setting menu will appear instead of the timer programming list at step 1 Continue w...

Page 40: ...xit press TIMER or SETUP When 2 or more programs are overlapped Overlap and the overlapped program number will appear 8 Press STANDBY ON y y to set a timer programming TIMER RECORDING How to select a channel number for the timer recording Analog TV For channel number 2 6 press press B or to decide the channels For other channels 7 69 the channel will be decided as soon as you enter the channel num...

Page 41: ...led E24 Unrecordable disc E42 No disc when recording E25 26 Copy prohibited program E43 Already 49 titles recorded E29 Disc protected E44 Already 254 chapters recorded E30 Disc full E45 Copy prohibited program E35 PCA full E46 It is impossible to record additionally on a disc recorded by other units when setting Replace Disc Menu to OFF E36 Already finalized video format disc E40 Some portion has ...

Page 42: ...press STANDBY ON y y first then select the recorded title and press PLAY B or OPEN CLOSE A to remove the disc During timer recording or timer standby mode will appear any operations on the unit will not be available To make these operations available press STOP C on the front panel to cancel the timer recording or STANDBY ON y y to release timer standby mode will disappear To cancel the timer stan...

Page 43: ...ng starts The elapsed time counter starts running 8 Press STOP C to stop recording Title name is also overwritten This operation may take a while to be completed You can overwrite the existing title from the selected position 1 Follow the steps 1 and 2 on the left 2 Use K L to select a title to be overwritten then press OK 3 Use K L to select Play then press OK Playback will start 4 Press PAUSE F ...

Page 44: ...verwrite recording A existing title B after overwriting When overwriting in the middle of the title 30 180 seconds will be cut off 30 180 seconds will be cut off overwrite recording A existing title B after overwriting overwrite recording A existing title B existing title C after overwriting title name A title name A title name B title name A title name C title name B title name B Overwritten sect...

Page 45: ...se K L to select desired external input position then press OK Video Input E2 Front Video In E1 Rear Video In 5 Use K L to select the input jack type to connect then press OK If you want to use VIDEO IN jack select Video In If you want to use S VIDEO IN jack select S Video In Video Input E2 Front S Video In Video In 6 Press SETUP to exit Connect the external device properly to the unit by using in...

Page 46: ...ng SOURCE or CH To use the input jacks on the front of this unit Select E2 or E3 Front position by using SOURCE or CH You can also select external input position by using the Number buttons e g For E1 press 0 0 1 5 Press REC MODE to select a recording mode Refer to Recording Mode on page 35 HQ 1Hr SP 2Hr SPP 2 5Hr LP 3Hr EP 4Hr SLP 6Hr 6 Press RECORD on the unit to start recording 7 Start playback...

Page 47: ...nction When the unit is ready for dubbing Start Rec will appear When the unit is in dubbing Pause Rec will appear 5 Channel position When you select E3 by using SOURCE or CH E3 DV IN will appear DVD RW 1 1 0 00 00 SP 2Hr 1 35 AB 1234 0 00 00 E3 DV IN DV Audio Stereo1 Start Rec Control DVD DVD RW 1 1 0 00 00 SP 2Hr 1 35 AB 1234 0 22 54 E3 DV IN 2 3 1 4 5 7 6 The menu changes according to what mode ...

Page 48: ...ess REC MODE to select a recording mode See page 35 3 Press INFO DVD RW 1 1 0 00 00 SP 2Hr 1 35 AB 1234 0 00 00 E3 DV IN DV Audio Stereo1 Start Rec Control DVD 4 Press OK to display the item selection Use K L to select DV Input then press OK Before recording from DV camcorder see page 45 for connection instructions E7C40UD indd 48 E7C40UD indd 48 2007 01 15 11 19 52 2007 01 15 11 19 52 ...

Page 49: ...gnal again When the DV camcorder is in camera mode refer to Guide to DV and On Screen Display on page 47 You cannot dub from DVC during timer standby mode During timer standby of either component you cannot select E3 DV IN even on the component which is not in timer standby Date time and cassette memory data will not be recorded Pictures with a copy guard signal cannot be recorded A DV terminal is...

Page 50: ...s Disc Protect OFF ON A disc will be protected This operation may take a while to be completed To prevent accidental recording editing or erasing the titles you can protect them from Disc Edit menu Note To cancel the disc protect When you insert a disc protected with this unit Disc Protect ON OFF will appear instead of OFF ON No Yes Disc Protect ON OFF To release the protect for the disc select Ye...

Page 51: ...ACK finalizing will be continued You cannot cancel finalizing the DVD R DVD R once it has started This operation may take a while to be completed 5 Finalizing is completed You will need to finalize discs to play back in other DVD players Finalizing may take several minutes up to an hour A shorter recording period on the disc will require a longer time period for finalization Do not unplug the powe...

Page 52: ...alize End of Timer Rec OFF Disc Full OFF 5 Use K L to select ON then press OK Auto Finalize Disc Full OFF ON Auto Finalize End of Timer Rec OFF ON Your setting will be activated 6 Press SETUP to exit You can finalize discs automatically using this function You can use this function to finalize discs after finishing all timer recordings and at the end of the disc space Auto Finalizing E7C40UD indd ...

Page 53: ... can only play back on the unit with the same region code Region Codes Logos Playable discs Media Playable files CD DA MP3 Windows Media Audio CD RW R JPEG DivX CD RW R DVD RW R DVD RW R CD DA audio CD video CD CD RW CD R DVD video DVD RW DVD R DVD RW Finalized video mode discs only DVD R Finalized video mode discs only DVD R Double Layer is a trademark of DVD Format Logo Licensing Corporation Div...

Page 54: ...n temporarily to perform those operations by following the instruction below 1 Press SETUP 2 Use K L to select CD Playback Mode then press OK CD Playback Mode menu will appear 3 Use K L to select PBC Video CD only then press OK 4 Use K L to select ON or OFF then press OK Your setting will be activated You can play back interactive software using menu screens Refer to instructions in the video CD P...

Page 55: ...to page 53 for the list of compatible discs 3 Press OPEN CLOSE A to close the disc tray It may take a while to load the disc completely 4 Press PLAY B to start playback If you are playing back a DVD video or video CD with PBC function a menu may appear Refer to Using the Title Disc Menu on page 61 5 Press STOP C once to stop playback temporarily Refer to Resume Playback on page 62 Note Some discs ...

Page 56: ... the list of compatible discs 3 Press OPEN CLOSE A to close the disc tray It may take a while to load the disc completely Title list will appear automatically To exit the title list press STOP C To resume the title list press TITLE Note Some discs may start playback automatically You can also start playback by pressing PLAY B instead of OK at step 4 Press B to display the next page and press to di...

Page 57: ...ce Used 1 30 48 Disc Protect OFF Finalize Finalized 1 Disc name Default No Disc Name 2 Disc type DVD RW DVD R DVD RW DVD R 3 Total number of title include EMPTY TITLE 4 Total time of recorded disc space 5 Status of disc protection ON is protected disc 6 Making edits compatible finalize When DVD RW is inserted If the disc needs to be set Make Edits Compatible Needed is displayed Otherwise Not Neede...

Page 58: ...E NAME 1 2 FILE NAME 2 1 2 3 3 When selecting file Playback will start When selecting the folder The files in the folder will appear Use K L to select the file or folder you want to play back then press OK Press PLAY B OK or B to move to any lower hierarchies Press s or BACK to move back to the previous hierarchy Hints for MP3 Windows Media Audio JPEG files Folders are shown by MP3 files are shown...

Page 59: ...P C To resume the file list press TITLE 3 Use K L to select the desired folder or file then press OK File List DISC NAME A B 1 file name 1 2 file name 2 3 file name 3 4 file name 4 5 file name 5 6 file name 6 1 2 When selecting file Playback will start When selecting folder The files in the folder will appear Use K L to select the file you want to play back then press OK Press PLAY B OK or B to mo...

Page 60: ...hies cannot be played back If the file extends beyond the scope of TV screen a down arrow L appears indicating that the user can view another part on the previous page The current page number and the number of total pages are shown on the right of the down arrow L The name of folder and file can be displayed up to 29 characters Unrecognizable characters will be replaced with asterisks You can play...

Page 61: ... STOP C to exit 1 During playback press PAUSE F Playback will be paused and sound will be muted F 2 Press PLAY B to return to the normal playback Note You can select a numbered menu with the Number buttons also Menus vary among discs Refer to the information accompanying the disc for details TITLE or DISC MENU will not always be active with all DVD For video CD when PBC Video CD only in CD Playbac...

Page 62: ...MP3 Windows Media Audio JPEG files playback will resume from the beginning of the file at which playback was stopped Some video CD with the PBC function resume playback from the beginning of the track Note Forward reverse speed will be indicated with icons as follows forward approx speed 2x 20x 40x reverse approx speed 5x 20x 40x 1 During playback press FFW D or REW E Every time you press FFW D or...

Page 63: ...ill be output Step by Step Playback 1 During playback press PAUSE F Playback will be paused and sound will be muted 2 Press NEXT repeatedly Playback will advance one frame or step at a time when you press NEXT with the sound muted To play back step by step backward Press PREV repeatedly Every time you press the button the playback will go backward by one frame Press and hold PREV NEXT to reverse a...

Page 64: ...art This feature allows you to assign a specific point on a disc to be called back later 1 During playback press INFO 2 Use B to select then press OK DVD Video 1 1 0 00 00 3 Use K L to select a desired marker number When it reaches the desired point press OK e g DVD video 1 2 3 4 5 6 DVD Video 1 1 0 00 00 e g audio CD Audio CD 1 0 00 00 1 2 3 4 5 6 The title track number and the time will be displ...

Page 65: ...ally Title Chapter Search Note In search mode display total numbers of each search contents title chapter time are shown as a denominator 001 028 00 00 00 02 18 33 01 01 total number of titles total number of chapters total time of the disc Using PREV NEXT 1 During playback press NEXT to skip the current track file and move to the next The track file will move forward one at a time To go back to t...

Page 66: ... search is not available and time counter are not displayed 3 Use K L B or the Number buttons to enter a desired time to search then press OK After the search playback will start automatically Note Time search is available only in the same track file or title Time search is not available when you play back the video CD with PBC function Time Search SEARCH E7C40UD indd 66 E7C40UD indd 66 2007 01 15...

Page 67: ...red ending point B Track The current track or file will be played back repeatedly Group The current folder will be played back repeatedly You can play back a disc randomly instead of playing back in the original order 1 Press SETUP 2 Use K L to select CD Playback Mode then press OK CD Playback Mode menu will appear 3 Use K L to select Random Play then press OK Random playback will start Note To ca...

Page 68: ...ess SETUP 2 Use K L to select CD Playback Mode then press OK CD Playback Mode menu will appear 3 Use K L to select Program Play then press OK 4 Use K L to select a desired track then press OK or B Program Play 0 00 00 Total Repeat this step until you program all the desired tracks 5 Press PLAY B Program Play 0 06 11 Total 09 Program playback will start Slide Show You can select the display time be...

Page 69: ... or rented from DivX VOD video on demand services The files are available on the internet When you purchase or rent DivX VOD files on the internet you will be asked to enter an activation registration code This menu item provides you with the activation registration code On how to activate this unit for the DivX VOD file playback visit www divx com vod 1 Press SETUP 2 Use K L to select Playback th...

Page 70: ...an select the format of audio and video as you prefer depending on the contents of the disc you are playing back When playing back a DVD video recorded with 2 or more soundtracks these are often in different languages you can switch them during playback When playing back video CD audio CD or Windows Media Audio DivX files you can switch L R stereo L left or R right 1 During playback press INFO 2 U...

Page 71: ...VD video have scenes shot from 2 or more angles Angle information should be on the disc case if the disc contains multi angle scenes 1 During playback press INFO 2 Use B to select then press OK DVD Video 1 1 0 00 00 Angle icon appears when a switching camera angle is available Angle will switch each time you press OK 1 During playback press INFO 2 Use B to select then press OK DVD Video 1 1 0 00 0...

Page 72: ...e selected menu are displayed here 8 Title name editable If you do not name the title the recorded date time channel and the recording mode are displayed here 9 Progress bar Indicating the progress of the playback 10 Preview window Preview of the selected title is displayed here 11 Playback status Indicating the current playback status of the selected title Press STOP C to exit the title list Note...

Page 73: ...itle list will appear e g DVD RW DVD RW 1 2 3 EMPTY TITLE 0 21 14 SP 2Hr NOV 22 07 11 35AM CH13 EP NOV 22 07 0 10 33 EMPTY TITLE 1 37 52 SP 2Hr SP 2Hr You can delete titles which you do not need anymore Please be advised that the titles once deleted cannot be brought back to the disc For DVD RW DVD RW when the last recorded title in the title list is deleted the available disc space to record on w...

Page 74: ...ically 2 Press to character set will be changed to the previous input mode automatically To delete letters press CLEAR repeatedly Holding CLEAR to delete all letters Use s B to move the cursor to the left and right You can enter up to 30 letters Note Undefined letters in a title name are shown by If you delete them adjoining letters may change to or other Guide to Edit Title Name 1 Follow steps 1 ...

Page 75: ...ess OK Chapter Mark Add No Yes NOV 21 07 11 00AM CH12 SP 0 00 59 1 Chapter 2 2 F A new chapter mark will be added 6 Press BACK twice to exit Data will be written onto the disc momentarily This operation may take a while to be completed You can put chapter marks in each title Once a chapter is marked you can use it for the chapter search feature Note When the number of chapter marks in a title is 9...

Page 76: ...select Yes then press OK Chapter Mark Delete No Yes NOV 21 07 11 00AM CH12 SP 0 00 59 1 Chapter 2 2 F The selected chapter mark will be deleted 6 Press BACK twice to exit Data will be written onto the disc momentarily This operation may take a while to be completed Note Remaining time of the disc may decrease when adding chapter marks or increase when clearing chapter marks depending on the record...

Page 77: ...pter Mark Delete All No Yes NOV 21 07 11 00AM CH12 SP 0 00 59 1 Chapter 2 2 F 5 Use K L to select Yes then press OK Chapter 2 2 Chapter Mark Delete All No Yes Are you sure NOV 21 07 11 00AM CH12 SP 1 0 00 59 All chapter marks will be deleted 6 Press BACK twice to exit Data will be written onto the disc momentarily This operation may take a while to be completed Note Remaining time of the disc may ...

Page 78: ... be completed If you want hidden chapters to be Visible select the chapter to be shown Then use K L to select Visible at the step 4 on this page Data will be written onto the disc momentarily After that title list is displayed Note Hidden will be displayed in the preview window while previewing the hidden chapter When you make all chapters in the title Hidden Hidden is displayed in a thumbnail of ...

Page 79: ...select Index Picture then press OK 4 Use K L to select Yes then press OK No Yes 1 Index Picture NOV 21 07 11 00AM CH12 SP 0 00 59 F A picture for thumbnail will be set 5 Press BACK to exit Data will be written onto the disc momentarily This operation may take a while to be completed Note If the selected picture for a thumbnail is overwritten the index picture is reset to the first scene of the tit...

Page 80: ...11 00AM CH12 SP 0 00 59 F The title will be divided into 2 new titles Both title names are identical and index pictures are reset to the first scene at this point Data will be written onto the disc momentarily This operation may take a while to be completed You can divide one title into 2 new titles Note You cannot divide a title of the disc when the number of recording titles reaches the maximum ...

Page 81: ...t OFF Make Edits Compatible Needed 4 To enter a disc name follow the steps of Guide to Edit Title Name on page 74 When you finish entering a title name press OK 5 Use K L to select Yes then press OK Edit Disc Name 0 00 00 MY FAVORITE DISC No Yes No Disc Name Disc DVD RW Total Titles 3 Disc Space Used 0 30 48 Disc Protect OFF Make Edits Compatible Needed The name you entered will be activated for t...

Page 82: ...OK e g DVD RW Disc Edit Disc Protect OFF ON Erase Disc Make Edits Compatible Edit Disc Name 3 Use K L to select Yes then press OK Disc Protect OFF ON No Yes Data will be written onto the disc momentarily This operation may take a while to be completed To prevent accidental editing or erasing the titles you can protect them E7C40UD indd 82 E7C40UD indd 82 2007 01 15 11 20 17 2007 01 15 11 20 17 ...

Page 83: ... on Disc on page 81 to display Disc Edit menu 2 Use K L to select Disc Protect ON OFF then press OK e g DVD RW Disc Edit Disc Protect ON OFF Erase Disc Make Edits Compatible Edit Disc Name 3 Use K L to select Yes then press OK Disc Protect ON OFF No Yes Data will be written onto the disc momentarily This operation may take a while to be completed E7C40UD indd 83 E7C40UD indd 83 2007 01 15 11 20 17...

Page 84: ... Make Edits Compatible Edit Disc Name 3 Use K L to select Yes then press OK Erase Disc Yes No When you press Yes all the contents in the disc will be erased Are you sure to erase the disc Data will be written onto the disc momentarily This operation may take a while to be completed You can erase all titles on a disc Note When you select Yes at step 3 all contents of the disc will be erased E7C40UD...

Page 85: ... Make Edits Compatible then press OK Disc Edit Disc Protect OFF ON Erase Disc Make Edits Compatible Edit Disc Name 3 Use K L to select Yes then press OK Make Edits Compatible Yes No Data will be written onto the disc momentarily This operation may take a while to be completed If you have added or deleted chapters or made chapters hidden you must perform Make Edits Compatible to see those effects o...

Page 86: ...n Font Opacity Page 34 Solid Translucent Flash Set font opacity of the displayed caption Font Color Page 34 Transparent White Black Set font color of the displayed caption Back Opacity Page 34 Solid Translucent Flash Set back opacity of the displayed caption Back Color Page 34 Transparent White Black Set back color of the displayed caption HDMI Format Page 89 RGB YCbCr Set color space for the HDMI...

Page 87: ...the screen saver starts FL Dimmer Page 94 Auto Bright Dark Set the brightness of the front panel display Recording Auto Chapter Page 36 OFF 5 minutes 10 minutes Insert chapter marks every set time interval Auto Finalize Page 52 Disc Full ON OFF Set the unit to finalize the disc automatically End of Timer Rec ON OFF Replace Disc Menu Page 36 ON OFF Make the discs recorded on other unit recordable o...

Page 88: ...esired item then press OK Video Input TV Aspect Required Settings TV Audio Select Stereo 4 3 Letter Box CC Style HDMI 3 1 4 5 2 Submenu will appear 4 Refer to 1 to 2 on page 89 and set the selected item For 3 refer to page 45 For 4 refer to pages 31 For 5 refer to page 32 34 5 When you finish with setting press SETUP to exit SETUPS Required Setting E7C40UD indd 88 E7C40UD indd 88 2007 01 15 11 20 ...

Page 89: ...MI output Set the appropriate color space for your display device Use K L to select a setting then press OK When the connected device is not compatible with the Y Cb Cr HDMI signal is output as RGB regardless of the setting RGB YCbCr Format Your setting will be activated HDMI Audio Default ON If you do not want to output the audio through HDMI when you digitally output the audio through the COAXIA...

Page 90: ...ired Settings 3 Use K L to select a desired item then press OK Playback Video Disc Audio Parental Lock OFF Language DivX VOD 1 2 3 4 5 Submenu will appear 4 Refer to 1 to 4 on pages 91 93 and set the selected item For 5 refer to page 69 5 When you finish with setting press SETUP to exit SETUPS Playback E7C40UD indd 90 E7C40UD indd 90 2007 01 15 11 20 21 2007 01 15 11 20 21 ...

Page 91: ... and loud sounds Use K L to select a setting then press OK Dynamic Range Control OFF ON Your setting will be activated Note Dynamic range control function is available only on the discs which are recorded in the Dolby Digital format 2 Video Default Progressive Scan Use K L to select a desired item then press OK Video Progressive Scan Still Mode Auto OFF Progressive Scan Default OFF This unit is co...

Page 92: ...French Spanish Other Original Your setting will be activated When Original is selected the audio language will be in the disc s default language Subtitle Default OFF Set the subtitle language Use K L to select a setting then press OK Language Subtitle OFF French Spanish Other English Your setting will be activated DivX Subtitle Default OFF Set the DivX subtitle Use K L to select a setting then pre...

Page 93: ...se you forget it If there is a DVD in the unit when you set up the parental lock press OPEN CLOSE A to activate the parental lock level A A password has not been set yet Use K L to select Yes Use the Number buttons to enter a new password except for 4737 then press OK Parental Lock Yes No Change password Parental Lock Password Input Yes Your setting will be activated B A password has been set alre...

Page 94: ...ing will be activated Screen Saver Default 10 minutes Set the time to work the screen saver function on the TV screen Use K L to select a setting then press OK Screen Saver 5 minutes 10 minutes OFF 15 minutes 30 minutes Your setting will be activated FL Dimmer Default Bright Set the front panel display brightness Use K L to select a setting then press OK FL Dimmer Bright Dark Auto You can choose o...

Page 95: ...nna Adjust the picture Refer to the TV s instruction manual Place the unit and TV farther apart Place the TV and any bunched RF coaxial cables farther apart TV channels cannot be changed Switch the input to TV Connect the RF coaxial cable correctly page 13 15 Playback picture is distorted Keep the device which may cause electrical disturbances such as a cellular phone away No analog TV closed capt...

Page 96: ...nd track cannot be changed Multilingual tracks are not recorded being played back The DVD video prohibits the changing of the language for the sound track Try changing the language using the DVD video s menu The subtitle language cannot be changed or turned off Multilingual subtitle are not recorded on the DVD video The DVD video prohibits changing of the subtitles Try changing the subtitle using ...

Page 97: ...her than OFF If you connected component video cable to your TV which is not compatible with progressive scan the distorted picture will be output Press HDMI to set the HDMI output mode to OFF No image from HDMI connection Check the HDMI connection Check the status of the HDMI related indications Check whether the connected monitor device or other device supports HDCP This unit will not output a vi...

Page 98: ...ding Error Disc is full No area for new recording You are trying to record onto the disc which has no space for recording Insert the recordable disc with enough recording space Recording Error You cannot record more than 49 titles on one disc The maximum is 49 You are trying to record onto the disc on which the number of recording titles comes up to the maximum 49 Delete unnecessary titles page 73...

Page 99: ...nel using a cable satellite box It depends on your connection configurations For more details please kindly contact your cable satellite provider Can I connect this unit directly to a TV which only has an antenna in jack using an RF coaxial cable No You need an RF modulator commercially available to connect this unit to a TV which only has an antenna in jack page 14 This unit does not have an RF m...

Page 100: ...1 Kirundi 6460 Korean 5761 Kurdish 5767 Laothian 5861 Latin 5847 Latvian Lettish 5868 Lingala 5860 Lithuanian 5866 Macedonian 5957 Malagasy 5953 Malay 5965 Malayalam 5958 Maltese 5966 Maori 5955 Marathi 5964 Moldavian 5961 Mongolian 5960 Nauru 6047 Nepali 6051 Norwegian 6061 Occitan 6149 Oriya 6164 Oromo Afan 6159 Panjabi 6247 Pashto Pushto 6265 Persian 5247 Polish 6258 Portuguese 6266 Quechua 636...

Page 101: ... and play back the files on this unit PBC playback control video CD only This function enables you to play back interactive software using a menu screen See also Video CD PCM pulse code modulation The most common system of encoding digital audio found on CD and DAT Excellent quality but requires a lot of data compared to formats such as Dolby Digital and MPEG audio For compatibility with digital a...

Page 102: ...zed tuning system Channel coverage ATSC NTSC Terrestrial CATV VHF 2 13 UHF 14 69 2 13 A W W 1 W 94 analog W 1 W 84 A 5 A1 5A Terminals Front Audio input RCA jack x 2 2V rms input impedance more than 22kΩ Video input RCA jack x 1 1Vp p 75Ω S video input Mini DIN 4 pin x 1 Y 1Vp p 75Ω C 286mVp p 75Ω DV input DV 4 pin jack x 1 IEEE 1394 Rear VHF UHF CATV input and output F type 75Ω unbalanced Audio i...

Page 103: ...lation of programs data or other information is not covered under this Limited Warranty This warranty does not apply a to damage caused by accident abuse misuse misapplication or non Philips product b to damage caused by service performed by anyone other than Philips or Philips Authorized Service Location c to a product or a part that has been modified without the written permis sion of Philips or...

Page 104: ... Philips Electronics North America Corp P O Box 671539 Marietta GA 30006 0026 Meet Philips at the Internet http www philips com usasupport Printed in China JpnCN 0702 37 3 1VMN23366 E7C40UD DVDR3505 37 8239 300 53242 E7C40UD indd 104 E7C40UD indd 104 2007 01 15 11 20 31 2007 01 15 11 20 31 ...

Reviews: