background image

E

ng

l

i

sh

64

Setup Menu Options

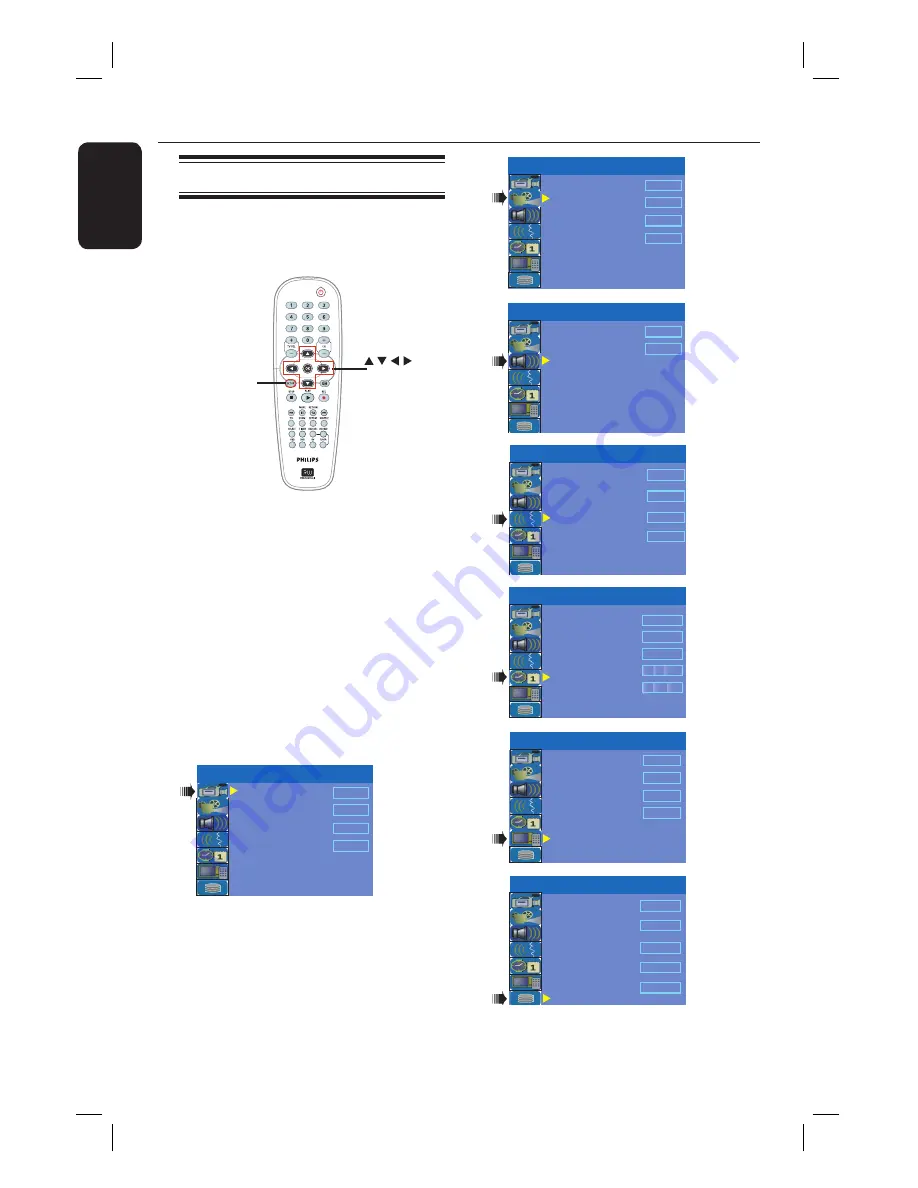
Accessing the Setup Menu

The setup menu provides various options
for you to adjust the recorder to suit
your preferences.

SETUP

OK

A

 Press 

SETUP

 on the remote control.

 The setup menu appears on TV.

B

 Use 

 keys to highlight a setup option 

and press   to access.

C

 Use 

 keys to highlight the setting you 

wish to change and press 

OK

 to confi rm 

and go back to the previous menu item.

 Instructions and explanation of the

options are provided in the following
pages.

D

 To exit, press 

SETUP

.

Record Quality

Auto Program

Manual Program

SP

Search

Edit

Auto Chapter Marker

5min.

SETUP MENU - GENERAL

TV Shape

Progressive Scan

DivX(R) Video on Demand 

4:3 LB

TV System

NTSC

Off

OK

SETUP MENU - VIDEO


SETUP MENU - AUDIO

LPCM Output 

LPCM 96Hz

SPDIF Output 

RAW

Audio Language

Subtitle Language

Off

System Language

Disc Menu Language

English

English

SETUP MENU - LANGUAGE

English

S

ETUP MENU - DATE / TIME

Time(hh:mm)

Daylight 

S

aving

Date(mm/dd/yyyy)

Time Zone

Date -Time 

S

etting

Auto

Pa

c

ifi

c

Off

12  31  2005

10  :  33  AM

SETUP MENU - PREFERENCES

Change Password

Reset Menu Settings

Screensaver

OK

Parental Level

Off

OK

On

HDD Info 

Space Management

Automatic

Save Time Shift Buffer 

Delete HDD

Delete Optical Disc 

No

SETUP MENU - HDD

Show

OK

OK

Pages 
25, 33

Page 65

Page 67

Page 27

Page 27

Page 66

Page 31

Summary of Contents for DVDR3350H

Page 1: ...Hard Disk DVD Recorder DVDR3350H User Manual HTR5000 Digital A V Surround Receiver DVD Recorder pages 1 75 A V Receiver pages 76 101 ...

Page 2: ...uarantees that your date of purchase will be on file so no additional paperwork will be required from you to obtain war ranty service Product Safety Notification By registering your product you ll receive notification directly from the manufacturer in the rare case of a product recall or safety defect Additional Benefits Registering your product guar antees that you ll receive all of the privilege...

Page 3: ...when moving the cart apparatus combination to avoid injury from tip over 13 Unplug this apparatus during lightning storms or when unused for long periods of time 14 Refer all servicing to qualified service personnel Servicing is required when the apparatus has been damaged in any way such as power supply cord or plug is damaged liquid has been spilled or objects have fallen into the apparatus the ...

Page 4: ... ejecucción de métodos que no sean los aquí descritos puede ocasionar peligro de exposición a radiación CONSUMERS SHOULD NOTE THAT NOT ALL HIGH DEFINITION TELEVISION SETS ARE FULLY COMPATIBLE WITH THIS PRODUCT AND MAY CAUSE ARTIFACTS TO BE DISPLAYED IN THE PICTURE IN CASE OF 525 OR 625 PROGRESSIVE SCAN PICTURE PROBLEMS IT IS RECOMMENDED THAT THE USER SWITCH THE CONNECTION TO THE STANDARD DEFINITIO...

Page 5: ...ks of Gemstar Development Corporation TheVCR Plus system is manufactured under license from Gemstar Development Corporation US patent Nr 6 466 734 6 430 359 6 091 882 6 049 652 5 335 079 5 307 173 4 908 713 4 751 578 4 706 121 NOTE This equipment has been tested and found to comply with the limits for a Class B digital device pursuant to Part 15 of the FCC Rules These limits are designed to provid...

Page 6: ...tional Connections 19 Connecting to a Cable Box or Satellite Receiver 20 Connecting to a VCR or other similar device 21 Connecting to a VCR and Cable Box Satellite Receiver 22 Connecting a camcorder to the front jacks 23 Step 3 Installation and Setup 24 Finding the viewing channel 24 Setting your TV channel programs 24 GENERAL settings 25 Setting the language 26 Setting the time date 26 LANGUAGE s...

Page 7: ...49 Changing to another title chapter track 49 Pausing playback and step play 49 Searching forward backward 49 Zooming in 49 Using m INFO options 50 Edit Recordings Edit Recordings HDD 53 About HDD title edit menu 53 Accessing the HDD title edit menu 53 Edit Recordings Recordable DVD 56 About disc edit menu 56 Accessing disc editing menu 56 Playing your recordings DVD R DVD RW on other DVD players ...

Page 8: ...u can pause the program by pressing PAUSE button and resume playback at the scene it was interrupted by pressing PLAYÉ button To return to the live TV program press and holdÉ Direct Recording to DVD This feature enables you to record content directly on to a recordable DVD disc Press DVD REC button on the remote control to activate direct recording to the recordable DVD disc This is a simple progr...

Page 9: ...are Titles and Chapters A DVD disc contains Titles and Chapters which are similar to the Titles and Chapters of a book A Title is often a complete movie and is broken down into Chapters or individual scenes from the movies Title Chapter Title Chapter Chapter Chapter Chapter chapter markers A program is recorded as a single title it may consist of one chapter or a few chapters within a title depend...

Page 10: ...ources of danger on the apparatus e g liquid filled objects lighted candles Cleaning discs Some problems occur because the disc inside the recorder is dirty frozen picture sound disruptions picture distortions To avoid these problems discs should be cleaned on a regular basis To clean a disc use a micro fibre cleaning cloth and wipe the disc from the center to the edge in a straight line CAUTION D...

Page 11: ...ou have any questions or if problems occur during operation see the chapter Troubleshooting If you need further assistance please call the customer support service for your country The corresponding telephone numbers and e mail addresses are given in the guarantee booklet Refer to the type plate on the rear or bottom of the product for identification and supply ratings Accessories supplied Remote ...

Page 12: ...screen help text f PLAYÉ Plays a disc g REC Starts recording the current TV channel or the current video input source h Skips to previous or next Chapter Track i RETURN Returns to the previous menu of a video CD VCD or some DVDs j SHUFFLE Switches to random playback of an audio CD Video CD VCD picture CD or DVD disc In HDD title menu select to sort the titles k REPEAT Select to repeat title playba...

Page 13: ...es the playback or recording Pauses Live TV viewing t ZOOM Enlarges a picture on the TV screen u T C Displays title chapter information v SELECT Selects a track chapter file in the program menu In HDD title menu marks titles for copying to a DVD recordable disc w TIMER Enters exits the timer recording menu x HDD Enters the HDD content menu y DVD Switches to disc mode or displays the disc content m...

Page 14: ...te control is not to be used for a long time Do not mix batteries old and new or carbon and alkaline etc Batteries contain chemical substances so they should be disposed of properly Using the remote control to operate the system A Aim the remote control directly at the remote sensor iR on the front panel B Select the source you want to control by pressing the TUNER HDD or DVD button on the remote ...

Page 15: ...or next chapter track or hold down the button to make a reverse forward search Stops playback recording Jacks behind the flap Flip down the door as indicated by the OPENÉ label at the right hand corner h S VIDEO S video input for SVHS Hi8 camcorders or SVHS Hi8 video recorders In tuner mode press SOURCE on the remote control repeatedly to select CAM2 when using this input source i VIDEO Video inpu...

Page 16: ... only see page 19 for the complete connection to your TV If you want to connect to a VCR and or Cable Box Satellite Receiver see page 20 22 for the complete connection to your TV A Connect the existing Antenna Cable TV signal or from the Cable Box Satellite Receiver RF OUT or TO TV to the ANTENNA jack on the recorder B Use the supplied RF coaxial cable to connect the TV jack on the recorder to the...

Page 17: ... the recorder to the video input jack or labeled as A V In Video In or Composite on the TV Option 2 Using S Video jack excellent picture quality Use an S video cable not supplied to connect the S VIDEO Y C OUT2 jack on the recorder to the S Video input jack or labeled as Y C or S VHS on the TV Option 3 Using ComponentVideo jack best picture quality A Use the component video cables red blue green n...

Page 18: ... AV amplifier receiver Option 1 Option 2 Option 2 Using a Coaxial cable You can connect the recorder to an AV amplifier receiver in order to enjoy multichannel surround sound Use a coaxial cable not supplied to connect the COAXIAL jack to the digital input on the AV amplifier receiver with a digital multi channel sound decoder Before you start operating set the audio settings accordingly see page ...

Page 19: ...ack on the RF modulator to the antenna input jack on your TV D Use the supplied AV cables yellow ends to connect the VIDEO CVBS OUT2 jack on the recorder to the video input jack or labeled as A V In Video In Composite or Baseband on the RF modulator E Use the supplied AV cables red white ends to connect the AUDIO L R OUT2 jacks on the recorder to the audio input jack or labeled as AUDIO IN or LINE...

Page 20: ...e Box Satellite Receiver has video audio output jacks A Keep the existing antenna connection from the Cable Box Satellite Receiver to your TV B Use the supplied RF coaxial cable to connect the ANTENNA jack on the recorder to the RF OUT jack on the Cable Box Satellite Receiver C Use a RF coaxial cable to connect the TV jack on the recorder to the antenna input jack on your TV VHF UHF RF IN D Use th...

Page 21: ...er is turned off IMPORTANT Your new recorder can replace the VCR for all your recording needs Just unplug all the connections to your VCR A Connect the Antenna Cable TV signal to the ANTENNA jack on the recorder B Use a RF coaxial cable to connect the TV jack on the recorder to the antenna input jack on your TV VHF UHF RF IN C Use the audio video cables to connect the VIDEO AUDIO EXT1 on the recor...

Page 22: ...the ANTENNA jack on the recorder to the RF OUT jack on the Cable Box Satellite Receiver C Use a RF coaxial cable to connect the TV jack on the recorder to the antenna input jack on your TV VHF UHF RF IN D Use the supplied audio video cables to connect the VIDEO AUDIO EXT1 jacks on the recorder to the matching VIDEO AUDIO output jacks on the Cable Box Satellite Receiver E Use the audio video cables...

Page 23: ... to select DV as the input channel For recording see pages 29 39 Helpful Hints The DV IN jack does not support a connection to a Personal Computer It is not possible to record from the recorder to your camcorder via the DV IN jack on your recorder Option 2 Using the S VIDEO In or VIDEO In jack Use the S VIDEO connection if you have a Hi8 or S VHS C camcorder It provides good picture quality Altern...

Page 24: ...u may go to channel 1 on your TV then press the Channel down button repeatedly until you see the Video In channel Or the TV remote control may have a button or switch that chooses different video modes Or set the TV to channel 3 or 4 if you are using a RF modulator Setting yourTV channel programs Before the recorder can start recording any TV channel programs you need to search for the available T...

Page 25: ...ghlight OK CONTINUE and press OK The automatic TV channel search will start This process may take several minutes Once complete the total number of channels found will appear on the TV Select to modify your preset TV channels A Use keys to highlight Manual Program Edit and press The modify channel options will be displayed B Use keys to one of the options and press Name Use CH CH to select by the ...

Page 26: ...stemLanguage DiscMenuLanguage English English SETUP MENU LANGUAGE English C Use keys to highlight one of the options and press See next page for details D Use keys to highlight the desired setting and press OK to confirm Setting the time date This recorder has an automatic date and time setting feature The date and time settings are set according to the broadcast channel information of preset Prog...

Page 27: ...me Zone Daylight Saving Date mm dd yy Time hh mm The basic installation is now complete This recorder is ready for use You can choose to activate deactivate the automatic setting of date and time Auto Select to activate automatic setting of date and time The date and time setting will be updated according to the broadcast channel information of preset Program Number 1 Manual Select this to manuall...

Page 28: ...AM 07 15 36 AM For more information about the temporary HDD storage Time Shift Buffer see next page Pause liveTV function You may be interrupted whilst watching your favourite TV program You can pause the show by pressing PAUSEÅ and pressing PLAYÉ to resume playback of the program at the scene it was interrupted You can pause the live TV broadcast up to a maximum period of 3 hours It behaves exact...

Page 29: ...inning will be deleted and the start time will be updated accordingly c Status of source of video input LIVE or the time of current playback being viewed HH MM SS d Icon which shows the status of the time shift buffer playback of content stored in the time shift buffer marks the beginning of content recording marks the current recording in progress the current screen has been paused from playback ...

Page 30: ...SETUP OK A Press SETUP The system setup menu appears B Use keys to highlight SETUP MENU HDD and press to access the menu HDDInfo SpaceManagement Automatic SaveTimeShiftBuffer DeleteHDD DeleteOpticalDisc No SETUP MENU HDD Show OK OK C Use keys to highlight the option and press to access its options D To exit press Before Recording continued TIPS Press to go back to previous menu item Press SETUP to...

Page 31: ... the recorder will proceed to overwrite any unprotected recordings in the HDD The oldest unprotected recordings will be deleted first Manual During recording when the HDD is full recording will be stopped A warning message The hard disk is full Please erase some programs to allow further recording will appear on the screen This option will erase all marked unmarked recordings on the HDD This optio...

Page 32: ...r markers within a title during recording This allows you to access specific points on the recording A Use keys to highlight Auto Chapter Marker and press to access its options B Use keys to select your preferred setting C Press OK to confirm Default Recording Quality The setting defines the picture quality of recordings and the maximum recording time on the HDD Important When copying from the HDD...

Page 33: ...uring recording at every 20 minutes interval 30 mins Chapter markers are inserted during recording at every 30 minutes interval Off The feature is disabled Select this option to preset your preferred mode of record quality Press to access the menu and use keys to select one of the options Hours of Recording that can be stored Record Quality 1 2 2 5 3 4 6 17 34 42 5 51 68 102 HQ High Quality SP Sta...

Page 34: ...cording C Press RECâ on the remote control to start recording To cancel press and hold SELECT To save all current programs stored in the time shift buffer press and hold RECâ D To stop recording press STOPÇon the remote control To record directly to a DVD recordable disc see page 37 Recording from a DV camcorder You can record video directly from a connected DV camcorder onto the HDD where you can...

Page 35: ...rdable disc see page 37 Recording from an external device Camcorder VCR DVD player A copy protection system has been built into this recorder to prevent the transfer of data from pre recorded DVDs or other copy protected material onto the recordable DVD You can only store the contents in the temporary HDD storage of this recorder Note Set the preferred mode of record quality before proceeding see ...

Page 36: ...ice press PAUSE Å To continue press PLAY again You can use this function to avoid any unwanted recording G To stop the recording before the scheduled ending press STOPÇ To record directly to a recordable DVD disc see page 37 Record on Hard Disk continued TIPS Set the appropriate mode of record quality for HDD recording the same record quality will be transferred from HDD to a recordable DVD see pa...

Page 37: ...rd Play Plus LP Long Play EP Extended Play SLP Super Long Play The following information will be stored on the disc Title name of recording Date of recording Time of recording Record quality mode length of recording Index picture of title Discs for recording There are several formats of DVD recordable discs which can be used with this recorder DVD RW DVD ReWritable discs Discs that are rewritable ...

Page 38: ...SP NTSC 001 CH001 CH003 CH009 CH004 CH002 CH008 002 003 004 005 006 Date Time No Ch Title 05 14 05 05 20 05 04 25 05 04 30 05 03 28 05 04 12 05 02 00 PM 04 00 PM Travel Nature News Drama News Title 3 03 30 PM 08 30 PM 08 30 PM 11 00 AM 1 Press SELECT to mark or unmark recordings 2 Press HDD to copy selected recordings to DVD Press SHUFFLE to sort by title CH012 007 05 08 05 News 08 30 PM CH010 008...

Page 39: ...nd AUDIO L R jacks on the front panel EXT 1 Input source from the device connected to the VIDEO CVBS IN EXT and AUDIO L R jacks on the back panel OR Press DV to record from the DV camcorder connected to the DV IN jack on the front panel E Press SELECT to toggle between the different modes of record quality Hours of Recording that can be stored Record Quality 1 2 2 5 3 4 6 17 34 42 5 51 68 102 HQ H...

Page 40: ...is number in your TV listings magazine All the information needed by the recorder for programming is contained in the programming number A Turn on the TV power Select the correct Video In channel at the TV If you are recording directly to a DVD disc insert the DVD recordable disc before proceeding to step B B Press TIMER on the remote control The timer schedule list appears 1 2 3 4 5 6 Source Rec ...

Page 41: ...s to select the recording input source Rec To Use keys to select HDD or DVD to enter the recording destination Rec Mode Use keys to select your option Mode Use keys to select Once Daily or Weekly recordings Date Use keys or the numeric keypad 0 9 to enter the date for recording Start Use keys or the numeric keypad 0 9 to enter the start time of recording End Use keys or the numeric keypad 0 9 to e...

Page 42: ... 0 5 1 0 3 3 P M 1 1 0 3 P M Title M y T i t l e 01 Rec Mode SP OK OK OK CANCEL E Use keys to select an entry in the menu and press to enter its options Source Use keys to select the recording input source Rec To Use keys to select HDD or DVD to enter the recording destination Rec Mode Use keys to select your option Mode Use keys to select Once Daily or Weekly recordings Date Use keys or the numer...

Page 43: ...as the input channel and press OK to confirm C Keep the Satellite Receiver Cable Box switched on for the recording D Press STANDBY ON 2 to turn off the recorder TIPS Set the appropriate mode of record quality for HDD recording the same record quality will be transferred from HDD to a recordable DVD Timer Recording continued Changing Deleting a timer recording A Turn on the TV power Select the corr...

Page 44: ...ama News Title 3 03 30 PM 08 30 PM 08 30 PM 11 00 AM 1 Press SELECT to mark or unmark recordings 2 Press HDD to copy selected recordings to DVD Press SHUFFLE to sort by title CH012 007 05 08 05 News 08 30 PM CH010 008 06 30 05 Discover 10 30 PM C During playback you can use the following keys on the remote control to access additional playback features STOP PLAY PAUSE ZOOM 00 38 36 01 15 30 00 00 ...

Page 45: ... with regional restrictions Before playing a disc make sure the disc is for the same region as your player Do not push on the disc tray or put any objects other than discs on the disc tray It may cause the disc player to malfunction Inserting a disc A Press STANDBY ON 2 to turn on the recorder B Press OPEN CLOSE ç on the front of the recorder The disc tray opens C Carefully place the disc onto the...

Page 46: ...to toggle bewteen Title Chapter or Time Use the numeric keypad 0 9 to input your selection of title chapter number or specific time during playback B To stop playback press STOP Playing a Super Video CD Super Video CDs may feature PBC Play Back Control This allows you to play the video CDs interactively following the menu on the display A Insert a Super Video CD If the PBC is on the disc index men...

Page 47: ...ert a MP3 CD The disc content menu appears File Play Stop0 00 00 0 00 00 Directory Playlist Bee Gees Phil Collins Bryan Adams Collin Raye Nat King Cole UB40 Jordan Hill Faith Hill 1 2 3 4 5 6 7 8 Note It may require a longer time for the recorder to display the disc content menu on the TV due to the large number of songs pictures compiled into one disc B Use keys to navigate within the menu and pr...

Page 48: ... JPG BUTTER 1 JPG P1022500 JPG P1023000 JPG MERLIO 1 JPG 1 2 3 4 5 6 7 8 If the disc contains MP3 music and JPEG picture files you can start a musical slide show playback Select an MP3 file and press OK to start playback then select a picture file in the menu and press OK to start the musical slide show playback E During playback you can press m on the remote control to access various settings for...

Page 49: ...forward or fast reverse a disc at two four sixteen or thirty two times the normal playback speed A During playback press and hold fast reverse or fast forward to switch to the search function B During disc playback press RIGHT to access the playback menu Use keys to highlight Trick Mode Play and press RIGHT to access the search speed options FREV x32 FREV x16 FREV x4 FREV x2 FFWD x2 FFWD x4 FFWD x...

Page 50: ...eys to select one of the repeat options Normal Select this to cancel the repeat mode and return to normal playback Repeat A B Select this to repeat the playback of a specific segment within a title chapter track Press OK to mark the start and end of the segment you want to repeat Repeat Chapter Select this to repeat playback of the current chapter DVD recordable DVDs only Repeat Track Title Select...

Page 51: ...the track file chapter to program and press SELECT on the remote control To start program play F Press key to move to the right screen and press OK Playback will start from the selected track file chapter according to the programmed sequence To exit program play G Press STOP to exit program play Changing the audio soundtrack language This operation works only on DVDs with multiple soundtrack langu...

Page 52: ...Switching camera angles This option is only available with DVDs that contain sequences recorded from different camera angles This allows you to view the picture from different angles A Press m on the remote control The playback menu appears B Use keys to select Angle and press to enter its options The camera angles available for selection appears C Use keys to select the camera angle you want to s...

Page 53: ...ppears B Use keys to highlight a title recording and press The HDD title edit menu appears 001 CH001 CH003 CH009 CH008 CH002 CH008 002 003 004 005 006 Date Time No Ch Title HDD 05 14 05 05 20 05 04 25 05 04 30 05 03 28 05 04 12 05 02 00 PM 04 00 PM Travel Nature News Drama CSI Title 3 03 30 AM 08 30 PM 08 30 PM 01 15 PM 11 00 AM Press OK to play title Press SELECT to mark or unmark recordingS Pres...

Page 54: ...ain to mark the end of segment to hide To hide more segments repeat steps B to C for each segment you want to hide To unhide the scenes D In HDD title edit mode use keys to highlight Edit Title and press OK The edit title playback screen appears E During playback use keys to navigate through the title Press OK at the beginning of the marked segment F Press repeatedly until you reach the end of the...

Page 55: ...the keyboard and press OK The info panel is now updated To exit select Exit on the keyboard and press OK Lock Unlock a title You can choose to lock a title to prevent any unauthorized playback of the recording If a title has been locked the user will be prompted to enter a 4 digit password preset in the system setup menu For details see Parental Rating Level In HDD title edit mode use keys to high...

Page 56: ...ecording and editing to the disc are not allowed It is not possible to unfinalize the disc Lock Unlock Disc DVD RWs only Lock or unlock a disc to prevent accidental erasure or changes being made Unfinalize DVD RWs only Unfinalize a DVD RW disc to allow more recordings Accessing disc editing menu OK REC DVD A Insert a recorded DVD R RW disc into the recorder The Index Picture screen appears on the ...

Page 57: ...ated To exit select Exit on the keyboard and press OK Erase disc DVD RWs only This erases the content of the DVD RW disc including those that was not recorded on this recorder Once the existing content is erased it can be used for recording A In disc editing menu use keys to select Erase Disc and press OK A warning message will appear B Select OK YES in the menu to proceed or OK NO to abort then p...

Page 58: ...ly playback on this recorder After a DVD R disc has been finalized no further recordings or editing can be made to it Make sure you have completed all the recordings and editing before finalizing the disc A In disc editing menu use keys to select Finalize Disc and press OK A warning message will appear B Select OK YES in the menu and press OK to start the process Finalization will take a few minut...

Page 59: ...ecording Accessing DVD title edit menu A Insert a recorded DVD R RW disc into the recorder The Index Picture screen appears on the TV During playback press DVD to access the Index Picture screen B Use keys to highlight a title recording and press The title editing menu appears 3 My movie 11 04 2004 12 31 53 HQ 00 05 59 Edit Title Rename Title Erase Title Overwrite Title Play Title Overwrite Disc A...

Page 60: ...lect OK YES in the menu to proceed or OK NO to abort then press OK to confirm Overwrite title DVD RW only This function allows you to record a new title from the beginning of the current title in the DVD RW disc A In title editing menu use keys to select Overwrite Title and press OK B Select the source you want to record from and press REC to start recording Overwrite from the selected title You c...

Page 61: ...dex Picture Select a scene in the recording as the index picture screen Split Title Divide the recording into two under separate titles Edit Recordings Recordable DVD continued Accessing video editing menu DVD PLAY OK SELECT A Insert a recorded DVD R RW disc into the recorder The Index Picture screen appears on the TV B Use keys to highlight a title recording and press to access the menu The title...

Page 62: ...ing chapter marker at any point within a title during playback This will allow you to access a specific point in the recording easily or set a chapter you wish to hide Title Chapter Chapter Chapter Chapter chapter markers A In edit mode use keys to select Chapter Marker and press OK B Use keys to select one of the options and press OK to confirm Insert Marker Select this to insert a new chapter ma...

Page 63: ...deo editing mode Changing Index Picture The index picture is the picture of the title you will see when the recorder loads up the Index menu Normally the first frame of a recording is shown as the title s index picture A In edit mode use keys to select Index Picture and press OK The display will be in playback mode B Use keys on the remote control to search for the scene to use then press OK to co...

Page 64: ...Manual Program SP Search Edit Auto Chapter Marker 5min SETUP MENU GENERAL TV Shape Progressive Scan DivX R Video on Demand 4 3 LB TV System NTSC Off OK SETUP MENU VIDEO SETUP MENU AUDIO LPCM Output LPCM 96Hz SPDIF Output RAW AudioLanguage SubtitleLanguage Off SystemLanguage DiscMenuLanguage English English SETUP MENU LANGUAGE English SETUP MENU DATE TIME Time hh mm DaylightSaving Date mm dd yyyy T...

Page 65: ...S For a full height picture with sides trimmed 16 9 WS For wide screen TV frame ratio 16 9 Progressive scan delivers a higher picture quality than the standard interlaced TV channel scan It only works when you have connected the recorder s Y Pb Pr jacks to your TV that supports the progressive video input Otherwise the image may not appear or will be distorted Please check your TV user manual for ...

Page 66: ...lt guardian 7 NC 17 No children under age 17 not recommended viewing for children under age 17 8 Adult Mature material should be viewed only by adults due to graphic sexual material violence or language Off Parental Control is not active DVDs that are rated higher than the level you have selected will not play unless you enter your four digit pin code This option allows you to change your password...

Page 67: ...is capable of processing digital signal input with sampling rates of 96 kHz In addition the disc you are playing back must be recorded in 96kHz LPCM format SPDIF Output LPCM Output PREFERENCES settings underlined options are the factory default settings Press to reset the menu settings of this recorder A warning message will appear Select OK OK in the menu to proceed or OK CANCEL to abort then pre...

Page 68: ...s continuously refined for greater stability and compatibility of the recorder Caution Power supply must not be interrupted during upgrade Visit Philips website at www philips com usasupport to check for the availability of the latest firmware upgrade Note When checking for the latest firmware upgrade please also check for any accompanying instructions on installing the firmware ...

Page 69: ...e control Batteries are weak replace the batteries Turn on your TV and set to the correct Video In channel for the recorder You may go to Channel 1 on your TV then press the channel down button on your TV s remote control until you see the TV program Check the video connection between the recorder and the TV Check the recorder audio connections Read chapter Basic Recorder Connections Connecting th...

Page 70: ...want to record is not stored or you selected the wrong program number Check the TV channels stored You have to reset the timer recording after adjusting the clock setting You cannot use the recorder to duplicate copy protected materials DVDs or videotapes onto a DVD recordable disc The hard disk could be full Delete some titles to create space for new recordings 1 Enter the VCR Plus programming nu...

Page 71: ...ecordable disc has a limited recording lifetime please change a new disc for recording The requested action requires that the time shift buffer temporary HDD storage to be cleared All contents that were not marked for recording will be deleted Reselect the Delete HDD option and delete the HDD contents again The titles that were previously recorded will be deleted and the space used for recording c...

Page 72: ...ncement Progressive Scan Audio Performance DA Converter 24 bit 192 kHz AD Converter 24 bit 96 kHz Signal Noise 1kHz 100 dB Dynamic range 1kHz 95 dB Crosstalk 1kHz 105 dB Tuner Reception Transmission TV System NTSC Aerial input 75 Ohm coaxial IEC75 Storage Media Recording DVD R DVD RW DVD R DVD RW Hard Disk Capacity 80GB HDD recording enhancements Instant Replay Time Shift Buffer Extra Hard Disk Te...

Page 73: ...ing JPEG A very common digital still picture format A still picture data compression system proposed by the Joint Photographic Expert Group which features small decrease in image quality in spite of its high compression ratio MP3 A file format with a sound data compression system MP3 is the abbreviation of Motion Picture Experts Group 1 or MPEG 1 Audio Layer 3 By using the MP3 format one CD R or C...

Page 74: ...rs The disc is being formatted or data is being written to it MENU The system setup menu disc menu title menu or timer menu display is on HDDMENU The hard disk menu display is on NO DISC No disc has been inserted If a disc has been inserted then it is possible that the disc cannot be read NOSIGNAL No signal or poor signal strength OPEN Disc tray is opened or opening PRO SCAN Lights up when progres...

Page 75: ...llation of programs data or other information is not covered under this Limited Warranty This warranty does not apply a to damage caused by accident abuse misuse misapplication or non Philips product b to damage caused by service performed by anyone other than Philips or Philips Authorized Service Location c to a product or a part that has been modified without the written permis sion of Philips o...

Page 76: ...English DIGITAL A V SURROUND RECEIVER HTR5000 DIGITAL A V SURROUND RECEIVER HTR5000 ...

Page 77: ...ch is locat ed on the rear of the cabinet Retain this information for future reference Model No __________________________ Serial No ________________________ Know these safetysymbols This bolt of lightning indicates unin sulated material within your unit may cause an electrical shock For the safety of everyone in your household please do not remove product covering The exclamation point calls atte...

Page 78: ...the apparatus When a cart is used use caution when moving the cart apparatus combination to avoid injury from tip over 13 Unplug this apparatus during lightning storms or when unused for long periods of time 14 Refer all servicing to qualified service personnel Servicing is required when the apparatus has been damaged in any way such as power supply cord or plug is damaged liquid has been spilled ...

Page 79: ...H THIS MODEL 525p AND 625p DVD PLAYER PLEASE CONTACT OUR CUSTOMER SERVICE CENTER CAUTION INVISIBLE LASER RADIATION WHEN OPEN DO NOT STARE INTO BEAM DANGER INVISIBLE LASER RADIATIONWHEN OPEN AVOID DIRECT EXPOSURE TO BEAM VARO AVATTAESSA JA SUOJALUKITUS OHITETTAESSA OLE ALTTIINANAKYMATTOMAALLE LASERSATEILYLLE AL KATSO SATEESEEN VARNING OSYNLIG LASERSTRÅLNING NÄR DENNA DEL ÄR ÖPPNAD OCH SPARRENAR URK...

Page 80: ...uct complies with the radio interference requirements of the European Community Index English 7 Français 2 Español 4 7 9 Your product is designed and manufactured with high quality materials and components which can be recycled and reused When this crossed out wheeled bin symbol is attached to a product it means the product is covered by the European Directive 2002 96 EC Please inform yourself abo...

Page 81: ...s product incorporates copyright protection technology that is protected by method claims of certain U S patents and other intellectual property rights owned by Macrovision Corporation and other rights owners Use of this copyright protection technology must be authorized by Macrovision Corporation and is intended for home and other limited viewing uses only unless otherwise authorized by Macrovisi...

Page 82: ...ons available on the remote only 16 Getting Started Step 1 Inserting batteries into the remote control 17 Using the remote control to operate the system 17 Step 2 Switching On Off 17 Switching to an active mode 17 Switching to standby mode 17 Step 3 Setting the speakers 17 18 Adjusting the speaker output levels 18 Sound Controls Selecting surround sound 19 Selecting digital sound effects 19 Adjust...

Page 83: ...ce all around the apparatus for adequate ventilation Finding a suitable location Place the player on a flat hard stable surface Do not position the set on top of other equipment that might heat it up e g DVD player or amplifier Care of the cabinet Use a soft cloth slightly moistened with a mild detergent solution Do not use a solution containing alcohol spirits ammonia or abrasives 10 cm 4 inches ...

Page 84: ...of approximately 45 degrees from the listening position 2 Place the center speaker above the TV or the AV receiver so that the center channel s sound is localised 3 Place the rear speakers at normal listening ear level facing each other or mounted on the wall 4 Place the subwoofer on the floor near the TV Helpful Hints To avoid magnetic interference do not position the front speakers too close to ...

Page 85: ... SUBWOOFER SUBW black purple Helpful Hints Ensure that the speaker cables are correctly connected Improper connections may damage the system due to short circuit Do not connect more than one speaker to any one pair of speaker jacks Do not connect speakers with an impedance lower than the speakers supplied Please refer to the SPECIFICATIONS section of this manual 75 L L R SPEAKERS 3 SPEAKERS 3 FRON...

Page 86: ...ched on Helpful Hint Refer to the type plate on the rear or bottom of the system for identification and supply ratings Connections 1 Connect the supplied AM loop antenna to the antenna on a shelf or attach it to a stand or wall 2 Connect the supplied FM antenna to the FM jack Extend the FM antenna and fix its ends to the wall For better FM stereo reception connect an external FM antenna not suppli...

Page 87: ... connected source as usual 2 Press TV on the remote to activate the input source then press VOL to adjust the volume level To hear the playback of other audio visual devices such as VCR MP3 player cassette player use the audio cables white red to connect AUDIO IN AUX jacks to the corresponding AUDIO OUT jacks on the connected audio device see fig B TV AV DISC TUNER AUX VOL AUX VOL Before starting ...

Page 88: ...ume level Helpful Hints The audio signals produced by 6 channel is multichannel surround Therefore switching to Stereo mode has no effect Making recording from this input is not possible Option 2 Using Coaxial In jack Or use an coaxial cable to connect the AV receiver s COAXIAL IN jack to the COAXIAL output jack on the DVD SACD player see fig B Before starting operation 1 Start playing back the co...

Page 89: ...l source material is copy protected Before starting recording 1 Press DISC TUNER TV or AUX to select the source you want to record from The name of the source appears on the display panel 2 Start recording on the external recording device 3 Start playback on the connected source as usual Helpful Hints Recording from 6 Channel input source is not possible The sound settings will not affect the reco...

Page 90: ...automatic manual preset programming 6 TUNING Tunes the radio frequency down 7TUNING Tunes the radio frequency up Main unit and remote control 8 System display panel 9 SOURCE Selects the relevant active source mode DISC 6CH COAX OPTI TUNER FM AM AUX or TV on the remote only TV switches to TV source mode DISC toggles between DISC 6CH DISC COAX and DISC OPTI source mode TUNER toggles between FM and A...

Page 91: ...es or restores the volume NIGHT in Dolby Digital mode only Optimises for lower level listening Numeric Keypad 0 9 Enters a number of a preset radio station B Switches to standby mode Functional Overview TV DISC TUNER AUX DVD MENU DISC SYSTEM VOL PLAY PAUSE STOP RESUME SUBW REAR CENTER TV VOL REPEAT REPEAT SLEEP DIM SURROUND SOUND NIGHT MUTE 5 0 3 7 9 0 3 Press and hold the button for more than fiv...

Page 92: ...OP RESUME REPEAT REPEAT SLEEP DIM SURROUND SOUND NIGHT MUTE M AUX Step 3 Setting the speakers You can adjust the delay times center and rear only and volume level for individual speakers These adjustments let you optimise the sound according to your surroundings and setup IMPORTANT Press SURROUND button on the remote to select Multi channel DOLBY DIGITAL DTS MOVIE MUSIC PRO LOGIC surround mode bef...

Page 93: ...nd sound needs If the volume control is not used within 5 seconds it will become normal volume control function 5 Press PROG to confirm your selection Helpful Hints Use the longer delay time settings when the rear speakers are closer to the listener than the front speakers If CHECK SURROUND SETTINGS appears on the display press SURROUND button to select surround mode AUTO PROG only available for s...

Page 94: ... available on the disc Selecting digital sound effects Select a preset digital sound effect that matches your disc s content or that optimises the sound of the musical style you are playing Press SOUND on the remote to select the available sound effect In Dolby Digital DTS PRO LOGIC or PRO LOGIC II MOVIE surround mode you can select CONCERT ACTION DRAMA or DIGIT Adjusting the Bass Treble level The...

Page 95: ...g others at night IMPORTANT This feature is only available for movies with Dolby Digital mode Press NIGHT on the remote repeatedly to switch the Night mode on or off default setting OFF Helpful Hint The night mode option is not available in DISC 6CH mode Dimming system s display screen In any active mode press DIM on the remote to select desired brightness HIGH default setting MID or LOW Setting t...

Page 96: ...five seconds to enter system setup 2 Press S T to select AUTO PROG AUTO PROG 3 Press PROG to confirm CONFIRM appears 4 Press PROG again to start automatic presetting SEARCH appears All the available radio stations with strong transmission signal will be stored Automatic preset will begin from preset 1 and all your former presets will be overridden Manual presetting You can choose to store only you...

Page 97: ...than 40 preset radio stations PROG FULL appears The system will exit presetting mode if no button is pressed within two seconds Selecting a preset radio station Press or use the numeric keypad 0 9 to select a preset number The preset number followed by the radio frequency will appear on the display panel Tuner Operations E n g l i s h 22 ...

Page 98: ...Press CENTER or REAR to adjust the volume level Make sure the center and rear speakers are connected correctly Press SURROUND button to select a correct surround sound setting Make sure the source you are playing is recorded or broadcast in surround sound DTS Dolby Digital etc If the signal is too weak adjust the antenna or connect an external antenna for better reception Increase the distance bet...

Page 99: ... w x h x d 435 mm x 53 mm x 359 mm Weight 4 00 kg Specifications Specifications subject to change without prior notice Standby Power 1 0W SPEAKERS Front speakers Rear surround speaker System Front speaker 2 way magnetically sheided Rear speaker 2 way Impedance 3 Ω Speaker drivers 3 full range woofer 1 conical dome tweeter Frequency response 140 Hz 20 kHz Dimensions w x h x d 95 mm x 175 mm x 65 mm...

Page 100: ... surround when a Dolby Pro Logic Decoder is used It is also compatible with stereo systems but the user will only have two channel front left right of sound DTS Digital Theatre Systems This is a surround sound system but it is different from Dolby Digital The formats were developed by different companies Multichannel DVD is specified to have each sound track constitute one sound field Multichannel...

Page 101: ...on of programs data or other information is not covered under this Limited Warranty This warranty does not apply a to damage caused by accident abuse misuse misapplication or non Philips product b to damage caused by service performed by anyone other than Philips or Philips Authorized Service Location c to a product or a part that has been modified without the written permis sion of Philips or d i...

Reviews: