background image

U

SING


THE

 S

ET

 T

OP

 B

OX

13

English

Changing Channels 

You can change channels by using any of the following 
methods: 

Channel browse keys 

l

Use the 

P+

 and 

P-

 keys (channel up/down) to browse up 

and down the available channels.

Number keys (0-9) 

The complete channel number must be entered within 
3 seconds of the first digit entry. 

l

For example, to watch channel 43, press key 4 and then 
key 3.

The entered channel number will be displayed in top left 
of the TV screen and the TV will show the entered chan-
nel. 

Channel list

 1

Press

 to view the list of available channels in the 

Channel List
or
Press 

MENU

 to display the Main Menu. There select 

Channel List

 and press

.

 2

Select the required channel using the 

 keys. 

 3

Press

  to view/listen to the channel in the window. 

Press 

EXIT

 to go to full screen. 

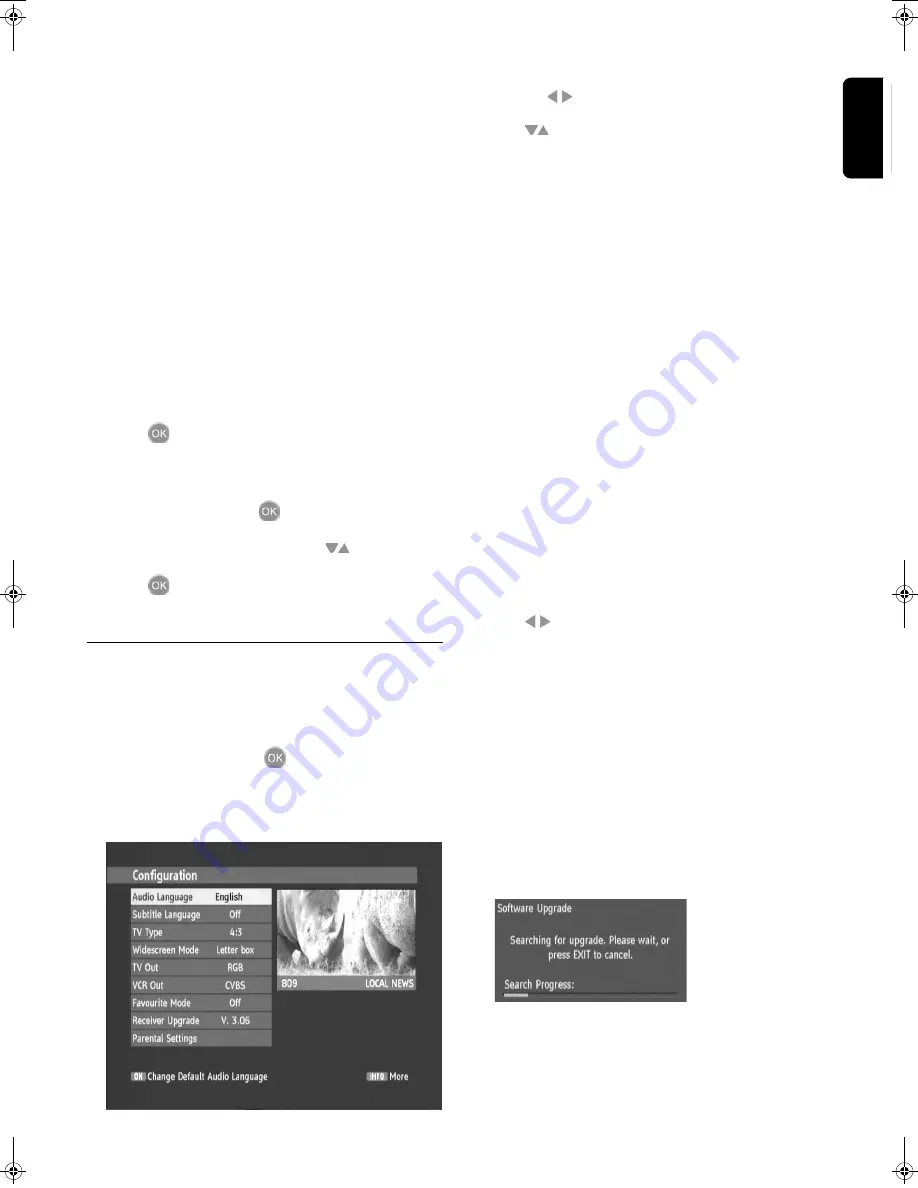
Configuration 

The Configuration window allows you to customise vari-
ous settings. 

 1

Press 

MENU

 to display the Main Menu. There select 

Configuration

 and press

You can select from the available options for each of the 
items in the Configuration window. See below for a typical 
display.

The text along the lower banner changes according to the 
item selected. 

 2

Use the 

 keys to display the options in turn. 

 3

Use 

 to navigate through the configuration list until 

you reach the item you want to re-configure.

 4

Use 

 to step through the options until you reach the 

new setting. 

Some configurations require further information to be 
entered in subwindows which are displayed when these 
items are selected. 

 5

Press 

EXIT

 to close the configuration window and return 

to the previously displayed channel. 

The configuration settings are stored automatically as they 
were set at the time you pressed the 

EXIT

 key. 

Receiver Upgrade 

When Receiver Upgrade is selected for re-configuring you 
will be presented with the following window: 

 1

The upgrade will be carried out automatically and the 
listed Receiver Upgrade version number will be changed 
accordingly. 

Audio 
Language:

You can choose the default played audio lan-
guage if a program is broadcasted in more than 
one language.

Subtitle
Language

If subtitles are availbable, you may choose the 
language here.

TV-Type:

Choose the type of TV you have
4:3 / 16:9.

Wide-
Screen 
Mode:

 Set your preferred mode for movies or shows 
that are broadcast in 16:9. 
Note: If your TV type is set to Widescreen this 
function is not available.

TV Out: 

Output can either be RGB, CVBS or
S-Video. Effect will be seen instantly on TV

VCR Out:  Output can either be CVBS or 

S-Video.

Favourite 
mode: 

Turn Favourites Mode on/off.
Select one of the Favourite Lists.

Receiver 
Upgrade:

To download software upgrades from broadcast-
ers or the manufacturer to further enhance the 
current service. 

Parental 
Settings:

Create viewing restrictions on all available chan-
nels. Once activated a lock key code must be 
entered to view the TV channels.

DTR 200.book  Seite 13  Donnerstag, 29. Juni 2006  1:02 13

Summary of Contents for DTR 210

Page 1: ... User s Manual first for quick tips that make using your Philips product more enjoyable If you have read your instructions and still need assistance you may access our online help at www philips com support or call 0906 1010 016 0 15 minute DTR 210 Digital Set Top Box ...

Page 2: ...equipment 9 Switching on for the first time 10 Using the Set Top Box 11 Channel List 11 To Watch a channel 11 To Delete a Channel 11 To Edit a channel name 11 To Lock a channel 12 To Add a channel to your Favourites list 12 Changing Channels 13 Channel browse keys 13 Number keys 0 9 13 Channel list 13 Configuration 13 Receiver Upgrade 13 Parental Settings 14 Audio Language 14 Timers 14 Electronic ...

Page 3: ...ied SCART output to TV RF in connector Set Top Box Power Supply Adaptor supplied 12V DC Example TV set rear panel Example VCR set rear panel SCART output to TV UHF Aerial SCART input on TV SCART to SCART cable supplied Set Top Box Power Supply Adaptor supplied RF In connector RF Out connector 12V DC Set Top Box rear panel SCART to SCART cable not supplied RF cable VCR RF In connector VCR RF Out on...

Page 4: ...re you clean it Do not use liquid or aerosol cleaners Clean the set top box with a soft damp not wet cloth Ventilation The slots and openings on the set top box are for venti lation Do not cover or block them as it may cause overheating NEVER let children push anything into the holes or slots on the case Servicing There are no user serviceable parts in this set top box When servicing refer to qual...

Page 5: ...not dis pose of your old products with your normal household waste The correct disposal of your old product will help prevent potential negative consequences for the environ ment and human health The Material recyclability symbol affixed on package cardboard and user manual means these parts are recyclable So do not dispose of them with your normal household waste The Material recyclability symbol...

Page 6: ...e make sure that you have the model number of your set top box before contacting us The label showing the type and serial number is underneath your receiver Identification of Parts Remote Control Batteries are removable from the remote using common household tools like a screwdriver The batteries supplied do not contain hazardous sub stances such as Mercury Cadmium or Lead However they must not be...

Page 7: ...he 12V connector on the back of the Digital Set Top Box The adaptor is shown on the right Plug the cable into the 12V DC connector on the rear panel Insert the adaptor body into a suitable mains outlet socket Note that the only recommended way to disconnect the Digital Set Top Box from the mains supply is to remove the adaptor from the mains socket If the mains socket is fitted with a switch this ...

Page 8: ...nnecting to a Television and DVD player Example TV set rear panel SCART output to TV UHF Aerial SCART input on TV SCART to SCART cable supplied Set Top Box Power Supply Adaptor supplied RF In connector RF Out connector 12V DC Set Top Box rear panel SCART to SCART cable not supplied SCART to DVD player Example DVD player rear panel If you decide to connect a DVD player or recorder to the VCR Scart ...

Page 9: ...xample audio equipment rear panel SPDIF Digital audio out Example TV set rear panel SCART output to TV UHF Aerial SCART input on TV SCART to SCART cable supplied Set Top Box Power Supply Adaptor supplied RF In connector RF Out connec tor 12V DC Set Top Box rear panel ...

Page 10: ...he following message displays 5 Use the keys to highlight Yes and then press the key The system then starts to search all channels for available radio and TV stations This may take a few minutes The stations found are listed in the centre panel A progress bar below the listing panel shows the channels searched so far within the scan range 21 68 When scanning has finished the received stations are ...

Page 11: ...ng the options until you reach Watch 3 Press to watch the selected channel in the picture window located at the top right corner 4 To watch the channel on full screen press again or press EXIT To Delete a Channel 1 Use to navigate through the channel list until you reach the channel you want to delete 2 Use to step along the options until you reach Delete 3 Press to delete the selected channel in ...

Page 12: ...tch this channel if you enter a valid number If you enter a wrong number the Wrong Lock Key box will be displayed briefly When a valid number is entered the channel will be played To Add a channel to your Favourites list 1 Use to step along the options until you reach Favourites 2 Use to navigate through the channel list until you reach the channel you want to add to your favourites list 3 Use to ...

Page 13: ...ugh the options until you reach the new setting Some configurations require further information to be entered in subwindows which are displayed when these items are selected 5 Press EXIT to close the configuration window and return to the previously displayed channel The configuration settings are stored automatically as they were set at the time you pressed the EXIT key Receiver Upgrade When Rece...

Page 14: ...k what is available 1 Press the MENU key to display the Main menu 2 Use to select Audio Menu 3 Press 4 If alternatives are available use to select the desired language 5 Press to apply these settings and exit this function This change is only temporarily for the current program Timers You can use the Timer function to turn your Set Top Box on and off in Stand by and also to automatically switch ch...

Page 15: ...been locked 1 Please enter your PIN code when setting the timer so that the receiver will not prompt for the PIN code when the timer becomes active 2 If you want to set timers on this service more often please go to the Main Menu and select the Channel list sub menu 3 Choose the service on which you want to set timers 4 Please unlock this service 5 Now program your timer Electronic Program Guide T...

Page 16: ...edia and Hypermedia Expert Group is a standard that offers you information about various contents like life style shopping or sports events and results 1 Press the TEXT or RED key to bring up the text menu for the current channel 2 Use the keys to navigate through the menu 3 Use to select an item Additionally you now have the four colour keys Red Green Yellow and Blue to navigate through the conte...

Page 17: ... an automatic search see Advanced Installation SCART connector not fully plugged in Check SCART connector Cannot receive station that you could receive before Program is no longer broadcast None Interference with DECT phones or wireless equipment Move phone wireless equipment away from the receiver to a loca tion where interference ceases Program is being broadcast with altered parameters Do an au...

Page 18: ...ctive symbol duration Fast PLL tuning speed step size 62 5 kHz 166 67 kHz Input Output 2x SCART VCR TV out TV SCART video out CVBS Y C RGB VCR SCART video out CVBS Y C switching signal 0 6 12V Audio out left right Digital audio out S PDIF RF input connector IEC60169 2 female termination 75 Ohm Return Loss min 6 dB 75 Ohm Loop Through of RF signals output termination 75 Ohm Power Supply Power suppl...

Page 19: ...ed The guarantee is subject to the following provi sions The product must be correctly assembled and operated in accordance with the instructions contained in this user guide The guarantee does not cover accidental damage mis use or consumable items The guarantee will be rendered invalid if the set top box is resold or has been damaged by inexpert repair The manufacturer disclaims any liability fo...

Page 20: ...3111 176 53261 ...

Reviews: