background image

9

EN

G

LI

SH

8

3

4

5

6

7

8

1

2

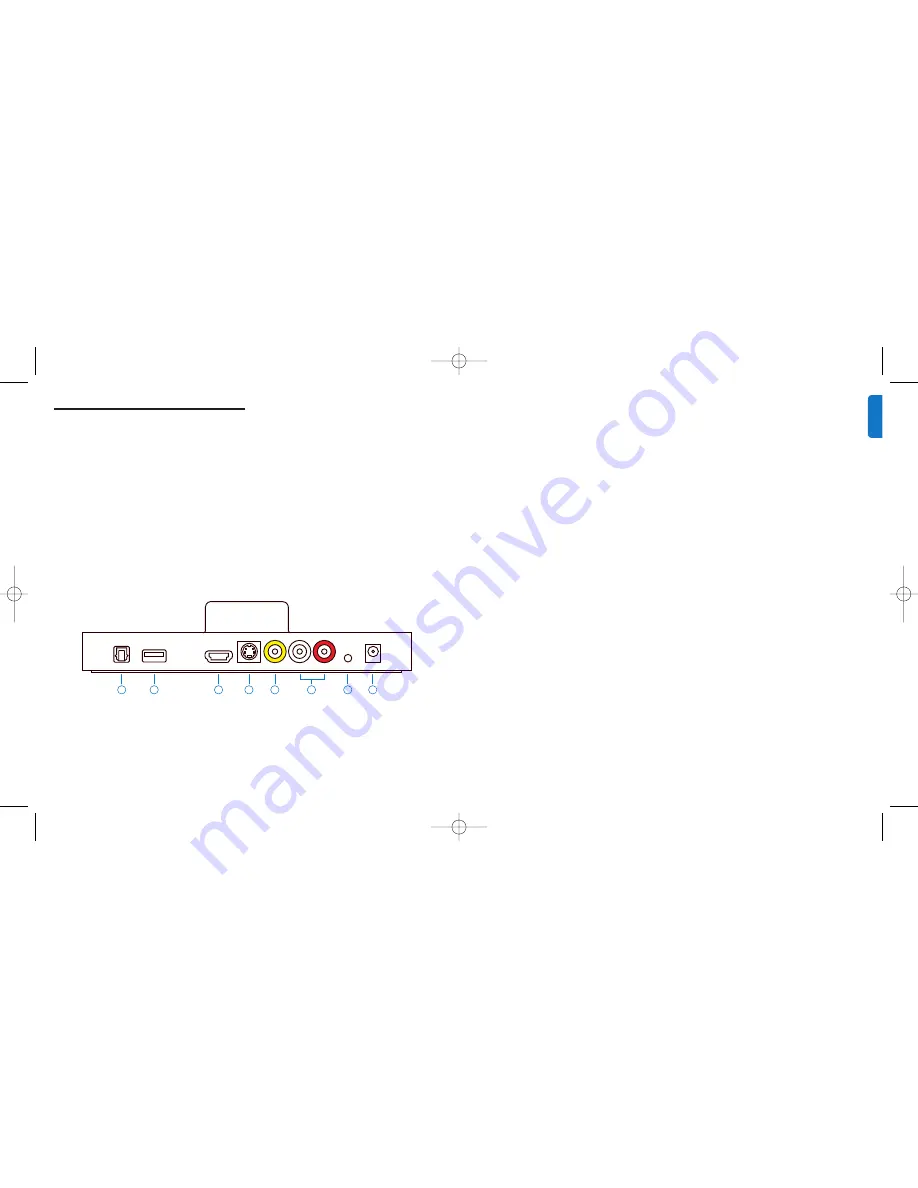
DIGITAL AUDIO

USB

HDMI

S-VIDEO

VIDEO

L – AUDIO – R

AUX INPUT

12V DC

Connecting HomeDock HD using an HDMI cable

1.

Plug the included AC power adapter into the back of

the HomeDock HD base, and the other end into any

available AC power outlet. Plugging in your HomeDock

HD will turn it on and start the boot-up process, which

may take a few minutes.

2.

Plug an HDMI cable (available separately) into the back

of the HomeDock HD base.

3.

Either connect the HDMI cable to any available HDMI

input on yourTV, or connect the HDMI cable to your

HDMI-compatible stereo receiver.

D

Note:

Connecting HomeDock HD via HDMI

directly to yourTV will route both video and audio

through theTV. In order to enjoy the audio over your

home stereo system, connect HomeDock HD to your

HDMI-compatible stereo receiver, then connect your

receiver to yourTV via HDMI.You may also choose to

connect HomeDock HD to yourTV via HDMI, then to

your stereo receiver via the digital audio output

(appropriate cables available separately).

4.

Turn on yourTV and/or home stereo and select the

correct input(s) for HomeDock HD.At this time, you’ll

see a screen on yourTV with a Philips logo and a small

box of moving squares until your HomeDock HD has

finished booting up. Once complete, a “No iPod

Connected” screen will appear.

5.

Dock your iPod, allowing it to pivot back and rest

securely against the HomeDock HD support stand.

Once your iPod has initialized, use the included RF

remote control to browse and select your iPod

content onTV. See the On-screen navigation chapter.

C

Important:

In order to maximize the performance

of your HomeDock HD when using an HDMI cable, you

must change the video resolution of HomeDock HD from

Standard Definition to High Definition.To do so, please

follow these steps:

1.

With your iPod docked, select Settings

in the HomeDock HD Main menu.

2.

In the Settings menu, select Resolution.

3.

Change the selection from Standard Definition

(PAL or NTSC) to High Definition (720p or 1080i).

Connecting HomeDock HD using the included AV cable

1.

Plug the included AC power adapter into the back

of the HomeDock HD base, and the other end into

any available AC power outlet. Plugging in your

HomeDock HD will turn it on and start the boot-up

process, which may take a few minutes.

2.

Plug the included AV cable into the composite video

output and RCA audio outputs on the back of the

HomeDock HD base. Be sure to match the colors

of the cable to the color of the corresponding jack

(yellow = video, white = audio left, red = audio

right).

3.

Connect the AV cable to the corresponding RCA

inputs on yourTV or home stereo. Be sure to note

which inputs you are using.

4.

Turn on yourTV and/or home stereo and then select

the correct input(s) for HomeDock HD.At this time,

you’ll see a screen on yourTV with a Philips logo and

a small box of moving squares until your HomeDock

HD has finished booting up. Once complete, a “No

iPod Connected” screen will appear.

Setting up HomeDock HD

Your HomeDock HD is ready to use right out of the box
with the included AV Cables.

For the best high-definition performance, we recommend
you connect HomeDock HD to your TV using an HDMI
cable (available separately). If you do not have an HDMI-
capable television or home entertainment center, there are
several optional ways you can connect HomeDock HD:

• Connect to your TV using S-Video or RCA connections

(AV cable included).

HomeDock HD connections

1.

Digital audio output (optical)

2.

USB connection

3.

HDMI output

4.

S-Video output

• Connect to an AV receiver using S-Video, RCA, or HDMI

connections.

• Connect to your home stereo or powered speakers

without using a TV. See “Using HomeDock HD with
external speakers” in the Additional usage chapter.

D

Note:

Remove the thin plastic strip on the back of the

included RF remote control to engage the battery.

C

Important:

On your iPod, ensure that “TV Out” under

iPodVideo Settings is set to either Ask or On in order to

enjoy the video content of your iPod using HomeDock HD.

For iPod touch in particular, see “Viewing the video content

of your iPod touch” in the Setting up HomeDock HD

chapter.

5.

Composite video output

6.

RCA audio output

7.

Auxiliary audio input

8.

AC power input

DLA99901-10_manual_GM2.qxd:Layout 1 copy  12/10/08  6:30 PM  Page 8

Summary of Contents for DLA99901

Page 1: ...HD 50 ES HomeDock HD 74 NL HomeDock HD 98 IT HomeDock HD 122 PT HomeDock HD 146 SV HomeDock HD 170 EL HomeDock HD 194 PL HomeDock HD 218 RU HomeDock HD 242 CS HomeDock HD 266 HU HomeDock HD 290 TR HomeDock HD 314 FN HomeDock HD 338 DLA99901 10_manual_GM2 qxd Layout 1 copy 12 10 08 6 30 PM Page 1 ...

Page 2: ...ted 7 Setting up HomeDock HD 8 On screen navigation 11 Enjoying photos slideshows 16 Settings and features 17 Additional usage 19 Warranty and service 20 Technical data 20 Frequently asked questions 21 EC Declaration of Conformity 24 ENGLISH DLA99901 10_manual_GM2 qxd Layout 1 copy 12 10 08 6 30 PM Page 2 ...

Page 3: ...he support that Philips offers register your product at www philips com welcome Important information Take time to read this manual before you use your Philips HomeDock HD DLA99901 10 It contains important information and notes about operating your Philips HomeDock HD 2008 Philips Consumer Lifestyle All rights reserved Reproduction in whole or in part is prohibited without the written consent of t...

Page 4: ...ontent onTV D Note For detailed information on setting up your HomeDock HD see Setting up HomeDock HD C Important On your iPod ensure that TV Out under iPodVideo Settings is set to either Ask or On in order to enjoy the video content of your iPod using HomeDock HD For iPod touch in particular see Viewing the video content of your iPod touch in the Setting up HomeDock HD chapter What s in the box I...

Page 5: ...ng the included AV cable 1 Plug the included AC power adapter into the back of the HomeDock HD base and the other end into any available AC power outlet Plugging in your HomeDock HD will turn it on and start the boot up process which may take a few minutes 2 Plug the included AV cable into the composite video output and RCA audio outputs on the back of the HomeDock HD base Be sure to match the col...

Page 6: ...t on and start the boot up process which may take a few minutes 2 Plug an S Video cable into the S Video output on the back of the HomeDock HD base 3 Connect the other end of the S Video cable to the corresponding S Video input on yourTV 4 Plug the appropriate audio cable available separately into either the digital audio output or RCA audio outputs on the back of the HomeDock HD base 5 Connect th...

Page 7: ... displayed by choosing Now Playing from the Main menu The current track information includes song title Whenever a selection is playing the Album Art is displayed in the Now Playing Banner near the bottom of the screen When browsing by album the Album Art for the selected album is shown if available as well as the Album Art for the song currently playing D Note Larger artwork may take a few moment...

Page 8: ...omeDock HD s memory for faster retrieval later If you d like HomeDock HD to retrieve Album Art even faster during use choose the Cataloging option from the Settings menu See Cataloging Album Art in the Settings features chapter If your current selection does not have any Album Art or if the Album Art is unavailable HomeDock HD will display one of seven placeholder images MUSIC Playlists Artists Al...

Page 9: ... it to be displayed much faster during playback You may choose this option from the Settings Cataloging menu D Note Cataloging may take up to 45 minutes depending on the size of your library During the cataloging process HomeDock HD will be unresponsive to other commands If you want to listen to music or watch videos you may cancel the cataloging process before it finishes Enjoying photos slidesho...

Page 10: ...emote control Using HomeDock HD with other audio devices HomeDock HD will also play the audio from other MP3 players laptops or other digital devices through yourTV or home stereo via HomeDock HD s auxiliary audio input labeled AUX INPUT D Note HomeDock HD does not support on screen navigation when using the aux input to play audio Using HomeDock HD with standard definition televisions While HomeD...

Page 11: ... Apple logo screen Refer to your iPod manual for more detailed instructions Make sure that you are in the desired mode On Screen Navigation Mode or iPod Mode If your HomeDock HD is in On screen Navigation Mode the iPod will display an Accessory Attached notice If HomeDock HD is in iPod Mode the iPod menu screen will be displayed on the iPod To change modes simply push the Mode button on the includ...

Page 12: ...ock HD and stereo TV can affect the audio quality significantly This is only necessary with an AV connection When using an HDMI connection volume is not managed with your HomeDock HD Also it is a good idea to adjust your iPod EQ settings We recommend setting your iPod EQ to Off and adjusting yourTV or home stereo s bass and treble controls to 0 Then you can experiment with iPod EQ settings and add...

Page 13: ...es because the correct disposal will help prevent negative consequences for the environmental and human health The mains plug of this products adapter is used as the disconnect device and shall remain readily operable CAUTION Danger of explosion if battery is incorrectly replaced Replace only with the same or equivalent type No naked flame sources such as lighted candles should be placed on the ap...

Page 14: ... 2008 Philips Consumer Lifestyle All rights reserved M DLA99901 10 081103 A DLA99901 10_manual_GM2 qxd Layout 1 copy 12 10 08 6 31 PM Page 362 ...

Reviews: