background image

4

the disconnect device shall remain readily 
operable.

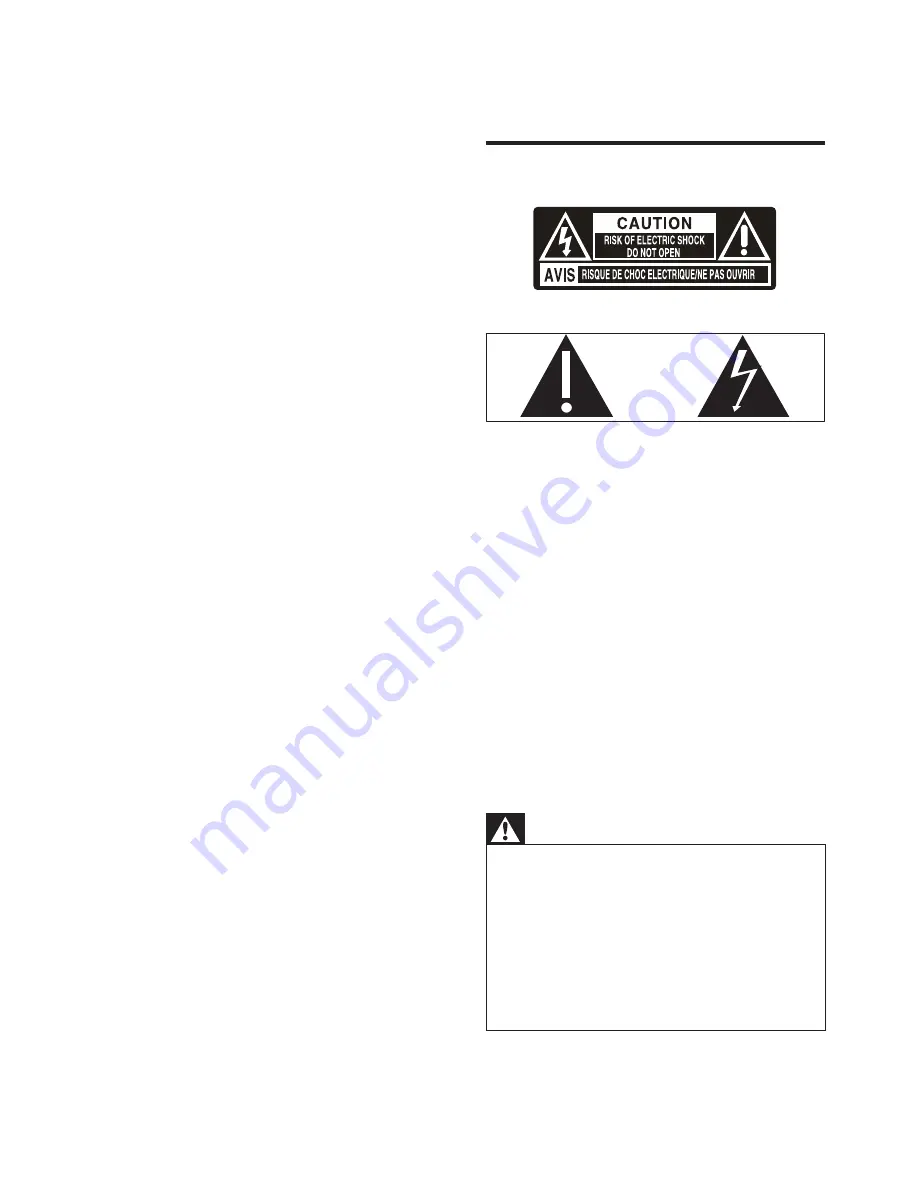
Know these safety symbols


This ‘bolt of lightning’ indicates uninsulated 
material within your unit may cause an electrical 
shock. For the safety of everyone in your 
household, please do not remove product 
covering. 
The ‘exclamation point’ calls attention to 
features for which you should read the enclosed 
literature closely to prevent operating and 
maintenance problems. 
  
shock, this apparatus should not be exposed to 
 !" # $%
such as vases, should not be placed on this 
apparatus. 
CAUTION: To prevent electric shock, match 
wide blade of plug to wide slot, fully insert. 

Warning


&

Never remove the casing of this apparatus. 


&

Never lubricate any part of this apparatus.


&

Never place this apparatus on other electrical 
$ '


&

Keep this apparatus away from direct sunlight, naked 
( '


&

Never look into the laser beam inside this apparatus.


&

Ensure that you always have easy access to the power 
cord, plug or adaptor to disconnect this apparatus from 
the power.

1 Important

&

Read these instructions.

&

Follow all instructions.

&

Do not block any ventilation openings. 
Install in accordance with the 
manufacturer’s instructions.

&

Do not install near any heat sources such 
as radiators, heat registers, stoves, or 
  )*+  
produce heat. 

&

Protect the power cord from being 
walked on or pinched, particularly at plugs, 
convenience receptacles, and the point 
where they exit from the unit.

&

-;   <
by the manufacturer.

&

Unplug this unit during lightning storms or 
when unused for long periods of time. 

&

=* $=
'=*$#
unit has been damaged in any way, such 
as power-supply cord or plug is damaged, 
$!!" =
fallen into the apparatus, the unit has been 
exposed to rain or moisture, does not 
operate normally, or has been dropped.

&

Battery usage CAUTION – To prevent 
battery leakage which may result in bodily 
injury, property damage, or damage to the 
remote control: 

&

Install all batteries correctly, + and - as 
marked on the remote control. 

&

Do not mix batteries (old and new or 
!% '+'

&

Remove batteries when the remote 
control is not used for a long time.

&

The unit shall not be exposed to dripping 
or splashing. 

&

Do not place any sources of danger on 
  )'*'$!" %*
+'

&

Where the plug of the Direct Plug-in 
Adapter is used as the disconnect device, 

EN

Summary of Contents for DCM2060

Page 1: ...Register your product and get support at www philips com welcome EN User manual DCM2060 ...

Page 2: ...Turn on 11 4 Play 12 Play disc 12 Play from USB 12 Play from iPod iPhone iPad 12 Play options 13 Adjust sound 14 Display different information 14 5 Listen to FM radio 15 Tune to FM radio stations 15 Program FM radio stations automatically 15 Program FM radio stations manually 15 Select a preset radio station 15 Show RDS information 15 Select stereo mono broadcast 16 6 Other features 16 Set the ala...

Page 3: ... Important Read these instructions Follow all instructions Do not block any ventilation openings Install in accordance with the manufacturer s instructions Do not install near any heat sources such as radiators heat registers stoves or produce heat Protect the power cord from being walked on or pinched particularly at plugs convenience receptacles and the point where they exit from the unit by the...

Page 4: ...t you can t hear what s around you You should use caution or temporarily discontinue use in potentially hazardous situations Excessive sound pressure from earphones and headphones can cause hearing loss Caution Use of controls or adjustments or performance of procedures other than herein may result in hazardous radiation exposure or other unsafe operation Norge Typeskilt finnes på apparatens unders...

Page 5: ... ___________________________ 2 Your Micro System Congratulations on your purchase and V X support that Philips offers register your product at www philips com welcome Introduction With this unit you can enjoy audio from discs iPod iPhone iPad USB devices and other external devices listen to FM radio You can enrich sound output with these sound effects Z Z Z Z The unit supports these media formats ...

Page 6: ...eception l DC IN Connect power Overview of the main unit a Connect USB device b Headphone socket c Turn the unit on off Switch to standby mode d SOURCE Select a source CD FM USB Dock or MP3 LINK e Skip to the previous next track Search within a track disc Tune to radio stations Adjust time k a g h i j b c d e f MICRO MUSIC SYSTEM DCM2060 l m n FM ANT DC IN 3A V 12 o DOCK for SOURCE VOLUME VOLUME M...

Page 7: ...lume i Numeric Keypad 0 9 Select a track from a disc or USB device directly Select a preset radio station j PROG CLOCK SET Program tracks Program radio stations Set time k SLEEP TIMER Set sleep alarm timer l DSC Select a preset sound setting m DBB Turn dynamic bass enhancement on off m Display panel Show play information n Disc tray o DOCK for iPod iPhone iPad Overview of the remote control PRESET...

Page 8: ...uctions included in the package Connect FM antenna Tip For optimal reception fully extend and adjust the position of the antenna Connect the supplied FM antenna to the FM ANT socket on the main unit n REPEAT SHUFFLE Play a track or all tracks repeatedly Play tracks in current album repeatedly Play tracks randomly o MENU Access iPod iPhone iPad menu Stop play or erase a program p DOCK Select iPod i...

Page 9: ...socket Store FM radio stations automatically When the unit turns to FM tuner mode and no radio stations are stored the unit begins to store FM radio stations automatically 1 Connect the unit to the power supply AUTO INSTALL PRESS PLAY STOP CANCEL to auto install press to cancel press Prepare the remote control Caution Risk of explosion Keep batteries away from heat Risk of decreased battery life N...

Page 10: ...trol for two seconds SET CLOCK the display 2 Press CLOCK SET again The 12 24 hour format blinks 3 Press repeatedly to select hour format 4 Press CLOCK SET The hour digits blink 5 Repeat steps 3 4 to set the hour 6 Repeat steps 3 4 to set the minute 7 Repeat steps 3 4 to select whether to synchronize time of this unit with RDS stations RDS TIME SYNC N time synchronization is deactivated RDS TIME SY...

Page 11: ...iPod iPhone into the dock Load the iPad For iPad or iPad 2 you can use the supplied rubber pad to keep it stable 4 Play Play disc 1 Press to open the disc compartment 2 Insert a disc with the printed side facing up 3 Press to close the disc compartment 4 Press CD on the remote control to select the disc source Reading moment then CD starts playing automatically If not press Play from USB Note Make...

Page 12: ...so press a key on the numerical keypad Search within a track 1 During play press and hold 1 Push DOCK for iPod iPhone iPad to open the dock compartment 2 Place the rubber pad into the dock compartment as indicated 3 Place an iPad or iPad 2 into the dock Listen to the iPod iPhone iPad 1 Make sure that the iPod iPhone iPad is loaded correctly 2 Press SOURCE repeatedly or DOCK on the remote control t...

Page 13: ...cks press to select an album 3 Press to select a track then press PROG 4 Repeat steps 2 to 3 to program more tracks 5 Press to play the programmed tracks During play PROG displayed To erase the program when playback is stopped press Adjust sound During play you can adjust volume and select sound effects Function Action To increase decrease volume Press VOL To mute restore sound Press To turn dynam...

Page 14: ...2 Press RDS repeatedly to scroll through the Program service Program type such as NEWS SPORT POP M pop Radio text message Time 5 Listen to FM radio Tune to FM radio stations Note Position the antenna as far as possible fromTV VCR or other radiation source Ensure that you have connected and fully extended the supplied FM antenna 1 Press FM to select FM tuner mode 2 Press and hold for 3 seconds SEAR...

Page 15: ...link 6 Repeat steps 4 5 to set the minute Note If no button is pressed in 90 seconds the unit exits alarm setting mode automatically If iPod iPhone iPad is selected as alarm source and you have created a playlist called PHILIPS in iTunes and import it to your iPod iPhone iPad you will wake to a random track in the playlist If no PHILIPS playlist is created in the iPod iPhone iPad or no track is st...

Page 16: ...it switches to the tuner source automatically Set the sleep timer Note Make sure that you have set the clock correctly When the unit is turned on press SLEEP repeatedly to select the sleep timer period in When sleep timer is activated is displayed Tip To deactivate the sleep timer press SLEEP repeatedly until OFF Play from external audio device With this unit you can play audio from an external au...

Page 17: ...sions Main Unit W x H Z 400 x 235 x 97 5 mm Weight With Packing Main Unit 3 8 kg 2 2 kg USB playability information Compatible USB devices Supported formats J J J GV J J variable bit rate WMA v9 or earlier 7 Product information Note Product information is subject to change without prior notice Rated Output Power 2 X 10 W RMS Response 80 Hz 16 kHz 3 dB Signal to Noise Ratio MP3 Link Input 0 5V RMS ...

Page 18: ...dphones No response from the unit Disconnect and reconnect the AC power plug then turn on the unit again As a power saving feature the system switches off automatically 15 minutes after track play reaches the end and no control is operated Remote control does not work select the correct source with the remote control instead of the main unit Reduce the distance between the remote control and the u...

Page 19: ...sposal of your old product helps to prevent potential human health Your product contains batteries covered by the European Directive 2006 66 EC which Replace the battery Aim the remote control directly at the sensor on the front of the unit No disc detected Insert a disc Check if the disc is inserted upside down Wait until the moisture condensation at the lens has cleared Replace or clean the disc...

Page 20: ...austed batteries and old Made for iPod Made for iPhone and Made for iPad mean that an electronic accessory has been designed to connect specifcally to iPod iPhone or iPad respectively and has been certifed by the developer to meet Apple performance standards Apple is not responsible for the operation of this device or its compliance with safety and regulatory standards Please note that the use of ...

Page 21: ... 2011 Koninklijke Philips Electronics N V All rights reserved DCM2060_12_CCR_V2 0 ...

Reviews: