background image

12

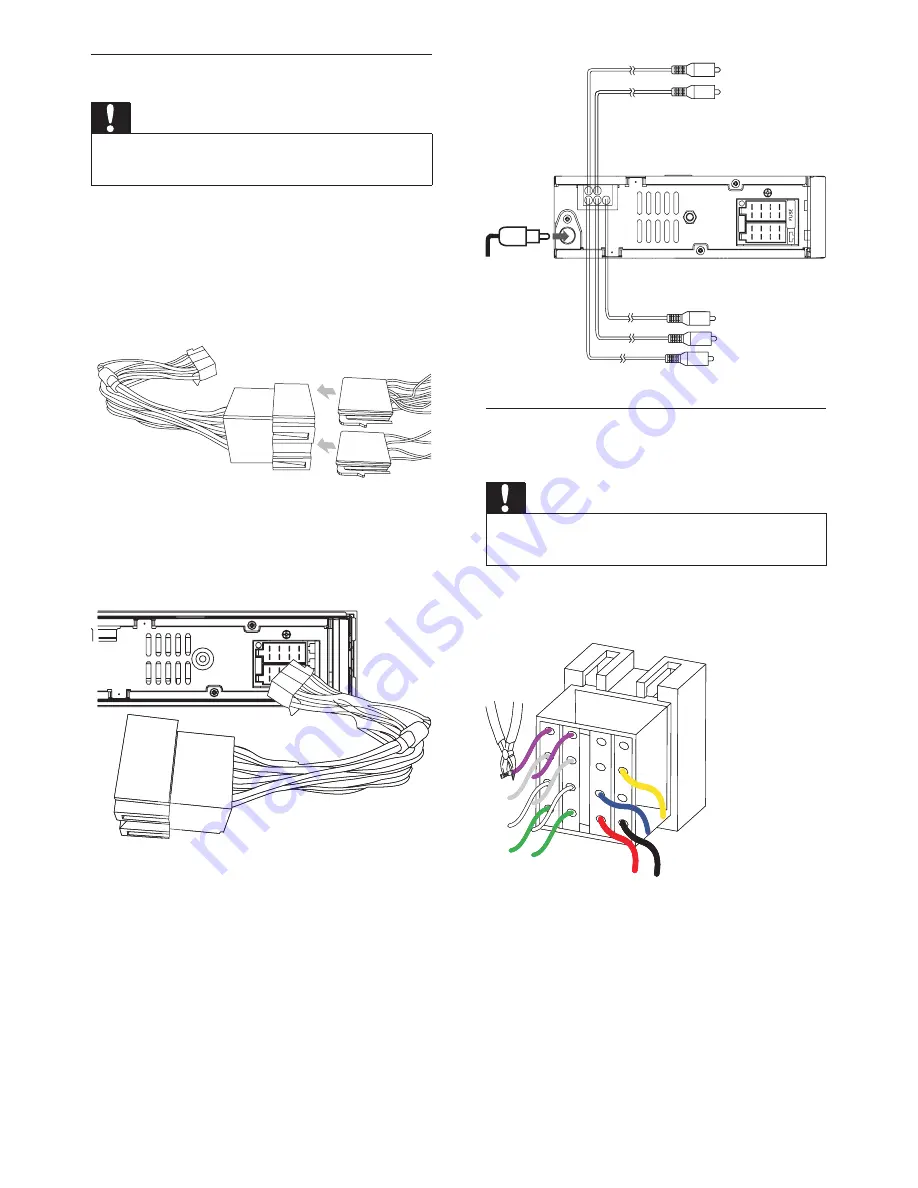
Connect wires: without ISO 
connectors

Caution

Ensure that all loose leads are insulated with 

electrical tape.

1

  Cut off the bigger end of the supplied 

standard connector.

2

  Check the car’s wiring carefully, then 

connect them to the standard connector.

ANTENNA

FRONT LINE OUT R

FRONT LINE OUT L

REAR LINE OUT L
REAR LINE OUT R
SUB OUT

Connect wires: ISO connectors

Caution

Ensure that all loose leads are insulated with 

electrical tape.

1

  Pull out the ISO connectors from the 

car dashboard and connect them to 
the bigger end of the supplied standard 
connector.

2

  Connect the other end of supplied 

standard connector to the unit.

3

  Do the other connections, if applicable.

EN

Summary of Contents for CEM5000

Page 1: ...your product and get support at Cadastre seu produto e obtenha suporte em Registre su producto y obtenga asistencia en www philips com welcome EN User manual ES Manual del usuario PT BR Manual do Usuário CEM5000 ...

Page 2: ... Terminate call 19 Play audio files from bluetooth devices 19 6 Play audio files 20 Play a disc 20 Play from USB SD SDHC device 20 Control play 21 Search for an MP3 WMA track 21 View play information 21 Intro play 21 Shuffle play 21 Repeat play 22 Connect external sound source 22 7 Adjust sound 23 Adjust volume 23 Mute 23 Turn DBB and subwoofer on off 23 Select preset equalizer 23 Other sound setting...

Page 3: ...eration only To ensure safe driving adjust the volume to a safe and comfortable level Improper fuses can cause damage or fire When you need to change the fuse consult a professional Use only the supplied mounting hardware for a safe and secure installation To avoid short circuit do not expose the apparatus remote control or remote control batteries to rain or water Never insert objects into the ven...

Page 4: ...on separate collection of batteries The correct disposal of batteries helps prevent potentially negative consequences on the environment and human health This product complies with the radio interference requirements of the European Community Environmental information All unnecessary packaging has been omitted We have tried to make the packaging easy to separate into three materials cardboard box ...

Page 5: ...r AM MW radio Audio from CD or MP3 disc Audio from your mobile phone Audio from a USB drive Audio from a SD SDHC card Audio from external devices Besides you can make a call answer and hang up a call on the audio system What s in the box Check and identify the contents of your package a Car audio system b Remote control c Rubber cushion d Screw 4 pieces e Disassembly tool 2 pieces f Front panel g ...

Page 6: ...erview of the main unit a Phone call button with LED indicator Green button press to answer phone Press and hold to transfer call Red button terminate call b MENU Access system menu c SOURCE Select audio source SUB W d e c g f h i j b a u t v y x w s r q p o n m l k z SUB W d e c g f h i j b a u t v y x w s r q p o n m l k z E ng l i sh EN ...

Page 7: ...tings under different menus g Return to previous menu h Display panel i Unlock the panel j USB socket k MP3 LINK External device socket l 5 6 Select preset station 5 6 Select preset 5th 6th speed dial number m SHUF 4 Set shuffle play mode Select preset station 4 Select preset 4th speed dial number n 3 REP Set repeat play mode Select preset station 3 Select preset 3rd speed dial number o INTRO 2 Tur...

Page 8: ...roll up down menu Select MP3 WMA folder j Store radio stations automatically Brows files or folders k SOURCE Select audio source l VOLUME Adjust volume m Terminate call n TOP Return to previous top menu o MENU Access system menu p AUDIO Access audio setting menu q INFO Display playback information Overview of the remote control a Tune to a radio station Skip track Fast backward forward playback b T...

Page 9: ...or off Select preset station 2 Enter phone number Select preset 2nd quick dial number t 3 REP Set repeat play mode Select preset station 3 Enter phone number Select preset 3rd quick dial number u 0 DBB Enter phone number Turn on or off Dynamic Bass Boost DBB sound Input symbol EN ...

Page 10: ...odel No __________________________ Serial No ___________________________ Install the car audio These instructions are for a typical installation However if your car has different requirements make the corresponding adjustment If you have any questions regarding installation kits consult your Philips car audio dealer Caution This unit is designed for negative ground earth 12 V DC operation only Alw...

Page 11: ...tandard connector ANTENNA FRONT LINE OUT R FRONT LINE OUT L REAR LINE OUT L REAR LINE OUT R SUB OUT Connect wires ISO connectors Caution Ensure that all loose leads are insulated with electrical tape 1 Pull out the ISO connectors from the car dashboard and connect them to the bigger end of the supplied standard connector 2 Connect the other end of supplied standard connector to the unit 3 Do the o...

Page 12: ...t to 1 Black wire A metal surface of the car First connect the black ground earth lead then connect the yellow and red power supply leads 2 Yellow wire The 12V car battery which is live at all times 3 Blue wire Motor electric antenna relay control lead Amplifier relay control lead 4 Red wire The 12V power terminal which is live in the accessory ACC position of the ignition switch If there is no acc...

Page 13: ...panel in the chassis until it is correctly engaged 3 Push the left side of the panel and point the left hole at the left pillar 4 Release the panel to engage the left side 5mm If the car battery is not disconnected to avoid short circuit ensure that bare wires do not touch each other 2 Remove the two screws on the top of the unit 3 Remove the mounting sleeve with the supplied disassembly tools 4 E...

Page 14: ...l backward to the main unit a click is heard Install remote control battery Caution Risk of explosion Keep batteries away from heat sunshine or fire Never discard batteries in fire Risk of decreased battery life Never mix different brands or types of batteries Risk of product damage When the remote control is not used for long periods remove the batteries Perchlorate Material special handling may ap...

Page 15: ...DS ON To turn off the RDS function repeat steps above and choose RDS OFF 4 Listen to radio Tune to a radio station 1 Press SOURCE repeatedly to select Radio 2 Press or to select band FM1 FM2 FM3 AM1 or AM2 3 Press or to tune to a radio station manually The radio station is broadcast Select tuner area You can select the suitable country area of the radio 1 Under Radio mode press MENU repeatedly to ...

Page 16: ...rdless of the current mode and begins to broadcast the announcement on traffic conditions When the traffic announcement is over it returns to the previous mode TA OFF Traffic announcement does not cut in Select program type Before tuning to RDS stations you can select program type and let the unit search only for programs of the selected category 1 Press MENU until PTY RDS displays 2 Press OK MUTE to...

Page 17: ...ted number Note If no preset quick dial number is stored Empty displays 5 Use bluetooth devices With this car audio system you can listen to audio files from a player or make a call if bluetooth connection is available on your phone or player Pairing bluetooth devices You can pair your bluetooth device with the unit as follows Note For pairing operation make sure to switch on the BT MODE on the uni...

Page 18: ...n transfer voice from loudspeaker to mobile phones during call 1 Press and hold until MUTE displays Voice transfers from loudspeaker to mobile phone Terminate call 1 Press to terminate call Play audio files from bluetooth devices You can listen to audio from a bluetooth device and control playback with the unit 1 Press SOURCE repeatedly to select BT Audio To start play press 1 Note Some mobile phon...

Page 19: ... Note Ensure that the disc or device contains playable files Play a disc Note You cannot play CDs encoded with copyright protection technologies You can play commercially available audio CDs and these discs CD Recordables CD R CD Re writables CD RW MP3 CDs WMA CDs Note Ensure that the disc contains playable content 1 Press on the front panel to release the panel 2 Insert a CD with the printed side ...

Page 20: ...rmal play Shuffle play You can play the tracks in random order 1 During play press SHUF 4 to select SHUFFLE On shuffle on start shuffle play for all tracks SHUFFLE Off shuffle off cancel shuffle play 2 Insert the card into the card slot The unit starts playing from the card automatically Remove the card 1 Press to turn off the unit 2 Press the card until you hear a click sound The card is now disengage...

Page 21: ...racks in the current folder repeatedly REPEAT ALL play all tracks repeatedly Connect external sound source 1 Connect the external audio device to MP3 LINK socket with a 3 5 mm cable 2 Press SOURCE repeatedly until MP3 Link displays 3 Operate the external device refer to the instructions supplied with the external device EN ...

Page 22: ...12 SUBWOOFER LPF subwoofer low pass filter range 80 120 160 RESUME resume Resume the preset EQ value to factory default value 2 Rotate encoder knob to adjust value 7 Adjust sound Adjust volume Press VOLUME on the remote control Or rotate encoder knob on the front panel Mute You can turn off the sound of your audio 1 During play press OK MUTE To turn the sound back on press OK MUTE again Turn DBB an...

Page 23: ...rmation related to the unit displays 1 Press MENU repeatedly until DEMO demonstration is displayed 2 Rotate encoder knob to select a setting DEMO ON Turn on the demo mode DEMO OFF Turn off the demo mode 8 Adjust system settings BT mode 1 Press MENU repeatedly until BT MODE bluetooth mode displays 2 Rotate encoder knob to toggle between the settings BT MODE On Turn on the bluetooth BT MODE Off Turn...

Page 24: ...set the unit to its default setting 1 Detach the front panel 2 Press the reset button by using a ball point pen or a similar tool Preset adjustments such as preset channels and sound adjustments are erased E ng l i sh EN ...

Page 25: ...ional information Detach the front panel You can detach the front panel to deter theft 1 Press to release the panel 2 Press the left side of the panel rightward 3 Pull the panel towards you to detach it from the chassis 4 Store the panel in the supplied carry case to protect it from dirt or damage Replace fuse If the fuse is damaged 1 Check the electric connection 2 Buy a fuse that matches the vol...

Page 26: ...album is an album that does not contain MP3 WMA files and is not be shown in the display Unsupported file formats are skipped For example Word documents doc or MP3 files with extension dlf are ignored and not played AAC WAV PCM audio files DRM protected WMA files wav m4a m4p mp4 aac WMA files in Lossless format 10 Product information Note Product information is subject to change without prior notice Pow...

Page 27: ... or remove any obstacle between the device and the system 11 Troubleshooting Caution Never remove the casing of this apparatus To keep the warranty valid never try to repair the system yourself If you encounter problems when using this apparatus check the following points before requesting service If the problem remains unsolved go to the Philips web site www philips com support When you contact P...

Page 28: ... poor Move the mobile phone closer to the car audio system or remove any obstacle between the mobile phone and the system Some mobile phones may connect and disconnect constantly when you make or end calls This does not indicate any malfunction of the system For some mobile phones the Bluetooth connection may be deactivated automatically as a power saving feature This does not indicate any malfunc...

Page 29: ...emory card with a flash memory SDHC Secure Digital High Capacity SDHC is a type of flash memory card based on the SDA 2 00 specification The SDA 2 00 specification enables SD cards to reach higher capacities from 4GB to 32GB and growing W WMA Windows Media Audio An audio format owned by Microsoft is a part of Microsoft Windows Media technology Includes Microsoft Digital Rights Management tools Windows...

Page 30: ...31 Po r t u gu ês PT BR ...

Page 31: ... 2010 Koninklijke Philips Electronics N V All rights reserved Document order number CEM5000_55_UM_V1 0 ...

Reviews: