background image

38

EN


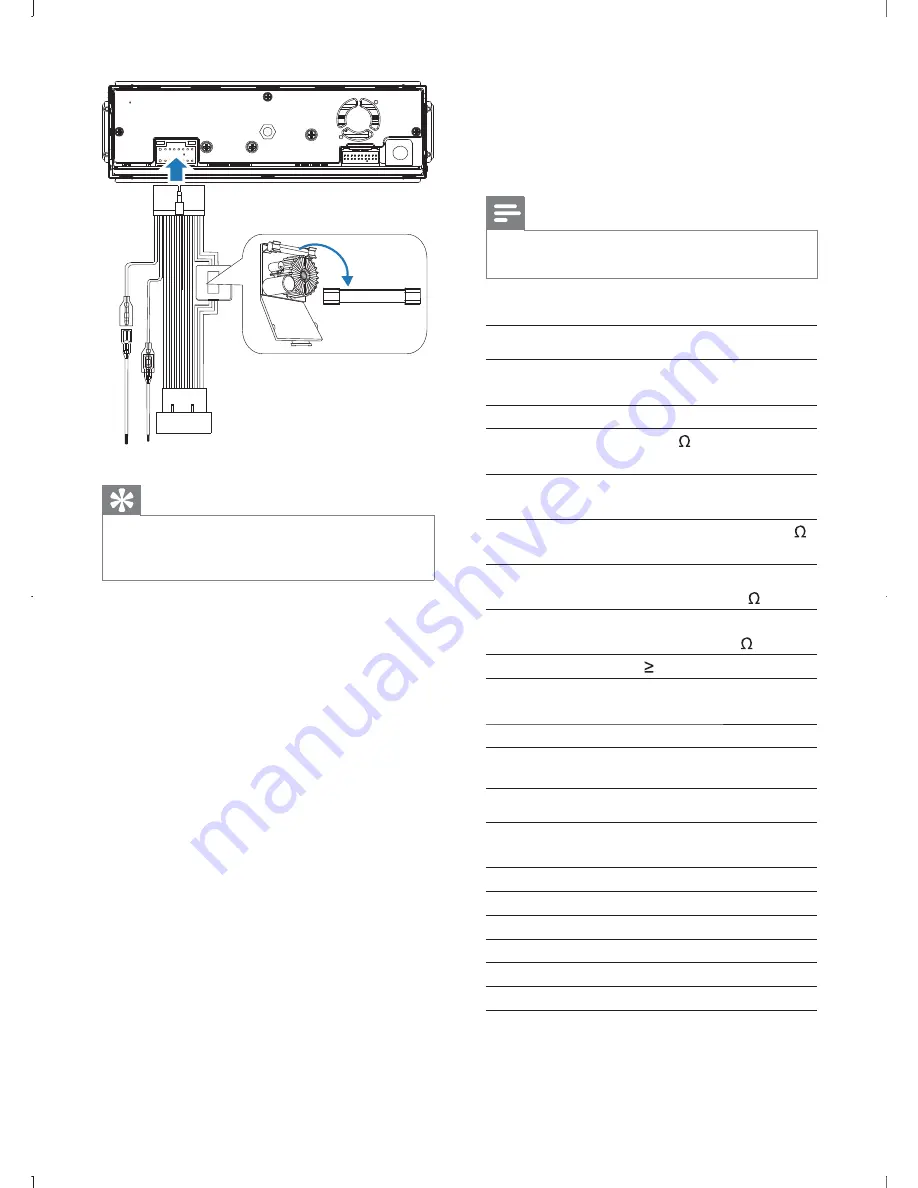
Tip


If the fuse breaks immediately after it has been 
replaced, there may be an internal malfunction. In this 
case, consult your Philips dealer.

FUSE (15A)

13 Product 

information

Note


Product information is subject to change without prior 
notice.

General

Power supply

12 V DC (11 V - 16 V), 
negative ground

Fuse

15 A

Suitable speaker 
impedance

4 - 8 

Maximum power 
output

50 W x 4 channels

Continuous power 
output

24 W x 4 channels (4   
10% T.H.D.)

Pre-Amp output 
voltage

4.0 V ( CD play mode; 1 
kHz, 0 dB, 10 k   load)

Subwoofer output 
voltage

4.0 V (CD play mode, 61 
Hz, 0 dB, 10 k   load)

Aux-in level

 800 mV

Dimensions (W x 
H x D)

182 x 53 x 210 mm

Weight (main unit)

3.1 kg

Disc player

System

DVD / CD audio / 
MP3 system

Frequency response

20 Hz - 20k Hz

Signal/noise ratio

>75dB

Total harmonic distortion

Less than 1%

Channel separation

>50dB

Video signal format

NTSC/PAL only

Video output

1 +/- 0.2Vp-p

Summary of Contents for CED780

Page 1: ...Register your product and get support at www philips com welcome User manual 3 Ԛ ʹ 43 CED780 ...

Page 2: ...program type 24 RDS program types 24 Activate AF TA functions 25 7 Use navigation system 25 Insert map card 25 Use map 25 8 Play with Bluetooth device 26 Pair the Bluetooth enabled devices 26 Make a call 27 Receive call 27 Bluetooth phone book settings 28 Favorite call 28 Adjust Bluetooth settings 28 Listen to music from Bluetooth device 29 9 Play iPod 29 Compatible iPod iPhone 29 Listen to the iP...

Page 3: ...4 EN Reset 37 Replace fuse 37 13 Product information 38 Playability information 39 14 Troubleshooting 40 About the Bluetooth device 40 ...

Page 4: ...ice Risk of damage to the screen Never touch push rub or strike the screen with any object Never use solvents such as benzene thinner cleaners available commercially or anti static sprays intended for discs Clean the device with soft damp cloth Never use substances such as alcohol chemicals or household cleaners on the device Notice The making of unauthorized copies of copy protected material incl...

Page 5: ...ackaging materials exhausted batteries and old equipment Recycling Your product is designed and manufactured with high quality materials and components which can be recycled and reused When you see the crossed out wheel bin symbol attached to a product it means the product is covered by the European Directive 2002 96 EC Never dispose of your product with other household waste Please inform yoursel...

Page 6: ...hority to operate the equipment 2011 Koninklijke Philips Electronics N V All rights reserved notice Trademarks are the property of Koninklijke Philips Electronics N V or their respective owners Philips reserves the right to change products at any time without being obliged to adjust earlier supplies accordingly 2 Your in car entertainment system Congratulations on your purchase and support that Ph...

Page 7: ...it and front panel with a sleeve b Remote control c Trim plate d Carrying case for front panel e ISO standard connector b a d c f e i g h l j k f Audio andVideo cable g Hexagon head screw h Screws M4x8mm x4 i Remote control battery j Rubber cushion k User manual l Quick start guide ...

Page 8: ... on or off Mute or unmute sound Rotate to adjust volume d BAND Select tuner band a b c d e i j k p a b c d e f g n h j k o m l q e PRESET Select preset radio station Search for track folder f DISP Adjust dimmer settings Press and hold to turn offTFT display g TILT Adjust position of the screen h Eject disc i NAVI Enter GPS navigation system ...

Page 9: ...st backward forward playback p RESET Reset the unit when it hangs up q SD SDHC card slot Overview of the remote control a Turn the unit on or off b NAVI Enter GPS navigation system c SOURCE Select source d Mute or unmute sound e BAND Select tuner band f VOLUME Adjust volume g SUBTITLE Select DVD or DivX subtitle language f h j l m o e g i k n p a b d c q r t v y x s z w u ...

Page 10: ...ial or redial number r Terminate call s Browse photos t Switch to music playing mode u Skip to previous next preset station Skip to previous next folder Search backward forward for DVD video Move cursor up down v Start play or pause w OK x Skip to previous next track chapter Move cursor to left right y TurnTFT on or off z DVD AUDIO Select audio language or audio channel TOP MENU Return to top menu...

Page 11: ...oving parts e g seat rail Ensure that all ground earth leads are connected to a common ground earth point Use only the supplied mounting hardware for a safe and secure installation need to change the fuse consult a professional Note on the power supply lead yellow When you connect other devices to this system ensure that the rating of the car circuit is higher than the total fuse value of all the ...

Page 12: ... speaker Rear 2 Connect the other end of the supplied standard connector to the car audio system Caution To avoid any accident the driver must not watch video while driving This unit is designed to not allow watching moving video while driving Park your car in a safe place and engage the parking brake before watching moving video Note The video blocking system under parking brake not engaged only ...

Page 13: ...14 EN 1 2 3 4 5 6 7 8 90 18 19 20 21 22 ...

Page 14: ...ard Note Check wire connection before you mount the unit into a car If preset radio stations are lost when the ignition key is turned off and then turned on reconnect the red leads crosswise to the yellow ones 1 If the car does not have an on board drive or navigation computer disconnect the negative terminal of the car battery If you disconnect the car battery in a car that has an on board drive ...

Page 15: ...is step Attach the front panel 1 Attach the trim plate 2 Insert the left side of the panel in the chassis until it is correctly engaged 3 Press the right side of the panel until the mechanism locks it into place Install remote control battery Caution Risk of explosion Keep battery away from heat Note not to be used for a long time Battery contain chemical substances It should be disposed of proper...

Page 16: ...ution Risk of road accidents Never watch videos or adjust settings while you drive 1 Press to turn the unit on The available OSD On Screen Display languages are displayed 2 The OSD language is changed to the selected language immediately 3 The OSD region is changed to the selected radio region immediately 4 Set date and time 1 Tap to display main menu ...

Page 17: ...You can play video audio or images stored on the following discs DVD video DVD R DVD RW VCD Audio CD CD R CD RW 1 Insert the disc into the disc slot with label side facing up The disc starts playing automatically 2 To remove the disc press the button When the disc is ejected the unit switches to the previous source if connected Otherwise the unit switches to Radio mode automatically Note Supported...

Page 18: ... To remove the USB device switch the car take off the USB device When USB device is disconnected it plays the previous source Insert SD card Note This device supports Secure Digital High Capacity SDHC card 1 Detach the front panel see Detach the front panel on page 39 2 Insert the SD card into SD card slot Play starts automatically Remove SD card 1 Switch to another source 2 Press the card until y...

Page 19: ... corner to display the control bar 2 Tap repeatedly to select audio track The audio channel information is displayed on upper line of the screen Tip You can also press DVD AUDIO on the remote control repeatedly to change audio track Select subtitle language For DVD or DivX discs that contain two or more subtitle languages 1 During play tap anywhere except for the upper left corner to display the c...

Page 20: ...line of the screen to select play the current track repeatedly play all tracks in the current folder repeatedly cancel repeat play Random play _ During play tap repeatedly to turn random play on or off red start random play gray cancel random play Select audio mode When you playVCDs you can select an audio mode R L Stereo 1 During play tap anywhere except for the upper left corner to display the c...

Page 21: ...to display home menu 2 Tap Band and frequency information is displayed 3 Tap FM or AM to select band FM band options FM1 FM2 FM3 AM band options AM1 AM2 4 or to tune to a radio station by step Tap or for over one second to tune to a radio station automatically Tip You can also press BAND on the front panel or remote control repeatedly to select the band Select radio range Before you start to searc...

Page 22: ...over two seconds The station is saved under the selected channel Store stations automatically You can search for a station with intro search which broadcasts a 10 second preview of each detected radio station 1 Select band 2 Tap 3 Tap Auto Store Auto search starts The six strongest stations of the selected band are saved in preset channels 1 6 automatically Tune to a preset station 1 Select band 2...

Page 23: ...is displayed 2 Tap PTY list The PTY list of available program type is displayed 3 select an option The setting is changed RDS program types Item Program type Description 1 NEWS News services 2 AFFAIRS Politics and current affairs 3 INFO Special information programs 4 SPORT Sports 5 EDUCATE Education and advanced training 6 DRAMA Radio plays and literature 7 CULTURE Culture religion and society 8 S...

Page 24: ...ion when the tuner cannot get a good reception TA automatically no matter what source you are listening to 7 Use navigation system Insert map card Note Navigation map card is not included in the packaging of the car entertainment system 1 Press OPEN to release the panel 2 Open the card door under the screen 3 Insert the map card into the map card slot 4 Close the card door 5 Attach the front panel...

Page 25: ...nit and a Bluetooth device can reduce the operational range Keep this unit away from any other electronic device that may cause interference Pairing with unit 1 Tap to display home menu 2 Tap The setting menu is displayed 3 Tap to display Bluetooth setting menu 4 Tap New Pairing to search for Bluetooth device with your device 5 Select the name of desired device in the pairing list 6 Enter default ...

Page 26: ... Bluetooth settings section Make a call You can make phone call with the unit under any mode Note Ensure that the phone is connected to the unit via Bluetooth 1 Tap on top of the screen The dial screen is displayed 2 Tap number icons directly to input phone number Tap to clear the last input Tap to clear all input Tap to go back to previous screen 3 Tap to start calling 4 During talking tap to dis...

Page 27: ...er stored in the phone book 1 Tap on top of the screen The dial screen is displayed 2 Tap to display the phone book mode Tap Sync to synchronize phone book 3 Search the number you want to dial then tap to start calling Tip You can enter desired name number on the keypad to search quickly Favorite call You can make a favorite call from the favorite call list 1 Tap on top of screen The dial screen i...

Page 28: ...ap 4 The Bluetooth menu is displayed Tap switch to music mode Tap switch to dial screen mode Tap switch to phone book Tap switch to favorite list 9 Play iPod Compatible iPod iPhone The car audio system supports below iPod iPhone models Made for iPod touch 4th generation iPod touch 3rd generation iPod touch 2nd generation iPod touch 1st generation iPod classic iPod nano 6th generation iPod nano 5th...

Page 29: ... iPhone to control the music Unit control mode tap screen on car audio to control the music Search for a track During play from iPod iPhone you can search _ _ 1 During playing tap Search list is displayed 2 Tap _ 3 Tap on the screen to select desired song 4 Tap on the selected song to play Charge the iPod iPhone When the iPod iPhone is connected to the car audio system the iPod iPhone begins to ch...

Page 30: ...pping on the screen Bass bass range 14 to 14 Middle middle range 14 to 14 Treble treble range 14 to 14 LPF 160 MPF 1 0KHz 1 5KHz 2 5KHz HPF 12 5KHz 15 0KHz 17 5KHz 4 sound settings tap to restore default settings 5 Tap to exit Adjust fader balance subwoofer You can adjust the sound balance between the front rear left and right speakers and subwoofer 1 Tap on upper line of the screen to display set...

Page 31: ...ng zone setting Turn FullSound on off Philips FullSound restores the audio details that is lost in music compression It enriches the music signal so what you hear is the full sound with every nuance of emotion and every detail of musical genius Philips FullSound can Bring CD listening experience to MP3 Achieve fuller bass with greater depth and impact Restore sense of spaciousness that is lacking ...

Page 32: ...gle between the settings red DBB Dynamic Bass Boost function is activated gray DBB Dynamic Bass Boost function is deactivated 11 Adjust settings Display system setup menu 1 Tap to display the full menu 2 Tap The settings menu is displayed Adjust general settings 1 Tap 2 Drag the bar downward to view all settings 3 select an option The setting is changed ...

Page 33: ... language Calibration Calibrate the touch screen Clock Mode 12Hr 24Hr Select time format Date Set date Time Set time Parking On Turn parking on Off Turn parking off Camera PAL NTSC Select camera format Demo On Turn demo mode on Off Turn demo mode off 4 Tap to exit View Info settings 1 Tap 2 Drag the bar downward to view all detailed information of the system Adjust Navigation settings 1 Tap 2 sele...

Page 34: ... 3 Tap to exit Adjust Bluetooth settings 1 Tap 2 Tap on a setting repeatedly to change setting Bluetooth settings Options Description New Pairing Pair new device Auto Connect On If the pre paired device is within effective range the system reconnects to pre paired device automatically Off Need to reconnect manually Auto Answer On Answer paired phone call automatically Off Answer phone call manuall...

Page 35: ...setting menu to set PAL system if your camera is not NTSC system Adjust display design You can change the background screen on the playback mode 1 In any mode tap The option menu is displayed 2 Tap Display Design to set the options Wallpaper tap to change wallpaper on screen Visualizer tap to change visualizer on screen Skin tap to change OSD display color Backlight tap to change main unit button ...

Page 36: ...t side of the panel leftward 3 Pull the panel towards you to disengage it from the chassis 4 Store the panel in the supplied carrying case to protect it from dirt or damage Reset When the unit hangs up you can reset it Press RESET with a ball point pen or similar tool Tip When the unit is reset all the settings remain unchanged Replace fuse If there is no power the fuse may be damaged and need to ...

Page 37: ...edance 4 8 Maximum power output 50 W x 4 channels Continuous power output 24 W x 4 channels 4 10 T H D Pre Amp output voltage 4 0V CD play mode 1 kHz 0 dB 10 k load Subwoofer output voltage 4 0V CD play mode 61 Hz 0 dB 10 k load Aux in level 800 mV Dimensions W x H x D 182 x 53 x 210 mm Weight main unit 3 1 kg Disc player System DVD CD audio MP3 system Frequency response 20 Hz 20k Hz Signal noise ...

Page 38: ... 4000 GHz 2 4835 GHz Compatible Bluetooth Advanced Audio Distribution AudioVideo Remote Supported codecs Receive Transmit SBC Sub Band Codec SBC Sub Band Codec Playability information Compatible devices Memory cards SD SDHC Supported USB formats Supported MP3 WMA formats ISO9660 Joliet MP3 bit rate data rate 32 320 Kbps and variable bit rate WMA v9 or earlier Number of tracks titles maximum 9000 I...

Page 39: ... soft lint free cloth Wipe the disc outwards from the center Disc is defective Try another disc incompatible disc is used Try another disc Disc rating exceeds the restriction setting Change the rating settings to lower one Disc region code is not compatible with the unit Use disc with proper region code No image Parking wire connection is incorrect Check the wiring No image on rear display Check i...

Page 40: ... and then try again The paired mobile phone connects and The Bluetooth reception is poor Move the mobile phone closer to the system or remove any obstacle between the mobile phone and the system Some mobile phones may connect and disconnect constantly when you make or end calls This does not indicate any malfunction of the system For some mobile phones the Bluetooth connection may be deactivated a...

Page 41: ...Specifications are subject to change without notice _ ...

Reviews: