background image

10

EN

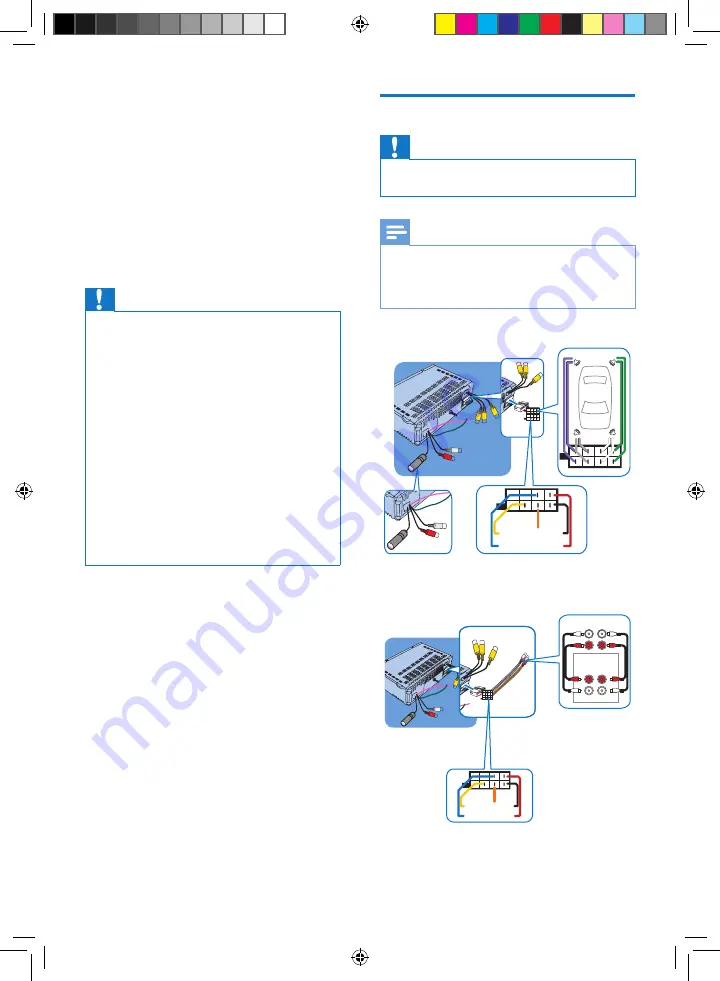
3  Install the car 

audio

These instructions are for a typical installation. 

However, if your car has different requirements, 

make the corresponding adjustment. If you have 

any questions regarding installation kits, consult 

your Philips car audio dealer.

Caution


This unit is designed for negative ground (earth) 12 V 

DC operation only.


Always install this unit in the car dashboard. Other 

locations can be dangerous as the rear of the unit heats 

up during use.


To avoid short-circuit: before you connect, ensure that 

the ignition is off.


Ensure that you connect the yellow and red power 

supply leads after all other leads are connected.


Ensure that all loose leads are insulated with electrical 

tape.


Ensure that the leads do not get caught under screws 

orin parts that will move (e.g. seat rail).


Ensure that all ground (earth) leads are run to a 

common ground (earth) point.


Use only the supplied mounting hardware for a safe 

and secure installation.


Improper fuses can cause damage or fire. When you 

need to change the fuse, consult a professional.

Note on the power supply lead (yellow)

• 

When you connect other devices to this 

apparatus, ensure that the rating of the car 

circuit is higher than the total fuse value of 

all the connected devices.

Notes on speaker connection

• 

Never connect speaker wires to the metal 

body or chassis of the car.

• 

Never connect speaker wires with stripes 

to one another.

Connect

Caution


Make sure that all bare wires are insulated with 

electrical tape.

Note


As different cars have different requirements, you might 

need to connect the device differently from the user 

manual's instructions. In that case, consult a professional 

mechanic to connect.


 OR


+

+

+

+

-

-

-

-

a

j

k

l

f

g

h

i

b

c

d

e

n o

FR

FL

RL

RR

a

b
c

d
e

CED230_51_UM_V2.1.indb   10

8/14/2012   4:37:49 PM

Summary of Contents for CED230/51

Page 1: ...elerate behaviors and keeping our pledges made to maintain Philips high performance culture and achieve exceptional business results Let s continue our Accelerate journey together keep running and winning Register your product and get support at www philips com welcome Always there to help you Руководство пользователя 29 User manual 3 Question Contact Philips Question Contact Philips CED230 51 CED...

Page 2: ...ual tune to a radio station 17 Auto tune to a radio station 17 Store stations manually 17 Store stations automatically 18 Select the preset station 18 Play with RDS 18 7 Adjust sound 19 Dynamic Bass Boost 19 MAX sound 19 Select equalizer settings 20 Select listening zone 20 Other sound settings 20 8 System settings 21 Adjust general settings 21 Select video settings 22 Select language settings 23 ...

Page 3: ...trike the screen with any object Never use solvents such as benzene thinner cleaners available commercially or anti static sprays intended for discs Clean the apparatus with soft damp cloth Never use substances such as alcohol chemicals or household cleaners on the apparatus The product remote control may contain a coin button type battery which can be swallowed Keep the battery out of reach of ch...

Page 4: ...rself about the local rules on the separate collection of electrical and electronic products and batteries The correct disposal of these products helps prevent potentially negative consequences on the environment and human health Your product contains batteries which cannot be disposed of with normal household waste Please inform yourself about the local rules on separate collection of batteries T...

Page 5: ...io from USB drive or external devices Music CDs DVD andVCD video What s in the box Caution Use the controls only as stated in this user manual Register your product and get support at www philips com w elcome EN User manual CED229 Always follow the instructions in this chapter in sequence If you contact Philips you will be asked for the model and serial number of your apparatus The model number an...

Page 6: ...display b MENU Access the system menu c Return to previous menu b c d e t p r o n m l k j i h f g s q a u v w d Screen e Unlock the front panel f USB socket g Remote control sensor h R L 6 Select preset station no 6 Select audio channel CED230_51_UM_V2 1 indb 7 8 14 2012 4 37 43 PM ...

Page 7: ... sound and maximum volume p AS Store radio station automatically q OK MUTE Turn the unit on or off Turn mute on or off Adjust volume Confirm selection r Select tuner band Select folder s Tune for radio station Skip search for track t EQ AUDIO Select equalizer EQ setting Access audio setting menu u Eject disc v Disc slot w RESET Restore default settings Overview of the remote control a TITLE Access...

Page 8: ...ect video output format n SUBTITLE Select DVD subtitle language o DISC MENU Return to DVD main menu p 5 6 7 8 9 0 Select track or preset radio station q SHUF 4 Turn random play on or off Select preset station no 4 r 1 Select preset station no 1 Start play Pause or resume play s INTRO 2 Turn intro play on or off Select preset station no 2 t AUDIO Access audio setting menu u Navigation buttons Tune ...

Page 9: ... seat rail Ensure that all ground earth leads are run to a common ground earth point Use only the supplied mounting hardware for a safe and secure installation Improper fuses can cause damage or fire When you need to change the fuse consult a professional Note on the power supply lead yellow When you connect other devices to this apparatus ensure that the rating of the car circuit is higher than t...

Page 10: ...camera You can view the things that happens behind your car in the display especially you are driving a big vehicle This helps protecting your bumper and anything it might contact Mount into dashboard Note For proper operation of the DVD player the chassis must be mounted within 20 degree horizontal Ensure that the unit is mounted within this limitation Caution Keep the connection of the car batte...

Page 11: ...t panel leftward to release it from the chassis of the main unit 3 Pull the front panel outwards to remove it Install remote control battery Caution Risk of explosion Keep batteries away from heat sunshine or fire Never discard batteries in fire Risk of decreased battery life Never mix different brands or types of batteries Risk of product damage When the remote control is not used for long period...

Page 12: ...rn Off Press and hold the same power button for 3 seconds Adjust volume To adjust volume rotate knob on the front panel or press VOLUME on the remote control Mute Set clock 1 Press MENU 2 Press the navigation buttons to select SETTINGS then press 3 Select GENERAL then press CED230_51_UM_V2 1 indb 13 8 14 2012 4 37 53 PM ...

Page 13: ...display special characters track name ID3 or album name properly It cannot play some WMA is protected by Digital Rights Management DRM The system does not display or play the folders or files that exceed the supporting limit Warning To reduce the risk of traffic accident do not watch video during driving Load and eject discs Warning To reduce the risk of traffic accident do no watch video during d...

Page 14: ...er track or picture Press to start playing Tip If the disc is blocked in the disc compartment press and hold the button until the disc comes out Insert and remove USB device 1 Slide down the USB socket cover 2 Insert the USB device into the USB socket The unit starts playing from the USB device automatically 3 To remove the USB device press to turn off the unit 4 Remove the USB device Skip search ...

Page 15: ... or more audio channels During play press on the remote control repeatedly until the language is selected Intro play This feature plays the first 10 seconds of each audio track Press the button to select an option INTRO 1 play the first 10 seconds of each audio track SEQ PLAY resume normal play Repeat play There are different modes of repeat play for video audio and MP3 WMA Press the button repeat...

Page 16: ...displayed 2 Press the navigation buttons to pan across the display 6 Radio Manual tune to a radio station 1 Press 2 Press the navigation buttons to select RADIO then press 3 Press or to select band FM or AM is display 4 Press or to tune to a radio station manually Auto tune to a radio station In RADIO mode press and hold or for 3 seconds Store stations manually You can store up to 6 stations in ea...

Page 17: ...rogram type then press to start searching 3 Select a channel RDS program types Item Program type Description 1 NEWS News services 2 AFFAIRS Politics and current affairs 3 INFO Special information programs 4 SPORT Sports 5 EDUCATE Education and advanced training 6 DRAMA Radio plays and literature 7 CULTURE Culture religion and society 8 SCIENCE Science 9 VARIED Entertainment programs 10 POP M Pop m...

Page 18: ... different station when the tuner cannot get a good reception REG regional radio sets AF tuning region CT clock time synchronizes the clock of the unit with that on the RDS station 4 Turn to select ON then press to confirm 7 Adjust sound Dynamic Bass Boost 1 Press on the car audio system for 3 seconds or press on the remote control DBB ON The Dynamic Bass Boost DBB function is on DBB OFF The DBB f...

Page 19: ... values 6 Press to exit Select listening zone 1 Press The current zone setting is displayed 2 Press or to select one of the preset zone settings ALL all speakers are in same volume level LEFT front left speaker is louder than the rest of the speakers RIGHT front right speaker is louder than the rest of the speakers FRONT the front speakers are louder than the rear speakers 3 Press to confirm 4 Pre...

Page 20: ... Press to exit 8 System settings Within system settings there are General settings DVD settings Language settings and Radio settings Adjust general settings 1 Press The main menu is displayed 2 Press the navigation buttons to select SETTINGS the press to confirm The settings menu is displayed 3 Press or buttons to select the general setting 4 Press then or to select the sub menu and then press to ...

Page 21: ... Japan Mexico the Philippines South Korea Taiwan and some other countries PAL Used in the United States Canada Japan Mexico the Philippines South Korea Taiwan and some other countries AUTO The correct format is set automatically Select this option if you are not sure which format should be selected TV TYPE 4 3 PS While playing a full height picture the sides of the picture may be trimmed 4 3 LB Wh...

Page 22: ...r saturation Select language settings 1 Press 2 Press the navigation buttons to select SETTING the press to confirm 3 Press or buttons to select the language setting 4 Press and then or to select a language OSD LANGUAGE AUDIO LANG SUBTITLE LANG MENU LANG 5 Press to confirm Adjust turner settings 1 Press 2 Press the navigation buttons to select SETTINGS then press 3 Press to select RADIO then press...

Page 23: ...tion buttons to select AV IN 4 Operate the connected the device see the device s instructions manual Set rear view camera If you connected a rear view camera you can see from the screen of the car audio system what the camera takes when the back lamp lights up 1 In reverse driving mode press The main menu is displayed 2 Press the navigation buttons to select CAMERA Picture from rear camera is disp...

Page 24: ...r on the fuse may be damaged and need replacement 1 Detach the front panel and take out the system 2 Check the electric connection 3 Buy a new fuse that matches the voltage of the damaged fuse 15A 4 Replace the fuse CED230_51_UM_V2 1 indb 25 8 14 2012 4 38 06 PM ...

Page 25: ...AUTO Video output 1 2 0V Tuner Frequency range FM1 FM2 FM3 ORIT 87 5 107 9 MHz 65 74 MHz Frequency range AM MW 522 1620 kHz 9kHz per step Usable sensitivity FM 8 uV Usable sensitivity AM MW 30 uV LCD Screen size 3 inches 16 9 Display resolution 960 x 240 dots Contrast ratio 300 Brightness 250 cd m Compatible USB devices USB flash memory USB 2 0 or USB1 1 USB flash player USB2 0 or USB1 1 Supported...

Page 26: ... doc or MP3 files with extension dlf are ignored and not played AAC WAV and PCM audio files DRM protected WMA files wav m4a m4p mp4 aac WMA files in Lossless format ISO9660 Joliet Maximum title number 512 depending on file name length Maximum album number 255 Supported sampling frequencies 32 kHz 44 1 kHz and 48 kHz Supported bit rates 32 256 Kbps variable bit rates CED230_51_UM_V2 1 indb 27 8 14 ...

Page 27: ...is upwards Disc is dirty Clean the disc with a clean soft lint free cloth Wipe the disc outwards from the center Disc is defective Try another disc Imcompatible disc is used Try another disc Disc rating exceeds the restrict setting Change the rating settings to lower one Disc region code is not compatible with the unit Use disc with proper region code Disc is blocked in the disc compartment Press ...

Page 28: ...Specifications are subject to change without notice 2012 Koninklijke Philips Electronics N V All rights reserved CED230_51_UM_V2 0 CED230_51_UM_V2 1 indb 64 8 14 2012 4 38 34 PM ...

Reviews: