background image

Preparation

General
1.

Press the Stand by On button to switch on the projector.

The lamp indicator
flashes green and the
start up screen appears
for several seconds.

When the average
lamplife time has almost
expired and less than 
100 hours remain, the
message ‘Warning:
lamplife has almost
expired’ will be displayed
on the screen when
switching the projector
on. For this refer to the
section ‘Lamp’ under
‘Maintenance’ 

When the lamp is on, the lamp indicator lights up green.

2.

If you use the 

trackball remote control

:

Set the ON/OFF switch of the remote control to ON in order
to switch on the remote control.

If required, press the light button of the remote control.
When this button is pressed, the button illumination is
switched on for 5 seconds. Every time one of the buttons is
pressed within these 5 seconds, the illumination time is
extended by a further 5 seconds.

3.

Select the required source (Data, Video or S-Video) by
pressing the Source button.

4.

Switch on the computer or start video playback.

A feedback message appears on the screen, indicating the
selected source.

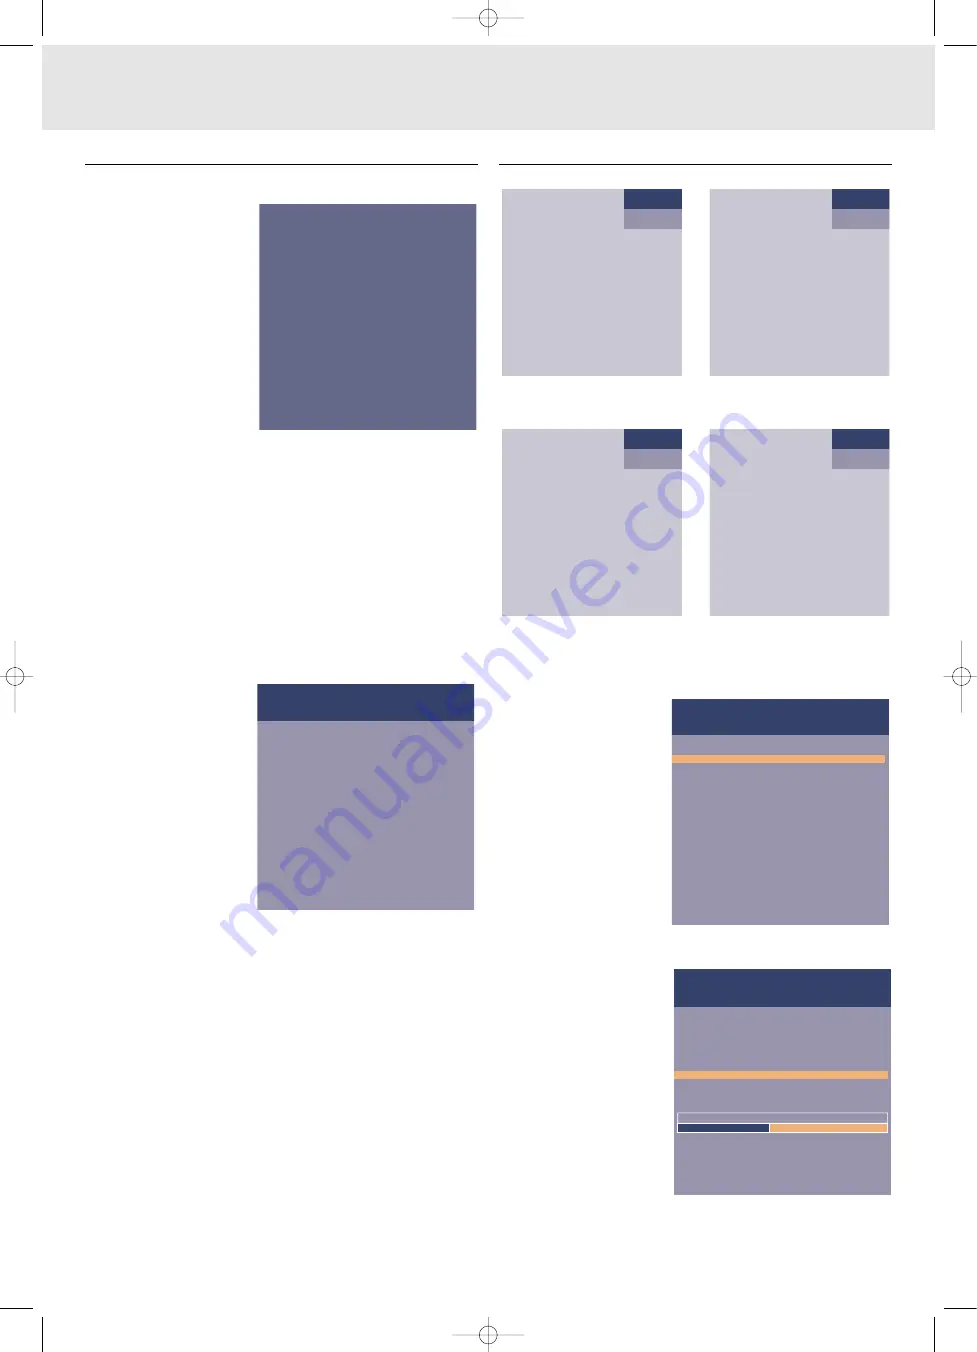
Messages - General explanation

Messages are
displayed in the centre of
the screen. The problem is
described in the header of
the message display.
Suggestion(s) to solve the
problem are displayed in the
gray part of the message
display.
These messages cannot be
suppressed.

Feedback messages

Feedback messages are displayed in the top right corner of the
screen. They are displayed when:

a signal comes up or goes down,

when an input source is changed

when Mute or A/V Mute is activated.

when the Auto image function is set to On.

These messages will only be displayed when the menu option
Feedback is set to ‘On’ in the Settings menu. All messages, will
be removed automatically after 4 seconds.

Some examples:

Data selected as source.

Video selected as source, no
input signal.

S-Video selected as source.

Video selected as source.

A/V muted.

A/V muted.

On Screen Display menu - General explanation

All video and data adjustments and settings (except A/V Mute)
are done via On Screen
Displays and with help of
Menu, OK (

–/– –

) and

Cursor Control on the
projector or the remote
control.

1.

Press Menu.

The menu bar appears on the screen.
The first item
is highlighted and its sub
menu is shown.

Depending on the
selected source (Data,
Video or S-Video) some
options of the submenu
may be greyed out. This
indicates that these
functions:
– are not available in a

certain mode,

– have no function for

the selected source.

For example:

Horizontal size under submenu Display when Auto image is
switched to ON.

Hue under submenu Picture when signaltype is not NTSC.

Picture

Audio

Settings

Display

Digital Freeze

Digital Zoom

1

Magnification

1

Pan...

Keystone correction

Auto Image

1

Horizontal size...

1

Phase

1

Shift...

Auto Image is used to automatically adjust

Horizontal Size, Phase and Shift.

Off

On

Menubar

Submenu

Submenu highlight

Actionwindow

S-Video

A/V Muted

S-Video

A/V Muted

Video

No signal

Data

Fan error

The projector will switch off automatically.

Please contact a service centre for repair.

PHILIPS

PHILIPS

PHILIPS

Multimedia Projectors

Multimedia Projectors

8. Operation

Preparation

15

XP Hopper SV30 Eng.*  05-09-2000 11:56  Pagina 15

Summary of Contents for cBright Series

Page 1: ...trusted dependable name in projector lamp sales http www myprojectorlamps com http www myprojectorlamps ca http www myprojectorlamps eu The following projector manual has not been modified or altered in any way ...

Page 2: ...Philips Multimedia projector cBright Series LC4345 LC4341 LC4331 User guide English Me nu OK AV Mu te Key sto ne Vol um e Sta nd by Lam p RC XP Hopper SV30 Eng 05 09 2000 11 56 Pagina 1 ...

Page 3: ...t Data in a c j i b d e f g b fig 1 fig 4 0 Controls and connections VOLUME OK MENU MUTE D ZOOM D FREEZE SOURCE MOUSE Right Left Volume OK Menu Stand by On Mute D Zoom D Freeze Source Mouse Right Left 2 3 1 9 6 5 4 0 7 8 AV MUTE AV MUTE AV Mute Menu Volume Stand by On AV Mute D Zoom D Freeze Source Menu Volume Stand by On AV Mute D Zoom D Freeze Source OK OK 3 2 1 9 5 0 6 7 8 4 fig 2 fig 3 LC4341 ...

Page 4: ...h the limits for a class A digital device in accordance with Part 15 of the FCC Rules as well as the European CE marking Operation is subject to the following two conditions 1 This device may not cause harmful interference and 2 This device must accept any interference received including interference that may cause undesired operation These limits are designed to provide reasonable protection agai...

Page 5: ...ped with mains lead with a 3 pin grounded plug for USA versions only or a 2 pin grounded plug for European versions only The 3 pin 2 pin grounded plug will fit only into a grounding type power outlet If the plug does not fit use an adapter that is properly grounded or have an electrician install a grounded type outlet Do not attempt to modify this AC plug 13 For added protection of the projector d...

Page 6: ...d on the compact remote control function as Cursor Control and are used to manipulate the mouse cursor on the connected computer as long as the menu is not active On the trackball remote control standard with models LC4345 and available as accessory for the other models the trackball is used to manipulate the mouse cursor When the menu is active the Cursor Control controls the menu cursor The loca...

Page 7: ...jected image Focus ring To adjust the focus of the projected image Height Level adjusters To adjust the vertical and or horizontal angle of the projector Lens cap To protect the lens when the projector is not in use IR sensor To receive the signals from the remote control On compact remote control LC4341 4331 fig 2 1 Stand by On To switch the projector in or out the the power standby mode 2 Mouse ...

Page 8: ...actor chosen under Magnification in the menu and the Cursor Control can be used to select the enlarged area Panning 0 A udio V ideo Mute To mute the sound of the projector or an externally connected sound amplifier and to mute the picture Back light button To switch on the button illumination The back light will automatically switch off after 5 seconds Connections fig 4 Data source connections a A...

Page 9: ...e the lamp is starting up and the start up screen appears for several seconds 4 Press the Stand by On button again to switch the projector back into the power standby mode The Standby Warning screen will appear for 20 seconds Note The Stand by Warning screen can be removed by keeping the Stand by On button pressed for 3 seconds If the Stand by On button is pressed for 3 seconds the first time step...

Page 10: ...ling fan has stopped about 3 minutes after the projector has been switched off and disconnect the mains lead and all other cables 3 Make sure the lens is turned back in to prevent damage to the lens 4 Put the lens cap back in place to prevent dust dirt or other contamination from harming or damaging the front of the projector lens when moving the projector Note Never place the projector on the sid...

Page 11: ...o a Macintosh computer a programmable VGA MAC adapter is available as an optional Philips cable accessory 7 Installation 10 No CONNECTIONS Computer AV products side Projector side Integrated VGA USB Cable CABLE ADAPTER Mini D Sub 15P male RCA pin male x 3 Mini D Sub 15P male RCA pin male x 3 3 RCA Audio Video Cable 1 2 Scart RCA AV Adapter USB connector 4P female USB connector 4P female depending ...

Page 12: ...nect the Data out terminal of the computer to the Data in terminal g of the projector and secure the plugs by tightening the thumb screws For this use the VGA USB cable 1 supplied When connecting the projector to a Macintosh computer use the VGA MAC adaptor optional 2 Connect the USB upstream socket b of the projector to the USB downstream port of the computer For this use the VGA USB cable 1 supp...

Page 13: ...r this use an optional S vVideo connection cable 2 Connect the Audio out L R sockets of the S VHS video recorder Laser Disc player video camera or TV to the Audio in L R sockets c of the projector For this use the red and white audio connectors of the audio video connection cable Insert the white plug into the L socket and the red plug into the R socket In case your VCR Laser Disc player video cam...

Page 14: ...em to the Audio out socket a of the projector Insert the white plug into the L socket and the red plug into the R socket Note When the projector is connected to an external audio amplifier you cannot control the volume via the projector or the remote control However the sound can still be muted via the projector or the remote control Projector Amplifier L Audio R in L Audio R in Audio out USB L Au...

Page 15: ...For this use an optional monitor cable To obtain the audio signal on the monitor instead of on the projector Connect the Audio in sockets of the monitor to the Audio out socket a of the projector Insert the white plug into the L socket and the red plug into the R socket Some monitors have a single Audio in socket for which a different audio connection cable with a 3 5 mm mini jack is required Note...

Page 16: ...n when an input source is changed when Mute or A V Mute is activated when the Auto image function is set to On These messages will only be displayed when the menu option Feedback is set to On in the Settings menu All messages will be removed automatically after 4 seconds Some examples Data selected as source Video selected as source no input signal S Video selected as source Video selected as sour...

Page 17: ...or the first time be sure to adjust the phase control for optimal readability of the projected text Data and Video S Video For both data and Video S Video signal input the following adjustments can be made Digital Freeze captures a moving picture still picture Digital Zoom enlarges a part of the picture Pan selects another section of enlarged picture in combination with digital zoom Keystone Corre...

Page 18: ... the value set by the Auto image function Switching to another data mode automatically restores Auto image if the data mode is not part of the ten most recently used display modes Shift The Shift function adjusts the computer image in horizontal and vertical direction to center it on the screen This function is only active when Auto image is set to OFF 1 Press Menu The menu bar appears on the scre...

Page 19: ...pecifications at the factory However you can adjust the sound to suit your own preferences by using the Audio control feature The following adjustments can be made Volume adjusts the sound level Bass adjusts the bass tones Treble adjusts the high tones Mute mutes the sound of the projector or an externally connected loudspeaker 1 Select the required input Data Video or S Video 2 Press Menu The men...

Page 20: ... screens displayed or Off to suppress the display of OSD screens 5 Press Menu to close the On Screen Display Key lock Key lock is used to de activate all remote and local controls You have to switch the projector off and on again by pulling out the mains cable to unlock the keys 1 Press Menu The menu bar appears on the screen 2 Use Cursor Control to move the cursor to Settings 3 Select Key lock by...

Page 21: ... 9 Replace the cover Notes We advise you to clean the filter every 100 hours Operating the projector without filter or with a torn or damaged filter may seriously damage the projector When the filter is damaged replace it with a filter of the same type 12 nc 3122 434 01180 The projector power cannot be switched on again unless the filter holder is installed correctly Maintenance of the trackball r...

Page 22: ...s 3 Turn the projector over Never place the projector on the side where the connections are located 4 Unscrew the screws at the bottom of the cover and remove the cover 5 Read the caution and warning labels on the lamp cover 6 Unscrew the lamp holder 7 Grasp the lamp holder handle and carefully pull the lamp holder out of the projector FILT ER FILT ER FILT ER FILT ER L A M P L A M P FILT ER FILT E...

Page 23: ...tor 14 Reset the lamp life time see Resetting the lamplife time 15 Properly dispose of the old lamp Note When replacing the lamp always use the same type of lamp LCA3111 00 12NC 8670 931 11009 Resetting the lamplife time 1 Press Menu The menu bar appears on the screen 2 Use cursor control to select Settings in the menu bar 3 Use cursor control to select Lamp counter in the sub menu 4 Press OK for ...

Page 24: ...to activate the projector again Blocked air inlets dirty dust filter The projector will go into Standby mode Clean air inlets or dust filter and allow the projector to cool down this may take up to 30 minutes When the LED stops flashing press any key to activate the projector again Poor colour Wrong video system has been selected Select the correct video system see the selection of the video syste...

Reviews: