background image

7

EN

3  Get started

Caution


Use the controls only as stated in this user manual.

Always follow the instructions in this chapter in 

sequence.

If you contact Philips, you will be asked for the 

model and serial number of your apparatus. The 

model number and serial number are on the 

bottom of your apparatus. Write the numbers 

here: 

Model No. __________________________

Serial No. ___________________________

Install the car audio

These instructions are for a typical installation. 

However, if your car has different requirements, 

make the corresponding adjustment. If you have 

any questions regarding installation kits, consult 

your Philips car audio dealer.

Caution


This unit is designed for negative ground (earth) 12 V 

DC operation only.


Always install this unit in the car dashboard. Other 

locations can be dangerous as the rear of the unit heats 

up during use.


To avoid short-circuit: before you connect, ensure that 

the ignition is off.


Ensure that you connect the yellow and red power 

supply leads after all other leads are connected.


Ensure that all loose leads are insulated with electrical 

tape.


Ensure that the leads do not get caught under screws 

orin parts that will move (e.g. seat rail).


Ensure that all ground (earth) leads are run to a 

common ground (earth) point.


Use only the supplied mounting hardware for a safe 

and secure installation.


Improper fuses can cause damage or fire. When you 

need to change the fuse, consult a professional.

Note on the power supply lead (yellow)

• 

When you connect other devices to this 

apparatus, ensure that the rating of the car 

circuit is higher than the total fuse value of 

all the connected devices.

Notes on speaker connection

• 

Never connect speaker wires to the metal 

body or chassis of the car.

• 

Never connect speaker wires with stripes 

to one another.

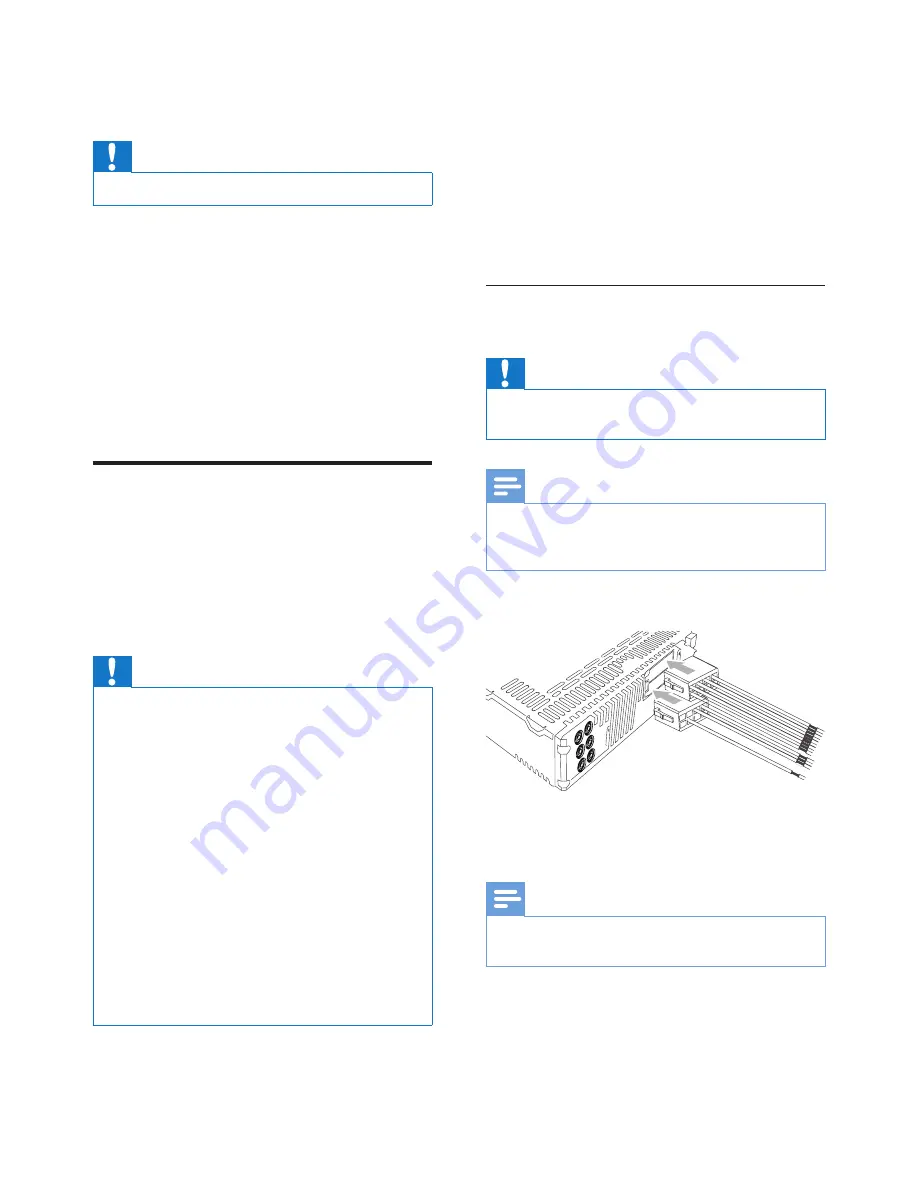
Connection: for cars with ISO 

connectors

Caution


Ensure that all loose leads are insulated with electrical 

tape.

Note


Consult a professional to connect CEM3100 as 

instructed below.


The ISO male connectors are not supplied.

Connect the male connector to the unit.


Check the car's wiring carefully and 

connect them to the the male connector.

Note


Risk of danger! Please consult a professional to perform 

the below steps!

Summary of Contents for CarStudio CEM3100

Page 1: ...Register your product and get support at www philips com welcome Always there to help you CEM3100 12 User manual Question Contact Philips ...

Page 2: ...2 ...

Page 3: ...a disc 14 Play from USB 15 Play from iPod iPhone 15 Play options 16 Connect external sound source 17 6 Adjust sound 17 Adjust volume 17 Mute 17 Turn Dynamic Bass Boost DBB on off 17 Turn on off MAX sound 17 Select preset equalizer 18 Switch music listening zone 18 Turn on off full sound 18 Other sound settings 18 7 Adjust system settings 19 Turn beep sound on off 19 Select blackout setting 19 Turn...

Page 4: ...f controls or adjustments or performance of procedures other than herein may result in hazardous radiation exposure or other unsafe operation The apparatus shall not be exposed to dripping or splashing Do not place any sources of danger on the apparatus e g liquid filled objects lighted candles Notice Any changes or modifications made to this device that are not expressly approved by Philips Consu...

Page 5: ...nd or other countries Made for iPod and Made for iPhone mean that an electronic accessory has been designed to connect specifically to iPod or iPhone respectively and has been certified by the developer to meet Apple performance standards Apple is not responsible for the operation of this device or its compliance with safety and regulatory standards Please note that the use of this accessory with ...

Page 6: ...ning to FM or AM MW radio Audio from CD or MP3 disc Audio from USB devices Audio from iPod iPhone Audio from other external devices The unit supports the following media format What s in the box Check and identify the contents of your package a Main unit with a sleeve b Remote control c Front panel d Trim plate e Carrying case for front panel f Rubber cushion g Screw x 1 pc h Disassembly tools x 2...

Page 7: ...evious menu Access music search in iPod iPhone mode d m p n o h r q f g a d c b t s l k j i e Turn the unit on or off Confirm selection Mute or unmute sound Rotate to adjust volume e Select tuner band Select MP3 WMA folder Switch music listening zone Turn on or off full sound Enter iPod iPhone control mode f Eject disc ...

Page 8: ...lder n Tune for radio station Skip search for track Fast backward forward playback o DISP Display current status Turn the dimmer on and off p EQ AUDIO Select equalizer EQ setting Access audio setting menu q Unlock the panel r BAND Select tuner band s RESET Restore default settings t Disc slot Overview of the remote control a VOL Adjust volume b Select tuner band Scroll up down menu Select MP3 WMA ...

Page 9: ...l other leads are connected Ensure that all loose leads are insulated with electrical tape Ensure that the leads do not get caught under screws orin parts that will move e g seat rail Ensure that all ground earth leads are run to a common ground earth point Use only the supplied mounting hardware for a safe and secure installation Improper fuses can cause damage or fire When you need to change the...

Page 10: ...enna 2 FRONT LINE OUT R Socket Front right speaker 3 FRONT LINE OUT L Socket Front left speaker 4 REAR LINE OUT R Socket Rear right speaker 5 REAR LINE OUT L Socket Rear left speaker 6 OE REMOTE Purple OE Remote 7 TEL MUTING Blue To cellular phone system 8 SUBWOOFER Blue Subwoofer 9 REAR AUX LINE OUT R Rear Aux right 10 REAR AUX LINE OUT L Rear Aux left Tip The pin arrangement for the ISO connecto...

Page 11: ... that car dashboard opening is within these measurements 3 Remove the mounting sleeve with the supplied disassembly tools 4 Install the sleeve into the dashboard and bend the tabs outward to fix the sleeve Note If the unit is not fixed by sleeve but by the supplied screws skip this step 183 mm 53m m 5mm 5 Place the supplied rubber cushion over the end of the mounting bolt 6 Slide the unit into the...

Page 12: ...periods remove the batteries Perchlorate Material special handling may apply See www dtsc ca gov hazardouswaste perchlorate For first time use Remove the protective tab to activate the remote control battery To replace the remote control battery 1 Open the battery compartment 2 Insert one CR2025 battery with correct polarity as indicated 3 Close the battery compartment Turn on To turn on the unit ...

Page 13: ...to a radio station manually The radio station is broadcast To search for a radio station automatically press or Select tuner region You can select suitable country region of the radio 1 Press SOURCE to select radio mode 2 Press MENU repeatedly until AREA is displayed 3 Rotate to select USA United States LATIN Latin America EUROPE Western Europe M EAST Middle East ASIA Asia Pacific JAP Japan AUST A...

Page 14: ...ation 1 Press BAND to select band 2 Press a numeric key to select a preset station Play with RDS The RDS Radio Data System function operates only in areas with FM stations broadcasting RDS signals If you tune to an RDS station the station name are displayed Turn on RDS Note The default setting for RDS is on 1 Press MENU 2 Press or repeatedly until RDS is displayed 3 Rotate to select RDS ON The RDS...

Page 15: ...F tuning You can define AF tuning region REG ON Only stations in current region can be tuned to automatically REG OFF All stations can be tuned to automatically 1 Press MENU 2 Press or repeatedly until REG is displayed 3 Rotate to select a setting Receive traffic announcement If you do not want to miss traffic announcement when enjoying music turn on theTA Traffic Announcement function 1 Press MEN...

Page 16: ...or device contains playable files Play a disc Note You cannot play CDs encoded with copyright protection technologies You can play commercially available audio CDs and these discs CD Recordables CD R CD Re writables CD RW MP3 CDs WMA CDs Note Ensure that the disc contains playable content Insert a CD with the printed side facing up Play starts automatically To pause CD play press To resume CD play...

Page 17: ... 8GB iPod nano 4th generation iPod nano 5th generation iPod nano 6th generation iPod classic 1st generation iPod classic 2nd generation iPod touch 1st generation iPod touch 2nd generation iPod touch 3rd generation iPod video 30GB 80GB Works with iPhone iPhone 3G iPhone 3GS iPhone 4 iPhone 4S Connect iPod iPhone 1 Slide the USB socket cover marked to the left 2 Insert USB adaptor on one end of iPod...

Page 18: ...control mode Play options Search for an MP3 WMA track Search within the current folder 1 Press The name of the current track is displayed 2 Rotate to select anther track in current folder 3 Press to confirm Search in other folder 1 Press The name of the current folder is displayed 2 Rotate to navigate through all folders 3 Press to access the selected folder The unit starts playing the first song ...

Page 19: ...e external component 6 Adjust sound Adjust volume Turn clockwise counterclockwise to increase decrease volume Mute You can turn off the sound of your audio During play press To resume sound press again Turn Dynamic Bass Boost DBB on off 1 Press DBB and the current setting is displayed DBB ON Dynamic Bass Boost DBB function is on DBB OFF Dynamic Bass Boot DBB function is off 2 Press DBB again to ch...

Page 20: ... on off full sound 1 Press and hold The current setting displays FULL ON The full sound function is on FULL OFF The full sound function is off 2 Press again to select an option Other sound settings You can also adjust the preset EQ AUDIO settings 1 Press EQ AUDIO for 3 seconds 2 Press or repeatedly to select the item to be adjusted SUBWOOFER ON OFF Rotate to turn on or off the subwoofer SUBWOOFER ...

Page 21: ...FF Never turn off the screen Turn demo mode on off 1 Press MENU 2 Press or repeatedly until DEMO is displayed The screen shows current Demo mode setting 3 Rotate to select a setting DEMO ON Turn on the demo mode When the unit is idle for more than 120 seconds all functions are displayed DEMO OFF Turn off the demo mode Dimmer 1 Press MENU 2 Press or repeatedly until DIMMER is displayed 3 Rotate to ...

Page 22: ... green 1 GREEN 2 green 2 GREEN 3 green 3 AMBER amber PINK 1 pink 1 PINK 2 pink 2 PURPLE 1 purple 1 PURPLE 2 purple 2 BLUE 1 blue 1 BLUE 2 blue 2 USER COLOR user color Audiobook In iPod iPhone mode you can set the audiobook playback speed on this car audio 1 Press MENU 2 Press or repeatedly until AUDIOBOOK is displayed 3 Rotate to select a setting FAST SLOW NORMAL Reset You can reset the unit to it...

Page 23: ...rying case to protect it from dirt or damage Replace fuse If the fuse is damaged 1 Check the electric connection 2 Buy a fuse that matches the voltage of the damaged fuse 3 Replace the fuse Note If the new fuse gets damaged again there may be an internal malfunction Consult your Philips dealer Remove the unit You can remove the unit from the dashboard 1 Detach the front panel 2 Pull out the unit b...

Page 24: ...e reading all speed support 1 1 2 0 USB flash players USB 1 1 host with interface reading all speed support 1 1 2 0 Supported formats USB or memory file format FAT16 FAT32 MP3 bit rate data rate 32 320 Kbps and variable bit rate WMAV4 V7 V8 V9 L1 L2 ISO9660 Joliet Supported sampling frequencies 2 kHz 44 1 kHz 48 kHz Supported Bit rates 2 256 kbps variable bit rates Directory nesting up to a maximu...

Page 25: ... Ensure that the track played is of a compatible format Noise in broadcasts Signals are too weak Select other stations with stronger signals Check the connection of the car antenna Change broadcast from Stereo to mono Cannot play disc Ensure that the disc label is inserted with the printed side facing up Wipe the disc with fibre cleaning cloth from the centre to the edge in a straight line This di...

Page 26: ...dio Layer 3 With the MP3 format one CD R or CD RW can contain about 10 times more data than a regular CD W WMA Windows Media Audio An audio format owned by Microsoft is a part of Microsoft Windows Media technology Includes Microsoft Digital Rights Management tools Windows MediaVideo encoding technology and Windows Media Audio encoding technology ...

Page 27: ...25 EN ...

Page 28: ...Specifications are subject to change without notice 2012 Koninklijke Philips Electronics N V All rights reserved CEM3100_12_UM_V3 0 ...

Reviews: