background image

10

EN

Program tracks

You can program a maximum of 20 tracks.

Press 

PROG

 to activate the program 

mode.

For MP3 tracks, press   /   to select an 

album.

Press   /   to select a track, and then 

press 

PROG

 to confirm.

Repeat steps 2-3 to program more tracks.

Press 

 to play the programmed tracks.


»

During play, 

[PROG] 

(program) is 

displayed.

• 

To erase the program, in the stop 

position, press  .

Play from Bluetooth-enabled 

devices

Note


The effective operation range between the unit and 

your Bluetooth enabled device is approximately 10 

meters (30 feet). 


Any obstacle between the system and the device can 

reduce the operational range. 


Compatibility with all Bluetooth devices is not 

guaranteed.


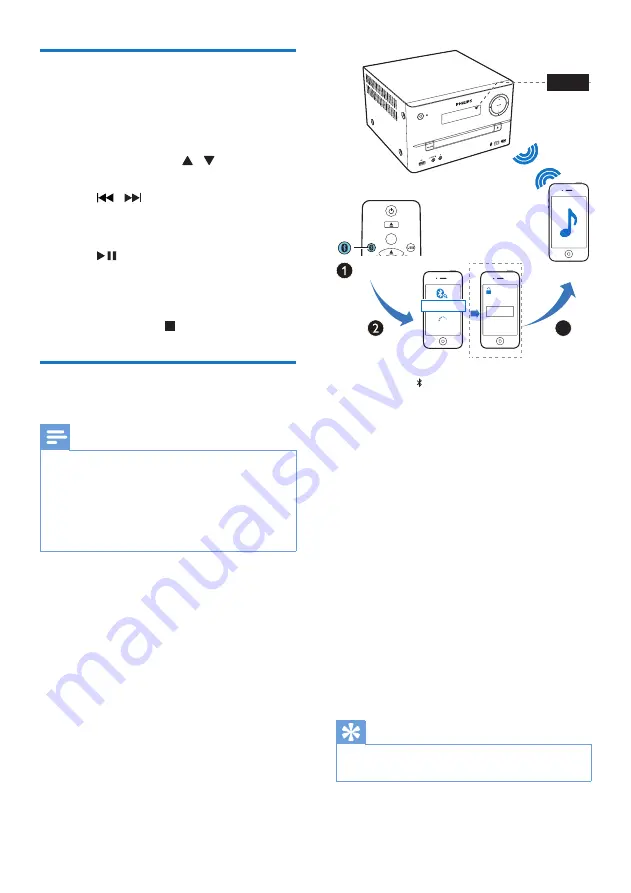
Press 

FM/ 

 repeatedly to select the 

Bluetooth

 source.


»

[BT] 

(Bluetooth) is displayed.


»

The Bluetooth indicator flashes blue.

On your device that supports Advanced 

Audio Distribution Profile (A2DP), enable 

Bluetooth and search for Bluetooth devices 

that can be paired (refer to the user 

manual of the device).

Select '

PHILIPS BTM3160

' on your 

Bluetooth enabled device and if necessary 

input '0000' as the paring password. 


»

After successful pairing and connection, 

the Bluetooth indicator turns solid 

blue, and the unit beeps twice.

Play audio on the connected device.


»

Audio streams from your Bluetooth 

enabled device to this unit.

Tip


The unit can memorize up to 8 previously connected 

Bluetooth devices.

3

3

0000

PIN

 BTM3160

CD

AUDIO IN

PRESET/ALBUM

 FM

BT

Summary of Contents for BTM3160

Page 1: ...www philips com welcome User manual Always there to help you Register your product and get support at BTM3160 Question Contact Philips ...

Page 2: ......

Page 3: ...ol play 9 Skip to a track 9 Program tracks 10 Play from Bluetooth enabled devices 10 5 Listen to the radio 11 Tune to a radio station 11 Program radio stations automatically 11 Program radio stations manually 12 Select a preset radio station 12 Show RDS information 12 6 Other features 12 Set the alarm timer 12 Set the sleep timer 13 Listen to an external device 13 Listen through a headphone 13 7 P...

Page 4: ...ticularly at plugs convenience receptacles and the point where they exit from the device Only use attachments accessories specified by the manufacturer Use only with the cart stand tripod bracket or table specified by the manufacturer or sold with the device When a cart is used use caution when moving the cart device combination to avoid injury from tip over Unplug this device during lightning sto...

Page 5: ...und can be deceiving Over time your hearing comfort level adapts to higher volumes of sound So after prolonged listening what sounds normal can actually be loud and harmful to your hearing To guard against this set your volume to a safe level before your hearing adapts and leave it there To establish a safe volume level Set your volume control at a low setting Slowly increase the sound until you c...

Page 6: ...to FM radio stations You can enrich sound output with below sound effect Digital Sound Control DSC DSC 1 Balanced DSC 2 Clear DSC 3 Powerful DSC 4 Warm DSC 5 Bright The unit supports these media formats What s in the box Check and identify the contents of your package Main unit 2 x speakers 1 x FM antenna Remote control with one AAA battery Short user manual Safety and notice BTM3160 Short User Ma...

Page 7: ... source CD USB FM BT AUDIO IN e Jack for a USB device f AUDIO IN Audio input jack 3 5mm for an external audio device f h g i j a b c d e l m k g Headphone socket h Disc compartment i Open close the disc compartment j Stop play or erase a program k VOLUME Adjust volume l Skip to the previous next track Search within a track disc USB Tune to a radio station Adjust time m Start pause or resume play ...

Page 8: ...DISPLAY RDS REPEAT a b c d e f g i h q p r m n o k j l f VOL Adjust volume g MUTE Mute or restore volume h SOUND Enrich sound effect with Digital Sound Control DSC i CLOCK Set the clock View clock information j SLEEP TIMER Set sleep timer Set alarm timer k PROG Program tracks Program radio stations Auto store FM radio stations l DISPLAY RDS Adjust display brightness Show RDS information m SHUFFLE ...

Page 9: ...power supply voltage corresponds to the voltage printed on the back or the underside of the unit Risk of electric shock When you unplug the AC power cord always pull the plug from the socket Never pull the cord Before you connect the AC power cord ensure that you have completed all other connections Demonstrate the features In standby mode press and hold for three seconds to demonstrate features o...

Page 10: ...conds the system exits clock setting mode automatically Tip You can view clock information in power on mode by pressing CLOCK Turn on Press The unit switches to the last selected source Switch to standby mode Press again to switch the unit to standby mode The clock if set is displayed on the panel Switch to ECO standby mode Press and hold for more than two seconds The display panel is dimmed Note ...

Page 11: ... 2 Insert a USB device into the socket Play starts automatically If not press CD 3 Control play Select a folder Select an audio file Pause or resume play Stop play REPEAT Play a track or all tracks repeatedly SHUFFLE Play tracks randomly VOL Increase or decrease the volume MUTE Mute or restore sound SOUND Enrich sound effect with DSC balanced clear powerful warm and bright DISPLAY Adjust display b...

Page 12: ...range Compatibility with all Bluetooth devices is not guaranteed 1 Press FM repeatedly to select the Bluetooth source BT Bluetooth is displayed The Bluetooth indicator flashes blue 2 On your device that supports Advanced Audio Distribution Profile A2DP enable Bluetooth and search for Bluetooth devices that can be paired refer to the user manual of the device 3 Select PHILIPS BTM3160 on your Blueto...

Page 13: ...lly extend and adjust the position of the antenna 1 Press FM repeatedly to select the FM source 2 Press and hold for more than two seconds The radio tunes to a station with strong reception automatically 3 Repeat step 2 to tune to more stations To tune to a weak station Press repeatedly until you find optimal reception Program radio stations automatically Note You can program a maximum of 20 prese...

Page 14: ...quency Stereo or Mono 6 Other features Set the alarm timer This unit can be used as an alarm clock You can select CD FM or USB as alarm source Note Make sure that you have set the clock correctly 1 In standby mode press and hold SLEEP TIMER for more than two seconds The hour digits are displayed and begin to blink 2 Press repeatedly to set hour 3 Press SLEEP TIMER to confirm The minute digits are ...

Page 15: ...ou can listen to an external device through this unit with an MP3 link cable 1 Press USB AUDIO IN repeatedly to select AUDIO IN source 2 Connect an MP3 link cable not supplied between AUDIO IN jack 3 5 mm on the unit and the headphone jack on an external device 3 Start to play the device see the device user manual AUDIO IN AUDIO IN Listen through a headphone Plug a headphone not supplied into the ...

Page 16: ...z Tuning grid 50 kHz Sensitivity Mono 26dB S N Ratio Stereo 46dB S N Ratio 22 dBf 45 dBf Search Selectivity 30 dBf Total Harmonic Distortion 3 Signal to Noise Ratio 45 dBA USB USB DirectVersion 2 0 full speed USB 5V Power 500 mA Disc LaserType Semiconductor Disc Diameter 12 cm 8 cm Support Disc CD DA CD R CD RW MP3 CD Audio DAC 24 Bits 44 1 kHz Total Harmonic Distortion 1 1 kHz Frequency Response ...

Page 17: ...upported Bit rates 32 256 kbps variable bit rates 8 Troubleshooting Warning Never remove the casing of this device To keep the warranty valid never try to repair the system yourself If you encounter problems when using this device check the following points before requesting service If the problem remains unsolved go to the Philips Web page www philips com support When you contact Philips make sur...

Page 18: ...ice The Bluetooth reception is poor Move the device closer to this unit or remove any obstacle between them Bluetooth cannot be connected with this unit The device does not support the profiles required for this unit The Bluetooth function of the device is not enabled Refer to the user manual of the device to find out how to enable the function This unit is not in pairing mode This unit is already...

Page 19: ... Your product contains batteries covered by the European Directive 2006 66 EC which cannot be disposed with normal household waste Please inform yourself about the local rules on separate collection of batteries because correct disposal helps to prevent negative consequences for the environmental and human health Environmental information All unnecessary packaging has been omitted We have tried to...

Page 20: ...Specifications are subject to change without notice 2013 Koninklijke Philips Electronics N V All rights reserved BTM3160_12_UM_V1 0 ...

Reviews: