background image

19

3. Image Optimization

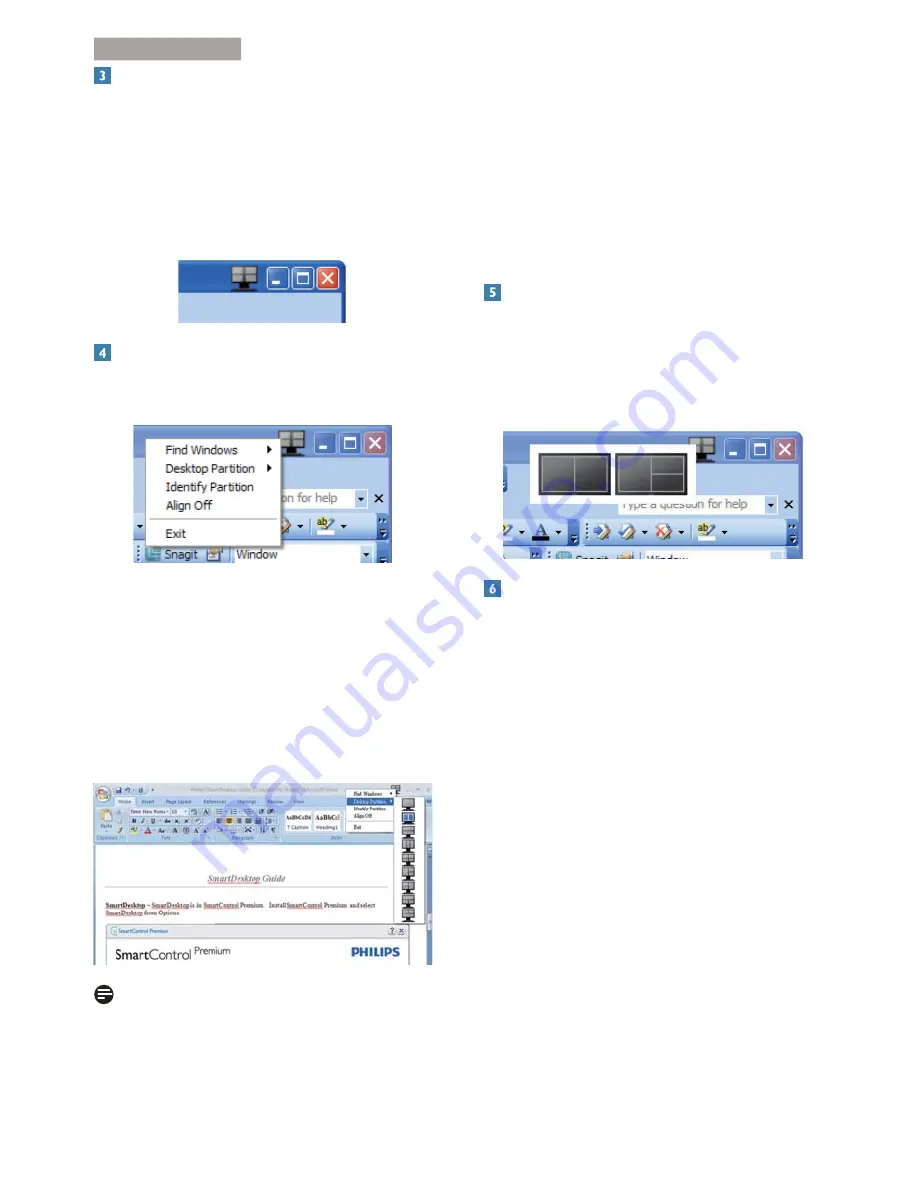
  Title Bar Options

Desktop partition can be accessed from the 
title bar of the active window.  This provides a 
quick and easy way to manage the desktop as 
well as sending any window to any partition 
without having to drag and drop.  Move the 
cursor into the active window’s title bar to 
access the drop down menu.

  Right Click Menu

Right click on the Desktop Partition icon to 
view the drop down menu.

%$&$'

 – In some cases, the user 

may have sent multiple windows to the 
same partition.  Find Windows will show 
all open windows and move the selected 
window to the forefront.

#

 – Desktop Partition 

shows the current selected partition and 
allows the user to quickly change to any of 
the partitions shown in the drop down.


Note

If more than one display is attached, the user 
can select the targeted display to change the 
partition.  The highlighted icon represents the 
current active partition.

*$


– Displays the outline 

grid on the desktop for the current parti-
tion.

+/;+/

 – Enables/disables the 

drag and drop auto align feature.

Exit

 – Closes Desktop Partition and Dis-

play Tune.  To re-initialize, launch Display 
Tune from the start menu or short cut on 
the desktop.

  Left Click Menu

Left click on the Desktop Partition icon to 
quickly send the active window to any partition 
without having to drag and drop. Releasing the 
mouse will send the window to the highlighted 
partition.

  Task Tray Right Click

The task tray also contains most of the features 
supported in the title bar (with the exception 
of automatically sending a window to any 
partition).

Summary of Contents for Brilliance 190BL1

Page 1: ...www philips com welcome 190BL1 EN User manual 1 Customer care and warranty 34 Troubleshooting FAQs 39 ...

Page 2: ...bly forVESA Mounting 8 3 Image Optimization 10 3 1 SmartImage 10 3 2 SmartContrast 11 3 3 Philips SmartControl Premium 11 3 4 SmartDesktop Guide 18 23 4 1 Resolution Preset Modes 25 5 Power Management 26 6 Regulatory Information 27 7 Customer care and warranty 34 7 1 Philips Flat Panel Monitors Pixel Defect Policy 34 7 2 Customer Care Warranty 36 8 Troubleshooting FAQs 39 8 1 Troubleshooting 39 8 ...

Page 3: ...r normal operation Please use approved power cord provided by Philips all the time If your power cord is missing please contact with your local service center Please refer to Customer Care Consumer Information Center Do not subject the monitor to severe vibration or high impact conditions during operation Do not knock or drop the monitor during operation or transportation Maintenance To protect yo...

Page 4: ...or any document for repair or integration please contact with your local service center please refer to the chapter of Consumer Information Center For transportation information please refer to Technical Specifications Do not leave your monitor in a car trunk under direct sun light Note Consult a service technician if the monitor does not operate normally or you are not sure what procedure to take...

Page 5: ...r utmost to make the packaging easily separable into mono materials how to dispose of your old monitor and packing from your sales representative Taking back Recycling Information for Customers Philips establishes technically and economically viable objectives to optimize the environmental performance of the organization s product service and activities From the planning design and production stag...

Page 6: ... 2 1 Installation Package contents VGA Optional DVI Optional 190BL1 190BL LED Install the base 1 Place the monitor face down a smooth surface taking care to avoid scratching or damaging the screen 2 Hold the monitor base stand with both the base column ...

Page 7: ... of your computer 4 Plug the power cord of your computer and your monitor into a nearby outlet 5 Turn on your computer and monitor If the monitor displays an image installation is complete 2 2 Operating the monitor Description of the control buttons 8 7 2 6 5 4 3 1 1 Switch monitor s power ON and OFF 2 Access the OSD menu 3 Adjust the OSD menu 4 To adjust brightness of the display 5 Adjust the spe...

Page 8: ...u Below is an overall view of the structure of the On Screen Display You can use this as a reference when you want to work your way around the different adjustments later on Main menu Sub menu Picture OSD Settings Setup Language Color Audio Input Picture Format Brightness Contrast Horizontal Vertical Transparency OSD Time Out Auto V Position Phase Clock Resolution Notification Reset Information En...

Page 9: ...hen the monitor is powered on at a different resolution an alert is displayed on screen Use 1440 900 60 Hz for best results Display of the native resolution alert can be switched off from Setup in the OSD On Screen Display menu Physical Function Tilt 190BL LED 20 Swivel 190BL LED 45 45 Height adjustment 190BL 70mm LED ...

Page 10: ... Remove base stand 1 Extend the monitor stand to its maximum height 2 Place the monitor face down on a smooth surface taking care to avoid scratching or damaging the screen Then lift the monitor stand 3 Press the release button on the rear of the stand to remove the base from the stand Remove the base For VESA standard mounting applications 1 Remove the 4 screw covers 2 Remove the 4 screw covers ...

Page 11: ...9 2 Setting up the monitor Note This monitor accepts a 100mm x 100mm VESA Compliant mounting interface ...

Page 12: ...ow to enable SmartImage 1 Press to launch the SmartImage on screen display 2 Keep pressing to toggle among Photo Movie Game Economy and Off 3 The SmartImage on screen display will remain on screen for 5 seconds or you can 4 When SmartImage is enabled the sRGB scheme is disabled automatically To use sRGB you need to disable SmartImage with the button at the front bezel of your monitor Except using ...

Page 13: ...ergy costs and extend the lifetime of your monitor How does it work When you activate SmartContrast it will analyse the content you are displaying in real time to adjust colors and control backlight intensity This function will dynamically enhance contrast for a great entertainment experience when viewing videos or playing games 3 3 Philips SmartControl Premium The new SmartControl Premium softwar...

Page 14: ...esolution You can follow the instruction and do the adjustment Cancel prompts user if you want to cancel installation Color menu Color Menu allows you to adjust RGB Black Level White Point Display Gamma Calibration SmartImage and SmartKolor You can follow the instruction and do the adjustment Refer to below table for sub menu item base on your input Example for Color Calibration ...

Page 15: ...ibration sequence 3 Quick View loads the before after images 4 To return to Color home pane click the Cancel button 5 Enable color calibration by default is on If unchecked does not allow for color calibration to happen dimes out start and quick view buttons 6 Must have patent info in calibration screen ...

Page 16: ...is set SmartContrast and SmartResponse are enabled Eco Power menu Options menu Options Preferences Will only be active when selecting Preferences from the drop down Options menu On a non supported display capable of DDC CI only the Help and Options tabs are available Displays current preference settings A checked box enables the feature The check box is a toggle Enable Context Menu on desktop is c...

Page 17: ...ontrol Premium is either from the desktop short cut or from the program file Any preset set to run at startup will not load when this box is unchecked Disabled Enable transparency mode Windows 7 Vista XP Default is 0 Opaque Options Audio Will only be active when selectingVolume from the drop down Options menu On a non supported display capable of DDC CI only the Help and Options tabs are available...

Page 18: ...into Theft Deterrence mode After creating PIN theTheft Deterrence pane will indicateTheft Deterrence Enabled and provide PIN Options button Theft Deterrence Enabled is displayed Disable Theft Deterrence Mode opens pane screen on next page PIN Options button only available after user creates PIN button opens secure PIN web site Help menu Will only be active when selecting User Manual from the drop ...

Page 19: ...he application Help Access to User Manual file Open User Manual file using the default browser window Displays the tech support page Chec Takes the user to PDI Landing and checks the user s version against the most current available About Displays detailed reference information product version release information and product name Exit Close SmartControl Premium To run SmartControl Premium again ei...

Page 20: ...the window and mouse cursor are within the region the region will become highlighted Note If the outline of the region is not visible when dragging the window Show windows contents while dragging is disabled To enable 1 In Control Panel click System 2 Click Advanced system settings For Vista Win7 OS this is located on the left sidebar 3 In Performance section click Settings 4 In the box check Show...

Page 21: ...ickly change to any of the partitions shown in the drop down Note If more than one display is attached the user can select the targeted display to change the partition The highlighted icon represents the current active partition Displays the outline grid on the desktop for the current parti tion Enables disables the drag and drop auto align feature Exit Closes Desktop Partition and Dis play Tune T...

Page 22: ...all open windows and move the selected window to the forefront Desktop Partition shows the current selected partition and allows the user to quickly change to any of the partitions shown in the drop down Displays the outline grid on the desktop for the current parti tion Enables disables the drag and drop auto align feature ...

Page 23: ...rizontal bottom For 270 Partition 3 horizontal top Partition 2 horizontal center Partition 1 horizontal bottom Vertical Split Left Assesses the screen resolution and divides the display into two vertical regions the left hand side is a single region the right hand side is split into two evenly sized regions For 90 Partition 1 on top Partition 2 3 on bottomFor 270 Partition 1 on bottom Partition 2 ...

Page 24: ...r 270 Partition 1 on left sideVertical Partition 2 3 on right sideVertical Horizontal Split Bottom Assesses the screen resolution and divides the display into two evenly sized horizontal regions the bottom region is single the top region is spilt into two evenly sized regionsFor 90 Partition 1 2 on right sideVertical Partition 3 on left sideVertical For 270 Partition 1 2 on left sideVertical Parti...

Page 25: ...g USB USB 2 0 x 1 Input Signal Separate Sync Sync on Green Audio In Out Stereo Audio Convenience Built in speakers 1W x 2 User Convenience OSD Languages English French German Spanish Italian Russian Other Convenience Kensington Lock Plug Play Compatibility DDC CI sRGB Windows 7 Vista XP Mac OSX Linux Stand Tilt 5 20 Swivel 45 45 Height adjustment 70mm Power On Mode 12 65W typ 19 5W max On mode ECO...

Page 26: ...ithout stand 3 04 kg Product with packaging 6 18 kg Operating Condition Temperature range operation 0 C to 40 C Temperature range Non operation 20 C to 60 C Relative humidity 20 to 80 MTBF 30 000hrs Environmental ROHS YES EPEAT Sliver www epeat net Packaging 100 recyclable 100 PVC BFR free housing EnergyStar YES Compliance and standards Regulatory Approvals CE Mark Energy Star FCC Class B SEMKO TC...

Page 27: ...7 640x480 59 94 35 00 640x480 67 00 37 50 640x480 75 00 37 88 800x600 60 32 46 88 800x600 75 00 49 70 832x624 75 00 48 36 1024x768 60 00 60 02 1024x768 75 03 63 89 1280x1024 60 02 79 98 1280x1024 75 03 60 02 1024x768 75 03 55 94 1440x900 59 89 70 64 1440x900 74 98 Note Please notice that your display works best at native resolution of 1440 x 900 60Hz For best display quality please follow this res...

Page 28: ...he following table shows the power consumption and signaling of this automatic power saving feature VESA Mode Video H sync V sync Power Used LED Color Active ON Yes Yes 12 65W typ 19 5W max White Sleep Standby OFF No No 0 3W typ White blink Switch Off OFF 0 3 W typ OFF The following setup is used to measure power consumption on this monitor Native resolution 1440 x 900 Contrast 50 Brightness 250 n...

Page 29: ...low as normal household background levels Low acoustic noise emissions when applicable Some of the Environmental features of the The brand owner demonstrates corporate social responsibility and has a certified environmental management system EMAS or ISO 14001 Very low energy consumption both in on and standby mode minimize climate impact Restrictions on chlorinated and brominated flame retardants ...

Page 30: ...ts Reduce use of primary materials Reduce use of toxic materials Avoid the disposal of hazardous waste EPEAT S requirement that all registered products meet means that these products will consume less energy throughout their life CE Declaration of Conformity This product is in conformity with the following standards EN60950 1 2006 A11 2009 A1 20 10 A12 2011 Safety requirement of Information Techno...

Page 31: ...t to which the receiver is connected Consult the dealer or an experienced radio TV technician for help approved by the party responsible for compliance could void the user s authority to operate the equipment Use only RF shielded cable that was supplied with the monitor when connecting this monitor to a computer device shock hazard do not expose this appliance to rain or excessive moisture THIS CL...

Page 32: ...teur l usage du présent équipement N utiliser que des câbles RF armés pour les connections avec des ordinateurs ou périphériques CET APPAREIL NUMERIQUE DE LA CLASSE B RESPECTETOUTES LES EXIGENCES DU REGLEMENT SUR LE MATERIEL BROUILLEUR DU CANADA EN 55022 Compliance Czech Republic Only Notice The equipment should draw power from a socket with an attached protection circuit a three prong socket All ...

Page 33: ...rch Röntgenstrahlen festgelegten Vorschriften ein Aufkleber der auf die Unbedenklichkeit der Inbetriebnahme hinweist da dieVorschriften über die Bauart von Störstrahlern nach Anlage Damit Ihr Monitor immer den in der Zulassung geforderten Werten entspricht ist darauf zu achten daß 1 Reparaturen nur durch Fachpersonal durchgeführt werden 2 nur original Ersatzteile verwendet werden 3 bei Ersatz der ...

Page 34: ...ina released a regulation called Management Methods for Controlling Pollution by Electronic Information Products or commonly referred to as China RoHS All products produced and sold for China market have to meet China RoHS request Ё ᄤֵᙃѻક ᶧ ࠊ 䆚㽕 Ё RoHS 㾘 㽕 ѻકЁ ᆇ 䋼 ܗ ⱘৡ ঞ 䞣 䚼ӊৡ ᆇ 䋼 ܗ 䪙 Pb Hg 䬝 Cd Ӌ䫀 Cr6 㘨㣃 PBB Ѡ㣃䝮 PBDE O O O O O O ᰒ ሣ ㅵ X O O O O O 䏃ᵓ㒘ӊ X O O O O O 䗖䜡㒓 X O O O O O 㒓 䖲 㒓 X O O O O O...

Page 35: ...tory Infomation ֱՓ ᳳ䰤 ℸ 䆚ᣛᳳ䰤 कᑈ ᄤֵᙃѻકЁ ⱘ ᆇ 䋼 ܗ ℷᐌՓ ⱘᴵӊ ϟϡӮথ さব ᄤֵᙃѻક Փ 䆹 ᄤֵᙃѻકϡӮᇍ ๗䗴៤Ϲ䞡 ᶧ ᇍ Ҏ䑿ǃ䋶ѻ䗴៤Ϲ䞡ᤳᆇⱘᳳ 䰤DŽ ljᑳᓗ ᄤѻકಲᬊ໘ ㅵ ᴵ NJ ᦤ ᗻ䇈ᯢ Ўњ དഄ ঞֱᡸഄ ˈᔧ ϡ ݡ 䳔㽕ℸѻક ѻકᇓੑ㒜ℶᯊˈ䇋䙉ᅜ ᆊᑳᓗ ᄤѻકಲᬊ໘ Ⳍ ᕟ 㾘ˈᇚ Ѹ㒭ᔧഄ ᆊ䅸ৃⱘಲᬊ໘ 䌘䋼ⱘॖଚ䖯㸠ಲᬊ໘ DŽ ...

Page 36: ...esses and practice stringent quality control However pixel or sub pixel defects on theTFT Monitor panels unavoidable No manufacturer can guarantee that all panels will be free from pixel defects but Philips guarantees that any monitor with an unacceptable number of defects will be repaired or replaced under warranty This notice explains acceptable defect levels for each type In order to qualify fo...

Page 37: ... exceeding the tolerances listed in the following tables BRIGHT DOT DEFECTS ACCEPTABLE LEVEL 1 lit subpixel 3 2 adjacent lit subpixels 1 3 adjacent lit subpixels one white pixel 0 Distance between two bright dot defects 15mm Total bright dot defects of all types 3 BLACK DOT DEFECTS ACCEPTABLE LEVEL 1 dark subpixel 5 or fewer 2 adjacent dark subpixels 2 or fewer 3 adjacent dark subpixels 0 Distance...

Page 38: ... 353 01 601 1161 Local call tariff Spain Eatsa Spain 34 902 888 785 0 10 Finland A novo 358 09 2290 1908 Local call tariff France A novo 33 082161 1658 0 09 Greece Allman Hellas 30 00800 3122 1223 Free of charge Italy A novo 39 840 320 041 0 08 Netherlands E Care 31 0900 0400 063 0 10 Denmark A novo 45 3525 8761 Local call tariff Norway A novo 47 2270 8250 Local call tariff Sweden A novo 46 08 632...

Page 39: ...raine NA Comel 380 562320045 NA Topaz Service Company 38 044 245 73 31 Russia NA CPS 7 495 645 6746 for repair NA CEEE Partners 7 495 645 3010 for sales Slovakia NA Datalan Service 421 2 49207155 Turkey NA Techpro 90 212 444 4 832 Czech Rep NA Asupport 800 100 697 Hungary NA Serware 36 1 2426331 NA 36 1 814 8080 Contact Information for LATIN AMERICA region Country Call center Consumer care number ...

Page 40: ...gapore Pte Ltd Philips Consumer Care Center 65 6882 3999 Taiwan PCCW Teleservices Taiwan FETEC CO 0800 231 099 Thailand NA Axis Computer System Co Ltd 662 934 5498 South Africa NA SylvaraTechnologies Pty Ltd 086 0000 888 United Arab Emirates NA AL SHAHD COMPUTER L L C 00971 4 2276525 Israel NA Eastronics LTD 1 800 567000 Vietnam NA FPT Service Informatic Company Ltd 84 8 38248007 Ho Chi Minh City ...

Page 41: ...rt Guide Check to see if the monitor cable has bent pins Make sure the computer is turned on AUTO button doesn t function The auto function is applicable only in VGA Analog mode If the result is not satisfactory you can do manual adjustments via the OSD menu Note The Auto Function is not applicable in DVI Digital mode as it is not necessary Visible signs of smoke or sparks Do not perform any troub...

Page 42: ... as monitor s recommended screen native resolution Green red blue dark and white dots appears on the screen The remaining dots are normal characteristic of the liquid crystal used in today s technology Please refer the pixel policy for more detail The power on light is too strong and is disturbing You can adjust power on light using the power LED Setup in OSD main Controls For further assistance r...

Page 43: ...ilips Service center has a right to authorization in order to establish ownership of the monitor 8 3 General FAQs Q1 When I install my monitor what should I do if the screen shows Cannot display this video mode Ans Recommended resolution for this monitor 1440 x 900 60 Hz Unplug all cables then connect your PC to the monitor that you used previously In the Windows Start Menu select Settings Control...

Page 44: ... option Color then press OK to enter color setting there are three settings as below 1 ColorTemperature The six settings are 5000K 6500K 7500K 8200K 9300K and 11500K With settings in the 5000K range the panel appears warm with a red white color tone while a 11500K temperature yields cool bluewhite toning 2 sRGB This is a standard setting for ensuring correct exchange of colors between different de...

Page 45: ...e your monitor unattended Always activate a periodic screen refresh application if your LCD monitor will display unchanging static content Warning Failure to activate a screen saver or a periodic screen refresh application may result in severe burn in or after image or ghost image symptoms that will not disappear and cannot be repaired The damage mentioned above is not covered under your warranty ...

Page 46: ...lectronics N V All rights reserved Philips and the Philips Shield Emblem are registered trademarks of Koninklijke Philips Electronics N V and are used under license from Koninklijke Philips Electronics N V Z Version M1190BLE1WWT ...

Reviews: