background image

1-12-9

AP5

AM10

AM16

AJ16

AM7

AN15

AK10

AP22

AN14

AJ19

AJ15

AN12

AP19

AP13

AJ11

AK21

AK18

AL9

AN11

AM21

AN18

AL7

AK12

AP7

AL8

AM15

AM9

AN9

AL14

AK8

AP17

AN8

AP14

AP11

AP20

AL17

AP10

AM4

AN17

AL21

AN3

AJ13

AL10

AK15

AL13

AM12

AM19

AP21

AP8

AM18

AL16

AP2

AJ12

AN5

AK14

AK20

AP16

AP4

AM13

AL19

AJ17

AN21

AL11

AJ21

AJ7

AK17

47

R6214

47

R6215

47

R6216

47

R6213

47

R6212

47

R6211

47

R6210

47

R6209

47

R6208

47

R6207

47

R6206

47

R6205

47

R6204

47

R6203

47

R6201

47

R6202

B3

UDM

H8

VSSQ

A3

VSS

A10/AP

M2

A4

N8

C3

VDDQ

1K

R6230

F3

LDM

A9

VDDQ

L7

/CAS

0.1

C6203

BA2

IC6201
K4T1G164QF-BCE7

L1

H2

VSSQ

A3

N2

J3

VSS

A9

P3

J1

VDDL

L8

/CS

E1

VDD

A2

M7

P9

VSS

NU

R3

A8

P8

F8

VSSQ

BA0

L2

M9

VDD

K3

/WE

A1

VDD

A1

M3

K2

CKE

A7

P2

CK

J8

BA1

L3

J9

VDD

K9

ODT

1K

R6231

A0

M8

K8

/CK

A6

N7

J2

VREF

A12

R2

N1

VSS

R1

VDD

DQ0

G8

NU

R7

J7

VSSDL

A5

N3

A11

P7

E3

VSS

C7

VDDQ

K7

/RAS

C1

VDDQ

R8

NU

47

R6225

47

R6222

82

R6220

82

R6221

47

R6224

47

R6223

33

R6219

10K

R6229

10K

R6228

1

C6201

1

C6202

100

R6226

100

R6227

AM2

AN1

75

R6236

75

R6239

300

R6238

75

R6237

0.1

C6243

AM1

IC6001(4/9)

*1

MN2WS0062AFF-B

AN20

AM20

AM6

AN6

10

R6218

10

R6217

AJ9

NU

A2

NU

E2

A8

/UDQS

F7

LDQS

E8

/LDQS

B7

UDQS

DQ1

G2

DQ2

H7

DQ3

H3

DQ5

H9

DQ4

H1

DQ6

F1

DQ7

F9

DQ9

C2

DQ8

C8

DQ10

D7

DQ11

D3

DQ13

D9

DQ12

D1

DQ14

B1

DQ15

B9

F2

VSSQ

E7

VSSQ

D8

VSSQ

D2

VSSQ

B8

VSSQ

B2

VSSQ

A7

VSSQ

1

C6221

150

R6240

0.1

C6205

0.1

C6206

0.1

C6207

0.1

C6209

0.1

C6210

0.1

C6211

0.1

C6219

0.1

C6213

0.1

C6217

0.1

C6214

0.1

C6218

0.1

C6215

P-ON+1.8V

0.1

C6220

10

C6204

0.1

C6208

0.1

C6212

0.1

C6216

A4

N8

A12

R2

K3

/WE

DQ8

C8

A1

M3

A8

P8

F2

VSSQ

DQ15

B9

F7

LDQS

DQ11

D3

B2

VSSQ

A11

P7

B7

UDQS

0.1

C6229

J3

VSS

NU

E2

A5

N3

H8

VSSQ

K9

ODT

1K

R6233

DQ4

H1

DQ3

H3

BA1

L3

0.1

C6235

DQ12

D1

A0

M8

0.1

C6223

0.1

C6231

CK

J8

0.1

C6230

0.1

C6225

A10/AP

M2

DQ5

H9

DQ7

F9

BA2

IC6202
K4T1G164QF-BCE7

L1

K2

CKE

DQ1

G2

0.1

C6239

E7

VSSQ

D2

VSSQ

A8

/UDQS

A7

VSSQ

A6

N7

DQ10

D7

0.1

C6227

NU

R3

DQ6

F1

DQ13

D9

NU

R7

F3

LDM

P9

VSS

0.1

C6236

0.1

C6237

0.1

C6232

1

C6241

0.1

C6234

K8

/CK

B3

UDM

A2

M7

DQ9

C2

10

C6224

A3

N2

L8

/CS

A3

VSS

NU

A2

A9

P3

A7

P2

BA0

L2

0.1

C6233

B8

VSSQ

J7

VSSDL

DQ2

H7

R8

NU

L7

/CAS

F8

VSSQ

D8

VSSQ

1K

R6234

E3

VSS

E8

/LDQS

K7

/RAS

0.1

C6238

0.1

C6228

0.1

C6240

DQ14

B1

DQ0

G8

J2

VREF

N1

VSS

H2

VSSQ

0.1

C6226

G7

VDDQ

C9

VDDQ

G3

VDDQ

E9

VDDQ

G1

VDDQ

G9

VDDQ

G9

VDDQ

C3

VDDQ

A1

VDD

E9

VDDQ

C7

VDDQ

G1

VDDQ

R1

VDD

M9

VDD

G7

VDDQ

C9

VDDQ

G3

VDDQ

C1

VDDQ

E1

VDD

J1

VDDL

A9

VDDQ

J9

VDD

C0XCK

C0DM3

C0DM1

C0DQ21

C0DQ10

C0DQ12

1

C0DQ30

C0XCS1

S

C0XCAS

C0DQ15

V

C0DQ19

C0DQ28

C0DQ4

C0DQ27

C0DS1

C0DQ26

C0DQ16

C0DQ20

W

C0DQ7

C0VREF1

C0DQ25

C0XRAS

C0DQ14

3

T

C0DQ29

C0DQ8

C0CKE

C0DM2

C0VREF2

C0DM0

C0DS2

C0DQ9

C0DQ23

C0DQ0

C0XWE

C0DQ22

C0DS0

C0DQ17

C0DS3

X

C0CK

C0DQ2

C0DQ6

C0DQ3

C0XCS0

4

2

C0DQ13

C0DQ1

C0DQ5

U

C0DQ31

C0ODT

C0DQ11

C0DQ18

C0DQ24

C0A4

C0A9

C0BA1

C0A3

C0A8

C0BA2

C0A2

C0A7

C0A12

C0A1

C0A6

C0A11

C0A0

C0A5

C0A10

C0BA0

C0BA2

C0BA0

C0BA1

C0A12

C0A11

C0A10

C0A9

C0A8

C0A7

C0A6

C0A5

C0A4

C0A3

C0A2

C0A1

C0A0

C0DQ2

C0DQ31

C0DQ30

C0DQ29

C0DQ28

C0DQ27

C0DQ26

C0DQ25

C0DQ24

C0DQ23

C0DQ22

C0DQ20

C0DQ19

C0DQ18

C0DQ17

C0DQ16

C0DQ15

C0DQ14

C0DQ13

C0DQ12

C0DQ11

C0DQ10

C0DQ9

C0DQ8

C0DQ7

C0DQ6

C0DQ5

C0DQ4

C0DQ3

C0DQ2

C0DQ1

C0DQ21

C0DQ0

RC_VCAL

RC_RDRV

RC_RODT

(DDR2 SDRAM)

MAIN MICRO CONTROLLER

/DIGITAL SIGNAL PROCESS

C0A7

C0BA1

C0A5

C0A12

C0A3

C0A10

C0A1

C0A8

C0BA0

C0A6

C0BA2

C0A4

C0A11

C0A2

C0A9

C0A0

MEMORY

I/F

TO BD 
MAIN 7 

IC6001(7/9)

C0XDS0

C0XDS1

C0XDS2

C0XDS3

C0DQ6

C0DQ7

C0DQ3

C0DQ0

C0DQ4

C0DQ5

C0DQ1

C0DQ15

C0DQ8

C0DQ13

C0DQ14

C0DQ11

C0DQ10

C0DQ9

C0DQ12

C0BA1

C0A9

C0A1

C0DQ25

C0A0

C0A5

C0DQ18

C0DQ19

C0DQ20

C0DQ29

C0A6

C0DQ24

C0DQ23

C0A4

C0BA2

C0A11

C0DQ17

C0A10

C0DQ26

C0A3

C0DQ27

C0DQ30

C0DQ16

C0A2

(DDR2 SDRAM)

C0BA0

C0DQ31

C0A7

C0A12

C0DQ22

C0A8

C0DQ28

C0DQ21

CONTINUE

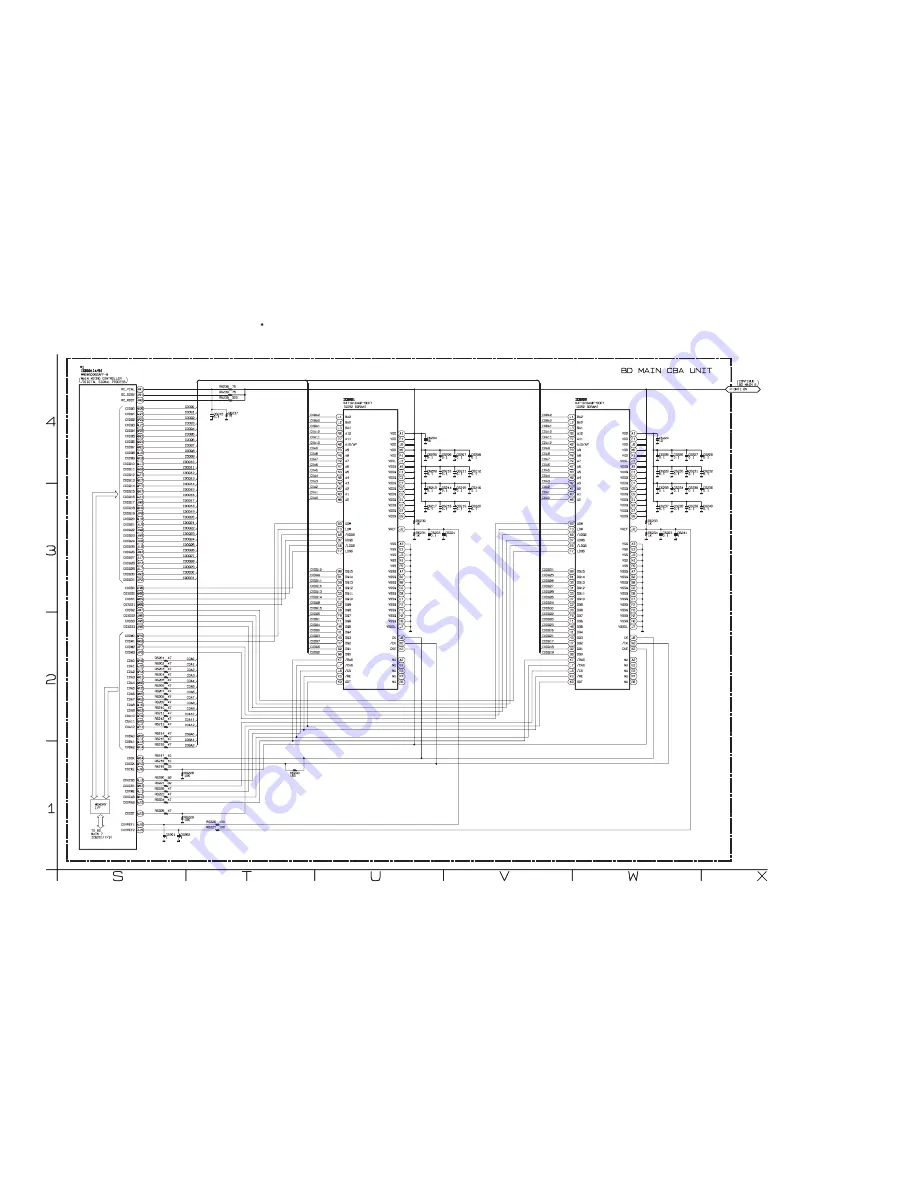
BD MAIN 8

BD MAIN CBA UNIT

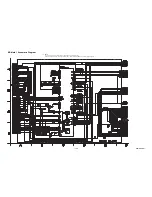
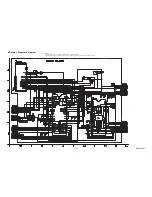
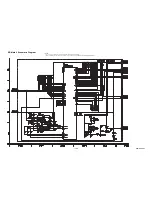
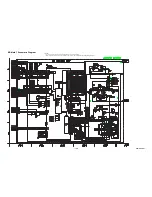
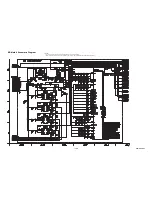
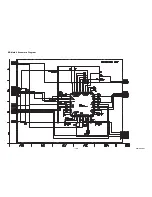
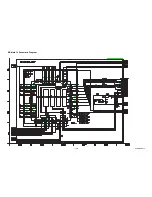
BD Main 4 Schematic Diagram

E5W21SCBD4

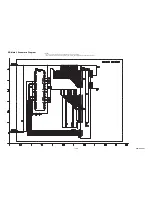
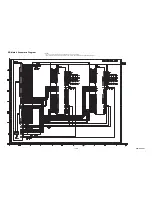
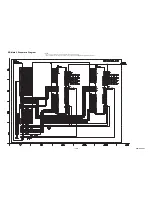
The order of pins shown in this diagram is different from that of actual IC6001. 
IC6001 is divided into nine and shown as IC6001 (1/9) ~ IC6001 (9/9) in this BD Main Schematic Diagram Section.

1   NOTE:

Summary of Contents for BDP3306/F7

Page 1: ...SERVICE MANUAL BLU RAY DISC PLAYER BDP3306 F7 ...

Page 2: ... each way Consequently P F has not undertaken any such broad evaluation Accordingly a servicer who uses a service procedure or tool which is not recommended by P F must first use all precautions thoroughly so that neither his safety nor the safe operation of the equipment will be jeopardized by the service method selected TABLE OF CONTENTS Specifications 1 1 1 Laser Beam Safety Precautions 1 2 1 I...

Page 3: ...1 1 1 E5W21SP SPECIFICATIONS ...

Page 4: ... pickup lens when the diode is turned on Do not look directly at the laser beam CAUTION Use of controls and adjustments or doing procedures other than those specified herein may result in hazardous radiation exposure CAUTION LABEL Location Inside Top of BD mechanism For N77FADUM or For N77F0DUM Do not look directly at the laser beam coming from the pickup or allow it to strike against your skin Dr...

Page 5: ...fied B In addition to safety other parts and assemblies are specified for conformance with regulations applying to spurious radiation These must also be replaced only with specified replacements Examples RF converters RF cables noise blocking capacitors and noise blocking filters etc C Use specified internal wiring Note especially 1 Wires covered with PVC tubing 2 Double insulated wires 3 High vol...

Page 6: ...le parts RF terminals antenna terminals video and audio input and output terminals microphone jacks earphone jacks etc is lower than or equal to the specified value in the table below Measuring Method Power ON Insert load Z between B earth ground power cord plug prongs and exposed accessible parts Use an AC voltmeter to measure across the terminals of load Z See Fig 2 and the following table Table...

Page 7: ...achine then apply hot air to the Flat Pack IC about 5 to 6 seconds Fig S 1 1 2 Remove the flat pack IC with tweezers while applying the hot air 3 Bottom of the flat pack IC is fixed with glue to the CBA when removing entire flat pack IC first apply soldering iron to center of the flat pack IC and heat up Then remove glue will be melted Fig S 1 6 4 Release the flat pack IC from the CBA using tweeze...

Page 8: ...by one using a sharp pin or wire to which solder will not adhere iron wire When heating the pins use a fine tip soldering iron or a hot air desoldering machine Fig S 1 4 3 Bottom of the flat pack IC is fixed with glue to the CBA when removing entire flat pack IC first apply soldering iron to center of the flat pack IC and heat up Then remove glue will be melted Fig S 1 6 4 Release the flat pack IC...

Page 9: ...Fig S 1 6 Note When using a soldering iron care must be taken to ensure that the flat pack IC is not being held by glue When the flat pack IC is removed from the CBA handle it gently because it may be damaged if force is applied 2 Installation 1 Using desoldering braid remove the solder from the foil of each pin of the flat pack IC on the CBA so you can install a replacement flat pack IC more easi...

Page 10: ...ed to remove any static electricity that may be charged on the body 2 Ground for Workbench Be sure to place a conductive sheet or copper plate with proper grounding 1 MΩ on the workbench or other surface where the semi conductors are to be placed Because the static electricity charge on clothing will not escape through the body grounding band be careful to avoid contacting semi conductors with you...

Page 11: ...embly 3 Press the A button to close the tray 2 CAUTION 1 Locking Tabs L 1 L 2 and L 3 are fragile Be careful not to break them 3 When reassembling be sure to use the original screws or specified screws listed in the parts list 4 When replacing the BD Mechanism Assembly or BD Main CBA Unit refer to ADJUSTMENT INSTRUCTIONS FOR BD MAIN CBA OR BD MECHANISM ASSEMBLY REPLACEMENT ID Loc No Part Fig No Re...

Page 12: ...Front CBA 5 Front Assembly L 3 Fig D3 6 Power Supply CBA S 2 S 3 Power Holder CN1001 7 SD CBA CN1000 CN6405 CN6401 Fig D4 9 BD Mechanism Assembly 2 10 BD Main CBA Unit 2 S 7 S 8 S 8 CN101 CN302 CN301 S 4 S 5 S 6 8 Rear Panel 1 1 See Reference Note 3 2 See Reference Note 4 Fig D5 ...

Page 13: ...ve the disc Procedure A 1 Unplug the AC power cord and then plug it in 2 Turn the power on by pressing the A button and the disc tray will open automatically Procedure B 1 Remove the Top Cover 2 Insert a screwdriver etc into the hole as shown below straight and gently until the tray is ejected 3 Pull the tray out manually and remove a disc Hole View for A A ...

Page 14: ...Cancel on the screen 1 Turn the power on 2 Remove the disc on the tray and close the tray 3 Press skip up 1 2 and 3 buttons on the remote control unit in that order Fig a appears on the screen All LED lights Fig a 4 Press C button on the remote control unit Fig b appears on the screen Fig b 5 After initializing the power will turn off automatically differ depending on the models F W Name Version R...

Page 15: ...ected the tray will open automatically Remove the disc or USB Memory Stick or SD Card from the unit Note All the settings will be put back to factory default The following USB Memory Stick SD Card can be used for software update Make sure to use a device that has enough space USB Memory Stick FAT16 FAT32 file system SD Mini SD Micro SD Card FAT12 FAT16 file system SDHC Mini SDHC Micro SDHC Card FA...

Page 16: ...lose the tray 3 Press skip up 1 2 and 3 buttons on the remote control unit in that order Fig d appears on the screen All LED lights Fig d 4 To exit this mode press button differ depending on the models F W Name Version Region Pickup ESN DRM Version Display OK Default Setting Default Setting STOP End STANDBY ON VFD LED Check OK ...

Page 17: ...ER ON lights If disc mode was selected the tray will open automatically Remove the disc or USB Memory Stick or SD Card from the unit Note The setup setting configured before the update will be kept The following USB Memory Stick SD Card can be used for software update Make sure to use a device that has enough space USB Memory Stick FAT16 FAT32 file system SD Mini SD Micro SD Card FAT12 FAT16 file ...

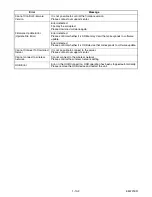
Page 18: ... will start shortly Press OK Software Update If you want to exit update press BACK Then all download date will be erased Loading Software 1 Loading 2 Updating No Error Message 1 The cable is not correctly connected Please confirm the connection of the cable 2 DHCP cannot be acquired Please set whether to confirm the connection with the manual 3 Internet Protocol address is not set Please confirm a...

Page 19: ...6 00 WHQL Certified Specialized application OpuDataWriter Caution Always turn the unit power off before connecting the FFC cable or removing the FFC cable from the BD Main CBA 1 Preparation Of Work Environment 1 1 For the OPU DATA write operation refer to the connection diagram and connect each device as shown below Connection Diagram Unit Completed product BD Main CBA BD Mechanism Assembly Comtoo...

Page 20: ... the box for Include this location in the search 5 Click on Browse button then select the device driver CDM 2 06 00 WHQL Certified folder in the C drive Click Next 6 Confirm that installation of USB Serial Converter device driver has completed and click on Finish 2 How To Check Which Port Is Used For COMTOOL Jig Relay Board 2 1 Click on the Windows Start button on the PC 2 2 Right click on My Comp...

Page 21: ...e input OPU DATA message is displayed in the Status Display Set the cursor position at the blank box next to the OPU DATA 4 4 Using the Barcode reader scan the QR code attached to the BD Mechanism Assembly 4 5 Check that FE CONNECTION CHECK message appears on the Status Display then turn the unit power on If error occurs If an error occurs the screen changes to a red display In such case close the...

Page 22: ...it AC power cord Check if each device is properly connected then repeat from step 1 If an error other than connection error occurs for more than 3 times the BD MAIN CBA or BD Mechanism Assembly may be defected Replace with a new one before performing the OPU DATA write 4 8 After data write has been completed successfully unplug the AC power cord 4 9 Remove the FFC Cable of COMTOOL jig relay board ...

Page 23: ...N could not be found 1140 DDDFile search error Error occurred while searching DDD file in WriteBackup folder 1151 WriteBackup Drive Mount error Cannot mount the drive set for WriteBackup folder 1152 Transfer Drive Mount error Cannot mount the drive set for Transfer folder 1153 OpuData Drive Mount error Cannot mount the drive set for OpuData folder 1154 Log Drive Mount error Cannot mount the drive ...

Page 24: ...Parameter 2044 LdParamClear TIME OUT Cannot initialize LD Parameter TimeOut 2051 IopSet NG Iop Set Error 2052 IopSet ERROR0 Iop Set Error 2053 IopSet ERROR1 Iop Set Error 2054 IopSet TIME OUT lop Set Error TimeOut 2055 IopSet ERROR0 Iop Set Error 2056 IopSet ERROR1 Iop Set Error 2057 IopSet TIME OUT lop Set Error TimeOut 2058 CD Iop LIMIT NG CD Iop exceeds limit value 2059 DVD Iop LIMIT NG DVD Iop...

Page 25: ...tage fluctuates Yes No FLOW CHART NO 4 When buzz sound can be heard in the vicinity of power circuit Check if there is any short circuit on the rectifying diode and the circuit in each rectifying circuit of the secondary side and service it if defective D1011 D1012 Does the photo coupler circuit on the secondary side operate normally Check IC1003 D1006 D1009 and their periphery and service it if d...

Page 26: ...trol receiver or remote control unit Is the L pulse sent out Pin 1 of RS1201 remote control receiver when the remote control unit is activated Replace BD Main CBA Unit Is 3 3V voltage supplied to Pin 2 of RS1201 remote control receiver Yes No Check EV 11V line on Power Supply CBA and service it if defective Or replace BD Main CBA Unit No Yes Yes FLOW CHART NO 8 The disc tray cannot be opened and c...

Page 27: ...ting Error BD Live Setting Error Network connection is interrupted Please confirm BD Live Setting LAN Cable Not Connected The cable is not correctly connected Please confirm the connection of the cable Cannot Acquire DHCP Server DHCP cannot be acquired Please set whether to confirm the connection with the manual Cannot Acquire IP Address Internet Protocol address is not set Please confirm a set co...

Page 28: ...hat corresponds to software update Error detected Please confirm whether it is USB device that corresponds to software update Cannot Connect To Download Server It is not possible to connect to the server Please contact our support center Cannot connect to wireless network Cannot connect to the wireless network Please confirm the wireless network setting USB Error Error in the USB Connection USB op...

Page 29: ... 17 PWSW1 18 PWSW2 21 PWSW3 48 SUB TXD SUB RXD RDY 47 19 AE32 A27 T34 31 CEC IN CEC 32 CEC OUT 13 PWSW1 PWSW2 PWSW3 SYS RESET V32 E3 TXD1 RDY U34 RXD1 REMOTE XIN XOUT 10MHz X TAL X6801 BUFFER LED DRIVE Q1802 JK6401 Q6301 Q6302 25 PWSW4 PWSW4 TO POWER SUPPLY BLOCK DIAGRAM 7 AUDIO MUTE AUDIO MUTE TO IDEO AUDIO BLOCK DIAGRAM P ON 1 8V RESET IC6301 2 1 RESET IC6303 2 1 P ON 5V 44 POWER LED 43 PLAY LED...

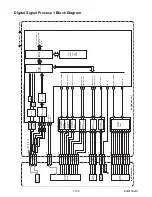
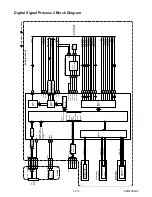
Page 30: ...1 5 EXPA 9 EXPA 10 EXPB 7 EXPB 8 A D 1 E H 2 RF 38 RF 36 LDD SDATA 23 LDD SDATA LDD SCLK LDD SCLK 24 CN101 CN101 CN101 1 29 30 33 34 2 40 41 42 43 40 41 2 1 20 19 18 17 26 25 24 23 LOADING MOTOR DRIVE 4 5 COLLIMATE LENS MOTOR DRIVE SLED MOTOR DRIVE SPINDLE MOTOR DRIVE 12 FOCUS 1 ACTUATOR DRIVE TRACKING CONTROL TO DIGITAL SIGNAL PROCESS 2 BLOCK DIAGRAM IC6001 FOCUS1 CONTROL FOCUS2 CONTROL SLED1 CON...

Page 31: ...IC6202 DDR2 SDRAM 1Gbit 8 8 SDDAT0 9 9 SDDAT1 1 1 SDDAT2 2 2 SDDAT3 6 6 SDCLK DDR2 SDRAM IC6203 IC6204 DDR2 SDRAM 512Mbit A4 A8 A9 B4 B9 C5 C9 C11 D8 D10 E10 E11 A3 A6 A7 B7 C4 C6 C7 C8 D6 D9 E8 E12 AF32 AG34 AH33 AJ34 I P CONVERTER SCALING DIGITAL VIDEO OUT DIGITAL AUDIO OUT VIDEO DAC CLK VSYNC HSYNC SDCLK SD DATA 0 3 VIDEO PRMCLK PRMVS PRMHS PRMC 0 11 PRMY 0 11 SCL3 33M CLOCK 33M CLOCK 74M CLOCK...

Page 32: ...ATA DDC CLOCK HOT PLUG DETECT IC6403 HDMI INTERFACE REGISTER IIC I F VIDEO I F DDC I F AUTHENT CATION KEY EXCHANGE AUDIO I F HDCP CIPHER ENCRYPTOR TMDS ENCODER AV CONTROLLER TMDS SERIALIZER 86 84 85 83 91 88 89 81 22 24 18 20 14 16 12 10 27 29 96 98 97 VIDEO SIGNAL AUDIO SIGNAL CLK VS HS 1 31 32 IC6602 VIDEO DRIVER 4dB AMP LPF 2 2dB AMP 75Ω DRIVER 4 VIDEO OUT WF1 19 15 16 3 1 6 4 9 7 10 12 IC6603 ...

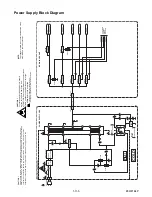
Page 33: ...e only with the same type fuse ATTENTION Pour une protection continue les risqes d Incele n utiliser que des fusible de même type Risk of fire replace fuse as marked This symbol means fast operating fuse A V F E5W21BLP HOT COLD Q1001 Q1002 IC1001 6 5 T1001 12 8 11 9 10 7 W1 F1000 2A 250V LINE FILTER L1001 A V F 3 4 IC1003 ERROR VOLTAGE DET IC1011 ERROR VOLTAGE DET 1 2 SHUNT REG D1001 D1004 BRIDGE ...

Page 34: ...titute replacement parts that do not have the same safety characteristics as specified in the parts list may create shock fire or other hazards Notes 1 Do not use the part number shown on these drawings for ordering The correct part number is shown in the parts list and may be slightly different or amended since these drawings were prepared 2 All resistance values are indicated in ohms K 103 M 106...

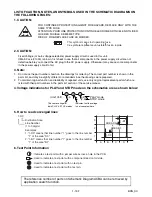
Page 35: ... reliability of repaired units use only original replacement parts which are listed with their part numbers in the parts list section of the service manual 4 Voltage indications for PLAY and STOP mode on the schematics are as shown below 5 How to read converged lines 6 Test Point Information A V F This symbol means fast operating fuse Ce symbole represente un fusible a fusion rapide 2 3 1 5 0 2 5 ...

Page 36: ...C D E A B 1 2 3 4 HOT COLD SWITCHING CONTROLLER POWER SUPPLY CBA 6 2 6 2 ERROR VOLTAGE DET 16 3 0 165 1 HOT CIRCUIT BE CAREFUL TO BD MAIN CBA UNIT CN6102 ERROR VOLTAGE DET OVER VOLTAGE DETECT OVER VOLTAGE DETECT 11 2 0 11 2 11 2 11 2 11 2 11 2 0 0 0 0 0 0 6 2 0 0 0 11 2 10 1 10 1 0 2 5 27BSB T26 Power Supply Schematic Diagram E5W21SCP CAUTION Fixed voltage or Auto voltage selectable power supply c...

Page 37: ...SW1203 SW1202 SW12001 390 R1201 Vcc GND VOUT 2 3 1 KSM 712TC2M RS1201 3 3K R1209 Q1202 MMBTSC3875G 3 3K R1208 Q1201 MMBTSC3875G 0 R1212 0 R1210 FRONT CBA UNLESS OTHERWISE SPECIFIED SWITCHES ARE SKRGABD010 PLAY STOP REMOTE SENSOR TO BD MAIN CBA UNIT CN6803 PLAY POWER OPEN CLOSE POWER C A B 1 2 LED DRIVE LED DRIVE 0 3 4 0 3 4 3 4 3 4 3 2 5 0 3 3 0 0 0 0 5 0 3 3 0 E5W21SCF Front Schematic Diagram ...

Page 38: ...1 C1401 0 1 GND 10 5 CD SDCLK SDDAT3 2 12 WP R1410 33 C1406 33P R1411 33 R1412 33 R1409 33 CN1402 4 1 3 2 GND BUS POWER USBDN USBDP 2 4 CN1401 1 3 GND USBDP USBDN BUS POWER R1404 0 1 2 SD CARD SLOT SD CBA A B C TO BD MAIN CBA UNIT CN6401 TO BD MAIN CBA UNIT CN6405 WIRELESS LAN MODULE 3 3 3 3 3 3 3 3 3 3 3 3 3 3 3 3 0 0 0 0 0 0 5 1 E5W21SCSD SD Schematic Diagram ...

Page 39: ...BDRFA G31 C201 1 C202 1 35 GND R122 2 2K R120 2 2K R119 2 2K R118 2 2K R125 2 2K 11 GND 12 GND 14 GND 16 GND N31 E19 D19 R808 10K C805 100P R807 10K C804 100P C803 100P R806 10K R805 10K C802 100P 3 GND 4 SOT0 CN804 1 SENSJ2 5 SIN0 2 SENSJ1 6 XFERST SENSJ2 C23 SENSJ1 A23 SOT0 A21 SIN0 B21 10K R801 10K R802 10K R803 10K R804 LD SENS LD SENS C312 2200P 15 SLD2 14 SLD2 12 SLD1 13 SLD1 C313 2200P SLED...

Page 40: ... VCC GND EXPB EXPA EXPB EXPA C310 2700P R323 4 7K R334 47K W V U HW HW HV HV HU HU VH THERMOOP THERMO R381 10K 1 2 3 4 5 6 7 9 10 8 11 12 13 15 16 14 17 18 19 20 21 28 27 26 25 24 23 22 BIAS BRAKE SELECT CTL HALL BIAS 120 MATRIX FG REVERSE IC301 AM9858 OSC GND GND VCC VREF GND GND GND VM1 VM2 C351 10 LD SENS SLED1 SLED2 LD SENS SLED1 SLED2 IC6001 2 9 1 MN2WS0062AFF B E21 3 GND CN301 1 LOAD 2 LOAD ...

Page 41: ...66 10K R6355 2 2K R6356 2 2K R6352 2 2K R6362 2 2K R6361 2 2K AL28 AM29 AM28 AL27 AM30 AP31 AM27 AN30 AP30 AK26 AK27 C6303 0 1 C6304 0 1 C6305 1 NAND RDY XSCIRQ AM25 AL24 AL26 R6392 10K C6301 10P L6301 0 ED2 XNFCE ED7 ED1 ED0 ED0 NFCLE ED1 ED3 XNFWE XNFWP ED4 ED7 ED6 TO BD MAIN 7 IC6001 7 9 ED5 NU ED4 ED5 XNFRE MAIN MICRO CONTROLLER DIGITAL SIGNAL PROCESS MEMORY I F ED2 ED3 ED6 NFALE NU I O7 NU WE...

Page 42: ...0 D7 0 1 C6227 NU R3 DQ6 F1 DQ13 D9 NU R7 F3 LDM P9 VSS 0 1 C6236 0 1 C6237 0 1 C6232 1 C6241 0 1 C6234 K8 CK B3 UDM A2 M7 DQ9 C2 10 C6224 A3 N2 L8 CS A3 VSS NU A2 A9 P3 A7 P2 BA0 L2 0 1 C6233 B8 VSSQ J7 VSSDL DQ2 H7 R8 NU L7 CAS F8 VSSQ D8 VSSQ 1K R6234 E3 VSS E8 LDQS K7 RAS 0 1 C6238 0 1 C6228 0 1 C6240 DQ14 B1 DQ0 G8 J2 VREF N1 VSS H2 VSSQ 0 1 C6226 G7 VDDQ C9 VDDQ G3 VDDQ E9 VDDQ G1 VDDQ G9 VD...

Page 43: ...SS H2 VSSQ 0 1 C6269 G7 VDDQ C9 VDDQ G3 VDDQ E9 VDDQ G1 VDDQ G9 VDDQ G9 VDDQ C3 VDDQ A1 VDD E9 VDDQ C7 VDDQ G1 VDDQ R1 VDD M9 VDD G7 VDDQ C9 VDDQ G3 VDDQ C1 VDDQ E1 VDD J1 VDDL A9 VDDQ J9 VDD AG4 AH1 AK1 AD1 AC2 AC6 AE4 AD5 AG5 AJ2 AD2 AG6 AD4 AC3 AH3 N4 R6 T4 T1 P5 R5 T3 U3 M1 L3 N3 L6 M5 M4 L5 M2 AG2 AF2 AE3 AF3 R1 R2 P3 P2 AE1 AG1 AC5 AA4 AA1 V4 AB3 W4 AA2 V2 AB1 W1 AB4 V1 U2 T6 Y6 AA5 Y3 Y2 AB...

Page 44: ...5 AL34 AL33 E20 R6459 47 27M CLOCK R6446 82 R6445 33 R6444 33 C6314 4P C6318 10P C6315 27P IC6301 PST8215NR 2 4 5 3 1 R6452 27K 1K R6453 MMBTSC3875G Q6301 1K R6456 MMBTSC3875G Q6302 R6455 10K R6460 10K 0 1 C6309 10K R6451 0 01 C6308 T34 AC30 10K R6442 XFERST SYS RESET D6301 1SS400ST 100 R6462 P ON 1 8V 0 01 C6319 C6320 0 1 R6334 10K R6317 10K R6303 2 2K R6321 10K IC6303 PST8215UR 1 2 3 4 3 AI AE 4...

Page 45: ... R6568 82 R6500 82 R6561 82 R6566 82 R6565 82 R6557 82 R6499 82 1 C6422 C6607 1 R6608 33K R6665 1K C6606 39P 14 13 12 11 10 9 8 2 7 4 5 3 1 6 GND GND NU CHARGE AMP IC6604 DRV602PWR R6604 22K C6630 1 C6603 220P R6605 33K C6614 39P C6605 39P R6664 1K C6602 10 R6607 8 2K C6629 1 R6606 8 2K R6613 1K C6604 220P C6613 39P JK6602 R6655 220 R6654 2 2K C6623 10P R6653 2 2K C6624 0 1 R6659 100K Q6601 MMBTSC...

Page 46: ...DRC L31 0 1 C6704 VDDR F VDDR G AVSSD1 G32 VDDA W14 1 C6774 VDDR E 0 1 C6780 10 C6722 0 1 C6750 VDDA W13 0 01 C6754 1 C6742 AVDD_APLL1 E15 VDDIOCK AJ14 1 C6720 1 C6786 1 C6785 10 C6771 AVDD33A1 D25 1 C6758 0 1 C6762 AVSS A34 AVSSFEB L29 AVSSFEB J29 AVSS B33 AVSS D31 AVSSFEB K29 VSS H AVSS C32 A 8V P ON 3 3V P ON 3 3V P ON 3 3V P ON 1 8V P ON 5V 1 A 5V P ON 3 3V P ON 1 8V SAFETY1 D6110 1SS400ST 3 3...

Page 47: ...R6803 10K PWSW4 R6866 10K R6865 10K R6867 10K R6833 10K R6831 10K R6830 10K R6828 10K R6826 10K R6873 10K SAFETY1 R6810 10K RXD1 TXD1 R6812 10K Q6802 MMBTSC3875G R6864 10K D6801 1SS400ST R6863 27K CEC POWER LED KEY 1 EV 3 3V REMOTE P ON 5V C6811 0 1 P ON 5V R6862 0 C6810 0 1 AUDIO MUTE SAFETY1 SAFETY2 SYS RESET RDY 1 2 3 4 MMOD VDD AUDIO MUTE NRST GND XOUT XIN SDA2 SUB TXD SUB RXD PWSW4 CEC OUT CE...

Page 48: ... C6455 1000P C6454 1000P C6458 0 1 C6461 1000P C6460 L6401 EXC28CG900U L6402 EXC28CG900U Q6401 MMBTSA1504Y R6634 10K R6635 10K MMBTSC3875G Q6402 1 C6517 SAFETY1 R6619 10K R6616 1 5 0 1 C6449 0 1 C6437 0 1 C6439 0 1 C6441 0 1 C6442 0 1 C6443 0 1 C6445 0 1 C6447 L6412 BEAD 2 3 4 BD BE BF BG BH BC HDMI CONNECTOR 1 HDMI INTERFACE PRMC4 PRMY1 PRMY0 PRMC5 PRMC6 PRMC7 PRMC8 PRMC9 PRMC11 CONTINUE BD MAIN ...

Page 49: ... R6521 33 R6520 33 R6519 0 1 C6510 2 2 C6511 0 1 C6514 0 1 C6513 BK BL BM BN BI BJ 1 2 3 4 MAIN MICRO CONTROLLER MPEG2 AV CODEC MII RXCLK MII RXD0 MII RXD1 MII RXD2 MII RXD3 MII RXDV MII RXER MII TXCLK MII TXD0 MII TXD1 MII TXD2 MII TXD3 MII TXER MII TXEN MII CRS MII COL MDC MDIO MII_INTL PHYRSTL WAKEUP CONTINUE BD MAIN 8 BD MAIN CBA UNIT ETHERNET INTERFACE ETHERNET JACK CONTINUE BD MAIN 6 VDD 3 3...

Page 50: ... an isolation transformer must be used when repairing Also in order to have the ability to increase the input slowly when troubleshooting this type of power supply circuit a variable isolation transformer is required CAUTION Fixed voltage or Auto voltage selectable power supply circuit is used in this unit If Main Fuse F1000 is blown check to see that all components in the power supply circuit are...

Page 51: ...015 JP1005 J1010 FG J1011 FG D1008 Power Supply CBA Front CBA SD CBA Bottom View Because a hot chassis ground is present in the power supply circuit an isolation transformer must be used when repairing Also in order to have the ability to increase the input slowly when troubleshooting this type of power supply circuit a variable isolation transformer is required CAUTION Fixed voltage or Auto volta...

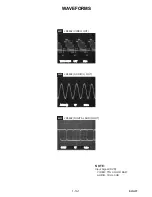
Page 52: ...02 VIDEO OUT JK6602 AUDIO L OUT JK6602 DIGITAL AUDIO OUT 20 20µs 0 5V 0 5V VIDEO CVBS VIDEO CVBS AUDIO L AUDIO L 1V 1V 0 5ms 0 5ms SPDIF SPDIF 1V 1V 0 1 0 1µs NOTE Input Signal DVD VIDEO 75 COLOR BAR AUDIO 1KHz 0dB 1 13 1 B4NWF ...

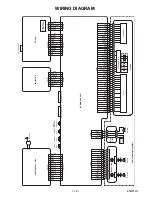
Page 53: ...AT2 SDDAT3 CMD GND 1 2 3 4 1 2 3 4 GND BUS POWER USBDN USBDP P ON 3 3V SDCLK GND SDDATO SDDAT1 CD 11 11 WP BD MECHANISM ASSEMBLY RELAY CBA MCH CBA CN101 CN301 CN302 30 B 31 PO1 1 LOAD 2 LOAD 3 GND 4 TRAY IN 32 PO0 33 A 34 D 35 GND 36 RF 37 GND 38 RF 1 W 2 V 3 U 4 VH 5 HU 6 HU 7 HV 8 HV 9 HW 10 HW 11 VH 12 SLD1 13 SLD1 14 SLD2 39 GND 40 G 41 F 42 E 43 H 44 GND 45 VC PD 1 FD2 2 FR2 3 TR 4 TD 5 FD1 6...

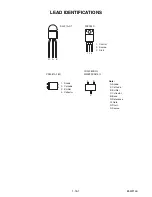
Page 54: ...S 1 2 4 3 1 Anode 2 Cathode 3 Emitter 4 Collector C E B R A K 1 Control 2 Source 3 Drain 1 2 3 Note A Anode K Cathode E Emitter C Collector B Base R Reference G Gate D Drain S Source SL431A AT MIP2E4D PS2561A 1 W 2SA1980SFG MMBTSC3875G ...

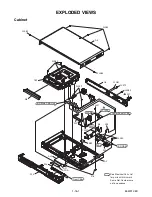
Page 55: ...List for parts with this mark Some Ref Numbers are not in sequence A3 A1X F1000 B13 2L058 SD CBA BD Main CBA Unit Power Supply CBA 2L082 2L082 2L085 2L082 2L083 2L081 2L070 2L027 2L027 A22 A2 W4 2L050 W3 W5 B4 B25 W2 W1 A6 A4 A21 A20 A A8 1B1 Front CBA 2L049 B59 ...

Page 56: ...1 16 2 E5W21PEX Packing S2 X19 X10 S1 A Upper Side Lower Side X1 X2 A X47 X34 X6 S1 B A20 C S3 S5 Some Ref Numbers are not in sequence X14 A20 B X33 X16 S16 S16 ...

Page 57: ...T M3X6 E5610UD 0VM412937A 2L050 SCREW C TIGHT M3X6 E5610UD 0VM412937A 2L070 SCREW B TIGHT M3X8 BIND HEAD GBHB3080 2L081 SCREW TAP TIGHT M3X5 BIND HEAD BLK NI GBHC3050 2L082 SCREW C TIGHT 6 6X5 M4 OTHER GAHC3050 1VM436459 2L083 SCREW TAP TIGHT M3X5 BIND HEAD BLK NI GBHC3050 2L085 SCREW S TIGHT M3X10 E5610UD 0VM412936A W1 AC CORD W O A GND WIRE UL CSA VW 1 172 NO WAV1620LW001 W2 WIRE ASSEMBLY FFC 13...

Page 58: ...20 ZBB NDWZ01ZB220Z D1006 DIODE FR154 NDLZ000FR154 D1007 RECTIFIER DIODE BA157 NDQZ000BA157 D1008 DIODE ZENER 27BSB T26 NDTB027BST26 D1009 DIODE ZENER 27BSB T26 NDTB027BST26 D1010 CHIP ZENER DIODE CRZ16 TE85L Q QD1Z00CRZ16Q D1011 SCHOTTKY BARRIER DIODE SMD SK36 ND1Z000SK36S D1012 SCHOTTKY BARRIER DIODE SMD SK36 ND1Z000SK36S ICS IC1001 IC IPD MIP2E4D TO 220 A1 3 QSCA0S0MS027 IC1003 PHOTOCOUPLER PS2...

Page 59: ... SMD MMBTSC3875G NQ1GBTSC3875 RESISTORS R1201 CHIP RES 1 10W J 390 Ω RRXAJR5Z0391 R1202 CHIP RES 1 10W J 390 Ω RRXAJR5Z0391 R1203 CHIP RES 1 10W J 180 Ω RRXAJR5Z0181 R1204 CHIP RES 1 10W J 220 Ω RRXAJR5Z0221 R1205 CHIP RES 1 10W J 6 2k Ω RRXAJR5Z0622 R1206 CHIP RES 1 10W J 6 8k Ω RRXAJR5Z0682 R1208 CHIP RES 1 10W J 3 3k Ω RRXAJR5Z0332 R1209 CHIP RES 1 10W J 3 3k Ω RRXAJR5Z0332 R1210 CHIP RES 1608 ...

Page 60: ...in without the obligation to notify any person or organization of such changes with the design is a registered trademark of Funai Electric Co Ltd and may not be used in any way without the express written consent of Funai All other trademarks used herein remain the exclusive property of their respective owners Nothing contained in this manual should be construed as granting by implication or other...

Reviews: