background image

19

EN-GB

E

ngl

ish

b


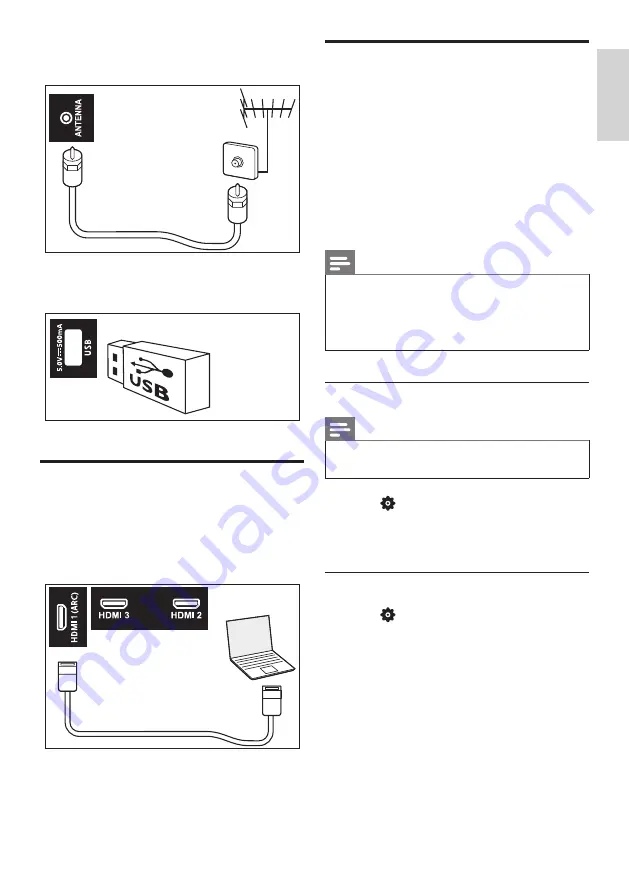
Antenna

Signal input from an antenna or cable.

c

 USB 

Data input into USB storage devices.

Connecting computers

Before you connect your computer to your TV.

• 

Set the refresh rate to 60Hz on the 
computer’s screen. 

• 

Select a supported screen resolution 
on your computer.

Use Philips EasyLink

Taking full advantage of your Philips EasyLink 
HDMI-CEC compatible devices can enhance 
the control function and achieve the best 
possible results. HDMI-CEC compatible 
devices connected through the HDMI 
connector can be controlled by a TV remote 
control.
To enable Philips EasyLink, you need to:

• 

Make sure that each HDMI-CEC 
compatible device can run normally.

• 

Switch to EasyLink

Note


EasyLink-compatible device must already 
be turned on and is selected as a signal 
source. 


Philips does not guarantee its 100% 
interoperability with all HDMI CEC devices.

Turn on or off EasyLink

Note


Pease do not enable Philips EasyLink if 
you do not intend to use it.

1

 Press   

SETUP

.

2

 Select 

[EasyLink]

 > 

[HDMI CEC]

.

3

 Select 

[On] 

or

 [Off]

 and press 

OK

.

Use the CEC device list

1

 Press   

SETUP

.

2

 Select 

[EasyLink]

 > 

[CEC Device List]

 and 

press 

OK

.


»

The connected HDMI devices list 
display.

Summary of Contents for 50PUN7625/61

Page 1: ...7625 61 65PUN7625 61 70PUN7625 61 50PUN7635 61 55PUN7635 61 65PUN7635 61 70PUN7635 61 50PUN7645 61 55PUN7645 61 65PUN7645 61 70PUN7645 61 Register your product and get support at www philips com TVsupport EN User Manual ...

Page 2: ......

Page 3: ...ge device 15 Picture formats supported by USB 15 Audio formats supported by USB 15 Video formats supported by USB 16 7 Installing channels 17 Automatic channel search 17 Manually set the channel list 17 Adjust picture aspect ratio automatically 17 8 Connecting Devices 18 Bottom Connectors 18 Side Connectors 18 Connecting computers 19 Use Philips EasyLink 19 HDMI Ultra HD 20 9 Product Information 2...

Page 4: ...lips N V or their respective owners TP Vision Europe B V reserves the right to change products at any time without the need to give response to early inventory adjustment The content in this manual is suitable for this system If the intended use of the product or its individual components or programs is not within the specified scope in this manual you will have to ensure its effectiveness and app...

Page 5: ...em of furniture bookcases for example please be sure to fix the furniture and the TV set onto the wall or the appropriate support point Tell your children that climbing onto furniture to touch the TV set is prone to danger 2 Important Before you start using the TV please read and understand all instructions If it is damaged due to failure to operate in accordance with the instructions it is not co...

Page 6: ... climb such as toys and remote controls on the top of the television or furniture on which the television is placed If the existing television set is going to be retained and relocated the same considerations as above should be applied Risk of overheating Do not place the TV set in a narrow space The TV must be reserved a space of at least 4 inches or 10 cm around it to ventilate Make sure not to ...

Page 7: ...rring and ghosting due to screen burn Please correspondingly reduce the screen brightness and contrast when using the TV set in this way The ghosting partial ghosting and other traces displayed on the TV screen for the above reasons are not within the scope of this warranty Caution Risk of Batteries Do not ingest the battery Chemical burn hazard The remote control may contains a coin button cell b...

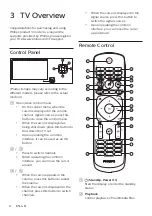
Page 8: ...at www philips com TVsupport Control Panel 2 3 4 5 1 Product shape may vary according to the different models please refer to the actual models a Open close control menu On the control menu when the cursor is displayed in the volume channel signal sources press this button to close the control menu When the cursor is displayed as being shut down press this button to shut down the TV set Upon opera...

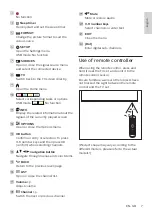
Page 9: ...selection To press 0 9 number keys and then press OK confirm when selecting channels n navigation button Navigate through menus and select items o BACK Return to the previous level page p LIST Open or close the channel list q Volume Adjust volume r Channel Switch the next or previous channel s Mute Mute or restore audio t 0 9 number keys Select channels or enter text u EXIT Close the menu v Dot En...

Page 10: ...er outlet and on the back of the TV Turn on the TV With the TV in Standby press Standby Power on on the remote control to switch the TV on You can also press the small joystick key on the back of the TV to switch the TV on in case you can t find the remote control or its batteries are empty Switch to standby Press the Standby Power on on the remote control You can also press the small joystick key...

Page 11: ... to open the Source menu 2 Select one of the item in the source list 3 Press OK to select TV is switched to the selected device Adjust the TV volume Increase or reduce the volume Press Volume on the remote control Mute or Unmute Press Mute button on the remote control Press Mute button on the remote control again to restore the sound ...

Page 12: ...ess OK Install channels The first time you set up your TV you are prompted to select a menu language and to install TV channels Automatic channel search 1 Press SETUP 2 Select TV Antenna Channel Search or Cable Channel Search and press OK 3 Press OK to start the automatic channel search Note This feature can be used only in the TV mode Manually set the channel list You can manually add or skip cha...

Page 13: ... temperature Sharpness Adjust the sharpness of the image Aspect Ratio Change the picture format Overscan Set the Overscan to Off to improve HDMI video quality The default setting is On Color Temperature Set the picture to a preset color temperature for a better white balance Noise Reduction Filter and reduce the noises in an image Dynamic Contrast Set the level at which the TV automatically enhanc...

Page 14: ...n Tip If you have forgotten your code please enter 8888 to overwrite the existing code Change the sound settings Change the sound settings to suit your preferences You can apply the predefined settings or change the settings manually Sound mode Apply a predefined sound setting options by using the sound mode 1 Press SETUP and select Sound Smart Sound 2 Select one of the following settings and then...

Page 15: ...select Closed Caption and then press OK 2 Select the correct type of closed captions then press OK 3 Select one of the settings and then press OK Updating the TV software Philips is continuously striving to improve its products and we recommend updating your TV software after updates are launched Check the current software version 1 Press SETUP select Settings System Info and then press OK Display...

Page 16: ...ture to the full screen size Start Pause the slide show Navigation button View the previous next picture Return to the browse page Change the slide show settings 1 Press Menu when playing a slide Display the list of slide show options and browse photos in accordance with the instructions on the screen Note The information about the photos will only appear when the slide stops playing Listen to mus...

Page 17: ...ress BACK to return or leave the main screen of the browse page 2 Wait about five seconds and then remove the USB storage device Picture formats supported by USB File Format Photo Resolution JPEG Base line 15360x8640 Progressive 1024x768 PNG non interlace 9600x6400 interlace 1200x800 BMP 9600x6400 Audio formats supported by USB File Format Audio Codec Sample rate Code rate mp3 wav MPEG1 2 layer1 1...

Page 18: ...e content packaging or coding does not meet the standards the video content may not play correctly The failure to play due to some specific parameters of the sources that go beyond the decoding range is not a fault of the machine The animated GIF pictures are not supported Before connecting the device to the TV set please back up your files to prevent file damage or data loss For no support for US...

Page 19: ... and press OK 3 Press OK to start the automatic channel search Note This feature can be used only in the TV mode Manually set the channel list You can manually add or skip channels to the channel list 1 Press SETUP 2 Select TV Add Skip Channels and press OK Adjust picture aspect ratio automatically Automatically adjust the picture aspect ratio according to the TV program 1 Press SETUP 2 Select TV ...

Page 20: ...d b HDMI 2 HDMI 3 Digital audio and video input in Blu ray disc player and other HD digital devices Note If there is no sound and picture displayed when connected to the HDMI 3 Please disconnect the device and re connect it to the HDMI 1 and HDMI 2 c AV input Video Composite video input from analogue devices such as VCR Audio Audio input from analogue devices connected to the video Side Connectors...

Page 21: ...vices connected through the HDMI connector can be controlled by a TV remote control To enable Philips EasyLink you need to Make sure that each HDMI CEC compatible device can run normally Switch to EasyLink Note EasyLink compatible device must already be turned on and is selected as a signal source Philips does not guarantee its 100 interoperability with all HDMI CEC devices Turn on or off EasyLink...

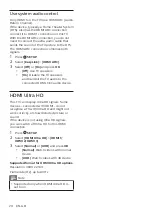
Page 22: ...rs On Disable the TV speakers and transmit the TV audio to the connected HDMI CEC audio device HDMI Ultra HD This TV can display Ultra HD signals Some devices connected with HDMI do not recognise a TV with Ultra HD and might not work correctly or show distorted picture or sound If the device is not using Ultra HD signals you can switch off Ultra HD for this HDMI connection 1 Press SETUP 2 Select H...

Page 23: ... the TV set does not support resolution and refresh rate there will be a black screen or flower screen Please switch to the TV set to display resolution and refresh rate Multimedia Supported storage device USB Supports FAT 32 FAT 16 USB storage devices Sound power 8W x 2 Intrinsic Resolution 3840 x 2160 Tuner Reception Transmission Aerial input 75 ohm coaxial F type TV system ATSC Video playback N...

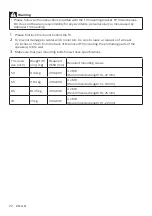
Page 24: ... sure to leave a clearance of at least 2 2 inches or 5 5cm from the back of the locked TV including the protruding parts of the speakers to the wall 3 Make sure that your mounting bolts follow these specifications TV screen size inch Weight TV only kg Required VESA mm Required mounting screws 50 11 44 kg 200x200 4 x M6 Recommended length 16 22 mm 55 11 84 kg 200x200 4 x M6 Recommended length 14 16...

Page 25: ...ave problems The previous channel installed does not appear in the channel list Check that the selected channel list is correct Picture problem The TV is on but has no picture Check that the antenna is not properly connected to the TV Check that a correct device is selected as the TV signal source There is no sound nor picture Check that the picture settings are correct Antenna connection causes b...

Page 26: ...tput This does not indicate a failure Check that all cables are properly connected Check that the volume is not set to 0 Check the sound is not muted There is picture but the sound quality is poor Check that the sound settings are set properly There is a picture but only one speaker has sound Check that the sound balance is set to the middle HDMI connection problem HDMI has a problem Note that HDC...

Page 27: ... Agreement grants you only the right to use the Software but you do not acquire any rights express or implied in the Software other than those specified in this Agreement TP VISION and its licensors retain all right title and interest in and to the Software including all patents copyrights trade secrets and other intellectual property rights incorporated therein The Software is protected by copyri...

Page 28: ...ense for such content already stored on your Device However you will not be able to use certain of the WM DRM Software features that require Internet access such as the ability to download content that requires the WM DRM Upgrade All title and intellectual property rights in and to the Secure Content is the property of the respective Secure Content owners and may be protected by applicable copyrig...

Page 29: ...e was provided to you free of charge on an evaluation only basis 10 NO OTHER WARRANTIES EXCEPT AS SET FORTH ABOVE TP VISION AND ITS LICENSORS DO NOT WARRANT THAT THE SOFTWARE WILL OPERATE ERROR FREE OR UNINTERRUPTED OR WILL MEET YOUR REQUIREMENTS YOU ASSUME ALL RESPONSIBILITIES FOR SELECTION OF THE SOFTWARE TO ACHIEVE YOUR INTENDED RESULTS AND FOR THE INSTALLATION OF USE OF AND RESULTS OBTAINED FR...

Page 30: ... without reference to its conflict of laws principles Any dispute between you and TP VISION regarding this Agreement shall be subject to the non exclusive jurisdiction of the courts of your country of residence 15 General This Agreement contains the entire agreement between you and TP VISION and supersedes any prior representation undertaking or other communication or advertising with respect to t...

Page 31: ......

Page 32: ...ninklijke Philips N V All rights reserved Document order number Philips and the Philips Shield Emblem are registered trademarks of Koninklijke Philips N V and are used under licence from Koninklijke Philips N V ...

Reviews: