background image


EN            26           
 

3


Use more of 
your TV 

Pause TV 

What you can do 

While you watch a digital channel, you can 

pause a programme to answer a phone call 

or to have a break. The broadcast is stored 

on a USB hard drive that is connected to the 

TV. You can resume playback of the 

programme at any time. 

Note:


You can pause a programme for a 

maximum of 90 minutes. 


What you need 


Tune your TV to receive digital 

channels. See 

Change your TV settings 

> Channels > Automatic installation


(Page 39). 


Connect a USB 2.0 compatible hard 

drive with a minimum capacity of 4 GB 

and a minimum transfer speed of 30 

megabits per second. For optimal 

performance, use a hard drive with 32 

GB of disk space. 


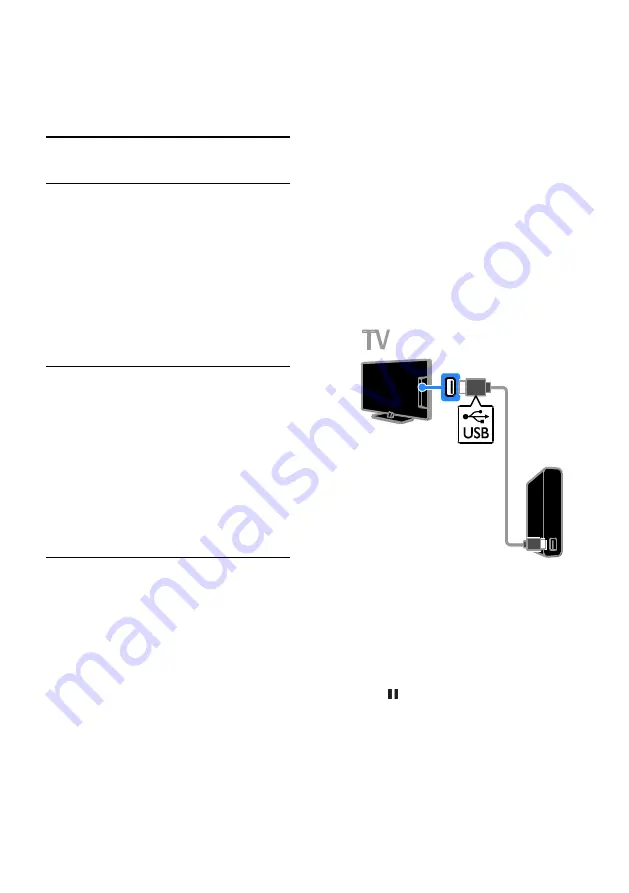
Install USB hard drive 

To pause TV, you must connect a USB hard 

drive to the TV and format it. 
If the TV does not recognise the USB hard 

drive, use a PC to format it to NTFS or 

FAT32 system, then try again. 

Caution:


TP Vision is not responsible if the USB 

hard drive is not supported, nor is it 

responsible for damage to or loss of 

data in the device.   


Formatting removes all data from the 

connected USB hard drive. 


The USB hard drive is formatted 

exclusively for this TV. Keep it 

permanently connected to the TV. You 

cannot access the contents of the USB 

hard drive from another TV or PC.   


Do not overload the USB port. If you 

connect a USB hard drive device that 

consumes more than 500mA power, 

make sure that it is connected to its 

own external power supply. 

Note:


Make sure that the TV and the USB 

hard drive are switched off. 


While you are formatting the USB hard 

drive, do not connect other USB 

devices to the TV. 


1. Connect the USB hard drive directly to 

the TV, or if you intend to connect other 

USB devices in future, connect the USB hard 

drive through a USB hub.     

2. Switch on the TV and the USB hard drive, 

if it has an external power source. 
3. Switch to a digital TV channel.     

4. Press    to start formatting the USB hard 

drive. 

5. Follow the onscreen instructions to 

complete the formatting process. 

Warning:

 The formatting process may take 

some time. Do not switch off the TV or 

disconnect the USB hard drive until this 

process is complete. 

Summary of Contents for 46PFL4908H

Page 1: ...EN User Manual Register your product and get support at www philips com welcome 46PFL4908H 46PFL4908K 46PFL4908M 46PFL4908T 55PFL4908H 55PFL4908K 55PFL4908T ...

Page 2: ...settings 43 Universal access settings 44 Other settings 45 Update software 45 Reset all 46 5 Connect your TV 47 About cables 47 Connect antenna 48 Connect devices 48 Connect more devices 55 Watch connected devices 58 Set up EasyLink devices 58 Connect to a network and the Internet 61 Connect a CAM Conditional Access Module 64 6 Troubleshooting 65 General issues 65 Channel issues 66 Picture issues ...

Page 3: ...power cord can loosen connections and cause arcing To disconnect the TV from the mains power the power plug of the TV must be disconnected When disconnecting the power always pull the power plug never the cord Ensure that you have full access to the power plug power cord and outlet socket at all times Risk of damage to the TV Two people are required to lift and carry a TV that weighs more than 25k...

Page 4: ...y part of the TV power cord or aerial cable Risk of hearing damage Avoid using earphones or headphones at high volumes or for prolonged periods of time Low temperatures If the TV is transported in temperatures below 5 C or 41 F unpack the TV and wait until the TV temperature matches room temperature before connecting the TV to the power outlet 3D health warning For 3D TVs only If you or your famil...

Page 5: ...s manufacturers of sunglasses Do not expose the 3D glasses to direct sunlight heat fire or water This may result in a product malfunction or fire Do not drop bend or apply force to the lenses of the 3D glasses Do not use cleaning chemicals containing alcohol solvent surfactant or wax benzene thinner mosquito repellent or lubricant Using these chemicals can cause discolouration or cracks Placement ...

Page 6: ...pressly prohibited in this manual or any adjustments and assembly procedures not recommended or authorised in this manual shall void the warranty Pixel characteristics This LCD LED product has a high number of colour pixels Although it has effective pixels of 99 999 or more black dots or bright points of light red green or blue may appear constantly on the screen This is a structural property of t...

Page 7: ...nterface and the HDMI Logo are trademarks or registered trademarks of HDMI Licensing LLC in the United States and other countries Kensington and Micro Saver are registered US trademarks of ACCO World Corporation with issued registrations and pending applications in other countries throughout the world DLNA the DLNA Logo and DLNA CERTIFIED are trademarks service marks or certification marks of the ...

Page 8: ... settings You can apply a combination of energy saving picture settings While you watch TV press the Green button and select Energy saving Then select the Energy saving picture setting Screen off If you only want to listen to audio from the TV you can switch off the TV display Other functions continue to operate normally While you watch TV press the Green button and select Screen off Light sensor ...

Page 9: ...usehold waste Correct disposal of your old product helps to prevent potential negative consequences for the environment and human health Your product contains batteries covered by the European Directive 2006 66 EC which cannot be disposed of with normal household waste Please inform yourself about the local rules on separate collection of batteries because correct disposal helps to prevent negativ...

Page 10: ...ble in certain countries only Use the Philips connectivity guide An easy to use connectivity guide gives you guidance on how to connect your TV to other devices Visit http www connectivityguide philips com Search the TV forum Your question may have already been answered by the Philips TV community of users Visit www supportforum philips com Contact Philips You can contact Philips Consumer Care in ...

Page 11: ... your TV is in standby Point the remote control at the sensor Make sure that the line of sight between the remote control and the TV is not blocked Remote control 1 Standby Switch the TV on or to standby 2 Play buttons Control playback of multimedia files 3 SOURCE Watch a connected device 4 GUIDE View programme guide 5 EXIT Exit from menus or TV functions 6 Home Access the Home menu 7 OK Confirm a...

Page 12: ...Page 59 On screen remote control You can also control connected HDMI CEC enabled devices through other buttons that are available through the on screen remote control Make sure that Easylink is switched on after connection Read more about Easylink in Connect your TV Set up Easylink devices Control devices Page 59 To access the on screen remote control 1 While you watch a connected device press OPT...

Page 13: ...u are not going to use the TV for an extended period of time disconnect the TV from the mains plug Automatic switch off You can save energy with this TV s energy efficiency settings which are enabled by default If there is no user interaction such as pressing a remote control button or a control on the TV for four hours the TV will automatically switch to standby To disable automatic switch off 1 ...

Page 14: ... channels Lock a channel Listen to digital radio Filter channels 1 While you watch TV press LIST 2 Press OPTIONS then select Filter 3 Select an option then press OK Digital Analogue Display all channels in the channels list Digital TV channels Display only digital channels Analogue Channels Display only analogue channels Free scrambled Display all channels in the channels list Scrambled channels D...

Page 15: ... are available you can listen to them They are installed automatically when you install the TV channels 1 While you watch TV press LIST The channel list is displayed 2 Press OPTIONS 3 Select Filter Radio then press OK 4 Select a radio channel then press OK Watch connected devices Before you can watch a device connect the device to the TV See Connect your TV Connect devices Page 48 Select a device ...

Page 16: ...cale 4 3 format to 16 9 Not recommended for HD or PC Wide screen Shows widescreen format content unstretched Not recommended for HD or PC Unscaled Provide maximum detail for PC Only available when PC mode is selected in the Picture menu 4 3 Display the classic 4 3 format View programme guide What you can do NonPublish You can view channel schedules and programme synopses for digital TV channels us...

Page 17: ...t programme guide 1 Press 2 Select TV guide then press OK Note If you are viewing the programme guide for the first time follow the onscreen instructions to update the guide Customise Internet programme guide You can use the programme guide to Schedule recordings of programmes See Use more of your TV Record TV shows Schedule recordings Page 28 Identify channels Select day of display Reload and zoo...

Page 18: ...matically enable 3D The TV detects when 3D is available and prompts you to put on your 3D glasses to start watching To set the TV response when a 3D signal is detected 1 Press 2 Select Setup TV settings 3D Switch to 3D 3 Select a setting then press OK Automatic TV switches to 3D automatically Notification only TV displays notification first Never No notification Select a source with 3D For 3D disc...

Page 19: ...ess OK Note If you switch to another activity the conversion stops Play multimedia files What you can do You can play videos photos and music on your TV from Your computer connected through the home network A USB device connected to the TV Play files from computer What you need A wired or wireless home network connected with a Universal Plug and Play uPnP router Optional An LAN cable that connects...

Page 20: ...the bottom of the TV screen Tips Select the top bar to filter your files by type Select Sort to arrange the files by name date or other fields Play options Watch video 1 Select in the top bar 2 Select a video then press OK 3 Optional To play all the videos in a folder select a video then select Play all To skip to the next or previous video press CH or CH To pause the video press OK Press OK again...

Page 21: ... or disable random play of tracks Note To view information about a song for example title artist or duration select the song then press INFO To hide the information press INFO again View photos 1 Select in the top bar 2 Select a photo thumbnail then pressOK Start a slideshow If there are multiple photos in a folder select a photo then select Slideshow To skip to the next or previous video press CH...

Page 22: ...tration video on your TV This completes the registration and activates DivX on your TV Consult the DivX website for detailed support To de register this TV 1 Press SOURCE 2 Select Browse USB then press OK 3 Press OPTIONS select DivX VOD then press OK 4 Follow the onscreen instructions Smart TV What you can do NonPublish With Internet Applications apps which are specially adapted Internet websites ...

Page 23: ...nstalled on your TV To access an app select the app then press OK to confirm Add apps 1 Select App Gallery then press OK 2 Select an app then press OK to add it to your home screen 3 Follow the onscreen instructions to add the app Tips You can search for apps available in other countries To return to the Smart TV home page press LIST Note Smart TV services are updated automatically To view the lat...

Page 24: ... and watch the video 1 Open a video store app You may need to register or enter your log in information 2 Select a video 3 Make the online payment 4 Start watching the video Interactive TV What you can do With interactive TV you can view additional information or entertainment pages provided by digital TV broadcasters You can experience true interactivity by responding directly to the digital cont...

Page 25: ...s an interactive programme 1 Switch to a digital channel with interactive services While the application is loading a blinking symbol is displayed When the application has loaded an icon is displayed 2 Press the Red button or OK to launch the interactive application 3 Follow the onscreen instructions and use your remote control to navigate the interactive pages ...

Page 26: ...nor is it responsible for damage to or loss of data in the device Formatting removes all data from the connected USB hard drive The USB hard drive is formatted exclusively for this TV Keep it permanently connected to the TV You cannot access the contents of the USB hard drive from another TV or PC Do not overload the USB port If you connect a USB hard drive device that consumes more than 500mA pow...

Page 27: ...mes as well as future TV programmes Note Recording is only supported in countries with programme guides In Nordic countries the TV provides limited support for subtitles while recording TV programmes What you need Tune your TV to receive digital TV channels such as DVB broadcasts See Change your TV settings Channels Automatic installation Page 39 Connect a USB 2 0 compatible hard drive with a mini...

Page 28: ...hard drive until this process is complete Start recording One touch recording You can record the programme you are currently watching with a single button 1 While you watch TV press Recording starts immediately A pop up window is displayed indicating the end time of the programme 2 Optional Use the Navigation buttons to mark the end time of the recording 3 Select Confirm then press OK 4 To stop re...

Page 29: ...recordings is displayed 3 Select the recording then select Remove The schedule recording is cancelled Watch recordings 1 Press 2 Select Recordings then press OK A list of recordings is displayed 3 Select a recording from the list then press OK The recording starts to play Sort recordings 1 Press 2 Select Recordings then press OK A list of recordings is displayed 3 Press OPTIONS 4 Select an option ...

Page 30: ...t on this TV or from your computer Tip If you have connected a USB keyboard to this TV you can enter text from your keyboard For keyboard connections see Connect your TV Connect more devices Keyboard and mouse Page 56 Start Skype Sign in to your account 1 Press then select Skype 2 Enter your Skype Name and Password To enter text select each field and press OK to access the onscreen keyboard 3 Sele...

Page 31: ...tructions to unblock the contact Contact info To view the details of a contact select a contact The contact details are displayed on the right of the TV screen Contact history To view the calls which you have had with a contact select History To open previous conversations select a conversation and press OK Note When you sign in with another Skype account on this TV the history of your previous ac...

Page 32: ...scription on your computer For more information see Use more of your TV Use Skype Skype settings Page 33 1 In the Skype menu select Call phones then press OK 2 Select Dial pad to access the on screen dial pad or enter the telephone number with the Numeric buttons 3 Once complete select Call then press OK to start the call 4 Optional To mute your microphone during your call press OPTIONS then selec...

Page 33: ...ssword 1 In the Skype menu select Settings then press OK 2 Select Change Password then press 3 Follow the onscreen instructions to enter your current and new passwords 4 Once complete select Apply then press OK Play games What you can do On this TV you can play single or two player games in full screen with optimised picture settings for games What you need Connect your game console to this TV See...

Page 34: ...en press TEXT 2 Select a page in one of the following ways Enter the page number with the Numeric buttons Press CH CH to view the next or previous page Press the Colour buttons to select a colour coded item Text options 1 While you view text press OPTIONS 2 Select an option Freeze page Unfreeze page Freeze or unfreeze the current page Dual screen Full screen Enable or disable dual screen text Dual...

Page 35: ...age 43 When in digital text Press the Navigation buttons to select or highlight items Press the Colour buttons to select an option then press OK to confirm or activate Set locks and timers Clock You can display a clock on the TV The clock displays the time that is broadcast by your TV service operator Display the TV clock 1 While you watch TV press OPTIONS 2 Select Clock then press OK The clock is...

Page 36: ...ect Set code or Change code 4 Enter the code with the Numeric buttons Tip If you access the channels from the channel list you are prompted to enter your lock code If you forget your code enter 8888 to override any existing codes Lock or unlock channels 1 In the child lock menu select Channel lock 2 Enter the child lock code with the Numeric buttons 3 Select the channels to lock or unlock Restart ...

Page 37: ...se HD Fine tune each pixel to match surrounding pixels and produce a brilliant high definition image Advanced sharpness Enable superior sharpness especially on lines and contours in the picture Dynamic contrast Dynamically enhance the details in the dark medium and light areas of the picture Dynamic backlight Select a backlight level to optimise dynamic power consumption and picture contrast Colou...

Page 38: ...age 60 Clear Sound Enhance sound quality Audio Out format Select the type of audio output through the digital audio output connector Choose between Multichannel and Stereo Audio Out levelling Set the output level for stereo audio Select Less for a certain amount of loss in intensity or signal strength Select More for no loss in intensity or signal strength HDMI 1 ARC Enable audio output from the A...

Page 39: ... reorder these channels Install analogue channels You can search and store analogue TV channels one by one Step 1 Select your system Note Skip this step if your system settings are correct 1 While you watch TV press 2 Select Setup Channel settings Channel installation 3 Select Analogue Manual installation System then press OK 4 Select the system for your country or region then press OK Step 2 Sear...

Page 40: ...etup Channel settings or Satellite settings 3 Select Channel installation Channel update message 4 Select Off then press OK Switch off automatic updates In the Channel installation menu select Automatic channel update Off Update channels manually 1 Press 2 Select Setup Search for channels Update channels then press OK 3 Follow the onscreen instructions to update the channels Copy channels ATTENTIO...

Page 41: ... reinstall the second TV to match the country setting of the first TV See Change your TV settings Reset all Page 46 8 Connect the USB storage device to the second TV 9 Press 10 Select Setup Channel settings or Satellite settings 11 Select Channel installation Copy channel list Copy to TV then press OK The channel list is copied to the second TV 12 Disconnect the USB storage device Satellite settin...

Page 42: ...e channels 3 Follow the onscreen instructions to complete the installation 4 Once complete select Finish and then press OK Add and remove satellites You can add or remove satellites at any time and install channels from new satellites Note Before you add satellites make sure that the connection type is correct See Change your TV settings Satellite Settings Install satellite channels Page 41 1 Pres...

Page 43: ...guages 4 Press OK to confirm Subtitles on analogue channels 1 While you watch an analogue TV channel press TEXT 2 Enter the three digit page number of the subtitles page which is usually 888 If available subtitles are switched on Subtitles on digital channels 1 While you watch a digital TV channel press OPTIONS 2 Select Subtitles then press OK 3 Select Subtitles off Subtitles on or Automatic then ...

Page 44: ... speakers or headphones You can choose to hear the visually impaired audio through the TV speakers headphones or both 1 While you watch TV press OPTIONS 2 Select Universal access Visually impaired 3 Select a setting then press OK Speakers Hear visually impaired audio from speakers only Headphones Hear visually impaired audio from headphones only Speakers headphones Hear visually impaired audio fro...

Page 45: ...write protection disabled Access to a computer with a USB connector and Internet access A file archiver program that supports the ZIP file format for example WinZip for Microsoft Windows or StuffIt for Macintosh Note Do not use a USB hard drive Download the latest software 1 Connect the USB flash drive to your computer 2 On your computer launch a browser such as Internet Explorer or Safari and see...

Page 46: ...the software We strongly recommend that you update the software when prompted Follow the onscreen instructions If you do not update the TV software when the update is received you are prompted to save the update file To update the software later 1 Press 2 Select Setup Software settings Local updates 3 Select the file that you downloaded and follow the onscreen instructions to complete the update U...

Page 47: ...e to the CVBS Y connector on the TV HDMI An HDMI connection has the best picture and sound quality An HDMI cable combines video and audio signals Connect HDMI for high definition HD TV signals and to switch on EasyLink An HDMI Audio Return Channel ARC connector allows output of TV audio to an HDMI ARC compliant device Connect HDMI cables shorter than 5 meters 16 4 feet Y Pb Pr Component video Y Pb...

Page 48: ...a Connect the antenna to the TV Connect devices Blu ray or DVD disc player Connect the disc player to the TV with an HDMI cable Connect the disc player to the TV with a component video cable Y Pb Pr and an audio L R cable ...

Page 49: ... digital TV receiver to the TV with an antenna cable For certain models only Connect the satellite or digital TV receiver to the TV with an HDMI cable Connect the digital TV receiver to the TV with a component video cable Y Pb Pr and an audio L R cable ...

Page 50: ...EN 50 Connect the digital TV receiver to the TV with a SCART cable Video recorder Connect the recorder to the TV with an antenna cable Connect the recorder to the TV with an HDMI cable ...

Page 51: ...ish Connect the recorder to the TV with a component video cable Y Pb Pr and an audio L R cable Connect the recorder to the TV with a SCART cable Game console Connect the game console to the TV with an HDMI cable ...

Page 52: ...o the TV with a component video cable Y Pb Pr and an audio L R cable Home theatre Connect an HDMI ARC compliant home theatre to the TV with an HDMI cable Connect the home theatre to the TV with an HDMI cable and a coaxial audio cable ...

Page 53: ...onnect the home theatre to the TV with a component video cable Y Pb Pr and an audio L R cable Connect the home theatre to the TV with a SCART cable Digital camera Connect the digital camera to the TV with a USB cable ...

Page 54: ...EN 54 Digital camcorder Connect the digital camcorder to the TV with an HDMI cable Connect the digital camcorder to the TV with a component video cable Y Pb Pr and an audio L R cable ...

Page 55: ...EN 55 English Connect more devices USB storage device Connect the USB hard drive to the TV with a USB cable Connect the USB flash drive with a USB cable to the TV ...

Page 56: ...ect the computer to the TV with an HDMI cable Connect the computer to the TV with a DVI HDMI cable and an audio cable Video call camera Connect the Philips TV video camera PTA317 sold separately with a USB cable to the TV ...

Page 57: ...text entry use the following keys Enter Confirm an entry Backspace Delete a character before the cursor Navigation keys Navigate within a text field Alt Shift Switch between keyboard layouts if multiple keyboard layouts are set Smart TV keys on your keyboard Enter Confirm an entry Backspace Go to the previous page Navigation keys Navigate between fields Tab Go to the next field Tab and Shift Go to...

Page 58: ...set the type and name of the device to default settings 1 In the Source menu select the device and press OPTIONS 2 Select Original name and icon then press OK Set up EasyLink devices What you can do You can get the most out of your HDMI CEC compliant devices with Philips EasyLink enhanced control features Connect your HDMI CEC compliant devices through HDMI to your TV and control them at the same ...

Page 59: ...ou connect multiple HDMI CEC devices that support this setting you can control all such devices through the TV remote control Note This is an advanced setting Devices that do not support this setting cannot respond to the TV remote control 1 Press 2 Select Setup TV settings General settings EasyLink EasyLink remote control 3 Select On or Off then press OK Tips To switch back to TV control press th...

Page 60: ...reaming You can switch audio between TV speakers and a connected amplifier at any time 1 Press OPTIONS 2 Select Picture and sound Speakers 3 Select one of the following then press OK TV On by default Stream TV audio through TV and the connected HDMI CEC audio device until the connected device switches to system audio control TV audio is then streamed through the connected device Amplifier Stream a...

Page 61: ...dows XP Microsoft Windows Vista Mac OS X or Linux To connect your TV to computers you need to install and configure a media server on your computer See Use your TV Play multimedia files Page 19 To connect your TV to the Internet you also need a high speed connection to the Internet Connect You can connect this TV to your home network through a wired or wireless connection For a wired connection se...

Page 62: ...1 If your router supports Wi Fi Protected Setup WPS press the WPS button on the router 2 After 2 minutes select WPS on the TV then press OK The TV connects to your network This takes about 2 minutes Most new wireless routers have the WPS system and carry the WPS logo The WPS system uses WPS security encryption and cannot be combined with devices on your network that use the WEP Wired Equivalent Pr...

Page 63: ...s TV network name If you have more than one TV in your home network you can rename this TV to give it a unique name 1 Press 2 Select Setup Network settings TV network name then press OK 3 Use the onscreen keyboard or the remote control keypad to enter the name Switch on Miracast This TV is a Miracast certified TV To seamlessly display content from a Wi Fi device on your TV switch on Miracast Note ...

Page 64: ...Caution To protect the CAM from damage insert the CAM as instructed Note Refer to the documentation from your service operator on how to insert a smart card into the Conditional Access Module 1 Switch off the TV 2 Follow the directions printed on the CAM to insert the CAM into the Common Interface slot at the side of the TV Push the CAM in as far as it will go 3 Switch on the TV then wait for the ...

Page 65: ...iour When the TV is disconnected and reconnected to the power supply the startup screen is displayed at the next startup To switch on the TV from standby press on the remote control or press any key on the TV The standby light on the TV blinks red Disconnect the power cable from the power outlet Wait until the TV cools down before you reconnect the power cable If the blinking reoccurs contact Phil...

Page 66: ...d to the TV Loud speakers unearthed audio devices neon lights high buildings and other large objects can influence reception quality If possible try to improve the reception quality by changing the antenna direction or moving devices away from the TV If reception on only one channel is poor fine tune this channel There is poor picture quality from connected devices Make sure that the devices are c...

Page 67: ...TV to display content from an HDMI device If the TV does not recognise the HDMI device and no picture is displayed switch the source from one device to another and back again If there are intermittent sound disruptions make sure that output settings from the HDMI device are correct If you use an HDMI to DVI adapter or HDMI to DVI cable make sure that an additional audio cable is connected to AUDIO...

Page 68: ...sly refer to the router s documentation to improve the signal quality between the router and TV Wireless network is distorted or not found Make sure that the wireless network is not disturbed by microwave ovens DECT phones or other neighbouring Wi Fi devices If the wireless network is not working try a wired network connection Make sure that the firewalls in your network allow access to the TV wir...

Page 69: ...Channel Hyperband Available on certain models only Display and sound Picture Display Display type LED backlight Full HD Diagonal size 117 cm 46 inches 140 cm 55 inches Aspect ratio 16 9 widescreen Panel resolution 1920x1080p Picture enhancement Pixel Plus Perfect Motion Rate PMR 200 Hz 3D 3D Easy Sound Output power RMS 10 THD 20 W Clear Sound Incredible Surround Mono Stereo Secondary audio program...

Page 70: ...USB Connect only those USB devices that consume 500 mA of power or less NTFS FAT 16 Read only FAT 32 Ethernet LAN RJ 45 Supported image files JPEG jpg jpeg mpo GIF 87a 89a gif PNG png BMP bmp dib JPS jps PNS pns BMS bms Supported audio video formats Supported audio video formats Supported audio video formats ...

Page 71: ...EN 71 English Supported audio video formats Supported audio video formats Supported audio video formats Supported audio formats ...

Page 72: ...indows Twonky Media Microsoft Windows Mac OS X Sony Vaio Media Server Microsoft Windows TVersity Microsoft Windows Nero MediaHome DiXiM Microsoft Windows XP Macrovision Network Media Server Microsoft Windows Fuppes Linux uShare Linux Connectivity Rear HDMI 1 ARC HDMI Audio Return Channel HDMI 2 AUDIO IN DVI Stereo 3 5 mm mini jack NETWORK Ethernet LAN RJ 45 SERV U Service port CVBS Y Pb Pr Audio L...

Page 73: ...39 channels install digital 39 channels install satellite 41 channels logo 14 channels reinstall 46 channels rename 14 channels sort 14 channels switch 14 channels update 40 child lock 36 CI 64 clock 35 codecs supported 70 Common Interface 64 computer play files 19 Conditional Access Module 64 connect computer 56 connect digital camcorder 54 connect digital camera 53 connect disc player 48 connect...

Page 74: ... EPG Internet 17 external hard disk 55 F favourite channels list 14 G game console connect 51 game settings 34 games two player 33 H HbbTV 24 HDMI 47 HDMI ARC 47 hearing impaired access 44 help onscreen 10 Help version 72 home mode 45 home network 61 home theatre connect 52 I install channels automatic 39 Interactive TV 24 Internet connect 61 Internet Smart TV 22 K Kensington lock 5 key beep 44 L ...

Page 75: ...ecorder connect 50 recordings delete 29 recordings schedule 28 recordings watch 29 recycle 9 reinstall 46 remote control 11 rename channels 14 rename connected device 58 rent online video 24 S safety 3 satellite add or remove 42 satellite install channels 41 satellite settings 41 SCART 47 schedule recordings 28 screen care 5 sensors 11 settings assistant 37 settings audio format 38 settings game 3...

Page 76: ...text digital text 35 text dual screen 34 text enlarge 34 text language 35 text subpages 35 text Table Of Pages 34 trademarks and copyrights 7 TV controls 11 TV guide 16 TV guide broadcaster 16 TV guide Internet 17 TV receiver connect 49 TV speakers mute 13 U universal access enable 44 universal access hearing impaired 44 universal access visually impaired 44 update source list 58 USB keyboard 57 U...

Page 77: ...Specifications are subject to change without notice Philips and the Philips shield emblem are registered trademarks of Koninklijke Philips Electronics N V and are used under license from Koninklijke Philips Electronics N V 2013 TP Vision Netherlands B V All rights reserved www philips com ...

Reviews: