background image

EN-8

Firmly pull the stand from the bottom of 

3. 

the TV. Place both the stand and screws in a 
secure location for future reinstallation.

Step 3 Connect cables

Connect the antenna cable, mains cord and 
all other devices to the back of the TV as 
described in the following sections and in 

Section 7.3 Connect devices

.

Step 4 Secure the VESA-compatible wall 
bracket to the TV

WARNING


B

Use bolts M8 and spacers to secure the 
VESA-compatible wall bracket to your TV. 

Note


B

Depending on your VESA-compatible wall 
bracket, you may need to separate the 
mounting plate from the wall bracket for 
easier installation. Refer to your VESA-
compatible wall bracket documentation for 
instructions.
Locate the four mounting nuts at the back 

1. 

of the TV.

Align the plate/bracket to the four 

2. 

mounting nuts, placing the supplied 
spacers between the plate/bracket and the 
mounting nuts.
Using a spanner or cross-head screwdriver, 
insert the supplied bolts through the plate/
bracket and spacers, tightly securing the 
bolts to the mounting nuts.

x4

Continue with the instructions provided 

3. 

with your VESA-compatible wall bracket.

Connect the antenna cable

3.3 

TV ANTENNA

75X

HDMI 2

CVI

AV IN

AV OUT

VIDEO

L

R

L

Pr

Pb

Y

R

L

AUDIO IN

VGA

R

L

R

VIDEO

HDMI 1

MI 1

SERV. C

TV ANTENNA

75X

Summary of Contents for 42PFL8803D

Page 1: ...Register your product and get support at www philips com welcome EN USER MANUAL 42PFL8803D ...

Page 2: ......

Page 3: ...tored channels 18 5 7 Set your preferences 18 5 8 Control access to digital channels 19 5 9 Setup your favourite channels 21 5 10 Check current software version 22 5 11 Use Electronics Programme Guide EPG 22 6 Use your TV in analogue mode 24 6 1 Select your location 24 6 2 Access the main menu 24 6 3 Adjust picture and sound settings 25 6 4 Adjust Ambilight settings 28 6 5 Use timers and child loc...

Page 4: ...st of physically performing source distribution a complete machine readable copy of the corresponding source code on a medium customarily used for software interchange This offer is valid for a period of 3 years after the date of purchase of this product To obtain the source code write to Development Manager Technology Development Philips Consumer Lifestyle 620A Lorong 1 TP1 Level 3 Toa Payoh Sing...

Page 5: ...d by a qualified technician To avoid risk of fire or electric shock do not place the TV remote control or remote control batteries near naked flame sources e g lighted candles and other heat sources including direct sunlight Do not install the TV in a confined space such as a bookcase Leave a space of at least 10cm four inches around the TV for ventilation Be sure air flow is not obstructed If pla...

Page 6: ...s or stock market tickers If you must use stationary images reduce the screen contrast and brightness to avoid screen damage Environmental care 1 3 Recycling your packaging The packaging of this product is intended to be recycled Contact your local authorities for information on how to recycle the packaging Disposing your used product Your product is manufactured with high quality materials and co...

Page 7: ... the TV side connectors to connect to mobile devices such as a camera or high definition game console You can also connect a pair of headphones Back connectors HDMI 2 CVI AV IN AV OUT VIDEO L R L Pr Pb Y R L AUDIO IN VGA R L R VIDEO HDMI 1 SERV C TV ANTENNA 75X Use the TV back connectors to connect to the antenna and permanent devices such as a high definition disc player DVD player or VCR Note D ...

Page 8: ...ital mode 5 Electronic programme guide 6 Navigation buttons 7 Up Î Down ï Left Í Right Æ OK Digital menu 8 Analogue menu 9 Channel 10 Volume 11 For more information about the remote control see Section 4 5 Remote control overview Remote control 2 3 4 9 10 11 5 1 6 8 7 ...

Page 9: ... be easily attached to the lock For the best Ambilight effect position the TV 10cm four inches to 20cm eight inches away from the wall Ambilight also works best in a room with dim lighting Wall mount theTV 3 2 WARNING B Wall mounting of the TV should only be performed by qualified installers Koninklijke Philips Electronics N V bears no responsibility for improper mounting that results in accident ...

Page 10: ... to separate the mounting plate from the wall bracket for easier installation Refer to yourVESA compatible wall bracket documentation for instructions Locate the four mounting nuts at the back 1 of the TV Align the plate bracket to the four 2 mounting nuts placing the supplied spacers between the plate bracket and the mounting nuts Using a spanner or cross head screwdriver insert the supplied bolt...

Page 11: ... back or on the bottom of the TV Connect the mains cord to the 2 AC IN mains connector Connect the mains cord to the mains 3 ensuring that the cord is tightly secured at both ends Manage cables 3 5 Route your mains cord antenna cable and all other device cables through the cable holder at the back of the TV This holder helps keep your cables tidy and easily manageable Insert the remote control 3 6...

Page 12: ...when in standby energy continues to be consumed as long as the mains remain connected and powered When not in use for extended periods of time switch off and disconnect the TV from the mains Switch on theTV from standby 4 1 4 If the standby indicator is on red press on the remote control Note D If you cannot locate your remote control and you want to switch on the TV from standby press CHANNEL or ...

Page 13: ...ontrol then select the input your device is connected to Press 3 OK to select the device Use Ambilight 4 4 Ambilight is an innovative Philips feature that adds reactive ambient lighting to your viewing experience Press 1 AMBILIGHT ON OFF on the remote control Ambilight turns on Press 2 AMBILIGHT ON OFF again to turn off Ambilight For more information on Ambilight see Section 6 4 Adjust Ambilight s...

Page 14: ...d settings SLEEP 5 analogue mode only Activates Timer menu Colour 6 buttons Selects tasks on digital menus GUIDE 7 digital mode only Electronic Programme Guide OK 8 Accesses the menus and activates settings Navigation 9 buttons Navigates the menu DIGITAL MENU 10 digital mode only Switches the digital menu on or off CH 11 Switches to the next or previous channel 12 Turns the sound on or off Number ...

Page 15: ...l mode INCR SURR 20 analogue mode only Enables Incredible Surround with stereo sources Spatial mode is enabled with mono sources DEMO 21 analogue mode only Toggles the Demo menu on or off AMBILIGHT ON OFF 22 Switches Ambilight on or off TV RADIO 23 Selects between TV or radio transmission ...

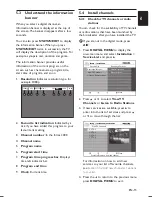
Page 16: ... set top box to view the program and change the channels at the set top box to view the program Switch on theTV for the 5 2 first time When you turn on TV for the first time the TV is in digital mode You will need to set the language and add new services Setup your language and services 5 2 1 Press 1 Æ to enter Language and Î or ï to select your preferred language and press OK to confirm Setup Set...

Page 17: ...s Up Down to view this channel For information on how to add new services to your list of favourite channels see Section 5 5 2 Add new channels or stations to your list Press the 4 Í to return to the previous menu press DIGITAL MENU to exit Understand the information 5 3 banner When you select a digital channel an information banner is displayed at the top of the screen The banner disappears after...

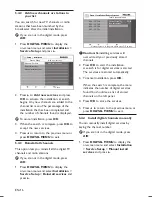
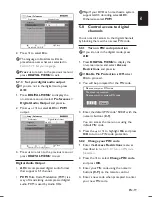
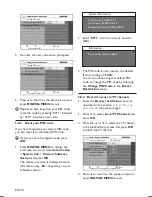
Page 18: ...d select Installation Service Setup Manual install services and press Æ Add new channels or stations to 5 4 2 your list You can search for new TV channels or radio stations that have been launched by the broadcaster after the initial installation If D you are not in the digital mode press A D Press 1 DIGITAL MENU to display the on screen menu and select Installation Service Setup and press Æ Setup...

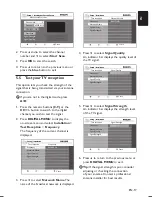
Page 19: ...nna Contact a professional antenna installer for best results Setup Installation Service Setup Setu Setup p p In Instal stallati lation on Ser Service vice Set Setup up p 7_ Close Manual install services Signal Strength Signal Quality Channel No 2 Frequency 60500 KHz Start Scan DTMB SC OK Press 2 Í and Æ to select the channel number and ï to select Start Scan Press 3 OK to start the search Press 4...

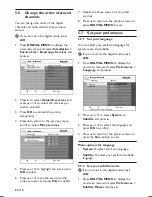
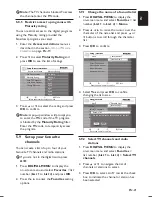
Page 20: ...f D you are not in the digital mode press A D Press 1 DIGITAL MENU to display the on screen menu and select Preferences Subtitle Mode and press Æ Change the order of stored 5 6 channels You can change the order of the digital channels and radio stations that you have stored If D you are not in the digital mode press A D Press 1 DIGITAL MENU to display the on screen menu and select Installation Ser...

Page 21: ...meric 3 buttons 0 9 on the remote control Enter a new code when prompted to enter 4 your new PIN code Setup Preferences Setu Setup p p p Pref Preferen erences ces Preferences Subtitle Mode Close Language Off 2Q Set subtitle ON OFF Digital Audio Output Subtitle Mode Press 2 ï to select On The D language in broadcast will take precedence over what was selected in Section 5 7 1 Set your language Pres...

Page 22: ...ct the TV channels you want to lock CCTV 1 CCTV 2 CCTV 3 CCTV 4 Press 4 Í to return to the previous menu or press DIGITAL MENU to exit Setup Access restrictions Setu Setup p p p p A A Acce Access r ss restr estricti ictions ons p Color Temp Contrast NR Change PIN code Close Enter your system PIN _ _ _ _ New system PIN Re enter system PIN New system PIN Re enter the new code when prompted 5 Setup A...

Page 23: ...marks the check box to indicate the channel or station has been selected Note D The TV channel is blocked To access the channel enter the PIN code Restrict access to programs with 5 8 5 Maturity rating You can restrict access to the digital programs using the Maturity rating provided the broadcast programs are rated Enter the 1 Access restrictions menu as described in the section Turn on PIN code ...

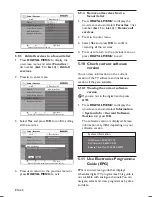
Page 24: ...tions Select TV channels Add all services Do you really want to add all services Yes No Press 4 Í to return to the previous menu or press DIGITAL MENU to exit Remove all services from a 5 9 4 favourite list Press 1 DIGITAL MENU to display the on screen menu and select Favorites list number List 1 to List 4 Remove all services Press 2 Æ to enter menu Select 3 Yes and press OK to confirm removing al...

Page 25: ...01 Monday 2008 01 07 When you have finished press 7 GUIDE to exit There are two types of EPG Now Next and 7 Days If D you are not in the digital mode press A D Press 1 GUIDE on the remote control or press DIGITAL MENU to display the on screen menu and select Digital EPG Digital EPG A list of digital TV programmes is displayed Press 2 Î or ï to change channel or Í or Æ to select to Now Next EPG Tel...

Page 26: ... Adjust Ambilight settings Features To turn features on or off and to adjust special features such as Timer Child Lock Parental Lock and Demo See Section 6 5 Use yourTV in 6 analogue mode On screen menus help you install your TV adjust picture sound and Ambilight settings and access other features This section describes how to navigate the menus If D you are not in the analogue mode press A D Tip ...

Page 27: ...ss Colour Contrast Sharpness Colour Temp Press 2 Æ to enter the Picture Setting menu Picture Setting Brightness Colour Contrast Sharpness Colour Temp Press 3 Æ to enter the Brightness setting Brightness Press 4 Î or ï to adjust the setting Press 5 Í to return to the Picture settings or press ANALOG MENU to exit Note D More choices are available when HD equipment or PC is connected Adjust picture a...

Page 28: ...ictures Switch on or off HD Natural Motion Reduces the field and line flicker and reproduces smooth movement especially in movies Switch on or off 6 3 2 Use Smart Mode Apart from manually adjusting picture settings you can use Smart Mode to set your TV to a predefined picture sound and Ambilight setting Press 1 SMART MODE on the remote control to toggle through a selection of pre defined picture a...

Page 29: ...picture and the top and bottom of the picture is clipped off Movie expand 16 9 The picture is enlarged to 16 9 format This mode is recommended when displaying pictures with black bands at the top and bottom letter box In this mode large parts of the top and the bottom of the picture are clipped off Subtitle Zoom This mode is used to display 4 3 pictures using the full surface of the screen leaving...

Page 30: ... of the TV Caution C To avoid poor remote control reception do not place remote control sensors on your devices in range of Ambilight Main Picture Setting Advanced Picture Sound Ambilight Features Install Location Equalizer Balance Auto Vol Leveller Incr Surround BBE Press 3 Î or ï to select one of the following settings Equalizer Adjusts each individual frequency tone Balance Balances the left an...

Page 31: ...s how to switch the TV on or off at a specified time and to lock or unlock the TV Child lock is useful in preventing your children from watching unauthorised content Automatically switch theTV to 6 5 1 standby Sleep timer Sleep timer switches the TV to standby after a defined period of time Press 1 ANALOG MENU on the remote control and select Features Timer Sleep Features Timer Child Lock Parental...

Page 32: ...ogies available on your TV and conventional TVs without these features Press 1 ANALOG MENU on the remote control and select Features Demo Features Timer Child Lock Parental Lock Demo Pixel Plus 3HD Features Timer Child Lock Parental Lock Demo Access Code To lock or unlock all channels In the 1 Parental Lock menu select Lock All or Clear All Press 2 Æ to enter Press 3 OK to confirm your choice Pare...

Page 33: ... 6 ï to select Sound System Press 7 Î or ï to select the appropriate system Press 8 ï to select Store and Æ to confirm Press 9 Í to return to the Manual Store menu Demo Pixel Plus 3HD Off On Press 2 Î or ï to select On or Off Press 3 OK to confirm Press 4 ANALOG MENU to exit Alternatively you can turn on or off the Demo mode with the DEMO button on the remote control Press 1 DEMO on the remote con...

Page 34: ...Manual Store Sort Name Fav Program 001 002 003 004 005 006 007 008 Step 2 Search and store new TV channels Press 1 ANALOG MENU on the remote control and select Install Manual Store Search Manual Store Colour System Sound System Search Channel Fine Tune Store 44MHz Press 2 Æ and the number buttons on the remote control to manually enter the three digit frequency Press 3 Í when the new channel is fo...

Page 35: ...r external channels Press 1 ANALOG MENU on the remote control and select Install Name Press 2 Î or ï to select the channel you want to rename Press 3 Æ to start the process Press 4 Î or ï to select the characters or numbers from the list You can use up to five characters or numbers Press 5 Í to end the process Repeat the above steps to name or rename 6 more channels Press 7 ANALOG MENU to exit Sto...

Page 36: ...IDEO L R L Pr Pb Y R L AUDIO IN VGA R L R VIDEO HDMI 1 SERV C TV ANTENNA 75X SERV U 3 2 1 Back connectors Side connectors 4 5 7 6 8 9 10 11 12 13 14 AV IN 1 Video and audio input cinch connectors for connection to devices AV OUT 2 Video output cinch connector and audio L R connectors for connection to devices CVI 1 3 Component video Y Pb Pr and Audio L R input connectors for DVD players digital re...

Page 37: ... Note Philips HDMI supports HDCP High bandwidth Digital Contents Protection HDCP is a form of Digital Rights Management that protects high definition content in DVD or Blu ray Discs 7 2 2 Component YPbPr High quality Component Y Pb Pr video provides better picture quality than S Video or composite video connections Though component video supports high definition signals picture quality is lower th...

Page 38: ...ed to connect a device to your TV depending on availability and your needs The following sections are examples only Indoor antenna 7 3 1 Connect an antenna cable from the TV to the indoor antenna HDMI 2 CVI AV IN AV OUT VIDEO L R L Pr Pb Y R L AUDIO IN VGA R L R VIDEO HDMI 1 SERV C TV ANTENNA 75X TV ANTENNA 75X Indoor antenna Blu ray Disc player 7 3 2 For full high definition video connect a HDMI ...

Page 39: ...evices DVD player Home theatre system 7 3 3 Other audio system Connect a component video cable from the DVD player to CVI connectors on the back of your TV To output sound to a home theatre system or other audio system connect up the SPDIF OUT connector on the back of the TV to the Digital Audio IN connector on the system HDMI 2 CVI AV IN AV OUT VIDEO L R L Pr Pb Y R L AUDIO IN VGA R L R VIDEO HDM...

Page 40: ...tor refresh rate to 60Hz See Section 11 Technical data for a list of computer resolutions Connecting to the back of the TV VGA Connect your PC to the VGA connector at 1 the back of the TV Connect an audio cable from your PC to 2 AUDIO IN L R connectors on the back of the TV R L AUDIO IN VGA HDMI 2 VI AV IN AV OUT VIDEO L R R L AUDIO IN VGA L R VIDEO HDMI 1 Setup devices 7 4 When all devices are co...

Page 41: ...ces appears Press 3 ï to select VGA and press OK to confirm Source list TV AV SIDE AV CVI VGA HDMI 1 HDMI 2 Side HDMI Digital TV Note D Set your PC refresh rate to 60 Hz Picture settings in PC mode Except for horizontal and vertical shift all of the picture settings in PC mode are the same as the picture settings in TV mode Horizontal To adjust horizontal position of the range Vertical To adjust v...

Page 42: ...ress Æ or OK to enter the menu Press 3 ï to select Mode Selection and press Æ or OK to enter the setting PC HD Features Timer Child Lock Parental Lock Demo Mode Selection Press 4 Î or ï to select HD Press 5 Í to return to the previous menu Press 6 ANALOG MENU to exit the menu Use yourTV in High 9 Definition HD mode The HD High Definition mode allows you to enjoy clearer and sharper pictures if you...

Page 43: ...0 mode When you connect HD equipment that supports a resolution of 1080i or 1080p the Display native 1080 feature is available in the Features menu This feature allows you to watch the original HD format in 1080i p mode Press 1 ANALOG MENU to display the Main menu Press 2 Î or ï to select Features and press Æ or OK to enter the menu Press 3 ï to select Display native 1080 Features Timer Child Lock...

Page 44: ...h play you can control your TV and the devices with one remote control For example when you press one touch play on your DVD s remote control your Philips TV will automatically switch to the correct channel to show the DVD content One touch standby When you connect your TV to devices that supports one touch standby you can use your TV s remote control to put the devices to standby To put a device ...

Page 45: ...ical data 11 Supported display resolutions HDMI Input Mode Signal Format PC Format 640x480 60Hz 72Hz 75Hz 85Hz 720x400 70Hz 85Hz 800x600 60Hz 72Hz 75Hz 85Hz 1024x768 60Hz 70Hz 75Hz 85Hz 1280x768 60Hz 1280x1024 60Hz Video Format 720x480p 60Hz 720 1440 x480i 60Hz 720x576p 50Hz 720x 1440 x576i 50Hz 1280x720p 60Hz 1280x720p 50Hz 1920x1080i 50Hz 60Hz 1920x1080p 24Hz 25Hz 30Hz 50Hz 60Hz PC Analog D sub ...

Page 46: ...ard Switch off and on the TV again You receive poor TV reception from an antenna connection Check that the antenna is properly connected to the TV Loud speakers non earthed audio devices neon lights high buildings or mountains can influence the picture quality Try to improve the reception quality by changing the antenna direction or moving devices away from the TV Verify if the correct TV system i...

Page 47: ... is picture but no sound from the TV Note D If no audio signal is detected the TV automatically switches off audio output and does not indicate malfunction Check that all cables are properly connected Check that the volume is not set to 0 Check that the sound is not muted There is a picture but sound quality is poor Check sound settings as described in Section 6 3 4 Adjust sound settings Verify th...

Page 48: ......

Page 49: ......

Page 50: ... 2008 Koninklijke Philips Electronics N V All rights reserved Document order number 3139 125 40733 ...

Reviews: