background image

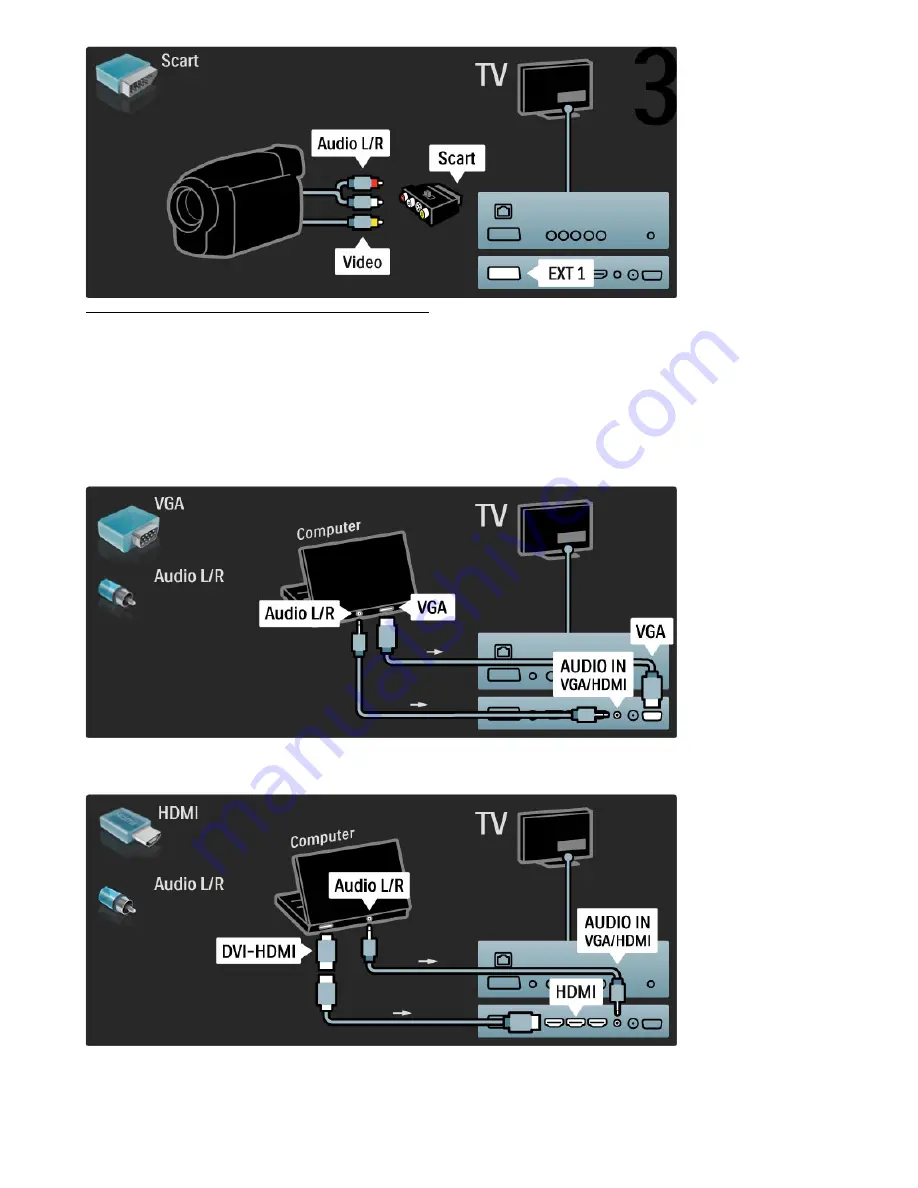
TV as PC monitor

You can connect the TV to your computer as a PC monitor.

Before connecting the PC, set the PC monitor refresh rate to 60

Hz.

See the following pages for how to connect your computer.

Use a VGA cable to connect the PC to the VGA connector and

an audio L/R cable to connect the VGA Audio L/R to the back

of the TV.

Use a DVI to HDMI adapter to connect the PC to HDMI and an

audio L/R cable to connect the Audio L/R to the back of the TV.

Connections / Connect more devices

57

Summary of Contents for 42PFL6805

Page 1: ... 012 301 0 43 15641 1 3 0 15 78 9 A ...

Page 2: ...LQJ WR WKLV HPDLO DGGUHVV SOHDVH ZULWH B 2SHQ 6RXUFH 7HDP 3KLOLSV QWHOOHFWXDO 3URSHUW 6WDQGDUGV 3 2 R IB B J 5 F D I RX GR QRW UHFHLYH WLPHO FRQÀUPDWLRQ RI RXU OHWWHU SOHDVH VHQG DQ HPDLO WR WKH HPDLO DGGUHVV DERYH 7KH WH WV RI WKH OLFHQFHV DQG DFNQRZOHGJHPHQWV IRU RSHQ VRXUFH VRIWZDUH XVHG LQ WKLV SURGXFW DUH LQFOXGHG RQ D VHSDUDWH OHDÁHW 7 51 2 3 89 RQLQNOLMNH 3KLOLSV OHFWURQLFV 1 9 PDQXIDFWXUHV...

Page 3: ...ltimedia 33 Locks and timers 34 Subtitles and languages 35 Universal access 36 Setup 37 Picture and Sound 37 Channels 39 Devices 41 Software 43 Connections 44 First connections 44 About cables 45 Connect devices 47 Connect more devices 55 Common Interface CAM 59 Troubleshooting 60 Contact information 60 TV and remote control 61 TV channels 62 Picture and sound 63 Devices 64 Multimedia 65 Specifica...

Page 4: ... To open or close the Home menu h In the Home menu you can start or stop a TV activity Like watching TV or watching a movie from a connected DVD player To open or close the Browse menu e In the Browse menu you can open Text the Channel list or the TV programme guide 4 To begin TV tour ...

Page 5: ...he slideshow of your photos shown on screen To open or close the Adjust menu s In the Adjust menu you can quickly adjust some picture and sound settings Back b With Back you go back to the previous TV channel or go one step back in a menu Red With the red key you select the red option or open digital Interactive TV services or some TV demonstration clips To begin TV tour 5 ...

Page 6: ... key you select the blue option Read more about the remote control in Help Use your TV Remote control Overview Or go to the Search page to look for any topic Press u to select the next TV tour The TV menus You can operate the TV with the 4 menus Discover and learn their specific uses the Home menu the Browse menu the Options menu the Adjust menu 6 To begin TV tour ...

Page 7: ...channel in the Channel list or open Text To open or close the Options menu o Open the Options menu to select a setting related to what is shown on screen While you watch a channel mark it as a favourite but also open the DVD disc menu while watching a DVD movie To open or close the Adjust menu s Open the Adjust menu to quickly adjust the picture and sound settings You can set the Smart picture set...

Page 8: ...hapter Help Connections drawings like these help you to connect most common devices High Definition TV This TV can display High Definition programmes but to enjoy HD TV you need to get programmes in HD first If you are not watching HD programmes the picture quality will be that of a normal TV Watch HD TV programmes from a Blu ray Disc player a Digital HD receiver connected with HDMI and with a sub...

Page 9: ...Contact your dealer for more information Go to www philips com support to find FAQs featuring the list of HD channels or providers in your country To begin TV tour 9 ...

Page 10: ...performed by qualified personnel The TV wall mounting should meet safety standards according to the TV s weight Read also the safety precautions before positioning the TV Koninklijke Philips Electronics N V bears no responsibility for improper mounting or any mounting that results in accident or injury Unmount the TV from the stand if necessary To wall mount the TV you need the 2 screws used to fi...

Page 11: ...Fix the bracket with the 2 screws using the supplied hex key Position the bottom plate on the bracket as shown Fix the bottom plate with one screw using the hex key To begin Setting up 11 ...

Page 12: ...e level with the centre of the screen when you sit down Distance between the 2 fixing points is 260mm 42PFL6705 Fix the 2 mounting discs Use screws with a diameter of max 6mm Slide the bottom plate of the stand onto the mounting discs 12 To begin Setting up ...

Page 13: ...discs Position the stand bracket opposite to the wall mount position VESA info Your TV is prepared for a VESA compliant wall mount bracket not included VESA codes to purchase the bracket VESA MIS F 200 200 M6 for 42PFL6705 Use a screw length as shown in the drawing To begin Setting up 13 ...

Page 14: ...ting the TV on a wall ensure that the wall mount can safely bear the weight of the TV set Koninklijke Philips Electronics N V bears no responsibility for improper wall mounting that results in accident injury or damage Risk of injury to children Follow these precautions to prevent the TV from toppling over and causing injury to children Never place the TV on a surface covered by a cloth or other m...

Page 15: ...1 3 Power switch Switch the TV on or off with the power switch at the bottom of the TV When switched off the TV does not consume any energy Zero power To begin Power switch 15 ...

Page 16: ...nd enjoy a range of benefits including full support including downloads privileged access to information about new products exclusive offers and discounts the chance to win prizes and even participate in special surveys about new releases Go to www philips com welcome 16 To begin Register your TV ...

Page 17: ...rt To solve any Philips TV related problem you can consult our online support You can select your language and enter your product model number Go to www philips com support On the support site you can find your country s telephone number to contact us as well as answers to frequently asked questions FAQs You can download new TV software or the manual to read on your PC You can email a specific que...

Page 18: ... switch to the next channel page or chapter 7 Previous X To switch to the previous channel page or chapter 8 Options o To open or close the Options menu 9 Back b To go back to the previous channel To exit a menu without changing a setting To go back to the previous Text or Net TV page 10 Adjust s To open or close the most used settings like picture or sound 11 Volume V To adjust the volume level 1...

Page 19: ...ce or its activity in the h Home menu and press OK The commands of all keys except the h key is forwarded to the device If the key you need is not on the TV remote control you can show extra keys on screen with Show remote control Show remote control keys To show the device keys on screen press o Options and select Show remote control Select the key you need and press OK To hide the remote control...

Page 20: ...te control in your bare hands charging is safe Charger cable If solar charging is unsufficient the TV warns you when the remote control is running low on power Charge the battery with the charger cable and connect it to a USB connection on a device a PC that is switched on The green light next to the connection on the remote control indicates that the battery is fully charged Cleaning Your remote ...

Page 21: ...elete a device To delete a device or activity from the Home menu select the item and press o Options and then select Remove this device If a device or activity keeps appearing in the Home menu after you deleted it switch off the EasyLink setting on the device to prevent this automatic pop up appearing again Read more about EasyLink in Help Setup EasyLink HDMI CEC Options for a device To view the a...

Page 22: ... are shown in the Channel list The list you select here determines which channels you look through with W and X while watching TV Mark as favourite When a channel is highlighted in the Channel list you can set it as a favourite channel Read Use your TV Watch TV Favourite channels Reorder You can reposition channels within the list 1 Press o Options and select Reorder to start reordering channels 2...

Page 23: ...nnel you want to hide 2 Press o Options and select Hide channel The channel is hidden as soon as you close the Channel list Show hidden channels You can recall all hidden channels and unhide them again 1 In the Channel list press o Options and select Show hidden channels The Channel list now shows all channels again 2 Press o Options and select Unhide all to unhide the previously hidden channels O...

Page 24: ...t Speakers and select TV Select Amplifier if you want to hear the sound through a connected Home Theatre System or Amplifier These settings temporarily override any EasyLink settings Surround To switch the TV automatically to the best surround sound mode depending on the programme being broadcast close Help press s Adjust select Surround and select On Picture shift You can shift the picture on scr...

Page 25: ...nel A DVB C channel installation usually places radio stations from channel number 1001 onwards Options for watching TV channels With digital TV broadcast you can see what programme is on now or coming up next switch Subtitles on or off or even view the channel diagnostics While watching TV channels press o Options to select an available option What s on This option shows information on the curren...

Page 26: ... First use The first time you open the Programme guide the TV scans all TV channels for programme guide information This can take several minutes This data is stored in the TV Read also Update Programme guide in the Programme guide options Programme guide options Select a programme with the navigation keys and press o Options to select the following Set reminder To set an on screen reminder for wh...

Page 27: ...aming Energy saving Energy conscious settings Standard Factory standard settings Photo Ideal for viewing photos Custom A smart picture setting free for any setting you wish Smart sound list Personal Your personal choices made in Personalise picture and sound Standard Factory standard News Ideal for speech Movie Ideal for watching movies Game Ideal for gaming Drama Ideal for TV soaps Sports Ideal f...

Page 28: ...ed standby key indicator is on Although the TV consumes very little power when on standby energy does continue to be consumed When the TV is not in use for an extended period of time we recommend you switch the TV off completely with the power switch 28 Use your TV Watch TV ...

Page 29: ...the device or its activity and press OK Make sure the device is switched on Read more about Add your devices in Help Use your TV Menus Home menu Use the TV remote control The TV remote control can operate a device if the device is connected with HDMI and has EasyLink HDMI CEC Read more about EasyLink Remote control in Help Use your TV Remote control EasyLink Remote control Use your TV Watch a conn...

Page 30: ...ct a word or number with the navigation keys Now press OK again to jump immediately to the next occurrence of this word or number Press OK again to jump to the subsequent occurrence To stop the search press u until nothing is selected Text from a connected device Some connected devices that receive TV channels can also offer Text To open Text from a connected device press h select the device and p...

Page 31: ...down the page press v or u Reveal To unhide hidden information on a page press o Options and select Reveal Cycle subpages To cycle subpage when these are available press o Options and select Cycle subpages Language To switch the group of characters that Text uses to display correctly press o Options and select Language Text setup Text language Some digital TV broadcasters have several Text languag...

Page 32: ...ts range from enhanced text to online TV and much more For some iTV services you need a high speed connection to the Internet Read Help Setup Network Use iTV To open iTV press the Red key while watching a digital channel If interactive TV is available the Home page of the broadcaster opens To close iTV press b Back repeatedly until the iTV page closes 32 More on Interactive TV ...

Page 33: ...eat Shuffle on off Music with photos You can play music and show photos at the same time You must start the music first then the photos 1 Select a folder with music files and press OK 2 Select a folder with photo files and press OK To stop press o Options and select Stop Mute screen If you only listen to music you can mute the TV screen to save energy To mute the screen press the Green key select ...

Page 34: ...channel To lock a channel press h and select Setup Channel settings and select Child lock Channel lock In the list of channel numbers select a channel and press OK to lock a channel In the list a locked channel is marked with an X Now you can select another channel to lock or unlock The lock is activated as soon as you close the menu You cannot lock programmes from connected devices Change code To...

Page 35: ...hannel settings and select Languages Primary and Secondary subtitles To select a subtitle language when none of your preferred languages is shown press o Options select Subtitle language and select a language you want temporarily Subtitle menu To open the subtitle menu press j In the Subtitle menu you can switch subtitles On or Off Select On during mute to show subtitles only when the sound is mut...

Page 36: ... Options menu switch on Universal access in the Setup Read Help More on Universal access Switch on Visually impaired In some countries some digital TV channels broadcast special audio adapted for visually impaired people The adapted audio has extra commentary Switch on To switch on Visually impaired press o Options select Universal access and press OK Select Visually impaired and select On or if a...

Page 37: ... with the best brightness intensity MPEG artefact reduction smooths the digital transitions in the picture Colour enhancement makes the colours more vivid and improves the resolution of details in bright colours Gamma is a non linear setting for picture luminance and contrast Use the slider bar to set a higher or lower gamma value PC mode Sets the TV to the ideal pre defined computer setting if a ...

Page 38: ...ch to standby after 4 hours You will be warned 1 minute before switch off This automatic switch to standby prevents unnecessary energy use in case you forget about the TV being switched on Select Auto switch off and press OK to mark or unmark 38 Setup Picture and Sound ...

Page 39: ...installation To reinstall the TV press h Setup Search for channels and press OK Select Reinstall channels and press OK Press Start The update can take a few minutes Follow the instructions on screen You can reorder and rename channels in the Channel list Reception quality If you receive digital TV broadcasting DVB you can check the quality and signal strength of a channel If you use an antenna you...

Page 40: ...k press h Setup TV settings Preferences Clock and select Country dependent Select Daylight saving and select the appropriate setting To set the time and date manually select Manual Then select Time or Date 40 Setup Channels ...

Page 41: ...ce or activity press o Options and select Rename Use the keypad on the remote control as you do for SMS text messaging to enter the new name Delete a device To delete a device or activity from the Home menu select the item and press o Options and then select Remove this device If the device or activity keeps appearing in the Home menu after you deleted it switch off the EasyLink setting on the dev...

Page 42: ...VD or Blu ray Disc from a recent Philips player the TV can move the subtitles upwards Subtitles will then be visible whatever Picture format you select The TV comes with Auto subtitle shift switched on To switch off Auto subtitle shift press h Setup TV settings EasyLink Auto subtitle shift Select Off Pixel Plus link Some other devices DVD or Blu ray Disc players might have their own picture qualit...

Page 43: ...d double click it Click on Send ID If new software is available download the zip file After the download unzip the file and copy the file autorun upg onto the USB memory Do not place this file in a folder 4 Update the TV software Insert the USB memory in the TV again The update starts automatically The TV switches itself off for 10 seconds and then back on again Please wait Do not use the remote c...

Page 44: ...th the power switch to save energy if you do not use the TV for a long period of time Read more about the power switch in Help To begin Keys on the TV Power switch Make sure the power cable is securely inserted in the TV Make sure that the power plug in the wall socket is accessible at all times Antenna cable Locate the antenna connection at the back of the TV Insert the antenna cable securely in ...

Page 45: ...o cable that is added normally the cable that connects the TV Digital audio Out to the device Digital audio In The return audio connection in this HDMI ARC connector is built in You do not need a special HDMI cable You can leave the ARC channel switched on if you use the additional digital audio cable Still you can switch off HDMI ARC To switch off the ARC in the HDMI 1 connection press h Setup TV...

Page 46: ...Connect the adapter to a Scart connection of the TV VGA Use a VGA cable DE15 connector to connect a computer to the TV With this connection you can use the TV as a computer monitor You can add an Audio L R cable for sound To connect a computer with the VGA connection read Help Connections Connect more devices TV as PC monitor 46 Connections About cables ...

Page 47: ... you use the HDMI ARC connections on both TV and device no other cable is needed If not read on If you do not use the HDMI ARC connection add a digital audio cable cinch coaxial Blu ray Disc DVD player Use an HDMI cable to connect the device to the TV Connections Connect devices 47 ...

Page 48: ... cable to connect the device to the TV If you use the HDMI ARC connections on both TV and device no other cable is needed If not read on If you do not use the HDMI ARC connection add a digital audio cable cinch coaxial 48 Connections Connect devices ...

Page 49: ...more about Audio to Video sync in Help Setup Devices Audio to Video sync Do not connect the audio signal from a DVD player or other device directly to the Home Theatre System Always route the sound through the TV first Recorder Use 2 antenna cables to connect the antenna to the device and the TV Add an HDMI cable to connect the device to the TV Connections Connect devices 49 ...

Page 50: ...ntenna cables to connect the antenna to the device and the TV Add an HDMI cable to connect the device to the TV Dig receiver Disc Recorder First use 3 antenna cables to connect the devices to the TV 50 Connections Connect devices ...

Page 51: ...connect the digital receiver to the TV Finally use an HDMI cable to connect the Disc Recorder to the TV Dig receiver Disc R Home Theatre First use 3 antenna cables to connect the devices to the TV Connections Connect devices 51 ...

Page 52: ...HDMI cable to connect the digital receiver to the TV Then use an HDMI cable to connect the Disc Recorder to the TV Then use an HDMI cable to connect the Home Theatre System to the TV 52 Connections Connect devices ...

Page 53: ...onnection on the TV and the device add a digital audio cable cinch coaxial Digital HD receiver First use 2 antenna cables to connect the device to the TV Use an HDMI cable to connect the device to the TV Connections Connect devices 53 ...

Page 54: ...54 Connections Connect devices ...

Page 55: ... to select the Smart picture you normally use for watching TV Use an HDMI cable to connect the device to the side of the TV Or use a Scart adapter to connect the device to the TV HD Game Use an HDMI cable or YPbPr and Audio L R cables to connect a High Definition game console to the TV To connect a HD Game console read Help Connections Connect more devices Game Photo camera To view pictures stored...

Page 56: ...ect a camcorder to the side or back of the TV You can use an HDMI YPbPr or Scart connection If your camcorder only has Video CVBS and Audio L R output use a Video Audio L R to Scart adapter to connect to the Scart connection See the following pages to connect your camcorder Use an HDMI cable to connect the camcorder to the side of the TV Or use a Scart adapter to connect the device to the TV 56 Co...

Page 57: ...ee the following pages for how to connect your computer Use a VGA cable to connect the PC to the VGA connector and an audio L R cable to connect the VGA Audio L R to the back of the TV Use a DVI to HDMI adapter to connect the PC to HDMI and an audio L R cable to connect the Audio L R to the back of the TV Connections Connect more devices 57 ...

Page 58: ...able to connect a decoder that decodes analogue antenna channels Use the EXT1 or EXT2 connectors on the back of the TV You have to assign the TV channel as a channel to be decoded Then assign the connection where the decoder is connected To assign this TV channel press h Setup Channel settings Decoder Select Channel to set up the channel that you want to decode Select Status to set the connection ...

Page 59: ...It can take a few minutes before the CAM is activated Removing the CAM will deactivate the service on TV Watching a CAM service If a CAM is inserted and subscription fees have been paid the TV shows the programme from the digital TV service provider The applications their function the content and the onscreen messages all come from the CAM service CAM settings To set passwords or PIN codes for the...

Page 60: ...er Care If the TV problem is not solved you can call the Philips Consumer Care hotline in your country Look up the TV model and serial number before you call Find the telephone number on the documentation that came with the TV Or consult our website www philips com support TV model number and serial number Find these numbers on the packaging label or on the type label on the back or bottom of the ...

Page 61: ...d During start up which can take up to two minutes with connected devices the TV and some external devices do not immediately respond to commands from the remote control The device is functioning normally and is not broken The TV switches off and the red light blinks Switch the TV off and on again with the switch at the bottom of the TV Check if there is enough space for ventilation Wait until the...

Page 62: ...select the list you need with Select list A channel could be hidden in the Channel list Read more about Channel list in Help Use your TV Menus Browse No digital channel found during installation Check if the TV supports DVB T or DVB C in your country Check the Digital TV Country Compatibility sticker on the back of the TV 62 Troubleshooting TV channels ...

Page 63: ...is set to the Home location Press s Setup TV settings Preferences Location The picture does not fit the screen Press s Adjust Picture format and select Auto fill The picture position on screen is not correct To correct a shifted picture press s Adjust and select Picture shift Use the navigation keys to adjust the picture position Press OK to stop Picture shift If distorted screen edges are visible...

Page 64: ...n additional audio connection is in place to complete the DVI connection EasyLink HDMI CEC Check if the connected device supports the HDMI CEC standard and is properly set up Read the user manual that comes with the device Check if the HDMI cable is properly connected Check if EasyLink on the TV and device is switched on Make sure that the System audio control in your HDMI CEC audio devices is pro...

Page 65: ... need specific driver software Unfortunately this software cannot be downloaded to your TV Not all audio and picture files are supported See the list in Help Specifications Multimedia Files from a USB device do not play back smoothly The transfer performance of the USB device limits the transfer rate Troubleshooting Multimedia 65 ...

Page 66: ...re than the cost of physically performing source distribution a complete machine readable copy of the corresponding source code on a medium customarily used for software interchange This offer is valid for a period of 3 years after the date of purchase of this product To obtain the source code write to Open Source Team Philips Electronics High Tech Campus Bld HTC 44 5600 AE Eindhoven The Netherlan...

Page 67: ...nergy You can check how your personal TV settings the level of brightness in current onscreen pictures and the surrounding light conditions determine the relative power consumption To check the relative power consumption press h Setup and press W Select Watch demos Active control and press OK Select a Smart setting to check the corresponding values End of use Disposal of your old product and batte...

Page 68: ...5 C Standby power consumption 0 075W Power saving features Light sensor Eco mode Picture mute for radio Auto switch off timer Eco settings menu Reception Aerial input 75 ohm coaxial IEC75 TV system DVB COFDM 2K 8K Video playback NTSC SECAM PAL DVB DVB Terrestrial DVB T MPEG4 DVB C MPEG4 DVB S MPEG4 HD MHEG see selected countries on the TV typeplate Tuner bands Hyperband S Channel UHF VHF 68 Specif...

Page 69: ...lution 1920 x 1080p Color processing 4 trillion colors 14bit RGB Brightness 450 cd m2 Dynamic contrast 500 000 1 Response time typical 2ms BEW equiv Sound Output power RMS 2 x 10W Dolby Digital Dolby Pulse Dolby and the double D symbol are registered trademarks of Dolby Laboratories Speaker types 2 mid high speakers 1 woofer Specifications Display and sound 69 ...

Page 70: ... 24 Hz 25 Hz 30 Hz 1080p 50 Hz 60 Hz Computer formats Resolution Refresh rate 640 x 480p 60 Hz VGA HDMI 800 x 600p 60 Hz VGA HDMI 1024 x 768p 60 Hz VGA HDMI 1280 x 768p 60 Hz VGA HDMI 1360 x 765p 60 Hz VGA HDMI 1360 x 768p 60 Hz VGA HDMI 1280 x 1024p 60 Hz HDMI 1920 x 1080i 60 Hz HDMI 1920 x 1080p 60 Hz HDMI 70 Specifications Display resolutions ...

Page 71: ...ported USB memory device formats FAT 16 FAT 32 NTFS Playback formats MP3 AAC WMA v2 up to v9 2 Still pictures JPEG MPEG 1 MPEG 2 MPEG 4 H 264 MPEG 4 AVC WMV9 MPEG program and transport stream AVI MP4 MKV ASF Specifications Multimedia 71 ...

Page 72: ... 15 Audio In stereo mini jack 3 5mm HDMI 1 ARC in HDMI v1 4 HDMI 2 in HDMI v1 3 HDMI 3 in HDMI v1 3 Audio In DVI to HDMI stereo mini jack 3 5mm Audio Out L R display synchronised coaxial cinch S PDIF Headphones stereo mini jack 3 5mm TV Side HDMI Side in HDMI v1 3 USB Common interface slot CAM 72 Specifications Connectivity ...

Page 73: ...Dimensions and weights 42PFL6705 Width 991 mm Height 605 mm Depth 43 mm Weight 17 kg with TV stand Height 658 mm Depth 200 mm Weight 19 kg UMv 3104 327 0066 1 110804 Specifications Dimensions and weights 73 ...

Page 74: ...8 Search 74 Specifications Dimensions and weights ...

Page 75: ...dio Return Channel 45 HDMI CEC 41 Headphone volume 37 Hidden channels 23 Home menu 21 I Infrared sensor 19 Interactive TV 32 L Lock code 34 M Music with photos 33 O On during mute 35 On screen keyboard 23 Open source software 66 Options menu 23 P Parental rating 34 Picture delay 55 Picture settings 37 Picture shift 24 Pixel Plus link 42 Pixel Precise HD 37 Play videos 33 Power consumption 67 R Rad...

Page 76: ...2 3 0 3 030 3 3 2 34 13 AAABCBHD6 1HGHUODQGV LHUELM YHUNODDUW 3KLOLSV QQRYDWLYH SSOLFDWLRQV 1 9 GDW GH H 3 31 3 0 13 330 3 0 3 3 3 30 M 3 3 30 30 3 20 3 3 UHOHYDQWH EHSDOLQJHQ YDQ ULFKWOLMQ VSDxRO 3 3 2 3 30 3 00 12 13 42 0 5676 34 2 2 TXH HO WHOHYLVRU FXPSOH FRQ ORV UHTXLVLWRV HVHQFLDOHV FXDOHVTXLHUD RWUDV GLVSRVLFLRQHV DSOLFDEOHV R H LJLEOHV GH OD LUHFWLYD WDOLDQR RQ OD SUHVHQWH 3KLOLSV QQRYDWLY...

Page 77: ...5 HIVH II IVI P Q 1RUWKHUQ UHODQG HLHH HNN VLLG DǴDǷFǿDǺ HHM MGM GNH VV IM P 9 Q 8 9 NGM OMVRI P Q 8 2 VMGGLLRV P Q X HPERXUJ X HPEXUJ HLHH GV NNH P9 0 0 1 Q KS3B 6 0 10 0DJ DURUV iJ HV LHHIL ILR P2 0 6Z5 0Q 5 5 HLHH HGO HHMV P 0Q KS3B 6 0 10 1RUJH GGMH LIII P 9 0 Q KS3B 6 0 10 gVWHUUHLFK HLHH ILH HIV P9 0 0Q KS3B 6 0 10 3ROVND SRãĀF HQLH ORNDOQH 3RUWXJDO LHH MLH RHO P 0Q KS3B 6 0 10 5RPüQl HLHH L...

Reviews: