background image

8

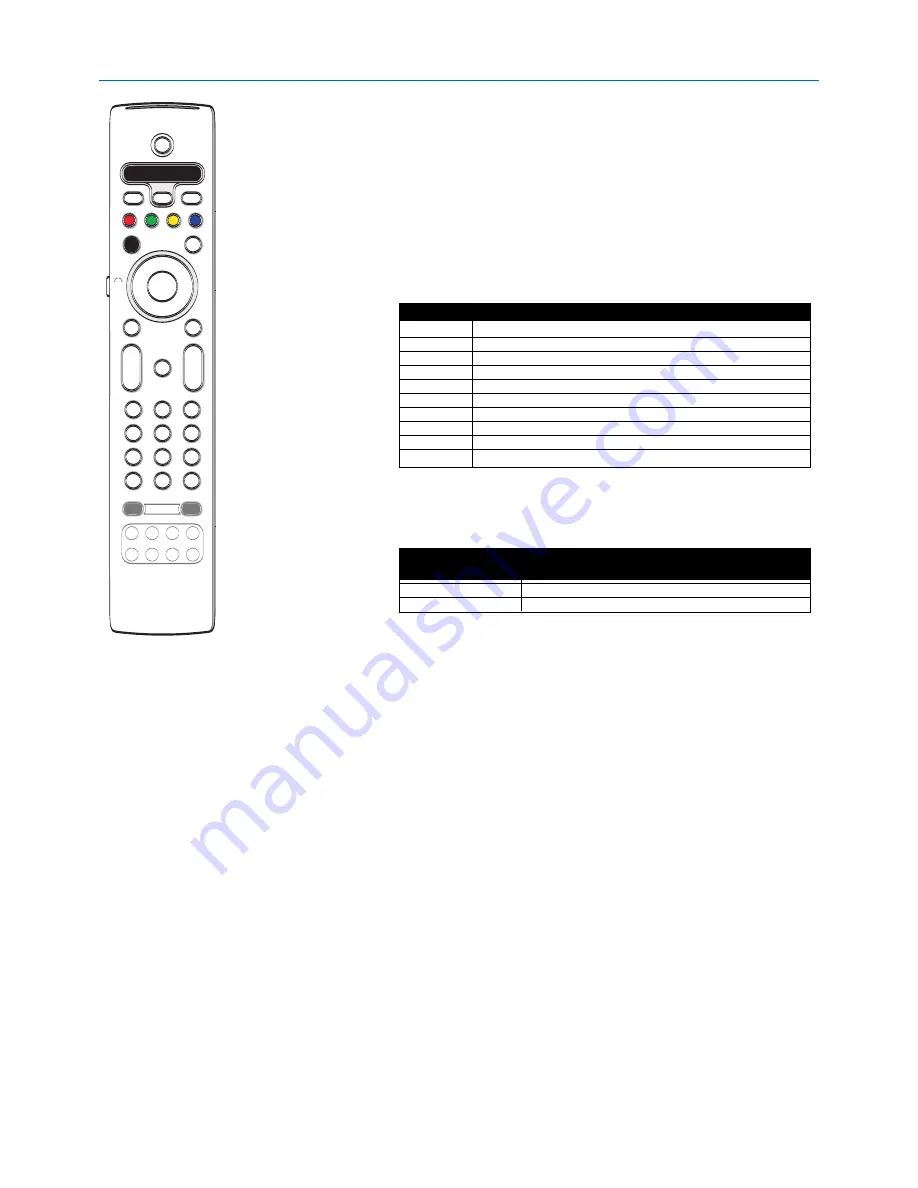
Alphanumeric buttons on the remote control

The alphanumeric buttons on the remote control can be used to enter
digits and text.
Multi-tap entry can be used to enter alphanumeric information when
necessary.
The characters displayed are dependent on the language selected in the
Installation menu. See p. 8.
Text is entered similar to the method used for entering text messages on a
cellular phone.
When a letter or number has been entered, the cursor automatically
advances to the next character position after the specified time out or by
pressing the cursor right.

Also the cursor up/down can be used to enter alphanumeric information.
When finished, press the 

OK

button to confirm the entry.

Move to the left panel.

rc4308 use rc1 -tv g.eps

.@

TUV

PQRS

WXYZ

JKL

GHI

MNO

ABC

DEF

MODE

ON/OFF

Ambilight

b

æ

+

-

+

-

v

DVD/R CBL TVVCR AUX

PIP

MENU

1

2

3

4

5

6

7

8

9

0

Ò

®

π

º

Ì

®

®

®

®

A/CH

VIEW

-

FAVORITES

-

FORMAT

INFO

SELECT

GUIDE

DEMO

CLOCK

MY CONTENT

VOL

CH/

PAGE

MUTE

AV+

-

POWER

SCREEN

®

®

®

®

®

®

® ® ®

®

®

®

®

®

®

®

®

®

®

®

®

®

® ® ®

®

®

®

®

®

®

®

OK

=

_-

S

W

IV

E

L

1

<space> 

Ò

- 1 <space> 

Ò

- 1 (etc.)

2

a

b c

A B C 2 a

b c

(etc.)

3

d e f

D E F

3 d e f

(etc.)

4

g

h i

G H I

4 g

h i

(etc.)

5

j

k l

J

K L 5 j

k l

(etc.)

6

m n o M N O 6 m n o (etc.)

7

p q r

s

P Q R S

7 p q r

s

(etc.)

8

t

u v

T U V 8 t

u v

(etc.)

9

w x y

z

W X Y Z 9 w x y

z

(etc.)

0

. @

0 . @

0 (etc.)

RC button

Default Multi-tap Alphanumeric entry order

RC

_

CURSOR

_

UP

a b c d . ..A B C D ... 1 2 3 ... 0 <space> _ - . @

RC

_

CURSOR

_

DOWN

@ . - _ <space> 0 9 8 7 ... Z Y X ... z y x ... c b a

Button

Default 

RC

_

CURSOR

_

UP

/

RC

_

CURSOR

_

DOWN

Alphanumeric

Entry Order

Summary of Contents for 42PF9630A/37

Page 1: ...User Manual Mode d emploi Manual de instrucciones ...

Page 2: ......

Page 3: ...tration Card at once Know these safety symbols This bolt of lightning indicates uninsulated material within your unit may cause an electrical shock For the safety of everyone in your household please do not remove product covering The exclamation point calls attention to features for which you should read the enclosed literature closely to prevent operating and maintenance problems WARNING To redu...

Page 4: ...d international global safety standards for tilt and stability properties of its cabinets design Do not compromise these design standards by applying excessive pull force to the front or top of the cabinet which could ultimately overturn the product Also do not endanger yourself or children by placing electronic equipment toys on the top of the cabinet Such items could unsuspectingly fall from the...

Page 5: ...ing the remote control to work accessory devices 36 Code setup 36 To cancel the selected mode 36 Learnable remote control 38 To put the remote control function buttons back to the factory mode 39 Before Calling Service 40 Tips 41 Glossary 42 Annex 1 Philips TV software upgrade with portable memory 43 Annex 2 Philips TV Slideshow Format with background music 45 Annex 3 Philips TV Portable Memory an...

Page 6: ...el You should not attempt to do the work yourself Philips bears no responsibility for improper mounting or mounting that results in accident or injury Make sure that the wall mount is being fixed securely enough so that it meets safety standards Preparation Your new TV is provided with a special slot called a CableCARD which means that you do not need a separate set top box to receive digital cabl...

Page 7: ...are watching Cable box with RF IN OUT Connect the incoming cable TV signal to the cable IN jack 1 on the back of the cable box Connect a coaxial cable not supplied from the TO TV jack on the back of the cable box to the CABLE ANTENNA 75 Ω x jack 2 at the bottom of the TV Note Your cable box may have a different label for the TO TV jack such as OUTPUT or OUT Set the OUTPUT CH switch 3 of the cable ...

Page 8: ...te This connection will supply stereo sound to the TV if it is being broadcast by the station you are watching Direct Broadcast Satellite DBS Satellite systems offer many of the same premium channels as cable systems and often at a lower price To get these channels you ll need to install a small dish antenna outside There are 2 main DBS systems DirecTV DishNetwork These systems require separate pr...

Page 9: ...no subchannels associated with the currently selected channel in the left panel the right panel will remain empty Home network Contains the locally connected devices on which content pictures audio files is stored See Home network browser p 27 My Content Should your remote be lost or broken you can still change some of the basic settings with the buttons on the right side of your TV Press the powe...

Page 10: ...tons When functions are attached to the color buttons the color buttons are shown on screen MY CONTENT Press to display the My Content menu on or off see p 5 SWIVEL no function OK to activate a setting to display the list of channels stored according to the selection made in the Installation mode Antenna or Cable p 10 starts playing content in the Home Network Browser application p 28 MENU Setting...

Page 11: ...ble Super zoom removes the black bars on the sides of 4 3 programs with minimal distortion When in Movie expand 14 9 Movie expand 16 9 or Super zoom picture format you can make subtitles visible with the cursor up down Note With HD sources not all screen formats will be available FAVORITES VIEW To display a list of all channels marked as favorite incl subchannels 3 To add or remove a channel in th...

Page 12: ...c information When finished press the OK button to confirm the entry Move to the left panel rc4308 use rc1 tv g eps TUV PQRS WXYZ JKL GHI MNO ABC DEF MODE ON OFF Ambilight b æ v DVD R CBL TV VCR AUX PIP MENU 1 2 3 4 5 6 7 8 9 0 Ò π º Ì A CH VIEW FAVORITES FORMAT INFO SELECT GUIDE DEMO CLOCK MY CONTENT VOL CH PAGE MUTE AV POWER SCREEN OK _ SWIVEL 1 space Ò 1 space Ò 1 etc 2 a b c A B C 2 a b c etc ...

Page 13: ...ursor right to enter the right panel The content of the right panel is moved to the left panel and the right panel shows the content of the newly highlighted item in the left panel Note In some cases it is important that the picture can be watched while adjusting the settings This means that when the highlight is on the right side panel the other menu items hide away When the cursor left is presse...

Page 14: ...nna signals and will search for antenna TV NTSC and ATSC channels available in your local area When Cable is selected the TV will detect cable company supplied signals and will search for cable TV NTSC ATSC QAM modulated channels available in your area Make sure that registration with your cable TV provider and connection of equipment are completed Press the green button Next on the remote control...

Page 15: ...der a single major channel number which can be selected by pressing the digit remote control direct acces channel number entry Important After the installation of the TV channels has been done always make a selection in the Installation menu between Antenna or Cable whether you want to watch Antenna TV channels or Cable TV channels If you make use of a signal splitter do not forget to put the swit...

Page 16: ...screen of video with a pip window of video on top of it Dual screen is selected the TV splits the screen into two equally sized screens Press the cursor left right to highlight the PIP window or the left right screen in Dual screen Press the CH PAGE button to change the broadcast channel or the AV button to change the HDMI source in the highlighted screen Note Audio only plays from the main when P...

Page 17: ...ansmitted T 1 2 3 or 4 Often used for channel guide schedules bulletin board information for Closed Captions programs news weather informations or stock market reports Not all Caption services are necessarily being used by a TV channel during the transmission of a Closed Caption program See Closed Caption in the TV Features menu see p 23 to turn the Caption service On or Off Note This television p...

Page 18: ...lt Automatic Small Standard or Large and press the OK button to confirm Style Select this option to select the font style of caption display according to your own preference Select Default Monospaced serif Serif Monospaced sans serif Sans serif Casual Cursive or Small caps Text Select this option to select the text color or the opacity of the text box of caption display according to your own prefe...

Page 19: ... allows a cable operator to disseminate emergency alert information related to state and local level emergencies and warnings in a cost effective and efficient way while minimizing disruption of programming An Emergency alert message will have one of the following priorities Low Medium High or Maximum The Emergency alert message with priority High or Maximum will always be presented Low or Medium ...

Page 20: ...is routed appropriately Once you have selected the source type e g DVD this source will automatically be selected when your remote control is in DVD mode see p 6 and when you press the AV button on the remote control Digital Audio Select Digital Audio In when the TV expects digital audio for a connected device to come from a Digital audio input Make your selection of the source to which the device...

Page 21: ...ith the cursor buttons select and enter the correct time and day If Auto clock mode Manual has been selected and no clock search has been done the system will keep the entered time and day Time zone only available when Auto clock mode is set to Automatic This function allows you to select your local time zone Broadcasted time information will correct the clock display for your local time Select Ti...

Page 22: ...ARD You may also be able to order call ahead pay per view events Note do not insert a PCMCIA card into the CableCARD interface slot Insert your CableCARD é Select CableCARD applications in the Settings menu Press the cursor right to enter the list of available CableCARD applications offered by the cable provider A CableCARD application is initiated when you select an application item and when you ...

Page 23: ...one that best suits your own viewing conditions Most consumers will find that Natural is the correct choice Contrast This will adjust the intensity of bright parts in the picture but keep the dark parts unchanged Brightness This will adjust the light output of the complete picture which will mainly affect the darker areas of the picture Color This will adjust the saturation level of the colors to ...

Page 24: ...s the cursor right é Select On or Off in order to activate de activate Color enhancement with the cursor right Tint Allows you to select the color mix hue of the picture Picture format This menu item performs the same as the SCREEN FORMAT button on the remote control See Use of the remote control p 7 Active Control The TV continuously measures and corrects all incoming signals in order to provide ...

Page 25: ... to obtain the best stereo reproduction for your listening position Headphone volume This controls the level of sound through the headphones Sound mode This select the modes for more spatial or surround sound reproduction dependent on the broadcast signals or signals from external inputs received Alternate audio only selectable with analog broadcast signals This gives you the possibility to swap b...

Page 26: ... available in the broadcast or only when mute is active Press the cursor right after having selected Closed captions é Select On Off or On during mute Sleeptimer This sets a time period after which the TV automatically turns to standby Select Sleeptimer é Press the cursor right Select a value with the cursor up down The list will have values from Off to 180 minutes When Off is selected the sleepti...

Page 27: ...ness to adjust the light output of the ambient lights Select Mode and press the cursor right to select Color Ambience Relaxed Movie or Action Color this will show constant light according to the settings in the Ambilight color menu See below The options Ambience Relaxed Movie and Action will dynamically match brightness and color to the screen content The mode selection made will effect the speed ...

Page 28: ...V is equipped with a V chip This allows you to control access to individual programs based on their movie and TV ratings All settings apply to all AV inputs except HDMI The program content advisory data are sent by the broadcaster or program provider Select TV ratings lock with the cursor down A list appears showing the age based TV ratings and a corresponding content based ratings list é Press th...

Page 29: ...children of all ages with themes and elements suitable for children aged 2 6 TV Y7 programs designed for children age 7 and older TV Y7 FV programs include fantasy violence more intense than other programs in the TV Y7 category TV G programs suitable for all ages These programs contain little or no violence no strong language and little or no sexual dialogue or situations TV PG programs contain el...

Page 30: ... item is selected When any other item has been selected all ratings below are selected as well thus all movies with those ratings will be locked Preferred channels A channel when installed is marked as preferred by default and added to the channel list This feature provides the ability to remove a channel number from the channel list Select Preferred channels with the cursor down é Press the curso...

Page 31: ...ng Such action may damage the memory card USB device Do not touch the terminals on the back of the card Always insert a card in the correct direction Failure to do so may result in damage to the card and the unit Do not subject the card to excessive pressure or strong impacts Malfunctions of the unit or card may result in data loss or damage to the card Philips shall not accept any liability for d...

Page 32: ... the USB device or memory card under Home network with the cursor up down The Home network browser will allow the user to browse content stored on the inserted USB device or memory card Press the cursor right The 2 panel browser will be shown with the left panel containing the content types Music Picture The right panel wil display the content that is available of the selected content type Press t...

Page 33: ...Y Pr Pb L Y R S VIDEO S VIDEO AV2 AV3 AV1 VIDEO VIDEO Cable CARD INTERFACE HDMI HDMI 1 2 ANTENNA 75 R L VIDEO IROUT DIGITAL OUT AUDIO MONITOR OUT R L MONITOR OUT VIDEO IROUT DIGITAL AUDIO OUT Recorder VCR DVD RW Note Do not place your recorder too close to the screen as some recorders may be susceptible for signals from the display Keep a minimum distance of 20 from the screen Connect the RF Anten...

Page 34: ...with RF output Use an optional signal splitter é Connect one of the cable TV signal splitter outputs 1 to the cable box s IN jack Connect the other cable TV signal splitter output 2 to the CABLE ANTENNA 75 Ω x plug on the bottom of the TV Connect the cable box s OUT jack 3 to the recorders RF IN socket Connect the Video Audio Left and Right only for stereo sound recorder AV cables 4 to the VIDEO a...

Page 35: ...or Cable TV cable as described above é Connect the AV cables 1 to the satellite receiver s or cable box s AV OUT jacks and to the recorder s AV IN jacks Connect the recorder s AV OUT jacks 2 to the TV s AV1 jacks as described above Connect another RF cable 3 from the output out of your recorder to the TV s input CABLE ANTENNA x jack Satellite Receiver cable box with AV outputs Connect the satellit...

Page 36: ...e Pr R Pb BY G input 1 jacks and to the H and V jacks of AV1 2 é Connect the audio cables to the L and R AUDIO jacks of AV1 3 Devices with an S Video connector Connect an S Video cable to the AV1 or AV2 S VIDEO input 1 Note When using the S VIDEO connector do not connect any device to the AV VIDEO input that you are using é Connect the audio cables to the device s AUDIO L and R jacks and to the L ...

Page 37: ...r with HDMI or DVI equipped devices like a computer So you can display high definition pictures on this TV in the digital form Note If the accessory device has DVI output only use a DVI to HDMI adapter cable to connect to the HDMI connector Then also connect the audio cable to DIGITAL AUDIO IN Connect your HDMI device with one of the HDMI connectors é Select the connected digital device in the Set...

Page 38: ...der to record See the handbook for your recorder Switching channel numbers on your TV does not disturb recording Record a program from MONITOR OUT You can record a program on your recorder from the TV tuner via MONITOR OUT Switch on the device é Select the correct channel on your TV and the correct input on your recorder Set your recorder to record Do not switch channels or turn off your TV when y...

Page 39: ...ol is in Expert mode and the remote control remains in the mode selected If the LED blinks 4 times after pressing the SELECT button with the OK button for at least 2 seconds the remote control is in Normal mode and the remote control returns to TV mode after 60 seconds Direct selection of a connected device When the remote is in TV Expert mode you may directly select a connected device in the foll...

Page 40: ...you entered a correct code The remote will go back to the last selected mode If you entered a wrong code the mode LED will stay on for 2 seconds Redo step Now you will try to use the TV remote with the accessory device Press the SELECT button repeatedly to select the desired mode The selected mode LED will stay on for 2 seconds and then begin blinking The blinking means that the remote is in the a...

Page 41: ... 024 028 Sylvania 003 Symphonic 002 Toshiba 001 002 025 Wards 002 003 022 Zenith 028 TV VCR Action 001 Precision 001 Realistic 002 Remote Control Direct Entry Codes for Accessory Devices This equipment has been tested and found to comply with the limits for a Class B digital device pursuant to part 15 of the FCC Rules These limits are designed to provide reasonable protection against harmful inter...

Page 42: ...in to copy other functions è To exit the learnable mode Press the button at the side of your TV remote control for about 2 seconds Your remote control will remain the last selected mode Note If a code from the remote control of your external device is not recognized by the TV remote control the LED of the selected source will blink for a few seconds This means that the code transfer did not succee...

Page 43: ...T LEDS will light up Press the SELECT button 1x DVD R is lit up 2x CBL is lit up 3x VCR is lit up 4x AUX is lit up 5x DVD R CBL VCR AUX are lit up Press the OK button when one or all mode LEDS are lit The function buttons which were learned will be erased or from the selected destination source or from all the external devices at once All the buttons from the TV remote control will have their fact...

Page 44: ...ut of range before the picture is correctly positoned the receiver box controls will need to be adjusted No photo music Check if the source complies with a supported code or video play or in poor quality only No sound Increase the VOLUME Check that the TV is not muted press the mute button on the remote control When no signal is detected the TV automatically switches off the sound This is proper o...

Page 45: ...ehold waste Please ensure you dispose of batteries according to local regulations Standby Your TV consumes energy in the standby mode Energy consumption contributes to air and water pollution Energy Star Compliance No CableCARD installed 1 W With CableCARD installed 15 W After improper shutdown If your TV has been shutdown in an improper way e g power drop power cord plug out starting up the TV ag...

Page 46: ...ies to digital terminal devices such as digital STV digital TV receivers and digital VCRs It allows a cable operator to disseminate emergency alert information related to state and local level emergencies and warnings NTSC Analog signals PBS Public Broadcast System POD Cable Card Point Of Deployment module process scrambled information Glossary Your TV is equipped with a Kensington Security Slot t...

Page 47: ...Digital Card Mini SD Card SmartMedia Card MultiMedia Card Note Only FAT DOS formatted portable memory is supported New software can be obtained from your dealer or can be downloaded from the www philips com support website Go to www philips com support using the web browser on your PC é Follow the procedure to find the information and the software related to your TV Select the latest software upgr...

Page 48: ...Automatic software upgrade procedure Power off your TV and remove all memory devices é Insert the USB portable memory that contains the downloaded software upgrade Switch on your TV with the power switch B at the right side of the TV At startup the TV will scan the USB portable memory until it finds the update content The TV will automatically go to the upgrade mode After a few seconds it will dis...

Page 49: ... your portable memory Select the slideshow file and press the OK button to start the slide show To stop a slide show press the button General Rules The slideshow will use plain ASCII XML syntax to allow the creation and editing of the slideshow files using simple tools All references to network content must be based on the global address of the content Content on a Portable Memory PM doesn t have ...

Page 50: ...ag The TV application can force the use of one or multiple predefined display times Identifies the slides to show Identifies the URL of the individual slide xml version 1 0 encoding ISO 885h9 1 philips slideshow version 1 0 title Philips AlbumFile title audio Music Nature mp3 audio slide duration 50 slide duration slides slide Images Image01 jpg slide slide Images Image02 jpg slide slide Images Im...

Page 51: ... Portable Memory Issues The following memory cards are supported by the digital media reader CompactFlash Card Type I II CF IBM Microdrive Memory Stick Memory Stick Pro SecureDigital Card SD SmartMedia Card SM MultiMedia Card MMC XD cards are supported through an external XD compatible card reader not supplied with the TV connected to the USB connector The same holds for other future memory cards ...

Page 52: ...23 2003 including all documents referenced by the document The document can be found on the USB standardisation website www usb org Full support of the USB Mass Storage Class Bulk Only Transport bInterfaceProtocol 50h Full support of SubClass Code 05h SFF 8070i spec Full support of SubClass Code 06h SCSI transparent command set For large USB memory devices when you are in the Content Browser it ma...

Page 53: ...signature verification of receipt can be provided A product used for commercial or institutional purposes including but not limited to rental purposes Product sold AS IS or RENEWED CARRY IN SHIP IN WARRANTY For Carry In warranty repair take the product to a Philips authorized service center for repair When the product has been repaired you must pick up the unit at the center For Ship In warranty r...

Page 54: ...50 ...

Page 55: ......

Page 56: ...ions are subject to change without notice Trademarks are the property of Koninklijke Philips Electronics N V or their respective owners 2005 Koninklijke Philips Electronics N V All rights reserved www philips com ...

Reviews: