background image


EN           23  


En

gl

is


The number of services available on 
Net TV can change. The functionality of 
services can change as well. These 
changes are updated automatically. You 
can view the latest services added or 
changed in the "New" category.   


Net TV displays one page at a time and 
in full screen. 


You cannot download and save files or 
install plug-ins on this TV. 


What you need 

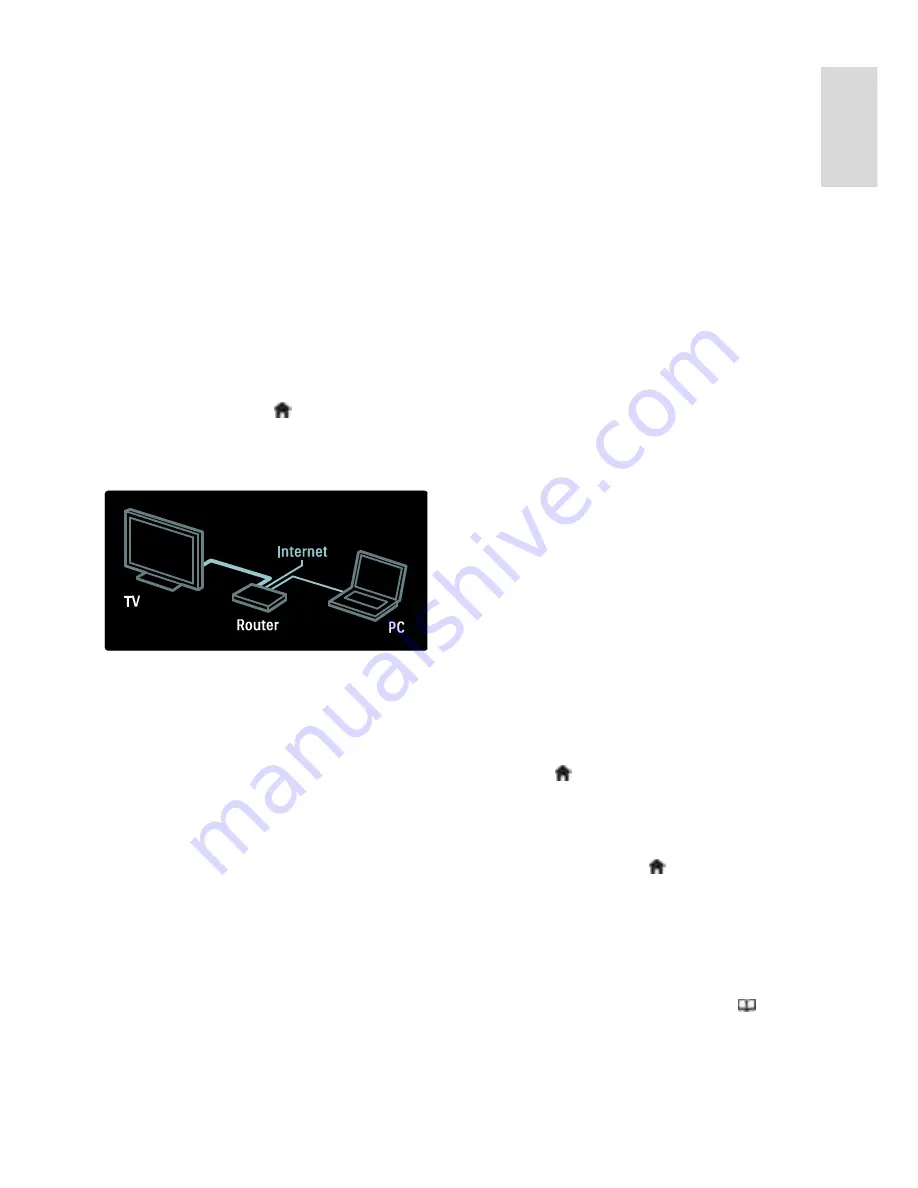
To enjoy Net TV, connect the TV to a 
router with a high-speed connection to the 

Internet. Read more at 

Set up the TV > Set 

up network

 (Page 39). 

Once connected, press    and select 

[Browse Net TV]

 to start the Net TV 

on-screen setup. Read more at 

Use your TV 

> Enjoy Net TV > First Use

 (Page 23).  


First use 

Registration benefits


By registering with Philips, you can enjoy 
exclusive benefits and receive updates on 
product information. 

Parental control benefits


With Parental control switched on, you can 
lock and unlock services and/or categories of 
services. You can also unlock some services 
that are not suitable for children. These 
services are locked from the start. 

Parental control specifics


Only services on the Net TV pages can 
be locked. Advertisements and Internet 
websites cannot be locked. 


Services are locked per country. 
Categories are locked for all countries. 

Initial setup


1. Agree to the Terms of Use. 
2. Register for Net TV. 

3. Switch on parental control. 

How to register


To register, you need an email address and a 
PC connected to the Internet. If you skip the 
registration during the initial setup, you can 
register from the Net TV Start page later. 
To start the Net TV registration, enter your 
email address on screen. To open the 
on-screen keyboard, highlight the text field, 

then press 

OK

. Enter the characters one by 

one. Select 

[Register]

 and press 

OK

A message will appear if a registration email 
has been sent to your email address. Open 
the email on your PC and click the link to 
the registration form. Complete the form 
and click the button to submit. 
On the TV, select 

OK

 and press 

OK

 to 

open the Net TV Start page. 

Switch on Parental control


The first time you open the Net TV Start 
page, you can switch on parental control. If 
you switch on parental control, you need to 
enter a personal lock/unlock code.   
Enter a 4-digit code as your Net TV 
lock/unlock code. 

Use the 

Numeric buttons

 on the remote 

control. Enter the same code again to 
confirm. 

Net TV is ready for use.


Browse Net TV 

Access the Net TV home page: 
1. Press  . 
2. Select 

[Browse Net TV]

, then press 

OK

.   

The TV links up to Net TV and opens the 
start page. 
To exit Net TV, press

and select another 

activity.


The Start page


The Start page shows your favourite services 
and some recommended services. You can 
browse Net TV from this page. 
To return to the Start page, press   

(

Browse

). 

Summary of Contents for 40PFL7605H

Page 1: ...EN User Manual Register your product and get support at www philips com welcome 32PFL7605H 37PFL7605H 40PFL7605H 46PFL7605H 32PFL7605C 42PFL7605C ...

Page 2: ... 0800 0230076 Gratis nummer Norge 22 70 81 11 Lokalsamtale Polska 00800 311 13 18 Pozosta e produkty RTV oraz AGD Portugal 800 780 903 Chamada Grátis România 0800 894910 0318107125 Apel gratuit Apel local Россия 495 961 1111 0 15 USD minute Србија 381 114 440 841 Lokalni poziv Slovensko 0800 004537 Bezplatný hovor Slovenija 00386 12 80 95 00 lokalni klic España 900 800 655 Teléfono local gratuito ...

Page 3: ... settings 34 Change channel settings 35 Install channels 37 Change language settings 38 Set up network 39 Change other settings 43 Update software 44 Reinstall the TV 46 5 Connect the TV 47 First connections 47 About cables 47 TV connectors overview 49 Connect devices 50 Connect more devices 56 Use Philips EasyLink 60 Use a CAM 63 Insert SD card 63 6 Troubleshooting 65 Contact us 65 General TV iss...

Page 4: ...n or close the Home menu In the Home menu you can access connected devices picture and sound settings and other useful features To open or close the Browse menu In the Browse menu you can access Teletext the channel list or the Electronic Programme Guide EPG EPG is not available in all countries ...

Page 5: ...or close the Experience menu In the Experience menu you can access a range of frequently used settings Back To return to the previous TV channel or menu Press and hold to return to watching TV Red To select the red option access digital Interactive TV services or watch TV demonstration clips Available on certain models only ...

Page 6: ...ion or to open the Widgets Available on certain models only Read more about the remote control in Help Use your TV Remote control Overview Page 15 Alternatively find the answer in Search for Press to select the next TV tour The TV menus Let s learn more about these frequently used menus the Home menu the Browse menu the Options menu ...

Page 7: ...e in all countries In the Options menu you can select settings related to what is shown on screen For example while you are watching a channel you can mark it as a favourite In the Experience menu you can quickly adjust Ambilight picture and sound settings You can select the ideal picture setting for movies games or music Or you can change the picture format of the on screen image You can even cha...

Page 8: ...elp Connect the TV Use Philips EasyLink Page 60 In Help Connect the TV Page 47 you can learn to connect the most common devices through illustrations for example High Definition TV You can watch High Definition HD programmes in HD picture quality If you watch non HD programmes the picture quality will be similar to non HD TVs Your TV can display HD video content from a Blu ray disc player connecte...

Page 9: ... www philips com welcome Safety NonPublish Read and understand all instructions before you use your TV If damage is caused by failure to follow instructions the warranty does not apply Risk of electric shock or fire Never expose the TV to rain or water Never place liquid containers such as vases near the TV If liquids are spilt on or into the TV disconnect the TV from the power outlet immediately ...

Page 10: ...ever cover the ventilation slots on the TV Risk of injury fire or power cord damage Never place the TV or any objects on the power cord To easily disconnect the TV power cord from the power outlet ensure that you have full access to the power cord at all times When you disconnect the power cord always pull the plug never the cable Disconnect the TV from the socket and aerial before lightning storm...

Page 11: ...s energy consumption press the green button and select Energy saving smart setting Ambient light sensor To save energy the built in Ambient light sensor lowers the brightness of the TV screen when the surrounding light darkens Mute screen Turns off the TV display Other functions including sound continue to operate normally Muting the screen saves energy if you just want to listen to audio from the...

Page 12: ...compatible TV mount Check your TV screen size and match it against the list for the type of wall mount to purchase 32 inches 81 cm 200 mm x 300 mm M6 37 inches 94 cm 200 mm x 200 mm M6 40 inches 102 cm 200 mm x 200 mm M6 42 inches 107 cm 200 mm x 200 mm M6 46 inches 117 cm 300 mm x 300 mm M8 Warning Follow all instructions provided with the TV mount Koninklijke Philips Electronics N V bears no res...

Page 13: ... brightness and superb colours The LED backlight of the display offers exceptional picture contrast with exceptional energy saving Ambilight NonPublish Ambilight is the lighting technology that emanates from the back of the television onto the wall This innovative technology automatically adjusts the colour and brightness of the light to match the TV picture This creates an unprecedented improveme...

Page 14: ...ideos from the USB connection on the side of the TV or directly from your PC See Use more of your TV Access multimedia Page 31 Access more information On screen NonPublish You are reading the on screen user manual This manual contains all of the information you need to install and use this TV Access the user manual by selecting Help in the home menu Before carrying out instructions temporarily clo...

Page 15: ...ow you to move vertically 4 Ambilight Switches Ambilight on or off During TV standby switches lounge light on or off 1 Ambient sensor remote control sensor Remote control Overview NonPublish 1 Standby Switches the TV to standby if it is on Switches on the TV if it is in standby 2 Home Accesses the home menu 3 Browse Accesses the browse menu to select TV channel list the Electronic Programme Guide ...

Page 16: ...ress and hold to return to watching TV Not supported in MHEG mode Batteries Open the battery cover on the back of the remote control to insert the batteries Type AAA LR03 1 5 V or Type CR2032 3 V Make sure the and ends of the batteries line up correctly and are marked inside Remove the batteries if you are not using the remote control for a long time Dispose of batteries according to the end of us...

Page 17: ...es 1 Press 2 Select an item in the home menu then press OK to access the menu 3 To exit the home menu press or To start an activity highlight the desired item with the Navigation buttons and press OK Help Accesses the electronic user manual Watch TV Switches back to the antenna source if another source is selected Browse USB If a USB storage device is connected accesses the content browser Browse ...

Page 18: ... 3 Select a channel then press OK to access the channel 4 Press to exit the channel list without changing the channel Add your devices NonPublish After you connect a device to the TV add this device in the home menu for easy access In the home menu select Add your devices then press OK Follow the instructions on screen to add the device to the home menu To remove a device from the home menu select...

Page 19: ... does not turn on when the TV is switched on The TV requires some time to start up During this time the TV will not respond to the remote control or side controls This is normal behavior To switch to standby Press on the remote control The front LED indicator switches to red To switch off Press the power switch on the bottom of the TV to the o position The TV switches off Though your TV consumes v...

Page 20: ... daylight use Natural A natural picture setting Cinema Ideal settings for watching movies Game Ideal settings for gaming Energy saving The most energy conscious settings Standard Adjusts picture settings to suit most environments and types of video Factory default settings Photo Ideal settings for viewing photos Custom Allows you to customise and store personal picture settings 3 Press OK to confi...

Page 21: ... watching a connected device you must add it to the home menu HDMI ARC compliant devices connected to the HDMI ARC connector on the TV are automatically added to the home menu 1 Connect and switch on the device 2 Press 3 Select Add your devices then press OK Follow the on screen instructions Watch connected device NonPublish 1 Press 2 Select the device from the home menu 3 Press OK to confirm your...

Page 22: ... the side of the TV Note It may take more than 5 seconds for the lounge light to switch on To select another lounge light colour see Use your TV Use Ambilight Set up Ambilight Page 21 Enjoy Net TV What is Net TV Koninklijke Philips Electronics N V bears no responsibility for content provided by Net TV service providers Net TV offers Internet services and websites tailored for your TV You can visit...

Page 23: ... to the Terms of Use 2 Register for Net TV 3 Switch on parental control How to register To register you need an email address and a PC connected to the Internet If you skip the registration during the initial setup you can register from the Net TV Start page later To start the Net TV registration enter your email address on screen To open the on screen keyboard highlight the text field then press ...

Page 24: ...e service icon and press Options Select Mark favourite and press OK You can mark up to 12 services as favourites All your favourite services are shown on the Net TV Start page In Services favourite services are marked with a star Only Net TV services can be marked as favourites Advertisements and Internet websites cannot be marked Unmark favourites To Unmark a favourite select the icon of a favour...

Page 25: ...on selected in the history list you can clear the whole list Press Options and select Clear history Video stores With this TV you can rent a video from an online video store 1 Open a video store You may need to register or enter your login 2 Select a video 3 Make the online payment 4 Download the video 5 Start watching What you need To rent and download a video you need a high speed Internet conne...

Page 26: ...ts press select Show widgets and press OK You can also open or close the Widgets directly with the Blue key on the remote control The Widgets appear at the bottom of the screen You can replace the initial widgets with other widgets Select a widget To select a widget press or to position the selection highlight Although only 4 widgets are shown on screen more Widgets can be added Open a Widget To d...

Page 27: ...the TV Read Set up the TV Set up network Page 39 Open Online TV from Net TV To open an Online TV service from Net TV press select Browse Net TV and press OK In the Net TV services look for the icon of the TV channel that broadcasts the programme you want Select the service and press OK Open Online TV on a channel To open the Online TV service of a TV channel directly press the Red key If this serv...

Page 28: ...uage correctly when that language uses a different character set 3 Press to exit the options menu Select a teletext language Some digital TV broadcasters have several teletext languages available You can set your primary and secondary language 1 Press 2 Select Setup Channel settings or Satellite settings Languages Primary Text or Secondary Text 3 Select your preferred teletext languages then press...

Page 29: ...ital channels EPG allows you to View a list of digital programmes being broadcast View upcoming programmes Group programmes by genre Set reminders when programmes start Set up preferred EPG channels Note EPG is not available in all countries Switch on EPG NonPublish 1 Press 2 Select Programme guide then press OK EPG options NonPublish Use the EPG options menu to set or clear reminders change day a...

Page 30: ...lect Setup Channel settings or Satellite settings Child lock Parental rating A message appears prompting you to enter the child lock code 3 Enter the child lock code with the Numeric buttons 4 Select an age rating then press OK All programmes beyond the selected age rating are blocked For information on child lock codes see Use more of your TV Use timers and locks Child lock Page 30 Use subtitles ...

Page 31: ...OK Press to fast rewind or fast forward a track Press to exit content browser Press to access or exit the following settings Stop Stops audio playback Repeat Repeats a song or an album Play once Plays the file once Shuffle on Shuffle off Enables or disables random play of songs Watch video Press the Navigation buttons to select a video file then press OK Press or to rewind or fast forward a file P...

Page 32: ...ck press to access the following settings Stop Stops playback Repeat Repeats a video Shuffle on Shuffle off Enables or disables random play of videos Listen to digital radio NonPublish If digital broadcasting is available digital radio channels are installed automatically during installation 1 While watching TV press 2 Select Channel list then press OK 3 In the channel list press 4 Select Select l...

Page 33: ...with extra commentary To switch on visually impaired audio if available 1 While watching TV press 2 Press the green button to select Visually impaired 3 Use the following buttons to select Red Off Turn off visually impaired audio Yellow Headphones Hear visually impaired audio from headphones only Green Speakers Hear visually impaired audio from speakers only Blue Speakers headphones Hear visually ...

Page 34: ... to exit More picture settings NonPublish 1 Press 2 Select Setup TV settings Picture then press OK 3 Select a setting to adjust Smart picture Accesses pre defined smart picture settings Reset Resets to factory default settings Contrast Adjusts the intensity of bright areas keeping dark areas unchanged Brightness Adjusts the intensity and details of dark areas Colour Adjusts colour saturation Hue C...

Page 35: ...ited for sports 3 Press OK to confirm your choice 4 Press to exit More sound settings NonPublish 1 Press 2 Select Setup TV settings Sound then press OK 3 Select a setting to adjust Smart sound Accesses pre defined smart sound settings Reset Resets to factory default settings Bass Adjusts the bass level Treble Adjusts the treble level Surround Enables spatial sound Headphones volume Adjusts headpho...

Page 36: ... press OK Hidden channels appear in the channel list but without channel information displayed 5 Select the channel to unhide then press 6 Select Unhide channel then press OK Repeat steps 5 and 6 to unhide other channels Update channel list NonPublish When the TV was switched on for the first time a full installation of channels was performed You can set the TV to add or remove digital channels au...

Page 37: ...o the respective network to watch channels on that network 1 While watching TV press 2 Select Setup Channel settings 3 Select Channel installation Antenna or Cable DVB 4 Select one of the following settings Antenna DVB T Access free to air antenna or digital DVB T channels Cable Access cable or digital DVB C channels 3 Press OK to confirm your choice 4 Press to exit The TV switches to the selected...

Page 38: ...store the fine tuned channel under the current channel or select Store as new channel to store under a new channel number Change language settings Audio subtitle teletext languages NonPublish Digital TV channels may stream several audio subtitle and teletext languages with a broadcast Set preferred languages when multiple languages are available 1 Press 2 Select Setup Channel settings or Satellite...

Page 39: ... high speed connection to the Internet You can also connect this TV to a PC network wirelessly via an optional wireless USB adapter Check with your local retailer for purchase details The PC network feature is DLNA 1 5 certified You can use Microsoft Windows XP or Vista Intel Mac OSX or Linux on your computer To share PC content on your TV you need recent media server software on your computer Win...

Page 40: ...ettings TV network name 2 Press OK to open the on screen keyboard 3 Enter the TV name with the on screen keyboard then press OK Project your PC Help To read the Wi Fi MediaConnect Help right click the program icon in the notification tray of the PC and select Help Specifics You can project high definition HD or standard definition SD video depending on the processing power of your PC Certain comme...

Page 41: ...olders for media sharing In TVersity click the Sharing tab Click the green plus icon and select Add folder In the Add media pop up window click the Browse button In the Browse for Folder window select a folder with music photos or videos that you want to share and click OK Twonky Media v4 4 2 on Macintosh OS X Enable media sharing In Mac OS X start Twonky Media Twonky Media appears In the Basic Se...

Page 42: ...ing In Microsoft Windows start Windows Media Player 11 Windows Media Player appears In the Media Sharing window tick Share my Media and click OK If no network connection is found and you are unable to tick this box click the Networking button to show the Network and Sharing Centre window Set Network discovery to On Set File sharing to On Go back to the Media Sharing window in Windows Media Player ...

Page 43: ... can add more folders to share Click the OK button to add the files to the library You can now enjoy music photos and videos on your TV Change other settings Energy efficient settings 1 While watching TV press the green button 2 Select one of the following settings then press OK Energy saving Applies a combination of picture settings to reduce energy consumption Mute screen Turns off the TV displa...

Page 44: ...pendent enable or disable daylight saving if required for your time zone 1 In the Clock menu select Daylight saving Daylight saving time or Standard time then press OK Daylight saving is enabled or disabled for your time zone Set the clock manually If clock mode is set to Manual set the date and time manually 1 In the Clock menu select Date or Time then press OK 2 Use the Navigation buttons to mak...

Page 45: ... screen When the update is done the TV switches off and back on again automatically Wait for the TV to switch back on do not use the Power switch on the TV If the TV is connected to the Internet the TV displays a message about the availability of new software at start up On screen Help Before updating the on screen Help ensure you have the following An empty USB flash drive The USB flash drive mus...

Page 46: ... power is restored If an error occurs during the update retry the procedure If the error reoccurs contact Philips Consumer Care 1 Switch on the TV 2 Connect the USB flash drive containing the upg Help file to the USB connector on the TV Disconnect all other USB devices from the TV 3 Press 4 Select Setup Software settings Local updates The updates screen appears 5 Select the upg Help file and press...

Page 47: ...to the SAT DVB S connector on the side of the TV This is available on certain models only About cables Overview NonPublish Before you connect devices to the TV verify which connectors are available on the device Connect the device to the TV with the highest quality connection available Good quality cables ensure a good transfer of picture and sound The connections shown in this user manual are rec...

Page 48: ...I ARC functionality This allows output of TV audio to an HDMI ARC compliant device Do not use an HDMI cable longer than 5 metres 16 4 feet Y Pb Pr Use the Component Video Y Pb Pr connection together with an Audio Left and Right connection for sound Match the Y Pb Pr connector colours with the cable plugs when you connect Y Pb Pr can handle High Definition HD TV signals SCART A SCART cable combines...

Page 49: ... or game consoles 5 Stereo audio output to headphones or earphones Bottom NonPublish 1 EXT 1 SCART Analogue audio and video input from analogue or digital devices such as DVD players or game consoles 2 DIGITAL AUDIO OUT Digital audio output to home theatres and other digital audio systems 3 HDMI Digital audio and video input from high definition digital devices such as Blu ray players 4 HDMI ARC I...

Page 50: ...o input from high definition digital devices such as Blu ray players 2 USB Data input from USB storage devices 3 CI Common Interface Slot for a Conditional Access Module CAM 4 SD CARD Slot for an SD memory card Connect devices Blu ray disc player Use an HDMI cable to connect the Blu ray disc player to an HDMI connector on the bottom of the TV ...

Page 51: ... the DVD player to an HDMI connector on the bottom of the TV DVD Recorder First use two antenna cables to connect the antenna to the DVD recorder and the TV Finally use a SCART cable to connect the DVD Recorder to a SCART connector on the bottom of the TV ...

Page 52: ...eo synchronisation sync If the sound does not match with the video on screen you can set a delay on most DVD Home Theatre Systems to match the sound and video EasyLink To automatically mute the TV speakers when content is played from your Home Theatre System enable EasyLink For more information see Connect the TV Use Philips EasyLink Configure TV speakers Page 61 ...

Page 53: ...antenna cables to connect the antenna to the receiver and the TV Finally use a SCART cable to connect the receiver to the back of the TV Dig receiver and DVD R First use three antenna cables to connect the digital receiver and the DVD Recorder to the TV ...

Page 54: ... SCART cable to connect the digital receiver to the TV Finally use two SCART cables to connect the two devices and the TV Dig receiver DVD R and HTS First use three antenna cables to connect the two devices and the TV ...

Page 55: ...es to connect the digital receiver to the DVD Recorder and the DVD Recorder to the TV Then use an HDMI cable to connect the Home Theatre System to the TV Finally use a digital audio cinch cable to connect the Home Theatre System to the TV ...

Page 56: ...devices Game console The most practical connections for a game console are at the side of the TV However more connectors are available at the back of the TV if needed Enable game mode To prevent picture delay set the TV to Game mode 1 Press 2 Select Smart picture Game then press OK 3 Press to exit The most practical connections for a game console are at the side of the TV ...

Page 57: ... On certain models EXT2 is labelled EXT3 Dig camera To view pictures on your digital camera connect it to the USB connector at the side of the TV Switch on the digital camera If the content of your camera does not appear automatically you may need to enable Picture Transfer Protocol PTP on the camera Refer to the camera s user manual for instructions ...

Page 58: ...Pr and Audio L R to connect the camcorder to the back of the TV Channel decoder NonPublish Before using a SCART digital channel decoder select the channel to decode and assign the decoder to the SCART connector 1 Press 2 Select Setup Channel settings Decoder Channel 3 Set the channel you want to decode 4 Select Status then the location of the decoder 5 Press OK ...

Page 59: ...EN 59 English PC NonPublish Connect a computer using one of the following cables HDMI cable DVI HDMI cable HDMI cable and HDMI DVI adaptor ...

Page 60: ... touch standby When you connect your TV to an HDMI CEC compliant device pressing on the TV remote control switches the TV and all connected HDMI devices to standby mode System audio control When you connect your TV to for example an HDMI CEC compliant Home Theatre System HTS your TV speakers automatically mute and audio from the TV plays through the HTS For more information about system audio cont...

Page 61: ...cted device s menu press To switch back to TV control press and select Watch TV To control another device press and select the device from the home menu A summary of EasyLink buttons you can use with the TV remote control is available at Connect the TV Use Philips EasyLink EasyLink buttons Page 61 EasyLink buttons NonPublish Control HDMI CEC compliant devices with the following buttons on the TV r...

Page 62: ... system audio control Thereafter TV audio is streamed through the connected device Amplifier Streams audio through the connected HDMI CEC device If system audio mode is not enabled on the device audio will continue to stream from TV speakers if EasyLink was selected If EasyLink autostart was enabled the TV prompts the connected device to switch to system audio mode Use HDMI ARC The HDMI 1 connecto...

Page 63: ...If a CAM is inserted and subscription fees are paid the TV shows the programme from the digital TV service provider The applications functions content and on screen messages vary by CAM service Insert SD card Memory size NonPublish To download rented videos from Net TV insert an SD memory card into the TV SD card slot Once formatted leave the card permanently in the slot SD memory size Use a blank...

Page 64: ...EN 64 4 Leave the SD card in the slot permanently ...

Page 65: ...urs contact Philips Consumer Care You forgot the code to unlock the child lock feature Enter 8888 The TV menu is in the wrong language Change the TV menu to your preferred language For more information see Set up the TV Change language settings Menu language see Menu language on page 38 When turning the TV on off to standby you hear a creaking sound from the TV chassis No action is required The cr...

Page 66: ...ng the TV See Setup the TV Change other settings TV location Page 44 for more information The computer display on the TV is not stable Check that your PC uses the supported resolution and refresh rate Set the TV picture format to unscaled Sound issues There is a picture but sound quality is poor If no audio signal is detected the TV automatically switches the audio output off this does not indicat...

Page 67: ...nt as described in the storage device s documentation Check that the USB storage device is compatible with the TV Check that the audio and picture file formats are supported by the TV Audio and picture files do not play or display smoothly The transfer performance of the USB storage device may limit the data transfer rate to the TV causing poor playback Network connection issues Applicable to cert...

Page 68: ...h 81 cm 37 inch 94 cm 40 inch 102 cm 46 inch 117 cm Aspect ratio Widescreen 16 9 Panel resolution 1920 x 1080p 100 Hz Pixel Precise HD picture enhancement 1080p 24 25 30 50 60 Hz processing 100 Hz LCD Sound Output power RMS 20 W Incredible Surround Clear Sound Dynamic Bass Enhancement Mono Stereo NICAM Display resolutions NonPublish Computer formats HDMI Resolution refresh rate 640 x 480 60 Hz 800...

Page 69: ...crosoft Windows XP Macrovision Network Media Server for Microsoft Windows Fuppes for Linux uShare for Linux Supported DLNA audio video files WMV wmv video WMV9 VC1 MPEG mp2 mp3 mpg mpeg vob audio MPEG 1 Layer 2 MPEG 1 Layer 3 LPCM AC3 MPEG 4 mp4 video MPEG 4 AVC H 264 L2 CIF MPEG 4 AVC H 264 L4 HD audio AAC LC HE AAC MKV mkv video H 264 audio HE ACC AC3 Connectivity Rear EXT 2 SCART RGB CVBS EXT 3...

Page 70: ...ht 602 mm Depth 242 mm Weight 15 kg estimate 40PFL7605H without stand Width 966 mm Height 593 mm Depth 41 5 mm Weight 13 kg estimate with stand Height 641 mm Depth 242 mm Weight 16 kg estimate 46PFL7605H without stand Width 1103 mm Height 669 mm Depth 42 4 mm Weight 17 8 kg estimate with stand Height 716 mm Depth 265 mm Weight 21 4 kg estimate UMv 3139 137 03594 20100708 ...

Page 71: ...ect antenna 47 connect channel decoder 58 connect PC 59 connect PC network 39 connect power 47 connect USB 31 connectors bottom 49 connectors rear 49 connectors side 50 controls side 15 D decoder 58 default settings 35 demo 35 devices add 21 devices watch 21 digital channels subtitles 30 digital radio 32 dimensions 69 display resolution 68 E EasyLink buttons 61 EasyLink enable 60 EasyLink features...

Page 72: ... 27 O options menu 19 P PC network settings 40 PC network media server 41 PC network wired 39 PC connect 59 picture format 21 picture settings 34 position TV 13 power 68 R rear connectors 49 recycle 10 register product 9 remote control on screen 17 remote control overview 15 rename channels 36 reorder channels 35 S safety 9 Scenea enable 32 Scenea lounge light 22 Scenea upload picture 32 screen ca...

Page 73: ...text digital text 28 teletext dual screen 28 teletext enable 28 teletext enlarge 28 teletext language 38 teletext menu 28 teletext search 28 teletext subpages 28 teletext Table Of Pages 28 U universal access enable 33 V Video store format SD card 25 63 Video store rent videos 25 visually impaired 33 volume adjust 20 volume mute 20 W websites 23 widgets 26 widgets add remove 26 ...

Page 74: ... 2009 Koninklijke Philips Electronics N V All rights reserved Document order number 313913703594 ...

Reviews: