background image

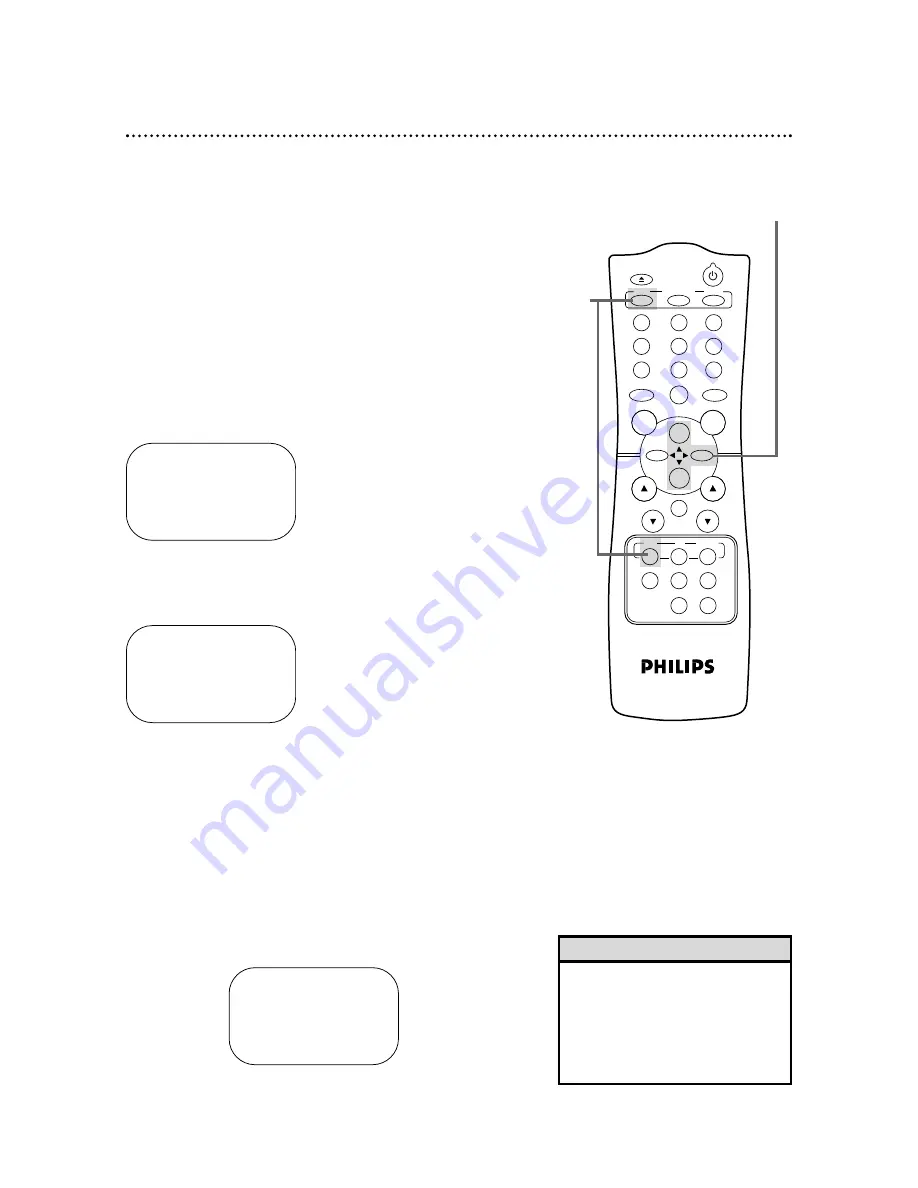
DAILY PROGRAM (MON-FRI)

PROGRAM    -1 2 3 4 5 6 7 8-

SELECT PROGRAM NUMBER

TO END PUSH EXIT

30  Timer Recording

Follow the steps below to program your VCR to record TV pro-
grams while you’re away from home. The VCR will turn itself on,
record, and turn itself off automatically. Before you begin:

Set up the channels at the VCR.  Details are on page 12.

Set the clock.  Details are on page 15.

Put a tape in the VCR. Make sure the tape’s record tab is intact
and the tape is long enough to record the program(s).

Make sure the VCR is in VCR position. The VCR/TV light will
appear on the display panel. If it does not, press the VCR but-
ton, then press the VCR/TV button once.

Do each step within 60 seconds of the previous step.

1

Press the VCR button, then press the MENU button.

SELECT 

op

CHOOSE 

B

PROGRAM
VCR SET UP
TUNER SET UP
SET CLOCK

TO END PUSH EXIT

2

Press the PLAY/

o

button or the STOP/

p

button to select

PROGRAM, then press the F.FWD/

B

button.

SELECT 

op

CHOOSE 

B

ONCE
DAILY
WEEKLY
PROGRAM REVIEW

TO END PUSH EXIT

3

Press the PLAY/

o

button or the STOP/

p

button to select

a ONCE, DAILY, or WEEKLY recording. Then, press the
F.FWD/

B

button.

ONCE: The VCR will record a TV program on any day you
choose, up to 12 months away.

DAILY: The VCR will record the same channel every day from
Monday to Friday – starting at the same time and recording for
the same length of time.

WEEKLY: The VCR will record the same channel on the same
day, at the same time, and for the same length of time every
week.

Daily

Recording
(example)

•  If you need to make a correction

while programming a timer record-
ing, press the CLEAR button until
the cursor is flashing on the item
you want to change. Then enter the
correct information.

Helpful Hint

1

2-3

POWER

EJECT

VCR/TV

SPEED

TIME SEARCH

SLOW

ENTER

1

2

3

4

5

6

7

8

9

0

CH.

VOL.

MEMORY

ALT.CH

REW

PLAY

F.FWD

REC

/OTR

PAUSE

/STILL

STOP

MUTE

VCR

CBL/DBS

TV

MENU

STATUS/EXIT

CLEAR

Summary of Contents for 4-HEAD VIDEO CASSETTE RECORDER VR420CAT - Hook Up Guide

Page 1: ...VR420CAT Video Cassette Recorder Owner s Manual ...

Page 2: ...ber to get the most from your PHILIPS product you must return your Warranty Registration Card within 10 days So please mail it to us right now Know these safetysymbols This bolt of lightning indi cates uninsulated material within your unit may cause an electrical shock For the safety of everyone in your household please do not remove product covering The exclamation point calls attention to featur...

Page 3: ...0 40 of the National Electrical Code which provides guidelines for proper grounding in particular specifying that the cable ground shall be connected to the grounding system of the building as close to the point of cable entry as possible Declaration of Conformity Model Number VR420CAT Trade Name Philips Responsible Party Philips Consumer Electronics P O Box 14810 Knoxville TN 37914 1810 865 521 4...

Page 4: ... a Cable Box Direct Broadcast System 19 Description of Controls Remote Control Buttons 20 21 On Screen Status Displays 22 VCR Display Panel 23 Front Panel 24 Rear Panel 25 Basic Operations Playing 26 Recording 27 Recording Recording One Channel Watching Another 28 One Touch Recording 29 Timer Recording 30 33 Rerecording Tape Duplication 34 Playing Repeat Play 35 Real Time Counter Memory 36 Time Se...

Page 5: ... to ensure that recordings are not accidentally erased 1 To prevent recording break off the tab with a screwdriver 2 To allow recording cover the hole with cellophane tape Recording Prevention 1 2 1 2 3 Battery Safety Battery Usage CAUTION To prevent battery leakage that may result in bodily injury or damage to the unit Install ALL batteries correctly with the and markings on the battery aligned a...

Page 6: ...low If you have a Cable Box or a Direct Broadcast System please see pages eight nine If you have a Stereo TV please see page 10 After you hook up the VCR go to page 11 to turn on the VCR ANTENNA IN Jack on back of TV Cable 75 ohm Back of VCR Antenna Indoor Outdoor 300 ohm 1 Disconnect the antenna or cable from your TV 2 Connect the antenna or cable to the ANT enna IN Jack of your VCR Cable 75 ohm ...

Page 7: ... may use either a snap on type supplied or screw on type of coaxial cable whichever you prefer 5 Set the CH3 CH4 switch on the back of the VCR to CH3 or CH4 whichever channel is not used or least used in your area Set the TV to the same channel For example when playing a tape if the CH3 CH4 switch is set to CH3 the TV should be on channel 03 Hookups Without a Cable Box Direct Broadcast System cont...

Page 8: ...hannel This is step 5 on page 31 Leave the Cable Box DBS on for a timer recording ANT AUDIO VIDEO IN OUT CH3 CH4 OUT IN OUT IN 75 ANT CABLE TV s ANTENNA IN Jack Cable Box DBS VCR Recording Viewing Any Channel Connections 1 With the VCR on and in VCR position the VCR TV light will appear on the dis play panel use the CH annel o p buttons to set the VCR to the Cable Box DBS output channel channel 03...

Page 9: ...rd at the VCR Start the recording 2 Press the VCR TV button once to put the VCR in TV position The VCR TV light will disappear 3 Select the channel you want to watch at the Cable Box DBS TV s ANTENNA IN Jack Cable Box DBS VCR When you play a tape make sure the Cable Box DBS is set to the same channel as the CH3 CH4 switch on the VCR Set the TV to the Cable Box DBS output channel 03 or 04 Helpful H...

Page 10: ...her end of the audio cable to the AUDIO IN Jack on your TV If your TV has Right and Left AUDIO IN Jacks you must use a Y splitter audio cable as illustrated to deliver audio to the TV s right and left channels 4 Turn on your TV making sure it is in Line Input mode This might be referred to as the TV s Audio Video In channel or the Auxiliary In channel Please refer to your TV owner s manual for det...

Page 11: ...u receive You can still select other channel numbers using the Number buttons To skip this feature and play a tape immediately insert a tape with its record tab removed Or to skip step 3 press the MENU button All on screen displays will be in English To skip step 5 press the STOP p but ton Channels will not be pro grammed and CHANNELS NOT SET will appear on the screen If you try to program channel...

Page 12: ...TOP p button to select TUNER SET UP then press the F FWD B button SELECT op CHOOSE B AUTO PROGRAMMING ADD DELETE CH CH MEMORY REVIEW TO END PUSH EXIT 3 Press the PLAY o button or the STOP p button to select AUTO PROGRAMMING then press the F FWD B but ton The VCR distinguishes between TV channels and cable chan nels and the VCR will memorize all the channels you receive 4 Wait for a few minutes whi...

Page 13: ... DELETE CH then press the F FWD B button 4 Press the PLAY o button or the STOP p button until the channel number you want to add or delete appears beside the arrow SELECT op ADD DELETE B 16 DELETED 17 ADDED 18 ADDED 19 ADDED 20 ADDED TO END PUSH EXIT 5 Press the F FWD B button to select ADDED or DELET ED Repeat steps 4 and 5 until you have added or deleted all the channels you wanted to add or del...

Page 14: ...g channels Then press the REW ind s button to return to the first screen of channels If there are no more channels pressing the F FWD B button will take you back to the previous menu If you do not press any buttons within 10 seconds you will either go to the next screen of channels or you will return to the previous menu 4 Press the STATUS EXIT button once or twice to exit 1 Press the VCR button t...

Page 15: ...T button Enter a 0 before a single digit number Entries that do not match the VCR s clock or calendar will cause a question mark to appear on the screen To make corrections press the CLEAR button until the space for the number you want to correct is flashing Then enter the correct number To see the current time on the TV screen press the STATUS EXIT but ton Details are on page 22 Power failures th...

Page 16: ... may program the VCR so its clock will automatically move forward one hour in April and turn back one hour in October Daylight Savings Time is ON when you receive your VCR Turn Daylight Savings Time ON or OFF by following the steps below Before you begin Make sure the clock is set Details are on page 15 3 Press the PLAY o button or the STOP p button to select DAYLIGHT SVG TIME Then press the F FWD...

Page 17: ...SH EXIT SELECT op CHOOSE B REPEAT PLAY OFF ON SCREEN MODE LANGUAGE BLUE BACKGROUND ON TO END PUSH EXIT If you accidentally select Spanish and need English 1 Press the VCR button then press the MENU button 2 Press the PLAY o button or the STOP p button to select PREPARE EL VCR then press the F FWD B button 3 Press the PLAY o button or the STOP p button to select LENGUA JE then press the F FWD B but...

Page 18: ...low 1 Point the remote control at your TV and press the TV button Then press the POWER button If your TV turns on or off try the other TV buttons see pages 20 21 If your TV doesn t turn on or off or if the other buttons don t work go to step 2 2 Find the brand of your TV on the list below and remem ber the two digit number beside it 6 Repeat step 1 If the remote control works your TV you re fin is...

Page 19: ... turn off or if the other buttons don t work go to step 2 2 Find the brand of your Cable Box or DBS on the lists below and remember the two digit number beside it 6 Repeat step 1 If the remote control works your Cable Box or DBS you re finished If the remote control still doesn t work your Cable Box or DBS repeat steps 3 5 using a different code for your brand if available There is no guarantee th...

Page 20: ... Antenna Users Enter channel numbers as a two digit number for the quickest results You may only select channels 2 69 For example to select channel 5 press 0 5 If you only press the Number 5 button channel 5 will appear after a brief delay PLAY o Button Press to play a tape press to release Slow Search or Still mode and return to normal playback Details are on page 38 Press to select an item in th...

Page 21: ...menus CH annel o p Buttons Press to change channels at the VCR TV Cable Box or Direct Broadcast System ALT CH Alternate Channel Button Press while in TV position to return to the TV channel you were viewing immediately before switching to your current channel If you press the ALT CH button while in VCR position the TV will change to the channel you last selected before choosing channel 3 or 4 to u...

Page 22: ... on the screen You must press the STATUS EXIT button to remove it Portions of the status display also may appear when you press other function buttons If you select STATUS ON then select COUNTER ONLY OFF Whenever you press the STOP p button or the PLAY o button the status display will appear for five seconds Portions of the status display also may appear when you press other function buttons If yo...

Page 23: ... Light This light appears during a record ing It flashes when a recording is paused CST IN Cassette Inside Light This light appears when there is a tape in the VCR POWER Light This light appears when the power is on TIMER Light This light glows when the VCR is turned off to set a timer recording during a timer recording or during a One Touch Recording It flashes if the power is off for a timer rec...

Page 24: ...8 Press to select an item in the menu REW ind Button When playback is stopped press to rewind the tape at high speed During playback press to rewind the tape while the picture stays on the screen Details are on page 38 Press to return to a previous menu STOP EJECT Button Press once to stop the tape When playback is stopped press to eject the tape Press to select an item in the menu F FWD Fast Forw...

Page 25: ...th your VCR Details are on pages six nine OUT Jack Use the supplied RF coaxi al cable to connect this jack to the ANTENNA IN Jack on your TV Cable Box or Direct Broadcast System Details are on pages six nine VIDEO OUT Jack Connect a video cable going to the VIDEO IN Jack of a camcorder another VCR or an audio visual system monitor laser disc play er digital video disc player etc here Details are o...

Page 26: ...r on the display panel If the tape s record tab has been removed playback will start automatically 6 Press the EJECT button to remove the tape 3 If playback does not start automatically press the VCR button then press the PLAY o button 4 Press the STOP p button to stop playback 5 Press the REW ind button to rewind the tape 1Turn on the TV 2Insert a tape in the VCR 6 3 4 5 POWER EJECT VCR TV SPEED ...

Page 27: ... on pages 28 34 You can change the tape speed dur ing a recording but some distortion will appear on the tape The VCR will record in a preset volume Helpful Hints 4 Press the VCR button then press the SPEED button repeatedly until the desired tape speed appears briefly on the screen Details about tape speed are on page 32 5 Use the CH annel o p buttons or the Number buttons to select the channel t...

Page 28: ...t the channel you want to watch at the TV If the VCR remote control doesn t work your TV use the TV remote control to select the channel 5 To return to the channel being recorded press the TV but ton then use the Number buttons to select channel 03 or 04 at the TV If the VCR remote control doesn t operate your TV use the TV remote control to select channel 03 or 04 7 Press the VCR TV button to put...

Page 29: ...p button To cancel the OTR but continue recording press the REC ord OTR button repeatedly until REC appears in the upper left corner of the TV screen STATUS must be set to ON See page 22 for details The RECORD light will remain on the display panel of the VCR but the TIMER light will disappear To check the time remaining for an OTR after the OTR has been set press the STATUS EXIT button To change ...

Page 30: ...2 Press the PLAY o button or the STOP p button to select PROGRAM then press the F FWD B button SELECT op CHOOSE B ONCE DAILY WEEKLY PROGRAM REVIEW TO END PUSH EXIT 3 Press the PLAY o button or the STOP p button to select a ONCE DAILY or WEEKLY recording Then press the F FWD B button ONCE The VCR will record a TV program on any day you choose up to 12 months away DAILY The VCR will record the same ...

Page 31: ...lay There also may be a brief delay when you select channels 10 11 and 12 If you want to select channels 100 and above enter channel numbers as a three digit number For example to select channel 117 press 1 1 7 Antenna Users enter channel numbers as a two digit number for the quickest results For example to select channel 5 press 0 5 If you only press the Number 5 button channel 5 will be selected...

Page 32: ...ER light will flash if there is no tape in the VCR If the timer recording will take place several hours or days from now you may use the VCR until time for the recording Turn off the VCR a few minutes before the recording starts If you forget to turn off the VCR PLEASE TURN OFF VCR FOR TIMER RECORDING flashes on your TV screen two minutes before a timer recording is set to begin Press the CLEAR bu...

Page 33: ...all timer recordings have been displayed Then the menu will disappear 5 To cancel the timer recording displayed press the CLEAR button Either the display will disappear or information about other timer recordings will appear If you do not press any other buttons the display will disappear after all timer recordings have been displayed 5 2 4 1 CLASH may flash on the screen when you finish setting a...

Page 34: ...u use the AUDIO and VIDEO IN Jacks on the back of VCR 2 press Number buttons 0 0 1 at step 5 AV REAR will appear on the TV screen If you use the AUDIO and VIDEO In Jacks on the front of VCR 2 press Number buttons 0 0 2 at step 5 AV FRONT will appear on the TV screen Unauthorized recording of copy righted television programs video tapes or other materials may infringe on the rights of copyright own...

Page 35: ... FWD B button so that OFF appears beside REPEAT PLAY Press the STATUS EXIT button The real time counter memory does not function during Repeat Play Helpful Hints 3 Press the PLAY o button or the STOP p button to select REPEAT PLAY 2 4 5 1 SELECT op CHOOSE B PROGRAM VCR SET UP TUNER SET UP SET CLOCK TO END PUSH EXIT SELECT op CHOOSE B REPEAT PLAY OFF ON SCREEN MODE LANGUAGE BLUE BACKGROUND ON TO EN...

Page 36: ...stop the tape 3 Press the STATUS EXIT button to see the status display 4 While the status display is on the screen press the CLEAR button to reset the real time counter to zero STOP 1 08 PM CH10 SLP 0 00 00 5 While the real time counter is on the screen press the MEMORY button so that M appears beside the counter STOP 1 08 PM CH10 SLP M 0 00 00 6 To go to a tape location where the real time counte...

Page 37: ...REW ind button The VCR will skip over the specified length of time then begin playback If you want to search for more than 59 minutes you must enter the length of time in hours and minutes For example to search forward 70 minutes press 1 1 0 at step 2 You can not do a Time Search while recording To remove the Time Search display press the TIME SEARCH button again To cancel a Time Search that is in...

Page 38: ...ture and return to playback press the PLAY o button or press the PAUSE STILL button again Viewing a Slow Motion Picture 1 During tape playback press the SLOW button The tape will play in slow motion 2 To release Slow mode and return to normal playback press the PLAY o button or press the SLOW button again Slow and Still modes will automati cally switch to Stop mode after five minutes to protect th...

Page 39: ...ape automatically or shut itself off Playback will continue as set for Repeat Play Tape Eject You can eject a tape with the VCR power on or off but the VCR must be plugged in If you have set a timer recording you can only eject a tape with the VCR power on Make sure you insert a tape and turn off the VCR power for the timer recording Automatic Tracking Adjustment The VCR adjusts tracking automatic...

Page 40: ...k signal is received set BLUE BACKGROUND to ON The screen will be blue and the sound will be muted Or if you want to receive the weak signal set BLUE BACK GROUND to OFF When you select a channel that is receiving a weak signal you will see and hear the static in the TV program ming The channel number will not appear on the screen when you select a weak channel and you can not access the VCR s sta ...

Page 41: ...trol the small electronic unit that came with your VCR allows you to operate your VCR from a distance RF coaxial cable The black cable supplied with your VCR Use it to connect your VCR to your TV or Cable Box or DBS The supplied cable is a snap on type However you may use a screw on type if you prefer Special Effects forward and reverse searching a still picture slow motion playback Tape Speeds ho...

Page 42: ...imer recording you turn off the VCR power without putting a tape in the VCR the TIMER light will blink If the record tab on a tape is missing the VCR will eject the tape The TIMER light will blink Make sure the VCR power is off Make sure you have set the clock Details are on page 15 The VCR may not perform or continue a timer recording if a power interruption of more than one minute occurs If you ...

Page 43: ...dio and video cables to connect your DBS VCR and TV you may have to put your VCR in Line Input mode channel 001 or 002 Line Input mode If you accidentally enter Line Input mode AV FRONT or AV REAR will appear on your TV screen briefly press the CH annel o p buttons or use the Number buttons to select another channel Cleaning the Video Heads Your VCR automatically cleans the video heads each time y...

Page 44: ...E AVAILABLE Warranty exchange is available in all countries where the product is officially distributed by Philips Consumer Electronics In countries where Philips Consumer Electronics does not distribute the product the local Philips service organization will attempt to exchange the product although there may be a delay if the appropriate product is not readily available MAKE SURE YOU KEEP Please ...

Page 45: ...ils call 1 800 531 0039 3 Put the completed Exchange Form a copy of the original sales receipt and the proper payment in an envelope Do not staple or clip these items together Label the envelope Return Documents Enclosed Place this enve lope in the box with the product 4 Seal the box with packing tape and return the product via United Parcel Service UPS insured and freight pre paid to Philips Reco...

Page 46: ...ne touch recording 29 out jack 6 9 25 pause button 24 pause still button 20 27 38 play K button 20 24 26 38 playing 26 power button 20 24 cord 25 light 23 real time counter 36 rear panel 25 rec otr button 20 27 29 record button 24 27 29 record light 23 recording basic 27 one channel watching another 28 prevention 5 timer 30 33 remote control buttons 20 21 sensor 24 repeat play 35 rerecording 34 re...

Page 47: ......

Page 48: ...way P O Box 555 Jefferson City TN 37760 1 800 851 8885 VHS Cassette Rewinder M61117 Three Cassette Storage Cases plastic Fits VHS and Beta cassettes M61104 Six High grade VHS T 120 Cassettes MHG1206 Monaural Audio and Video Cables 6 feet Color coded for easy connection M61103 RF Coaxial Cable 75 ohm 4835 323 27011 Remote Control 4835 218 37309 Two AA Batteries 4835 138 17012 This owner s manual is...

Reviews: