background image

22

Y

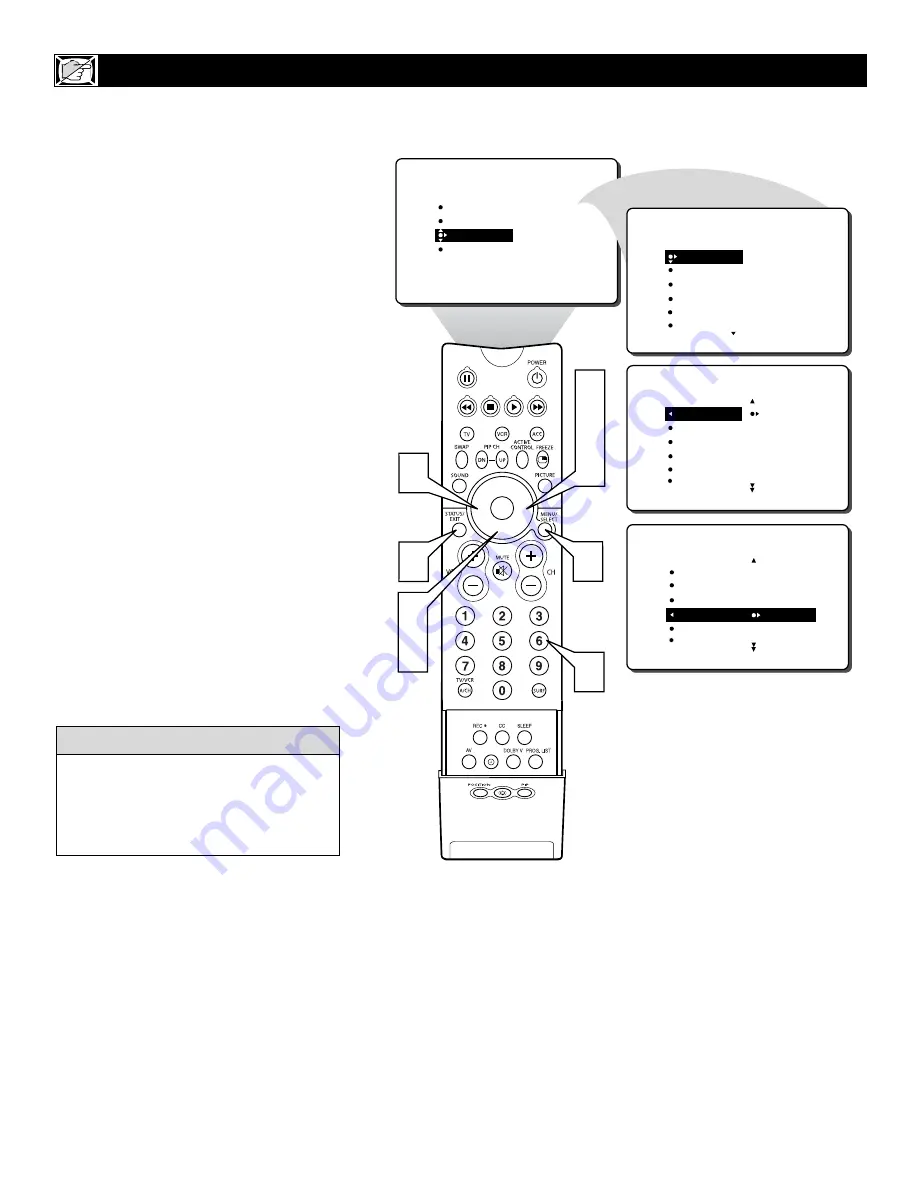
ou can select a specific channel that the
television will tune to when the timer

turns the set ON. Follow these steps to select
the channel.

1

Press the MENU button 

on the

remote control to show the onscreen
menu.

2

Press the CURSOR DOWN button

twice to highlight FEATURES.

3

Press the CURSOR RIGHT button 

and

the menu will shift to the left. TIMER will
be highlighted.

4

With TIMER selected, press the CUR-
SOR RIGHT button 

again to shift the

display left. 

5

Press the CURSOR DOWN button

to highlight the CHANNEL Control.

6

Press the NUMBERED buttons 

to

enter the desired start-up channel. 

Or,

press the CURSOR RIGHT or CUR-
SOR LEFT button

repeatedly to enter

the start-up channel you want.

NOTE:

The 

ACTIVATE Control

(page 23)

must be set to ONCE or DAILY for this
Channel Control to take effect.

7

Press the STATUS/EXIT button 

to

remove the menu from the screen.

S

ETTING THE

TV 

TO

S

TARTUP ON A

S

PECIFIC

C

HANNEL

U

SING THE

C

HANNEL

C

ONTROL

PICTURE

SOUND

FEATURES

INSTALL

TIMER
ACTIVE CTRL
AutoLock
PIP
CLOSED CAP

FEATURES

TIME

               _ _:_ _ AM

START TIME
STOP TIME
CHANNEL
ACTIVATE

TIMER

FEATURES

TIME               

START TIME   


STOP TIME    


CHANNEL           12


ACTIVATE

TIMER

7

1

3
4
6

2
5

6

6

TIMER

ACTIVE CTRL
AutoLock
PIP
CLOSED CAP

TIME
START TIME
STOP TIME
CHANNEL
ACTIVATE

FEATURES

The ACTIVATE Control must be set to
ONCE or DAILY for the television to shut
itself off at the specified time. See page 23
for more details about the ACTIVATE
Control.

H

ELPFUL

H

INT

Summary of Contents for 34PW862H99

Page 1: ...p Call us Philips representatives are ready to help you with any ques tions about your new product We can guide you through Connections First time Setup or any of the Features We want you to start enjoying your new product right away CALL US BEFORE YOU CONSIDER RETURNING THE PRODUCT 1 800 531 0039 or Visit us on the web at www philips com ...

Page 2: ...ause an elec trical shock For the safety of everyone in your household please do not remove product cov ering s The exclamation point calls attention to features for which you should read the enclosed literature closely to prevent operating and maintenance problems WARNING TO PREVENT FIRE OR SHOCK HAZARD DO NOT EXPOSE THIS EQUIP MENT TO RAIN OR MOISTURE CAUTION To prevent electric shock match wide...

Page 3: ...e should be serviced by qualified service personnel when A The power supply cord or the plug has been damaged or B Objects have fallen or liquid has been spilled into the appli ance or C The appliance has been exposed to rain or D The appliance does not appear to operate normally or exhibits a marked change in performance or E The appliance has been dropped or the enclosure damaged 17 Tilt Stabili...

Page 4: ...w to Use the Installation Features 3 4 Using the Language Control 3 Setting the Tuner Mode Control 3 How to Automatically Program Channels 3 How to Add and Delete Channels 4 How to set the AutoChron Feature Clock 4 How to Name Label Channels 4 IMPORTANT NOTE This owner s manual is used with several different television models Not all features and drawings discussed in this manual will necessar ily...

Page 5: ...the picture quality by improving the contrast between the darkest and brightest parts of the picture Eye Fidelity also know as Digital Options give a choice of two different scanning technics Progressive Scan or Interlaced Progressive Scan doubles the number of visible lines per field by displaying all picture frame lines at once eliminating any picture flicker The Interlaced mode provides a doubl...

Page 6: ...OR DOWN button to select ENGLISH ESPANOL Spanish or FRANCAIS French 6 Press the STATUS EXIT button to clear the menu from the screen HOW TO USE THE LANGUAGE CONTROL Remember the LANGUAGE control makes only the TV s onscreen MENU items appear in English Spanish or French text It does not change the other onscreen text features such as Closed Captioning CC with TV shows HELPFUL HINT PICTURE SOUND FE...

Page 7: ... control set to AUTO Auto Program see below will detect whether or not cable input is present If however you want to set the TUNER MODE to CABLE or ANTENNA press the CURSOR UP or CURSOR DOWN button until either CABLE or ANTENNA is high lighted 7 Press the STATUS EXIT button to clear the menu from the screen HOW TO USE THE TUNER MODE CONTROL When CABLE is selected channels 1 125 are available When ...

Page 8: ...ess the STATUS EXIT button to clear the menu from the screen HOW TO AUTOMATICALLY PROGRAM CHANNELS After you ve run Auto Program check out the results Press the CHANNEL or button and see which channels you can select Remember an antenna or cable TV signal must first be connected to your TV see instructions for making connections on page 1 of this guide HELPFUL HINT PICTURE SOUND FEATURES INSTALL B...
Page 9: ...e channel you ve marked SKIPPED will not appear when you are changing from channel to channel while watching TV NOTE When you want to add a channel that has been marked SKIPPED press the CUR SOR UP or CURSOR DOWN button to highlight the channel then press the CUR SOR RIGHT button to remove the word SKIPPED HOW TO ADD OR DELETE CHANNELS PICTURE SOUND FEATURES INSTALL BRIGHTNESS COLOR PICTURE SHARPN...

Page 10: ...RSOR DOWN button to scroll through a list of options for the first char acter A through Z 0 through 9 Press the CURSOR RIGHT button and repeat for the second third fourth and fifth characters 7 After you have selected a name for the channel press the MENU button to save the name in the TV s memory 8 Press the STATUS EXIT button to clear the menu from the screen HOW TO AUTOMATICALLY PROGRAM CHANNEL...

Page 11: ...toChron feature is set to the AUTO position the TV will scan the channels for a PBS channel to set the clock automatically It may take SEVERAL seconds before the TV powers itself ON HOW TO SET THE CLOCK WITH AUTOCHRON 7 9 1 3 5 6 8 9 2 4 7 9 TUNER MODE AUTO PROGRAM CHANNEL EDIT AutoChron NAME INSTALL SET TIME AUTO MANUAL TUNER MODE AUTO PROGRAM CHANNEL EDIT AutoChron NAME INSTALL ENTER TIME 1_ __ ...

Page 12: ...olor PICTURE improves the detail of the lightest parts of the picture SHARPNESS improves the detail in the picture TINT adjusts the picture to obtain natural skin tones COLOR TEMP offers NORMAL COOL or WARM picture preferences NORMAL keeps whites white COOL makes whites bluish WARM makes whites reddish DIGITAL OPTIONS Progress Scan or Interlaced 1050i Mode PROGRESSIVE SCAN doubles the number of pi...

Page 13: ...utton to adjust the TRE BLE high frequency level of the tele vision s sound 5 After adjusting the TREBLE control press the CURSOR DOWN button to select another sound adjustment BASS or BALANCE 6 Press the CURSOR RIGHT or CUR SOR LEFT button to adjust the selected control 7 Press the STATUS EXIT button to remove the menu from the screen ADJUSTING THE TREBLE BASS AND BALANCE CONTROLS PICTURE SOUND F...

Page 14: ...Press the CURSOR DOWN button once to highlight SOUND 3 Press the CURSOR RIGHT button and the menu will shift to the left TREBLE will be highlighted and an adjustment bar will be shown to the right 4 Press the CURSOR DOWN button repeatedly until AVL is highlighted 5 Press the CURSOR RIGHT or CUR SOR LEFT button to toggle AVL ON or OFF 6 Press the STATUS EXIT button to remove the menu from the scree...

Page 15: ...u from the screen 7 You can also change the INCR SUR ROUND onscreen menu control set tings by pressing the DOLBY V but ton on the remote control HOW TO USE THE INCREDIBLE SURROUND CONTROL PICTURE SOUND FEATURES INSTALL TREBLE BASS BALANCE AVL INCR SURROUND TREBLE BASS BALANCE AVL ON INCR SURROUND STEREO SOUND If the signal is in STEREO choose from INCR SURROUND STEREO INCR SURROUND INCR SURROUND I...

Page 16: ... STEREO MONO SOUND 6 1 3 5 2 4 5 TREBLE 30 BASS BALANCE AVL INCR SURROUND SOUND An SAP is an additional part of the stereo broadcast system Sent as a third audio channel an SAP can be heard apart from the current TV program sound TV stations are free to use SAP for any number of purposes If an SAP signal is not present with a select ed program the SAP option cannot be select ed Also if SAP is sele...

Page 17: ...edly until AUDIO OUT is high lighted 5 Press the CURSOR RIGHT or CUR SOR LEFT button to select FIXED or VARIABLE 6 Press the STATUS EXIT button to remove the menu from the screen HOW TO USE THE AUDIO OUT CONTROL PICTURE SOUND FEATURES INSTALL TREBLE BASS BALANCE AVL INCR SURROUND AVL INCR SURROUND STEREO SAP AUDIO OUT FIXED SOUND OR AVL INCR SURROUND STEREO SAP AUDIO OUT VARIABLE SOUND 6 1 3 5 2 4...

Page 18: ...an adjustment bar will be shown to the right 4 Press the CURSOR DOWN button repeatedly until SPEAKERS is high lighted 5 Press the CURSOR RIGHT or CUR SOR LEFT button to turn the televi sion s speakers ON or OFF 6 Press the STATUS EXIT button to remove the menu from the screen HOW TO TURN THE TV SPEAKERS ON OR OFF PICTURE SOUND FEATURES INSTALL TREBLE BASS BALANCE AVL INCR SURROUND INCR SURROUND ST...

Page 19: ...Press the CURSOR RIGHT button to move to the AM or PM position 9 Press the CURSOR UP or DOWN button to set AM or PM Press the STATUS EXIT button to remove the menu from the screen SETTING THE TV CLOCK USING THE TIMER CONTROL PICTURE SOUND FEATURES INSTALL TIMER ACTIVE CTRL AutoLock PIP CLOSED CAP FEATURES TIME _ _ _ _ AM START TIME STOP TIME CHANNEL ACTIVATE TIMER TIME 10 30 AM START TIME STOP TIM...

Page 20: ...R RIGHT button to move to the AM or PM position Press the CURSOR UP or DOWN button to set AM or PM NOTE The ACTIVATE Control page 23 must be set to ONCE or DAILY for the START TIME Control to take effect Press the STATUS EXIT button to remove the menu from the screen SETTING THE TV TO TURN ITSELF ON USING THE START TIME CONTROL PICTURE SOUND FEATURES INSTALL TIMER ACTIVE CTRL AutoLock PIP CLOSED C...

Page 21: ... position Press the CURSOR UP or DOWN button to set AM or PM NOTE The ACTIVATE Control page 23 must be set to ONCE or DAILY for the STOP TIME Control to take effect Press the STATUS EXIT button to remove the menu from the screen SETTING THE TV TO TURN ITSELF OFF USING THE STOP TIME CONTROL PICTURE SOUND FEATURES INSTALL TIMER ACTIVE CTRL AutoLock PIP CLOSED CAP FEATURES TIME _ _ _ _ AM START TIME ...

Page 22: ... or CUR SOR LEFT button repeatedly to enter the start up channel you want NOTE The ACTIVATE Control page 23 must be set to ONCE or DAILY for this Channel Control to take effect 7 Press the STATUS EXIT button to remove the menu from the screen SETTING THE TV TO STARTUP ON A SPECIFIC CHANNEL USING THE CHANNEL CONTROL PICTURE SOUND FEATURES INSTALL TIMER ACTIVE CTRL AutoLock PIP CLOSED CAP FEATURES T...

Page 23: ...O ACTIVATE THE TIMER CONTROL USING THE ACTIVATE CONTROL PICTURE SOUND FEATURES INSTALL TIMER ACTIVE CTRL AutoLock PIP CLOSED CAP FEATURES TIME _ _ _ _ AM START TIME STOP TIME CHANNEL ACTIVATE TIMER FEATURES TIME START TIME STOP TIME CHANNEL ACTIVATE OFF TIMER ACTIVATE ONCE OR ACTIVATE DAILY OR 7 1 3 4 6 2 5 6 TIMER ACTIVE CTRL AutoLock PIP CLOSED CAP TIME START TIME STOP TIME CHANNEL ACTIVATE FEAT...

Page 24: ...ght the DISPLAY Control 6 Press the CURSOR RIGHT or CUR SOR LEFT button repeatedly to select ON or OFF 7 Press the STATUS EXIT button to remove the menu from the screen HOW TO VIEW THE TIME USING THE DISPLAY CONTROL PICTURE SOUND FEATURES INSTALL TIMER ACTIVE CTRL AutoLock PIP CLOSED CAP FEATURES TIME _ _ _ _ AM START TIME STOP TIME CHANNEL ACTIVATE TIMER FEATURES START TIME STOP TIME CHANNEL ACTI...

Page 25: ...highlighted 5 Press the CURSOR RIGHT or CUR SOR LEFT button repeatedly to tog gle the ACTIVE CONTROL ON or OFF 6 Press the STATUS EXIT button to remove the menu from the screen 7 You can also press the ACTIVE CONTROL button on the remote control to toggle the ACTIVE CON TROL ON or OFF HOW TO USE THE ACTIVE CONTROL PICTURE SOUND FEATURES INSTALL TIMER ACTIVE CTRL AutoLock PIP CLOSED CAP FEATURES TI...

Page 26: ...is type of pro gramming contains one or more of the follow ing Moderate violence V some sexual situa tions S infrequent coarse language L or some suggestive dialogue D TV 14 Parents Strongly Cautioned This program contains some material that many parents would find unsuitable for children under 14 years of age This type of programming contains one or more of the following intense violence V intens...

Page 27: ...3 5 2 4 5 6 7 8 9 PICTURE SOUND FEATURES INSTALL TIMER ACTIVE CTRL AutoLock PIP CLOSED CAP TIMER ACTIVE CTRL AutoLock PIP CLOSED CAP FEATURES ACCESS CODE TIMER ACTIVE CTRL AutoLock PIP CLOSED CAP FEATURES ENTER NEW CODE TIMER ACTIVE CTRL AutoLock PIP CLOSED CAP FEATURES CONFIRM CODE TIMER ACTIVE CTRL AutoLock PIP CLOSED CAP FEATURES CONFIRM CODE X X X X CORRECT TIMER ACTIVE CTRL AutoLock PIP CLOSE...

Page 28: ...K PICTURE SOUND FEATURES INSTALL TIMER ACTIVE CTRL AutoLock PIP CLOSED CAP AutoLock FEATURES BLOCK CHANNEL SETUP CODE MOVIE RATING TV RATING BLOCK OPTIONS 12 13 14 15 16 AutoLock FEATURES BLOCK CHANNEL SETUP CODE MOVIE RATING TV RATING BLOCK OPTIONS 12 13 14 15 16 Channel 12 Blocked by AutoLock CHANNEL BLOCKING Access code 10 1 3 5 7 9 2 4 8 6 8 TIMER ACTIVE CTRL AutoLock PIP CLOSED CAP FEATURES T...

Page 29: ...ams with that rating from being seen Press the STATUS EXIT button to remove the menu from the screen HOW TO BLOCK PROGRAMMING BASED ON MOVIE RATINGS 11 1 3 5 8 10 2 4 7 9 6 PICTURE SOUND FEATURES INSTALL TIMER ACTIVE CTRL AutoLock PIP CLOSED CAP TIMER ACTIVE CTRL AutoLock PIP CLOSED CAP FEATURES ACCESS CODE TIMER ACTIVE CTRL AutoLock PIP CLOSED CAP FEATURES ACCESS CODE TIMER ACTIVE CTRL AutoLock P...

Page 30: ... to page 30 for definitions To access these subratings with the main rating selected press the CURSOR RIGHT button Then repeat steps 9 and 10 to turn the sub rat ings ON or OFF Press the STATUS EXIT button to remove the menu from the screen HOW TO BLOCK PROGRAMMING BASED ON TV RATINGS 11 1 3 5 8 10 2 4 7 9 10 9 6 PICTURE SOUND FEATURES INSTALL TIMER ACTIVE CTRL AutoLock PIP CLOSED CAP TIMER ACTIVE...

Page 31: ...CURSOR RIGHT button to enter the BLOCK OPTIONS menu BLOCKING will be highlighted 9 Press the CURSOR RIGHT or LEFT button to toggle BLOCKING ON or OFF Press the STATUS EXIT button to remove the menu from the screen OTHER AUTOLOCK BLOCKING OPTIONS BLOCKING CONTROL 10 1 3 5 8 9 2 4 7 9 6 PICTURE SOUND FEATURES INSTALL TIMER ACTIVE CTRL AutoLock PIP CLOSED CAP TIMER ACTIVE CTRL AutoLock PIP CLOSED CAP...

Page 32: ... 9 Press the CURSOR DOWN button to highlight either the BLOCK UNRATED or NO RATING option Press the CURSOR RIGHT or LEFT button to toggle either the BLOCK UNRATED or NO RATING ON or OFF Press the STATUS EXIT button to remove the menu from the screen OTHER AUTOLOCK BLOCKING OPTIONS UNRATED AND NO RATING 11 1 3 5 8 10 2 4 7 9 10 6 PICTURE SOUND FEATURES INSTALL TIMER ACTIVE CTRL AutoLock PIP CLOSED ...

Page 33: ... your selections 2 After a few seconds the settings will leave the screen automatically or you can press the STATUS EXIT button a third time to remove them from the screen HOW TO REVIEW THE AUTOLOCK STATUS SCREEN MOVIE RATING R NC17 X BLOCK UNRATED NO RATING TV RATING Y7 PG 14 MA ON ON 1 2 The AutoLock Status screen will only appear if the BLOCKING option is set to ON For details see page 32 HELPF...

Page 34: ...nu from the screen HOW TO USE THE CLOSED CAPTIONING CONTROL PICTURE SOUND FEATURES INSTALL TIMER ACTIVE CTRL AutoLock PIP CLOSED CAP FEATURES TIMER ACTIVE CTRL AutoLock PIP CLOSED CAP CLOSED CAP CAPTION MODE CC DISPLAY FEATURES CAPTION MPDE CC DISPLAY CC1 CC2 CC3 CC4 CC MUTE CLOSED CAP CAPTION MODE CC DISPLAY FEATURES CC1 CC2 CC3 CC4 CC MUTE CC1 CC2 CC3 CC4 CC MUTE TXT1 TXT2 TXT3 TXT4 8 1 3 5 6 2 ...

Page 35: ...gle among the six screen format sizes AUTO 4 3 ZOOM 14 9 ZOOM 16 9 SUBTITLE ZOOM SUPER WIDE or WIDE SCREEN 6 Press the STATUS EXIT button to remove the menu from the screen HOW TO USE THE SCREEN FORMAT CONTROL FORMAT 4 3 FORMAT ZOOM 14 9 FORMAT SUBTITLE ZOOM FORMAT SUPERWIDE FORMAT WIDE SCREEN FORMAT ZOOM 16 9 Normal Up Down Use the CURSOR UP or DOWN buttons to move pan the picture up or down in s...

Page 36: ...shift to the left 4 Press the CURSOR DOWN button repeatedly until the ROTATION con trol is highlighted 5 Press the CURSOR RIGHT or LEFT button to rotate the picture on the screen clockwise or counter clock wise Please note that the amount of rotation will be very minimal 6 Press the STATUS EXIT button to remove the menu from the screen HOW TO USE THE ROTATION CONTROL PICTURE SOUND FEATURES INSTALL...

Page 37: ...hift to the left 4 Press the CURSOR DOWN button repeatedly until the BLUE MUTE con trol is highlighted 5 Press the CURSOR RIGHT or LEFT button to toggle the control ON or OFF 6 Press the STATUS EXIT button to remove the menu from the screen HOW TO SET THE BLUE MUTE CONTROL PICTURE SOUND FEATURES INSTALL TIMER ACTIVE CTRL AutoLock CLOSED CAP FORMAT FEATURES AutoLock CLOSED CAP FORMAT ROTATION BLUE ...

Page 38: ...trol The SLEEP timer onscreen display will appear in the upper part of the screen 2 Within five seconds press the SLEEP button repeatedly to pick the amount of time 15 minute increments up to 60 minutes then 30 minute increments up to 90 minutes then 60 minute increments up to 240 minutes before the TV will turn itself off An onscreen countdown will appear during the last minute before the TV shut...

Page 39: ...ll read FREEZE ON momentarily and the picture frozen on the screen 2 Press the FREEZE button on the remote control again to resume normal viewing The screen will read FREEZE OFF momentarily while the television dis plays a normal moving picture again HOW TO USE THE FREEZE CONTROL After freezing a picture on the screen when the FREEZE control is turned OFF the nor mal signal programming will be sho...

Page 40: ... adjust the TV s brightness color picture sharpness tint and color tem perature levels The Personal AutoPicture settings are the ones that you made through the PICTURE options within the onscreen menu 1 Press the PICTURE button on the remote control The current AutoPictureTM setting will appear in the middle of the screen 2 Press the PICTURE button repeat edly to select either PERSONAL MOVIES SPOR...

Page 41: ...gle among the four settings PERSONAL VOICE MUSIC or THEATRE Remember only the PERSONAL control can be changed by the viewer This changes the settings in the main onscreen menu s SOUND controls HOW TO USE THE AUTOSOUND CONTROL AutoSoundTM works only with the programs coming through the ANTENNA CABLE ANT input on the rear of the TV RF audio It will not control the sound levels for the external conne...

Page 42: ...st message or the SURF channel list appears on the screen press the CURSOR RIGHT button to add the present channel to the SURF list 4 If you want to delete the present channel from the SURF list press the CURSOR RIGHT button again Repeat steps 1 through 3 to add more chan nels up to 10 to the SURF list HOW TO USE SURF CONTROL AND ALTERNATE CHANNEL Your remote also has an A CH Alternate Channel but...

Page 43: ...d laser disc players 2 Point the TV remote toward the desired accessory device and press the POWER button Does the remote turn the accessory device on If yes then try other function buttons on the TV remote With a VCR for example try the Play Stop and Rewind buttons for example If they also work the accessory device then the remote is ready and no further steps are needed If not do the following L...

Page 44: ... MENU SELECT button enter a four digit code for the accessory device see pages 46 and 47 If you make a mistake while attempt ing to enter the four digit code and want to start again press any button other than one with a number Then return to step 1 to begin again 3 Point the remote at the accessory device Then press the POWER button on the remote to turn the device on USING THE REMOTE WITH ACCESS...

Page 45: ... remote toward the accessory device and continue holding the buttons down 2 Watch the Channel Indicator on your accessory device Channel num bers will scan up when the TV remote has identified the correct code for your accessory device This may take sever al minutes 3 Release the mode VCR or ACC and SURF buttons as soon as chan nel numbers start to scan up The scanning means that your TV remote ha...

Page 46: ...9 MEI 0062 MGA 0070 0088 0267 MGN TECHNOLOGY 0267 MTC 0027 0267 MAGNASONIC 0305 MAGNAVOX 0062 0108 0137 0130 0027 0066 0176 MAGNIN 0267 MARANTZ 0108 0062 MARTA 0064 MATSUSHITA 0062 0189 0481 MEMOREX 0131 0074 0506 0027 0064 0075 0062 0073 0267 0334 0066 0189 0236 0481 0828 0829 MINOLTA 0132 0069 MITSUBISHI 0200 0088 0102 0241 0269 0070 0075 0094 0470 MOTOROLA 0062 0075 MULTITECH 0027 0099 NAD 0085...

Page 47: ...SCAN 0028 TIMELESS 0445 TOCOM 0039 0040 TOSHIBA 0027 TUSA 0042 UNIKA 0180 0234 0049 UNITED ARTISTS 0034 UNIVERSAL 0234 0049 0066 0083 0180 0218 VIEWMASTER 0847 VIEWSTAR 0285 0054 0087 0090 ZENITH 0027 0552 0081 ZENTEK 0427 CODE NUMBER ADS 0880 AIWA 0855 CARVER 0853 0850 0858 DENON 0851 0849 0875 DISCO VISION 0848 FUNAI 0855 HARMAN KARDON 0853 HITACHI 0848 KENWOOD 0877 MAGNAVOX 0853 0857 0875 MARAN...

Page 48: ...x o B e t i l l e t a S l a t i g i D r e v i e c e R n o i t c n u F S S D m e t s y S R E W O P R E W O P R E W O P R E W O P E S U A P E S U A P E S U A P D N I W E R D N I W E R E S R E V E R H C R A E S P O T S P O T S P O T S Y A L P Y A L P Y A L P D R A W R O F T S A F D R A W R O F T S A F D R A W R O F H C R A E S P U G N I R R O S R U C P U R O S R U C P U R O S R U C P U R O S R U C N ...

Page 49: ...ls the TV which one of these sources it is to show in the PIP window 1 Turn the TV and VCR or other device hooked to the external A V con nections ON 2 Press the PIP ON OFF button on the remote control The PIP window should appear in the upper right hand portion of the screen 3 Press the AV button on the remote control to toggle among the different external connections The PIP SOURCE may come from...

Page 50: ...ow PIP section 2 Press the POSITION button on the remote control to move the PIP picture to any of the four corners 3 Press the FREEZE button on the remote control to stop the action within the PIP window Press the FREEZE button again to resume the normal viewing action 4 Press the PIP CH annel UP DN but tons on the remote control to choose a different channel or a different PIP source 5 Press the...

Page 51: ...w The PIP window will appear in the LARGE format 2 Press the PIP ON OFF button on the remote again and the PIP Window will reduce in size to the SMALL format 3 Press the PIP ON OFF button on the remote a third time to display Double Window PIP Double Window PIP will split the screen with the main picture on one side and the PIP picture on the other 4 Press the PIP ON OFF button a forth time to cha...

Page 52: ...tments to the picture settings for PIP when shown on the TV screen 1 Press the MENU button on the remote control to show the onscreen menu 2 Press the CURSOR DOWN twice to highlight FEATURES 3 Press the CURSOR RIGHT and the menu will shift to the left 4 Press the CURSOR DOWN twice to highlight PIP 5 Press the CURSOR RIGHT again to shift the display to the COLOR adjust ment bar 6 Press the CURSOR R...

Page 53: ...es Remote Does Not Work Continued Clean the remote control and the remote control sensor win dow on the TV Check the TV power cord Unplug the TV wait 10 seconds then reinsert the plug into the outlet and push the POWER button again Be sure the fuse is not blown on the AC power strip if one is being used Check to be sure the TV outlet is not on a wall switch TV Displays Wrong Channel or No Channels...

Page 54: ... uneven aging of the picture tube Stock market tickers presented at the bottom of the TV screen Shopping channel logos and pricing displays bright and shown constantly or repeatedly in the same location on the TV screen PLACEMENT OF THE TV To avoid cabinet warping cabinet color changes and increased chance of set failure do not place the TV where temperatures can become excessively hot for example...

Page 55: ...e color and picture resolution in the playback of dig ital signal source material such as the kind available from DVD players Composite Video Input An input in which all the components required for displaying the onscreen image are combined in one signal High definition Television HDTV High resolution digital tele vision Incredible Stereo or Surround FProduces a dramatic expan sion of the wall of ...

Page 56: ...Dyn amic Contrast Control 12 Feature Highlights 5 Freeze Control 39 Glossary of Terms 55 Incr edible Surround Control 15 Index 56 Language Control 6 Name Control Channel Label 10 Picture Control 12 Picture In Picture PIP Features 49 52 Registration of TV Information 2 Remote Control Use with Accessory Devices Accessory Specific Remote Control Buttons 48 Code Entry Method of Identification 44 Direc...

Page 57: ...RENEWED 90 DAY LIMITED WARRANTY ...

Reviews: