background image


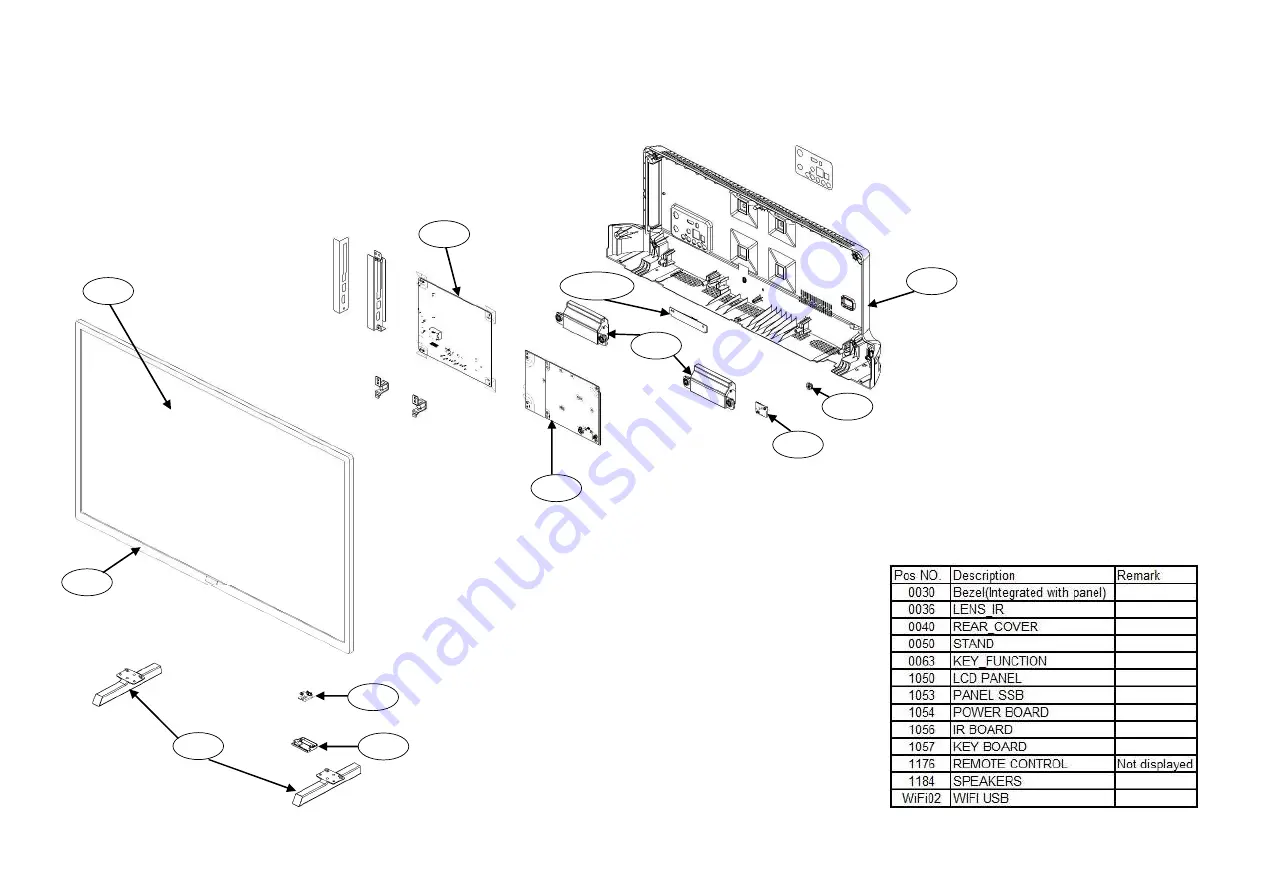
10. Styling Sheets 

10.1   5803/5823 series 32" 


50 

1050 

40 

1053 

1054 

1056 

1057 

1184 

WIFI02 

36 

63 

30 

Summary of Contents for 32PFS5823/12

Page 1: ...nklijke Philips Electronics N V or their respective owners TP Vision Netherlands B V reserves the right to change products at any time without being obliged to adjust earlier supplies accordingly PHILIPS and the PHILIPS Shield Emblem are used under license from Koninklijke Philips Electronics N V Chassis name Platform Model name TPM18 7E LA MTK5800 32PFS5803 12 32PFS5823 12 43PFS5803 12 43PFS5823 ...

Page 2: ...eld Emblem are used under license from Koninklijke Philips Electronics N V 1 Product information 3 2 Precautions Notes and Abbreviation List 5 3 Mechanical Instructions 11 Cable dressing 32 5803 5823 series 11 Cable dressing 43 5803 5823 50 5803 series 12 Assembly Panel Removal 13 4 Service Modes 17 5 Software upgrading Error Code and Panel Code 21 6 Trouble Shooting 26 7 Electrical Diagram 29 8 I...

Page 3: ...nt 300mA max Only for DVB T2 DVB S2 Supported Input Resolution Video Support Timing Video support timing also includes field frame rate 23 976Hz 29 97Hz and 59 94Hz HDMI 480i 24Hz 25Hz 30Hz 50Hz 60Hz 480p 24Hz 25Hz 30Hz 50Hz 60Hz 576i 24Hz 25Hz 30Hz 50Hz 60Hz 576p 24Hz 25Hz 30Hz 50Hz 60Hz 720p 24Hz 25Hz 30Hz 50Hz 60Hz 1080i 24Hz 25Hz 30Hz 50Hz 60Hz 1080p 24Hz 25Hz 30Hz 50Hz 60Hz Component Composit...

Page 4: ...Europe Windows 1252 Image Codec JPEG GIF PNG BMP Wi Fi Certified This TV supports Miracast certified devices Performance may vary depending on the capabilities of the mobile device and the software used Connectivity TV Side Common Interface slot CI CAM USB 1 2 USB 2 0 HDMI 1 in MHL TV Rear YPbPr Y Pb Pr Audio L R CVBS CVBS Audio L R Shared with YPbPr Audio out Optical Toslink Headphones Stereo min...

Page 5: ...measurements in the high voltage section Never replace modules or other components while the unit is switched on When you align the set use plastic rather than metal tools This will prevent any short circuits and the danger of a circuit becoming unstable 2 3 Notes 2 3 1 General Measure the voltages and waveforms with regard to the chassis tuner ground or hot ground depending on the tested area of ...

Page 6: ...t types of displays coming from two different suppliers This will then result in sets which have the same CTN Commercial Type Number e g 28PW9515 12 but which have a different B O M number By looking at the third digit of the serial number one can identify which B O M is used for the TV set he is working with If the third digit of the serial number contains the number 1 example AG1B033500001 then ...

Page 7: ...MHz BDS Business Display Solutions iTV BLR Board Level Repair BTSC Broadcast Television Standard Committee Multiplex FM stereo sound system originating from the USA and used e g in LATAM and AP NTSC countries B TXT Blue TeleteXT C Centre channel audio CEC Consumer Electronics Control bus remote control bus on HDMI connections CL Constant Level audio output to connect with an external amplifier CLR...

Page 8: ... video format used for broadcast grade video Uncompressed digital component or digital composite signals can be used The SDI signal is self synchronizing uses 8 bit or 10 bit data words and has a maximum data rate of 270 Mbit s with a minimum bandwidth of 135 MHz iTV Institutional TeleVision TV sets for hotels hospitals etc LS Last Status The settings last chosen by the customer and read and store...

Page 9: ...ive Temperature Coefficient non linear resistor PWB Printed Wiring Board same as PCB PWM Pulse Width Modulation QRC Quasi Resonant Converter QTNR Quality Temporal Noise Reduction QVCP Quality Video Composition Processor RAM Random Access Memory RGB Red Green and Blue The primary color signals for TV By mixing levels of R G and B all colors Y C are reproduced RC Remote Control RC5 RC6 Signal protoc...

Page 10: ...tronics Standards Association VGA 640 480 4 3 VL Variable Level out processed audio output toward external amplifier VSB Vestigial Side Band modulation method WYSIWYR What You See Is What You Record record selection that follows main picture and sound WXGA 1280 768 15 9 XTAL Quartz crystal XGA 1024 768 4 3 Y Luminance signal Y C Luminance Y and Chrominance C signal YPbPr Component video Luminance ...

Page 11: ...823 series Back cover overview 32 5803 5823 series LOUDSPEAKER 1184 CN 701 LOUDSPEAKER 1184 CN 408 CN167 CN605 CN164 CN8602 CN 9101 IR LED BOARD 1056 J MAIN POWER SUPPLY 1054 A WIFI MODULE Wifi02 W ECN408 ECN701 ECN605 KEY BOARD 1057 E SSB 1053 B ECN167 to key IR ECN164 ...

Page 12: ...rview 43 5803 5823 50 5803 series CN 701 CN 408 CN167 CN605 CN164 CN8602 CN9102 MAIN POWER SUPPLY 1054 A ECN408 ECN701 SSB 1053 B LOUDSPEAKER 1184 LOUDSPEAKER 1184 IR LED BOARD 1056 J WIFI MODULE Wifi02 W ECN605 KEY BOARD 1057 E ECN167 to key IR ECN164 ECN605 ...

Page 13: ...acket out from the set 3 2 2 IR board Control Unit 1 Unplug the connector from the SSB Caution be careful as these are very fragile connectors 2 Remove fixation screws 1 and connector 2 from the IR board control unit 3 Remove the IR lens IR board from the DECO_REAR_COVER When defective replace the whole unit 1 1 1 1 1 2 ...

Page 14: ...moving the rear cover 1 Remove fixation screws 2 and 3 that secure the Rear Cover 2 Unplug the connector 4 3 Gently lift the rear cover from the TV Make sure that wires and cables are not damaged while lifting the rear cover from the set 2 3 2 2 2 2 3 3 2 2 2 2 2 2 4 ...

Page 15: ...ce the whole unit 3 2 5 Small Signal Board SSB Caution it is mandatory to remount all different screws at their original position during re assembly Failure to do so may result in damaging the SSB 1 Release the clips from the LVDS connector that connect with the SSB 1 Caution be careful as these are very fragile connectors 2 Unplug connector 2 3 Remove all the fixation screws from the SSB 3 4 The ...

Page 16: ...When defective replace the both units 3 2 8 WIFI module 1 Unplug the connector from the SSB 2 Remove fixation screw that secure the WIFI module When defective replace the whole unit 3 2 9 LCD Panel 1 Remove the SSB as described earlier 2 Remove the PSU as described earlier 3 Remove the keyboard control panel as described earlier 4 Remove the stand bracket as described earlier 5 Remove the IR LED a...

Page 17: ...mote control RC is used with some renamed buttons This has an impact on the activation of the Service modes For instance the old MENU button is now called HOME or is indicated by a house icon 4 2 Service Alignment Mode SAM Purpose To modify the NVM To display clear the error code buffer To perform alignments Specifications Operation hours counter maximum five digits displayed Software version erro...

Page 18: ...stored separately via the STORE button How to Exit SAM Use one of the following methods Switch the set to STANDBY by pressing the mains button on the remote control transmitter or the television set Via a standard RC transmitter key in 00 sequence Note When the TV is switched off by a power interrupt while in SAM the TV will show up in normal operation mode as soon as the power is supplied again T...

Page 19: ...button Note When the TV is switched off by a power interrupt or normal switch to stand by while in the factory mode the TV will show up in normal operation mode as soon as the power is supplied again The error buffer will not be cleared 4 4 Customer Service Mode CSM Purpose The Customer Service Mode shows error codes and information on the TVs operation settings The call centre can instruct the cu...

Page 20: ...eys to display the next previous menu items Note Activation of the CSM is only possible if there is no user menu on the screen CSM Overview How to Navigate By means of the CURSOR DOWN UP knob or the scroll wheel on the RC transmitter can be navigated through the menus How to Exit CSM To exit CSM use one of the following methods Press the MENU HOME button on the remote control transmitter Press the...

Page 21: ...le format FLAT Size 1G 8G 3 Copy the software to USB flash disk root directory Note the version of this F W before you change the software file name Step 2 F W Upgrade 1 Plug the USB memory on the USB port on the side I O port of TV Please connect to USB 2 0 port not recommend USB3 0 port 2 AC on Power plug 3 TV will upgrade automatically as detect the software ...

Page 22: ...4 Press OK to start software upgrade 5 Upgrade in progress ...

Page 23: ...e added to the buffer if this error differs from any error in the buffer The last found error is displayed on the left An error with a designated error code never leads to a deadlock situation It must always be diagnosable e g error buffer via OSD or blinking LED In case a failure identified by an error code automatically results in other error codes cause and effect only the error code of the MAI...

Page 24: ...LEAR command in the Factory mode By using the following key sequence on the remote control transmitter 062599 directly followed by the OK button If the contents of the error buffer have not changed for 50 hours the error buffer resets automatically Note If you exit SAM by disconnecting the mains from the television set the error buffer is not reset ...

Page 25: ... the panel type see column Display Code in below tab After resetting the Display Code restart the set immediately CTN_ALT BOM Panel Type Display Code 32PFS5803 12 TPT315B5 FHBN0 K S49P0K 204 32PFS5823 12 TPT315B5 FHBN0 K S49P0P 204 43PFS5803 12 TPT430H3 DUYSHA G S1CZ 203 43PFS5823 12 TPT430H3 DUYSHA G S1CAM 203 50PFS5803 12 SDL500F0 AD0 000 SN SKYWORTH 205 ...

Page 26: ...icture related Y Backlight N Menu Smarkt function Signal issue Y SSB LVDS Panel RAM N LED working Y PSU SSB Sound N Picture N Y Intermittent problem SW latest SW issue Y Update SW N Problem solved Finish Y N Ask Photo N Y PSU Panel SW SSB Y ...

Page 27: ...8 Audio Sound related Y Mute N Extra device connect N Check extra device Y Sound N Y Intermittent problem SW latest SW issue Y Update SW N Problem solved Finish Y N Y HW N Setting issue Factory setting Sound back Setting issue Y SSB SPK N ...

Page 28: ...d 4 No function blinking LED 5 Set freezes intermittently 6 Slow response to user interaction 7 Switches ON by itself 8 Switches Off by itself 9 Stuck in standby mode unable to start up 10 Stuck on PHILIPS ANDROID logo 11 CAM not recognized by TV 12 CAM authentication issue 13 Misc CAM issue 14 IP EPG issues 15 BC EPG issues 16 PVR issues w BC EPG 17 PVR issues w IP EPG 18 PVR issues generic 19 ED...

Page 29: ...INTERFACE TUNER Tuner IF IF LVDS A Port CN408 U406 U408 U409 DDR3 CN501 MHL CN503 CN159 U401 MT5800 CN163 CN165 I2S U601 AD87588 CN605 SPEAKER OUT SPEAKER AMP U402 eMMC Embedded DEMOD Ethernet MII RMII CN401 UART0 CN166 YPbPr AV CN116 Tuner IF IF HP CN603 Platform MT5800 CN701 12V AUDIO AMP LVDS Display power CN8602 Platform power DIM ON OFF PS_ON 12V 12V_A PFC AC input Main filter AC IN 12V ...

Page 30: ...EN FB_PWR_EN FB713 LVDS_PWR_EN OPWRSB Wi Fi_PWR_EN 5V_STB Q710 D710 U202 TUNER_LNB U713 USB_EN_P1 5V_USB USB_PORT1_5V U716 U714 U102 CI_VCC USB_PORT2_5V U717 USB_EN_P2 D710 D708 D709 U720 12V U704 Vcck AVDD1V2 U701 U705 5V_SW AVDD3V3 U707 DVDD3V3 1 8V U702 Tuner3 3V 3V3SB Wi Fi_Vcc FB708 Q702 PANEL_VCC ...

Page 31: ...7 4 Power layout SSB Power SSB Top View FB705 3 3V_TUN FB708 1 2V_CORD POWER L701 5V_STB C7043 1 8V_EMMC C786 5V_SW L732 3 3V_SB L702 1 5V_DDR L731 5V_USB ...

Page 32: ...8 IC Data Sheets 8 1 MT5800VHEJ IC U401 Scaler ...

Page 33: ...8 2 AD87072 LG48NRY IC U601 Audio ...

Page 34: ...8 3 SI2169 D60 GMR IC U101 Demodulator ...

Page 35: ...8 4 TDSY G430D EUROPE TU101 ...

Page 36: ...8 5 TDQS A751F EUROPE TU102 ...

Page 37: ...F 50V For Q9101 R9146 0 OHM 5 1 8W U9103 TL431G AE2 R NC C9127 1nF 50V C9128 1nF 50V Q9306 NC P1604ED 12V_A 12V C9116 330UF 35V CN9101 CONN 2 4 6 8 10 12 14 16 1 3 5 7 9 11 13 15 5 2V D9103 FR107G A0 FB9908 BEAD 1 2 D9104 IN4148W FB9906 NC 1 2 D9106 IN4148W R9907 D9110 SR510 22 1 2 D9111 SR510 22 1 2 D9112 SR510 22 1 2 D9101 SR510 22 1 2 C9129 NC FB9902 127R 1 2 SG9902 SG9901 C9306 NC 100N 50V C93...

Page 38: ... DTA144WN3 S Q8602 2N7002K C8604 0 47UF 50V C8621 0 1uF 50V Vcc2 Vcc2 CN8601 NC CONN 1 2 3 4 5 ON OFF L8602 47uH D8603 IN4148W RHG D8604 IN4148W RHG R8605 1K 1 8W R8602 NC R8616 0 OHM 5 1 8W R8617 62K 1 8W 1 D8601 SR506 1 2 R8652 1 2R 1 R8653 1 2R 1 R8654 1 2R 1 R8655 1 2R 1 DIM C8606 1NF Add ON OFF Function R8611 NC R8612 100K U8601 PF7708BS LED 1 VCC 2 CS OVP 3 OUT 4 GND 5 DIM 6 GM 7 FB 8 R8601 ...

Page 39: ...C 5 D2 6 D2 7 NC 8 BD9901 TS10K80 01 2 1 3 4 T5AL 250V L9901 17mH 1 2 4 3 L9902 17mH 1 2 4 3 FB9902 BEAD 1 2 SG9901 DSPL 501N A21F FB9905 127R 1 2 t NR9902 1R5 1 2 C9903 220NF 305V F9903 NC CN9901 AC 2P 1 2 3 4 BR FB9901 BEAD 1 2 C9911 22pF 5 250V FB9903 NC 1 2 C9901 470NF 275V C9902 470NF 275V CN9905 NC 1 2 C9912 22pF 5 250V Vsin L R9905 510K R9906 510K C9923 NC N C9914 220PF 250V R9901 510K C991...

Page 40: ...9814 10K 1 8W C9802 10NF 1KV R9811 18K 1 1 8W FB9801 127R 1 2 R9803 51 OHM 1 4W R9804 1 5M 1 R9802 51 OHM 5 1 8W C9810 470PF 50V C9812 47N 50V U9801 LD7592 INV 1 RAMP 2 COMP 3 CS 4 OVP 5 GND 6 OUT 7 VCC 8 R9813 24K OHM 1 1 8W Q9803 MMBT2907A C9817 220PF C9814 100N 50V C9809 100N 50V R9818 NC 0R05 1 4W C9803 56UF 450V R9817 10K 1 4W HV VCC_ON VCC_ON PFC_OVP Vsin PFC_OVP Rsen For Q9801 D9802 HS9801 ...

Page 41: ...NF 50V R9118 1K OHM 5 1 8W R9104 22 1 8W 5 R9142 22R 5 R9133 27 OHM 1 4W R9131 100K 1 8W 1 R9406 1K5 1 1 8W HS9101 HEAT SINK 1 2 3 4 ZD9401 BZT52 B16 1 2 ZD9106 BZT52 B15 1 2 C9113 1NF C9920 470PF 250V C9143 1uF R9401 3K R9404 10K 1 4W HS9102 HEAT SINK 1 2 3 4 C9111 1 5NF R9147 82K 2W C9142 1uF 50V C9401 10uF 50V C9136 2N2 50V R9121 1K 1 8W 1 R9130 100K 1 U9102 EL817M X 1 2 4 3 R9132 27 OHM 1 4W R...

Page 42: ...HM 1 4W R8654 160R 1 R8613 9K1 1 8W 1 R8616 47K 1 8W 1 R8637 300 OHM 1 4W C8605 120uF 100V R8638 300 OHM 1 4W C8606 120uF 100V R8612 36K 1 8W 1 R8623 300 OHM 1 4W R8624 1 2R 1 R8657 160R 1 C8622 NC VLED R8613 R8616 R8612 9 1K 36K 47K 25 38 7V For U8605 C8634 NC VLED R8617 0R18 5 C8624 100P 50V C8625 NC VLED 1 VLED For LPB function R8604 10K OHM 5 1 8W C8611 100PF 500V C8620 1 5NF C8614 1uF R8615 1...

Page 43: ...High INVERTER ON OFF R1074 4K7 1 16W 5 R787 NC 0R05 R1081 4K7 1 16W 5 U719 SY8089AAAC EN 1 GND 2 LX 3 IN 4 FB 5 BL_DIMMING 8 11 BL_DIMMING BRIGHT ADJUST BRIGHT_ADJ BL_DIMMING PWM for BRIGHT_ADJ Max 0V Min 3V3 C1054 NC 10UF 16V BL_ON OFF FB_PWR_EN Synchronous buck for 5 5A output Current 650KHz 5V_SW to AVDD3V3 12V to Core Power Vout 0 765x 1 6 8K 12K 1 198V C7039 10UF 6 3V 20 C7043 10UF 6 3V 20 C7...

Page 44: ..._PWR_EN Tcon8 Normal High Stand_By Low R756 NC 100K 1 16W 5 R703 NC 100K 1 16W 5 L704 10uH C751 10UF 16V R7027 10K 1 16W 5 C703 0 1uF 25V C757 10UF 16V C707 10uF 25V R760 2 2 OHM 1 10W C705 10uF 25V C752 0 1uF 25V C710 0 1uF 25V R7029 10K 1 16W 5 R721 NC 100K 1 16W 5 R7053 100K 1 16W 5 C706 10uF 25V R757 13 3K 1 L731 4 7uH C704 10UF 16V R720 10K 1 16W 5 TP702 TP R706 3K R702 NC 100K 1 16W 5 R7050 ...

Page 45: ...LK_E U401 6 MT5800VHEJ OSDA0 AE26 OSCL0 AH26 XTALI B28 XTALO B27 AVDD33_REG_STB J22 VCC3IO_EMMC J1 AVDD33_RGB_STB H24 AVSS33_RGB K21 AVDD33_PLL_STB J23 AVDD10_LDO U25 AVDD10_ELDO Y26 U0TX T25 U0RX T24 POWE J2 POOE N7 POCE1 M7 POCE0 L7 PDD7 P3 PDD6 N1 PDD5 N2 PDD4 N4 PDD3 M3 PDD2 L1 PDD1 N6 PDD0 P6 PARB N5 PACLE L3 PAALE K3 EMMC_CLK P4 OPWRSB R26 ORESET L25 OIRI L26 FSRC_WR AH27 EMMC_RST P7 U402 EM...

Page 46: ...C6056 NC 220UF 16V R6036 10K 1 16W 5 C6039 1UF 10V R6038 30Kohm 1 16W 5 U601 AD87072 LG48NRY NC 1 NC 2 PLL 3 MONO 4 NC 5 CLK_OUT 6 DGND 7 DVDD 8 SDATA0 9 LRCIN 10 BCLK 11 TEST 12 RINN 13 OUTR 14 VSS 15 EN 16 PVSS 17 CN 18 CP 19 PVDD 20 PGND 21 UVP 22 OUTL 23 LINN 24 SDA 25 SCL 26 SA0 27 SA1 28 DEF 29 DGND 30 DVDD 31 PD 32 ERROR 33 RESET 34 NC 35 NC 36 NC 37 VDDRA 38 RA 39 GNDR 40 RB 41 VDDRB 42 VD...

Page 47: ...3 AVSS33_XTAL J20 AVSS33_DEMOD K20 C1012 1UF 10 16V C1016 47PF 50V ZD120 AZ2225 01L 1 2 ZD124 AZ2225 01L 1 2 C1007 1UF 10 16V R1004 30Kohm 1 16W 5 ZD123 AZ2225 01L 1 2 C1014 10NF 50V C1011 10NF 50V OSCL1 R1013 51OHM 1 16W 5 C1015 10PF 50V C1008 10NF 50V C1010 10PF 50V TP98 TP C1004 47NF 16V R1002 100R 1 16W 5 R1012 100R 1 16W 5 R1018 100R 1 16W 5 TU_FAT_IN2 R1006 100R 1 16W 5 TU_FAT_IN2 C1017 47PF...

Page 48: ... AO4N AG21 AO5P AF20 AO5N AE20 R1060 0R05 1 16W R260 NC 0R05 1 16W R1065 0R05 1 16W AVDD1V2 AVDD3V3 AVDD3V3 AVDD3V3 LVDS_PWR_EN 4 PANEL_VCC BL_DIMMING 3 11 BL_DIMMING LVDSTX_AECKN LVDSTX_AE2N LVDSTX_AE2P LVDSTX_AE3N LVDSTX_AE3P LVDSTX_AECKP LVDSTX_AE4N LVDSTX_AE4P BIT_SEL LVDS LVDSTX_AOCKN LVDSTX_AO2N LVDSTX_AO2P LVDSTX_AO0N LVDSTX_AO0P LVDSTX_AO1P LVDSTX_AO1N LVDSTX_AOCKP LVDSTX_AO4N LVDSTX_AO4P ...

Page 49: ... H1 VREFCA M8 NC2 J9 NC3 L1 NC4 L9 NC5 M7 VSS B3 C4086 100nF 16V CAPs for DRAM IO Power Close to DDR3 x16 3 C4309 100nF 16V C4311 100nF 16V C4308 100nF 16V C4310 100nF 16V R4064 100R 1 16W 5 RCLK0B RCLK0B Differential Clock NEAR Main Chip RCLK0 RCLK0 C4051 100nF 16V NEAR DRAM TP1 DDR_DEBUG_PAD 1 C4034 100nF 16V R4049 NC 1K R4051 47R 1 16W 5 C4029 100nF 16V R4047 NC 1K C4074 NC 100NF 16V C4068 100n...

Page 50: ... 43 IORD 44 IOWR 45 A17 46 A18 47 A19 48 A20 49 A21 50 VCC 51 VPP2 52 A22 53 A23 54 A24 55 A25 56 VS2 57 RESET 58 WAIT 59 INPACK 60 REG 61 69 69 70 70 71 71 72 72 CI_TSDATA0 PVR_TSCLK PVR_TSVAL PVR_TSSYNC PVR_TSDATA0 CI_D4 CI_D3 CI_D2 CI_D1 CI_MDO0 CI_D7 CI_D6 CI_D5 CI_MDO2 CI_MDO1 CI_MDO7 CI_MDO6 CI_MDO5 CI_MDO4 CI_MDO3 R1103 47R 1 16W 5 C1058 10UF 10V R1084 10K 1 16W 5 R1120 47R 1 16W 5 R1118 47...

Page 51: ...D6 10 CI_MDO1 10 CI_MDO0 10 CI_D3 10 CI_A0 10 CI_A10 10 CI_D1 10 CI_A5 10 CI_MDO7 10 TP57 TP CI_MDO3 10 CI_D4 10 CI_A8 10 CI_MDO5 10 CI_D0 10 CI_D5 10 CI_A11 10 CI_A4 10 CI_MDO2 10 CI_A3 10 CI_A13 10 CI_RST 10 CI_A14 10 CI_D7 10 CI_A6 10 CI_D2 10 CI_PWR_EN CI_MCLKI 10 CI_MIVAL 10 CI_MISTRT 10 PVR_TSCLK 10 PVR_TSSYNC 10 PVR_TSDATA1 10 SPI_CLK1 10 SPI_CLK 10 PVR_TSVAL 10 PVR_TSDATA0 10 CI_TSDATA0 10...

Page 52: ...1240R1A CH1 1 CH2 2 VN 3 CH3 4 CH4 5 NC 6 NC 7 VN 8 NC 9 NC 10 R5018 47K 1 16W 5 R503 5 1R 1 16W R5006 47K 1 16W 5 CN501 HDMI 19P TH1 20 TH2 21 D2 1 D2 Shield 2 D2 3 D1 4 D1 Shield 5 D1 6 D0 7 D0 Shield 8 D0 9 CK 10 CK Shield 11 CK 12 CE Remote 13 NC 14 DDC CLK 15 DDC DATA 16 GND 17 5V 18 HP DET 19 TH3 22 TH4 23 RX_2_CB RX_2_2B RX_2_2 RX_2_1 RX_2_1B RX_2_0B RX_2_C RP508 5R1 1 2 3 4 8 7 6 5 C5003 1...

Page 53: ...F_N 5 IF_P 6 IF_AGC 7 TH1 8 TH2 9 TH3 10 TH4 11 TH5 12 TH6 13 C1079 100nF 16V C1110 82pF 50V R1154 4K7 1 16W 5 C1095 100nF 16V C1251 100nF 16V R1153 100R 1 16W 5 C1066 100nF 16V C1071 NC 10PF 50V C1077 47NF 16V R1170 2K7 1 16W 5 C1097 100nF 16V X101 16MHz 1 2 4 3 R1174 NC 51R DEMOD_TS0 C1075 10NF 50V C1106 100nF 16V C1073 10PF 50V C1068 22PF 50V R1175 51OHM 1 16W 5 R103 22R 1 16W 5 C1102 3 9PF 50V...

Page 54: ...5V_USB 3V3SB AVDD3V3 3V3SB AVDD3V3 5V_SW OPCTRL2 11 PWRDN 6 PWRDN HP 6 OPCTRL8 11 OPCTRL6 11 OPCTRL5 11 RJ45_388G342KEF4VGN H 16 9_2016 0308 TP52 TP TP53 TP CN164 CONN 2 4 6 8 1 3 5 7 R1047 10K 1 16W 5 R1046 4K7 1 16W 5 C112 1UF 10V U716 G529A1TB1U EN 1 GND 2 IN 3 OUT 4 OUT 5 OC 6 R1048 1K 1 16W 5 5V_USB USB_EN_P1 WOL_ON OFF USB_PORT1_5V DVDD3V3 USB_OCP_P1 Wi Fi_PWR_EN R404 100R 1 16W 5 R1386 10K ...

Page 55: ... C1302 100nF 16V R1216 100R 1 16W 5 R1224 NC 100R 1 16W 5 C1303 100nF 16V 3V3SB 3V3SB 3V3SB LED_PWM0 5 11 LED_PWM1 5 11 ZD129 AZ5123 01H R7G 1 2 ZD130 AZ5123 01H R7G 1 2 ZD131 NC AZ5123 01H 1 2 KEY_PAD0 11 15 LED_R FB152 300R 1 2 LED_W B G FB153 300R 1 2 FB154 300R 1 2 FB155 120R 1 2 OIRI 5 OIRI CN167 CONN 2 4 6 8 10 1 3 5 7 9 C1155 1NF 50V LED_W B G KEY_PAD0 OIRI ...

Page 56: ...3 DVSS R13 DVSS T13 DVSS U13 DVSS V13 DVSS W13 DVSS AB13 DVSS AC13 DVSS AD13 DVSS AF13 DVSS G14 DVSS J14 DVSS K14 DVSS L14 DVSS M14 DVSS N14 DVSS P14 DVSS R14 DVSS T14 DVSS U14 DVSS V14 DVSS W14 DVSS AD14 DVSS AE14 DVSS J15 DVSS K15 DVSS L15 DVSS M15 DVSS N15 DVSS P15 DVSS R15 DVSS T15 DVSS U15 DVSS V15 DVSS J16 DVSS K16 DVSS L16 DVSS M16 DVSS K10 DVSS L10 DVSS AB16 DVSS R11 DVSS P11 DVSS N16 DVSS...

Page 57: ... 2 LS_SDA R223 0R05 1 16W C221 100N 16V JSA 1130 R223 LS_SDA LS_SCL R225 R224 R227 R226 NC 0x44 I2C ADDR NC NC 0R 0R JSA 1130 0R NC 0R TSL25715 0x45 NC NC 0R 0R NC NC 0R R229 R228 0x29 0R 0R NC 0R 0R NC DVD3V3 IR_power U212 TSOP75436TR GND 1 VCC 2 Vout 3 GND 4 CN201 NC CONN 1 2 3 4 5 6 7 8 9 10 11 R202 1K 1 16W 5 LED_R 3V3SB RC IR DVD3V3 LS_SDA LS_SCL CN202 NC CONN 1 2 3 4 5 6 7 8 9 10 11 LED_R ZD...

Page 58: ...10W 1 Direction switch C06 0 1uF 50V Joystick circuit diagram pin1 0V 0 5V 0 81V 1 65V 2 27V pin2 No function pin3 3 3V C04 NC 100N 50V pin4 C05 NC 100N 50V pin5 pin6 C01 NC 100N 50V C02 NC 100N 50V C03 NC 100N 50V Center Up Down CN01 CONN 1 2 3 4 R02 0R05 1 10W 0R 2K2 Resistance Key function Center CH CH 1K2 VOL VOL Left 6K8 15K Right Range 0 39 to 0 60 V 0 to 0 22V 1 93 to 2 58 V 1 41 to 1 87 V ...

Page 59: ...10 Styling Sheets 10 1 5803 5823 series 32 50 1050 40 1053 1054 1056 1057 1184 WIFI02 36 63 30 ...

Page 60: ...10 2 5803 5823 series 43 5803 series 50 50 1050 40 1053 1054 1056 1057 1184 WIFI02 36 63 30 ...

Reviews: