background image

Great user manuals database on 

UserManuals.info

21

         Disconnect a USB storage device

 Caution

 To avoid damaging your USB storage device, always 


follow the procedure described below when 
disconnecting.

    1

 Press 


MENU

  to exit the  

[USB]

  menu.

    2

 Wait 

fi

 ve seconds before disconnecting the 

USB storage device.

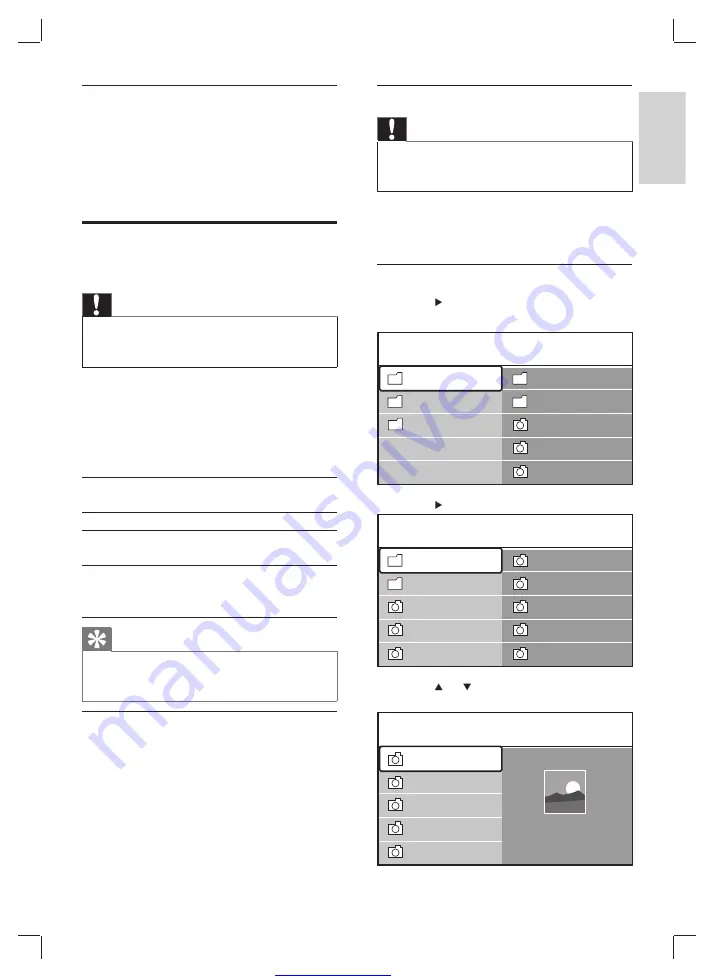
       View your photos

    1

 Press 

   to enter the  

[USB]

  menu.


»

[Picture]

  is highlighted.


      2

 Press 

   to enter the  

[Picture]

  folder.


    3

 Press 

   or     to select a picture or a 

picture album on the USB device.


USB

Picture

Afrika_2001

Paris_2006

My_car.jpg

Jean.jpg

Mary.jpg

Music

Picture

Themes

Jean.jpg

Mary.jpg

Picture

Afrika_2001

Kenya.jpg

Congo.jpg

Victoria.jpg

Dakar.jpg

Cairo.jpg

Paris_2005

My_car.jpg

Afrika_2001

Afrika_2001

Afrika_2001

Kenya.jpg

Congo.jpg

Victoria.jpg

Dakar.jpg

Cairo.jpg

Kenya.jpg

     Disable the TV clock

    1

 Press 


OPTION

 . 

    The  


»

[Quick access]

  menu appears.

      2

 Select 


[Clock]

 .

    3

 Press 


OK

 .

    The clock is disabled.


»

          View photos and play music 

from a USB storage device

 Caution

 Philips is not responsible if the USB storage device is 


not supported nor is it responsible for damage or loss 
of data from the device.

  Your TV  is 

fi

 tted with a USB connector that 

enables you to view photos or listen to music 
stored on a USB storage device. You can view 
your pictures as a slideshow or listen to a music 
playlist.


Supported 
formats


Non-supported formats

 JPEG

 Progressive JPEG 

fi

 les

 MP3

 File name exceeding 128 
characters

 FAT/DOS-
formatted 
memory devices

 File names containing a 
dot character

 Tip

 You can also use your USB storage device to apply new 


menu  themes   (see ‘Download and apply a new menu 
theme’ on page   11  ) .

    Connect a USB storage device

    1

  Turn on the TV.

    2

  Connect the USB device to the USB 

port on the side of your  TV   (see ‘Side 
connectors’ on page   30  ) . 

    The main menu appears automatically 


»

and the name of the USB device is 
displayed.

English

EN

Summary of Contents for 32PFL6403D/12

Page 1: ...Great user manuals database on UserManuals info Register your product and get suppor t at www philips com flavors 22PFL6403D 12 32PFL6403D 12 42PFL6403D 12 EN User Manual IT Manuale D uso ...

Page 2: ...urg 40 6661 5644 Ortsgespräch Appel local Nederland 0900 8407 0 10 Per minuut Norge 2270 8111 Lokalsamtale Polska 0223491504 połączenie lokalne Portugal 2 1359 1442 Chamada local România 1 203 2060 Apel local Россия 495 961 1111 Местный звонок Србија 381 114 440 841 Lokalni poziv Slovensko 0800 004537 Bezplatný hovor Slovenija 01 280 95 22 lokalni klic España 902 888 784 0 10 Por minuto Sverige 08...

Page 3: ... Flavors TV 8 Switch theTV on off or to standby 8 Switch channels 8 Watch connected devices 8 AdjustTV volume 9 Use teletext 9 5 Use more of your Flavors TV 10 AccessTV menus 10 Apply menu themes 11 Adjust picture and sound settings 12 Use advanced teletext features 14 Create and use lists of favorite channels 16 Use the Electronic Program Guide 17 Use timers 18 Use child control and rating locks ...

Page 4: ...dence available today Philips plays an active role in the development of international EMF and safety standards enabling Philips to anticipate further developments in standardisation for early integration in its products Mains fuse UK only ThisTV is fitted with an approved moulded plug Should it become necessary to replace 1 Notice 2008 Koninklijke Philips Electronics N V All rights reserved Speci...

Page 5: ... mains cordcable Copyright VESA FDMI and theVESA Mounting Compliant logo are trademarks of theVideo Electronics Standards Association Manufactured under licence from Dolby Laboratories Dolby Pro Logic and the double D symbol are trademarks of Dolby Laboratories Manufactured under licence from BBE Sound Inc Licensed by BBE Inc under one or more of the following US patents 5510752 5736897 BBE and BB...

Page 6: ...periods of time Never allow children to climb on or play with theTV Place theTV where it cannot be pushed pulled over or knocked down If theTV is transported in temperatures below 5 C 1 Remove theTV from the box 2 Wait until theTV temperature matches the room temperature 3 Install theTV 2 Important Read and understand all instructions before you use yourTV If damage is caused by failure to follow ...

Page 7: ...eTV before cleaning Clean theTV and frame with a soft damp cloth Never use substances such as alcohol chemicals or household cleaners on theTV Risk of damage to theTV screen Never touch push rub or strike the screen with any object To avoid deformations and color fading wipe off water drops as soon as possible Recycling Your product is designed and manufactured with high quality materials and comp...

Page 8: ... benefit from the support that Philips offers register your product at www philips com flavors TV overview This section gives you an overview of commonly usedTV controls and functions Side controls and indicators a Power indicator Remote control sensor Power indicator is white when theTV is on Power indicator is red when theTV is in standby b POWER Switches theTV on or off TheTV is not powered off...

Page 9: ...oggles teletext on or off u Dual Screen Enables dual screen teletext This splits the channel or source to the left of the screen with teletext on the right a Standby Switches theTV to standby if theTV is on Switches theTV on if theTV is in standby b SOURCE Selects connected devices c Picture format Selects one of the following picture formats Auto format Enlarges the picture to fill the screen sub...

Page 10: ...FlavorsTV operations Switch the TV on off or to standby To switch on If the indicator a is off press POWER b at the side of theTV If the indicator a is red press Standby on the remote control To switch to standby Press Standby on the remote control The indicator a switches to red To switch off Press POWER b at the side of theTV Tip Though yourTV consumes very little power when in standby energy co...

Page 11: ...ss VOLUME c at the side of theTV Use teletext 1 Press TELETEXT a The main index page appears 2 Select a page by Entering the page number with the Numeric buttons Pressing P or to view the next or the previous page Pressing the Colour buttons to select a colour coded item Pressing Previous channel to return to a previously viewed page 3 Press TELETEXT a to exit teletext 1 2 3 MENU VOLUME 1 E n g l ...

Page 12: ...2 Press or to select an option 1 Quick access Subtitle Audio language Subtitle language Equalizer Picture format Clock 5 Use more of your Flavors TV Access TV menus Menus help you to install yourTV adjust picture and sound settings and access other features Access the main menu 1 Press MENU a The main menu appears 2 Press or to select an option TV menu Select to access installation picture and sou...

Page 13: ...s and download new themes to the USB storage device 3 Insert the USB storage device into the USB connector on theTV The main menu appears 4 Press to select Themes and then press OK Audio language digital only Subtitle language digital only Subtitle Picture format Equalizer Clock 3 Press OK to display the menu of the selected option 4 Press OPTION a to exit Apply menu themes Apply menu themes to ma...

Page 14: ...ngs Picture Start now Settings assistant Settings assistant TV settings Sound Reset smart settings Picture Start now Settings assistant Reset smart settings TV settings Sound Picture Reset smart settings Settings assistant Current Standard Vivid Movie Reset smart settings TV settings Sound Picture Reset smart settings Settings assistant Current Standard Vivid Movie The Themes menu appears displayi...

Page 15: ... for the best picture possible according to lighting conditions in the room Picture format Changes the picture format Also accessible by pressing Picture format 3 Press to enter the Reset smart settings menu 4 Press the Navigation buttons to select Current Applies current picture and sound settings Standard Applies picture and sound settings that suit most enviroments and most types ofTV programme...

Page 16: ...broadcast Note Surround mode and Auto surround sound settings are not available on 22 inchTV models Use advanced teletext features YourTV has a 1 200 page memory that stores teletext pages and subpages The teletext memory reduces page loading time Adjust sound settings 1 Press MENU 2 Select TV menu TV Settings Sound 3 Press to enter the Sound menu 4 Press the Navigation buttons to select and adjus...

Page 17: ...I Off Off Select teletext subpages A teletext page can hold several subpages Subpages are displayed on a bar next to the main page number 1 Press TELETEXT 2 Select a teletext page 3 Press or to select a subpage Select T O P teletext broadcasts Table Of Pages T O P teletext broadcasts allow you to jump from one subject to another without using page numbers T O P teletext is not broadcast on allTV c...

Page 18: ...le Language Switches to a different language group to display a language correctly when that language uses a different character set 4 Press OK to change an option 5 Press MENU to exit TELETEXT MENU 6 Press TELETEXT to switch off teletext Use digital text services UK only Some digitalTV broadcasters in UK offer dedicated digital text or interactive services for example BBC1 These services work lik...

Page 19: ...th 10 15 Something Special 10 30 Trisha Goddard 12 00 This is BBCTHREE 12 00 This is BBC FOUR 10 15 Daddio Around Next 07 50 Commonwealth 13 50 Anastasia 0010 EEN Remind Watch Info Jump to 2 Press the Red button to show all favorite lists 3 Press or to select a list 4 Press OK 5 Press the Green button to enter Edit list mode The selected list displays a full channel list 6 Press or to highlight a ...

Page 20: ...tons to set the channel day of the week frequency and starting time 5 Press OK to confirm 6 Press MENU to exit Tip To switch off On timer select Off in the On timer menu Watch Switches to the current programme Jump to Jumps to the next or previous day Info If available displays information about a selected program 3 Press GUIDE to exit the EPG More on 7 or 8 day EPG Searching by genre scheduling r...

Page 21: ...the Child lock menu Custom lock Lock after Channel lock Parental rating Child lock Lock Custom lock Unlock Use child control and rating locks You can prevent your children from watching certain programmes or certain channels by locking theTV controls and by using ratings Set or change the child lock code 1 Press MENU 2 Select TV menu Features Set code Change code 3 Press to enter the code setup 4 ...

Page 22: ...uage Subtitle language Equalizer Picture format Clock Use subtitles You can enable subtitles for eachTV channel Subtitles are broadcast via teletext or DVB T digital broadcasts With digital broadcasts you have the additional option of selecting a preferred subtitle language Enable subtitles on analog TV channels 1 Select an analogTV channel 2 Press TELETEXT 3 Enter the three digit page number of t...

Page 23: ... The Quick access menu appears 2 Select Clock 3 Press OK The clock is disabled View photos and play music from a USB storage device Caution Philips is not responsible if the USB storage device is not supported nor is it responsible for damage or loss of data from the device YourTV is fitted with a USB connector that enables you to view photos or listen to music stored on a USB storage device You c...

Page 24: ...how 5 Press OK to pause the slide show and press OK again to restart 6 Press one of the Colour buttons to perform the corresponding function shown at the bottom of the screen 7 Press the Blue button to stop the show and to see more functions If the function bar at the bottom disappears press any of the Colour buttons to make it reappear 8 Press and select another picture or another album Slide sho...

Page 25: ...NU to exit Update the TV software Philips continuously tries to improve its products and we recommend that you update theTV software when updates are available Check www philips com flavors for availability Check the current software version 1 Press MENU 2 Select TV menu Software update Current software info Update software analog broadcasts Before performing this procedure be sure to Set aside so...

Page 26: ...e digital and analogTV channels as well as all available digital radio channels 1 In the Installation menu press to select Channel installation 6 Install channels The first time you setup yourTV you are prompted to select a menu language and to installTV and digital radio channels if available This chapter provides instructions on how to reinstall and fine tune channels Automatically install chann...

Page 27: ...el installation Analogue Manual installation Fine tune 3 Press to enter the Fine tune menu 4 Press or to adjust the frequency 5 Press when done 2 Press to enter the Channel installation menu Automatic installation is highlighted 3 Press to select Start now 4 Press OK 5 Press the Green button to start Installation takes several minutes 6 When installation is complete press the Red button to return ...

Page 28: ...the Installation update menu Start now is highlighted 4 Press OK 5 Press the Green button to start the update This may take a few minutes 6 Select Store current channel to store the fine tuned channel under the current channel number 7 Press to enter 8 Press OK Done appears 9 Press MENU to exit Rename channels Channels can be renamed so that a name of your choice appears whenever the channel is se...

Page 29: ...nstallation Digital Test reception 3 Press to enter the Digital Test reception menu 4 Press OK 5 Press the Green button to automatically start the test or use the Numeric buttons to enter the frequency of the channel you want to test If the signal quality and strength is poor reposition the aerial or satellite dish and retest 6 When complete press the Yellow button to store the frequency 7 Press t...

Page 30: ...DMI 2 Y Pb Pr component 3 SCART 4 VIDEO composite Note The connectivity diagrams provided in this section are examples only Other types of connections are possible Bottom connectors EXT 1 TV ANTENNA SPDIF OUT 22 32 42 EXT 1 EXT 2 TV ANTENNA SPDIF OUT AUDIO IN EXT 3 L R Pr Pb Y EXT 1 EXT 2 TV ANTENNA SPDIF OUT AC IN AUDIO IN EXT 3 L R Pr Pb Y AUDIO IN EXT 3 L R Pr Pb Y AC IN VIDEO IN EXT 2 EN ...

Page 31: ...R inputs analog audio from VIDEO IN composite devices Note 22 models only AUDIO IN L R is a shared connector You cannot input audio from Y Pb Pr EXT 3 when VIDEO IN EXT 2 is in use AUDIO IN EXT 3 L R Pr Pb Y VCR VIDEO IN EXT 2 AUDIO IN L R HDMI Input video audio from HDMI devices such as Blu ray players Note To experience full HD picture quality your HDMI device must support 1080p Connect a comput...

Page 32: ...deo from composite devices such as game consoles AUDIO IN L R inputs analog audio from VIDEO IN composite devices USB USB connector for USB storage devices see View photos and play music from a USB storage device on page 21 22 32 42 SPDIF OUT Optical OutputTV audio to home theatres and other digital audio systems TV ANTENNA Input signals from aerials SPDIF OUT TV ANTENNA EN ...

Page 33: ...AM is provided by digitalTV service operators to decode digitalTV channels AUDIO IN L R AUDIO IN L R AUDIO IN L R AUDIO IN L R COMMON INTERFACE Slot for a Conditional Access Module CAM see Use a Conditional Access Module on page 31 Connect a computer Before connecting a computer to the TV Set the monitor refresh rate on your computer to 60Hz Press Picture format and change the TV picture format to...

Page 34: ...DR HD rec Game VCR EXT 1 EXT 2 EXT 3 HDMI 1 HDMI 2 HDMI Side Side Connections EXT 1 None DVD Blu ray HDD DVDR HD rec Game VCR EXT 1 EXT 2 EXT 3 HDMI 1 HDMI 2 HDMI Side Side Insert and activate a CAM Caution Be sure to follow the instructions described below Wrong insertion of a CAM may damage both the CAM and yourTV 1 Switch off theTV 2 Following the directions printed on the CAM gently insert the...

Page 35: ... compliant devices Note Compliant devices must be connected to yourTV via HDMI Enable or disable EasyLink Note Do not enable EasyLink if you do not intend to use it 1 Press MENU 2 Select TV menu Installation Preferences EasyLink 3 Select On or Off Use one touch play 1 After enabling EasyLink press play on your device TheTV automatically switches to the correct source Use one touch standby 1 Press ...

Page 36: ... or to select the connector used by the decoder 8 Press MENU to exit Connections EXT 1 None DVD Blu ray HDD DVDR HD rec Game VCR EXT 1 EXT 2 EXT 3 HDMI 1 HDMI 2 HDMI Side Side 3 Push the CAM in as far as it will go 4 Turn on theTV and wait for the CAM to be activated This may take several minutes Do not remove the CAM from the slot when in use removing the CAM will deactivate digital services Acce...

Page 37: ... compliant devices Note Compliant devices must be connected to yourTV via HDMI Enable or disable EasyLink Note Do not enable EasyLink if you do not intend to use it 1 Press MENU 2 Select TV menu Installation Preferences EasyLink 3 Select On or Off Use one touch play 1 After enabling EasyLink press play on your device TheTV automatically switches to the correct source Use one touch standby 1 Press ...

Page 38: ...3D 32FWF1013 00 42PFL6403D 42FWF1013 00 Also compatible withVESA wall mounts 8 Product information Product information is subject to change without notice For detailed product information go to www philips com flavors Supported display resolutions Computer formats Resolution refresh rate 640 x 480 60Hz 800 x 600 60Hz 1024 x 768 60Hz 1920 x 1080i 60Hz 1920 x 1080p 60Hz Video formats Resolution refr...

Page 39: ...u receive poor picture quality from connected devices Verify that the devices are connected properly Also be sure to assign devices to connectors Verify that picture settings are correctly set 9 Troubleshooting This section describes commonly encountered issues and accompanying solutions General TV issues The TV does not switch on Unplug the power cord from the power outlet Wait for one minute and...

Page 40: ...torage device may limit the transfer rate The TV did not save my settings Verify that theTV is set to Home mode which offers you complete flexibility to change settings The picture does not fit the screen it is too big or too small Try using a different picture format Assign your device to connectors The picture position on screen is not correct Picture signals from some devices do not fit the scr...

Page 41: ...refer to the FAQs for thisTV at www philips com flavors If the problem remains unresolved contact Philips Customer Support in your country as listed in this User Manual Warning Do not attempt to repair theTV yourself This may cause severe injury irreparable damage to yourTV or void your warranty Note Please have available yourTV model and serial number before contacting Philips These numbers are a...

Page 42: ...Factory settings 23 H HDMI bottom 28 side 30 Home mode 23 Hue 13 I Installation automatic 24 manual 25 10 Index A Active Control 13 Analogue channel fine tune 25 Audio language 14 Audio position 14 Auto surround 14 Auto volume levelling 14 B Brightness 13 C Channel decoder 32 Channel list troubleshooting 35 update 26 Channels favourite list 16 install automatic 24 manual 25 rearrange 26 reinstall ...

Page 43: ... digital text services 16 dual screen 15 enlarge pages 15 menu 15 search 15 subpages 15 Table of Pages 15 Teletext 2 5 16 Themes 11 K Kensington lock 33 M Menu child lock 19 language 24 main menu 10 quick access menu 10 teletext 15 themes 11 Mono Stereo 14 Multimedia technical specifications 34 Music digital radio 22 USB 22 with slideshow 22 N Noise reduction 13 O One touch play 33 One touch stand...

Page 44: ...9 as computer monitor 31 connections 28 controls 6 location 23 menu 10 remote control 6 safety 4 screen care 5 software 23 standby 8 switch channels 8 switch off 8 switch on 8 troubleshooting 35 U USB connection 21 listen to music 22 view photos 21 V Video format display resolutions 34 Volume adjust 9 automatic levelling 14 delta 14 mute 9 Y YPbPr bottom 28 EN ...

Page 45: ... 2008 Koninklijke Philips Electronics N V All rights reserved Document order number 3139 125 40722 ...

Reviews: