background image

Switching on and initial setup

Before you switch on the TV, check that the AC power cord is properly 

connected. Press 

.


(POWER


/


STANDBY-ON)

 on the front panel of 

the TV, or press 

.


(POWER


/


STANDBY-ON)

 on the remote control. 

The TV normally takes 25-30 seconds to start up and the following 

screen appears the first time you turn on the TV. 

Initial Setup

Initial Setup

Select your menu language.

Seleccione el idioma para el menú.

Sélectionnez la langue du menu.

Français

Español

Select

Skip

MENU

OK

OK

English

Follow the on-screen instructions to select your language and complete 

your TV setup. Installation takes approximately 10 minutes.
Press 

Í 

or


Æ 

to select the desired mode for energy saving, then press 

OK

.

Select “Retail” or “Home” for your location.

Retail

Select

OK

Home

Select 

[Retail]

 if you want backlight to be brighter.

Select 

[Home]

 to reduce power consumption.

You must set 

[Home]

. Otherwise, personalized picture and sound 

settings will not be memorized after the unit goes to standby mode.
•  Select 

[Retail]

, the unit will be set up with predefined setting for 

retail displays. 

•  Select 

[Home]

, the unit will be set to maximize energy efficiency. 

Picture and sound settings can be adjusted and saved as per your 

personal preferences.

Press 

OK

 to begin 

[Settings assistant]

.

BACK

OK

MENU

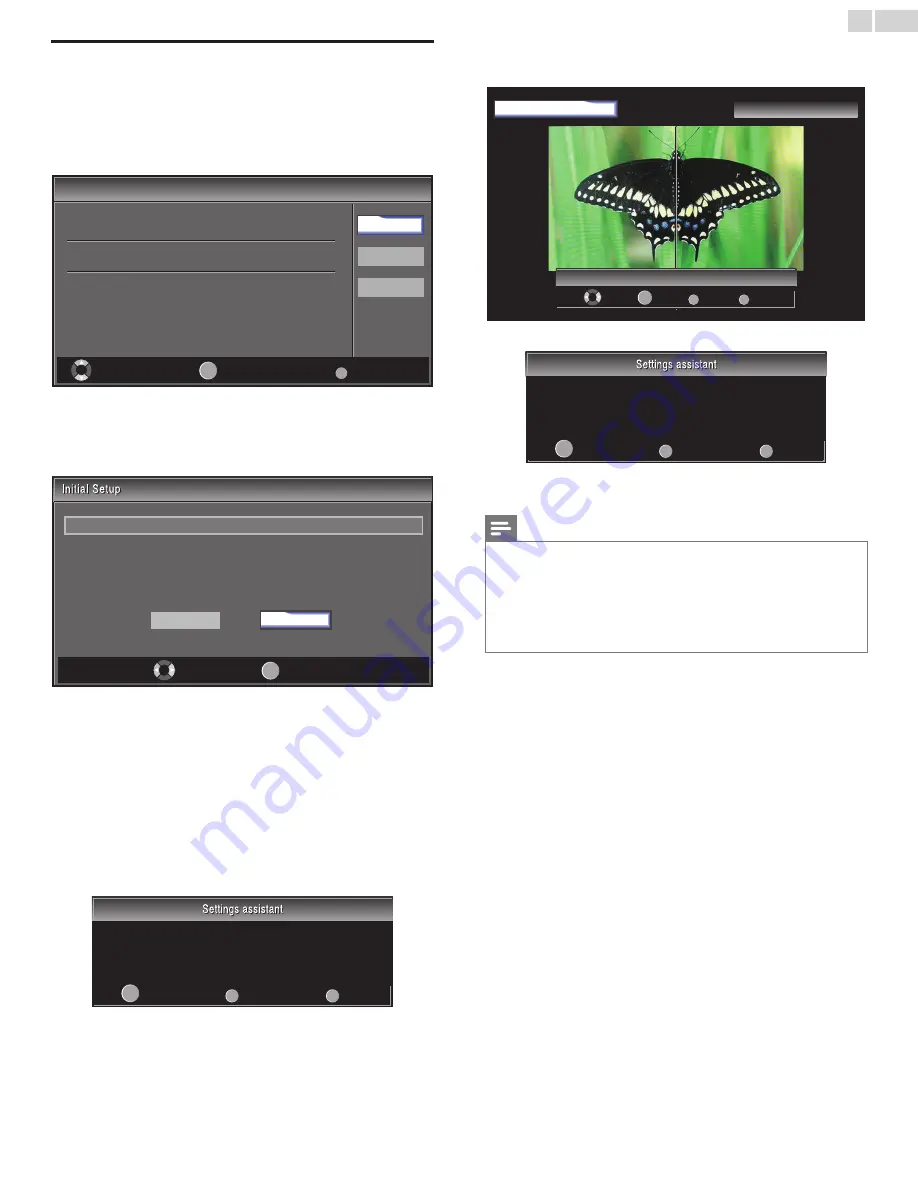
Settings assistant helps you customize picture settings. You will  

see a series of test pictures where the right side and left side 

differ. Select the side that is most pleasing to you with the Left/  

Right keys.

Next

Back

Exit

Press 

Í 

or 

Æ 

5 times to select the side of the pictures that is the most 

pleasing to you. then press 

OK

.

BACK

OK

MENU

Left side

Right side

1/5 Select the picture setting that you prefer.

Select

Next

Back

Exit

Press 

OK

 to finish 

[Settings assistant]

.

BACK

OK

MENU

You have set up your viewing preferences.

Store

Back

Exit

Finish the Setup.

Note


If you are not receiving a signal from your cable service, contact the CATV provider.


If you press 

.

 or 

MENU

 during autoprogram, this setting will be canceled.


The initial autoprogram function can be executed for either 

[Antenna]

 or 

[Cable]


only once. When you change the connection (Antenna / Cable), set autoprogram again. 

(Refer to page 24.)


If there is no signal input from the antenna terminal and no operation for several 

seconds after you turn on the TV, 

[Helpful Hints]

 appears. Follow the instructions 

listed on the TV screen.

English

11

Summary of Contents for 32PFL1507

Page 1: ...ico D F and Área Metropolitana 58 87 97 36 Interior de la Republica 01 800 839 19 89 Costa Rica 01 800 052 1564 Colombia 01 800 952 0640 ES Para obtener más información llame al servicio de soporte al cliente de su país Para obtener asistencia póngase en contacto con CENTRO DE INFORMACION AL CLIENTE México D F y Área Metropolitana 58 87 97 36 Interior de la Republica 01 800 839 19 89 Costa Rica 01...

Page 2: ... ray disc 14 Switching audio mode 14 6 Use more of your TV 15 Changing picture and sound settings 15 Sleeptimer 18 Child and rating locks 18 Closed caption 20 EasyLink 21 ECO 21 Set your location to home 21 Viewing photos and watching videos on a USB storage device 22 7 Install channels 24 Selecting your menu language 24 Autoprogram 24 Channel list 25 Add channels 25 Optimizing the signal quality ...

Page 3: ...la fiche dans la borne correspondante de la prise et pousser jusqu au fond CAUTION TO REDUCE THE RISK OF ELECTRIC SHOCK DO NOT REMOVE COVER OR BACK NO USER SERVICEABLE PARTS INSIDE REFER SERVICING TO QUALIFIED SERVICE PERSONNEL RISK OF ELECTRIC SHOCK DO NOT OPEN The caution marking is located on the rear or bottom of the cabinet CAUTION Product Safety Notification Additional Benefits By registerin...

Page 4: ...t the cable ground shall be connected to the grounding system of the building as close to the point of cable entry as practical Example of Antenna Grounding as per NEC National Electric Code ANTENNA DISCHARGE UNIT NEC SECTION 810 20 GROUNDING CONDUCTORS NEC SECTION 810 21 POWER SERVICE GROUNDING ELECTRODE SYSTEM NEC ART 250 PART H ANTENNA LEAD IN WIRE GROUND CLAMPS ELECTRIC SERVICE EQUIPMENT GROUN...

Page 5: ...ed on the P F Mexicana support website as soon as possible Pixel characteristics This LCD product has a high number of color pixels Although it has effective pixels of 99 999 or more black dots or bright points of light red green or blue may appear constantly on the screen This is a structural property of the display within common industry standards and is not a malfunction Warranty No components ...

Page 6: ...ition and explosion CAUTION Danger of explosion if battery is incorrectly replaced Replace only with the same or equivalent type WARNING Batteries battery pack or battery installed shall not be exposed to excessive heat such as sunshine fire or the like WARNING To prevent injury this apparatus must be securely attached to the furniture wall in accordance with the instructions Tipping shaking or ro...

Page 7: ...controls and indicators b a c d e f a Standby indicator remote control sensor b VOL Increases or decreases volume c MENU Toggles the main menu on or off d SOURCE Selects connected devices e CH Switches to the next or previous channel f POWER STANDBY ON Switches theTV on or puts it in standby mode TheTV is not powered off completely unless it is physically unplugged English 6 ...

Page 8: ...ion depends on the broadcaster You might see a difference in broadcast time if the broadcast is from a different time zone i CH Switches to the next or previous channel j MUTE Mutes or unmutes audio k Number buttons Select a channel page or setting l Dot Press the dot for digital channels m PREV CH Returns to the previously viewed channel n VOL Increases or decreases volume o MENU EXIT Turns the m...

Page 9: ... the connections are made Ensure that you always have easy access to the AC power cord or plug to disconnect theTV from the power Before you move theTV disconnect attached cables to prevent damage to connectors Be sure to unplug the AC power cord from the AC outlet before moving or carrying the unit Installing the remote control batteries 1 Slide the battery cover off the back of the remote contro...

Page 10: ...tailer if you are unsure about what HDTV programs are available in your area Broadcasters are transitioning from analog to digitalTV This means that a given broadcaster can have channels available either in analog or in digital or both analog and digital at the same time TheTV produces stereo sound only if a stereo signal is broadcast If you connect to a cable When yourTV is connected to the cable...

Page 11: ... that your power voltage corresponds with the voltage printed at the back of the TV Do not insert the AC power cord if the voltage is different Connect the AC power cord plug to the power outlet Ensure that the cord is tightly secured English 10 ...

Page 12: ...he unit will be set to maximize energy efficiency Picture and sound settings can be adjusted and saved as per your personal preferences Press OK to begin Settings assistant BACK OK MENU Settings assistant helps you customize picture settings You will see a series of test pictures where the right side and left side differ Select the side that is most pleasing to you with the Left Right keys Next Ba...

Page 13: ...is section helps you perform basicTV operations Switching on your TV and putting it in standby mode To switch on Press POWER STANDBY ON on the front panel or press POWER STANDBY ON on the remote control To switch to standby Press POWER STANDBY ON on the front panel or press POWER STANDBY ON on the remote control again Note Energy consumption contributes to air and water pollution When the AC power...

Page 14: ...op box and wait a few seconds for the picture to appear 2 Use the remote control of your set top box to select channels Watching connected devices To watch connected devices 1 Switch on the connected device The picture from your connected device might appear automatically on theTV screen 2 Use the remote control of the device to select channels If the picture does not appear 1 Press SOURCE repeate...

Page 15: ...udio languages Available languages differ depending on the broadcast Other is displayed when the audio language cannot be acquired or the acquired languages are other than English Spanish or French Note SAP does not control external audio devices The information display will automatically disappear in a few seconds TV Press SAP to display the currently selected audio mode While receiving an MTS br...

Page 16: ...s 6 Use more of your TV Changing picture and sound settings You must set Home in Location refer to page 21 Otherwise personalized picture and sound settings will not be memorized after the unit goes to standby mode Changing picture settings 1 Press MENU on the remote control 2 Press OK to enter the Picture Picture Sound Setup Features Language USB Settings assistant Personal 30 60 36 0 0 Normal On...

Page 17: ...of the screen Full Display a picture that is stretched out of proportion to fill the screen Unscaled Display a picture in its original size Changing picture format 1 Press FORMAT on the remote control 2 Press Î or ï to select a picture format and press OK to confirm your choice Summary of picture formats Display modes can be selected when the broadcasting station is sending 16 9 or 4 3 video signa...

Page 18: ...l volume on the external amplifier Press Î or ï to select the desired option then press OK On The sound will be output from the unit s speakers Off The sound will not be output from the unit s speakers Speakers EasyLink You can control audio output from your connected EasyLink Compliant Devices with VOL by using this unit s remote control Audio Setting You can set the output mode as a default for ...

Page 19: ...ures Language USB When you block a rating all ratings in the younger age categories are automatically blocked 3 Press MENU to exit Sleeptimer You can always put yourTV in standby mode earlier or reset the sleeptimer during the countdown Press SLEEP to set the sleep timer Sleep Off Sleeptimer display appears on theTV screen Press SLEEP repeatedly to change the amount of time in increments of 30 min...

Page 20: ...with strong violence strong language and strong sexual content 18ans Only to be viewed by adults and contains extreme violence and graphic sexual content pornography Summary of TV ratings Age rating Content rating TV Y Appropriate for children of all ages with themes and elements suitable for children aged 2 6 None TV Y7 Programs designed for children age 7 and older FV FantasyViolence TV G Progra...

Page 21: ...tions do not always use correct spelling and grammar Not allTV programs and product commercials include closed caption information Refer to your areaTV program listings for theTV channels and times of closed caption shows The captioned programs are usually noted in theTV listings with service marks such as CC DTV Selecting DTV caption services 1 Select a caption service for digital channels Press ...

Page 22: ...and select Features EasyLink Picture Master EasyLink On On On Sound Auto Device Off Setup Auto TV On Features Device List Language USB 2 Press Î or ï to highlight the desired setting and press OK to select the setting 3 Adjust the following items Master EasyLink Set the EasyLink On or Off The following additional settings will be grayed out when you set to Off Press Î or ï to select the desired op...

Page 23: ...n on theTV 2 Connect the USB storage device to the USB port on the side of yourTV The main menu appears automatically 3 Press Î or ï select USB USB USB0 Picture This menu allows you to enjoy your pictures and videos via your USB device Sound Setup Features Language Disconnect a USB storage device Caution To avoid damaging the USB storage device always exit the on screen menu and wait five seconds ...

Page 24: ...s a picture Zoom Displays a list of available magnifications Start show Stop show Starts or stops a slide show Watch yourVideo on a USB storage device 1 Connect your USB storage device to theTV 2 Press OK to enter the USB menu 3 Select Video 4 Press OK to enter the video folder 1 2 3 4 USB0 Video Title MOVIE1 avi Director Date 2009 04 02 Duration 00 06 37 MOVIE1 avi MOVIE2 avi MOVIE3 avi MOVIE4 av...

Page 25: ...Features Language USB Autoprogram Channel List Add Channels Antenna 2 Press OK to start the installation If you run Autoprogram when you have locked channels a message appears asking to enter your PIN Enter your PIN in order to complete the installation If you have forgotten your PIN reset it as described in Changing your PIN on page 18 3 Select Antenna or Cable and press OK When Antenna is select...

Page 26: ...Ch Change Back BACK Picture For analog channels select a channel to be added using number keys For digital channels you must perform Autoprogram function Add channels Sound Setup Features Language USB 3 Press MENU to exit Note If setup completes successfully Added to the channel list is displayed If external input is used it is not possible to register the channel and Unavailable will be displayed...

Page 27: ...retry the procedure or contact your dealer Downloading the software 1 On your PC open a web browser and go to www philips com support 2 Find information and software related to yourTV and download the latest software upgrade file to your PC 3 Decompress the ZIP file 4 Copy the upgrade file to the root directory of the USB storage device Upgrading software 1 Prepare the software upgrade see Prepari...

Page 28: ...m high definition Digital devices such as Blu ray disc players cable boxes and satellite set top boxes f Component Y Pb Pr CompositeVideo VIDEO Input jacks for VIDEO CompositeVideo Input VIDEO jack is shared jack with ComponentVideo Input Y jack g Analog Audio L R Input jacks Connect Analog Audio signals from HDMI DVI Analog Audio L R jacks signal ComponentVideo Analog Audio L R jacks signal Compo...

Page 29: ...orm of Digital Rights Management that protects high definition content in DVD or Blu ray Discs Component Y Pb Pr High quality Component video cable red green blue and audio L R cable red white Supports high definition signals but gives lower picture quality than HDMI Component cables combine a red green blue video cable with a red white audio L R cable Match the cable colors when you connect to th...

Page 30: ... loudspeaker reproduces sound for mono equipment Use a mono to stereo adapter not supplied for sound reproduction via all internal loudspeakers When you connect cables match the cable colors to the connectors on theTV Connecting your devices This section describes how to connect a selection of devices with different connectors Different types of connectors can be used to connect a device to yourTV...

Page 31: ...nector and analog audio RF IN OUT OUT IN IN Audio L R video cables set top box cable Note Only the left loudspeaker reproduces sound for mono equipment Use a mono to stereo adapter not supplied for sound reproduction via all internal loudspeakers When you connect cables match the cable colors to the connectors on theTV Connecting a digital home theater amplifier using a digital audio coaxial cable...

Page 32: ...to yourTV or void your warranty Note Please have available yourTV model and serial number before contacting us These numbers are available on the back and side of yourTV as well as on the packaging 10 Troubleshooting Problem Possible cause and solution No power or indicator light TheTV is not connected to the power Press POWER STANDBY ON on the front panel or on the remote control Ensure that the ...

Page 33: ... unsupported or corrupted files are on the device Digital Camera Issues If a USB connection between your digital camera and theTV isn t working you can try the solutions below to resolve your problem Make sure your digital camera is switched on and verify if the configuration of your digital camera is correct see the manual of your digital camera for more information Some digital cameras allow you...

Page 34: ...ocation retail or home 11 21 M Master EasyLink 21 Mounting stand onto TV 8 P PC 30 Picture format 16 17 Picture settings 15 Positioning the TV 8 Product information 5 R Ratings 18 19 Regulatory notices 5 Remote control insert batteries 8 overview 7 Retail mode 11 21 S Screen care 5 Settings assistant 11 Signal quality 28 Sleeptimer 18 Software update 26 version 26 Sound settings 17 Speakers EasyLi...

Page 35: ...hilips Shield are used under license of Koninklijke Philips Electronics N V P F USA Inc PO Box 430 Daleville IN 47334 0430 P F Mexicana S A de C V Av La Palma No 6 Col San Fernando La Herradura Huixquilucan Edo de México C P 52787 ...

Reviews: