background image

33

English

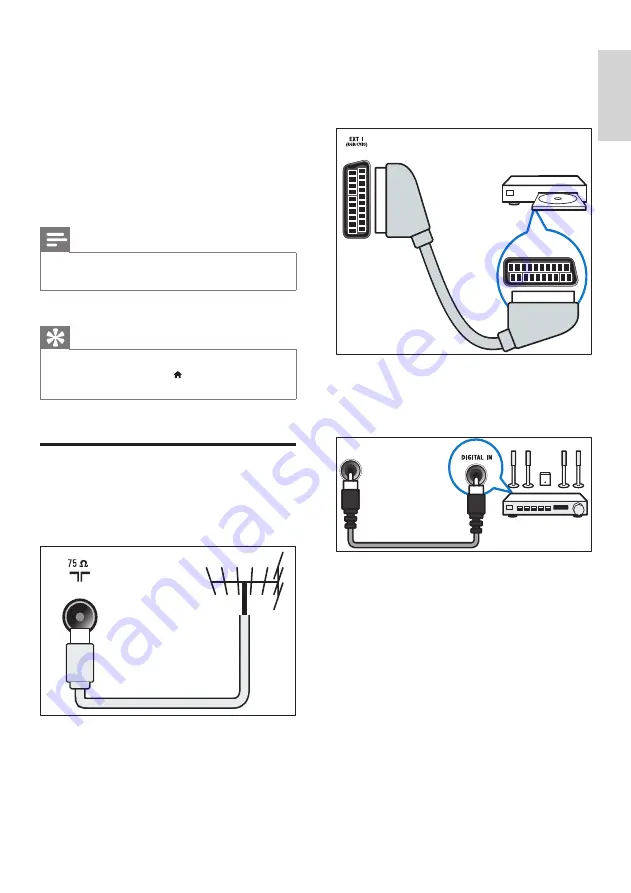
b

  EXT 1 (RGB and CVBS)

Analogue audio and video input from 

analogue or digital devices such as DVD 

players or game consoles.


c

  DIGITAL AUDIO OUT 

Digital audio output to home theatres and 

other digital audio systems.


d

  SERV. U

For use by service personnel only.

SPDIF OUT

7  Connect devices

This section describes how to connect devices 

with different connectors. For the location of 

these connectors on your TV, see the quick 

start guide. More examples of connections with 

other devices are provided in the Quick Start 

Guide.

Note


You can use different types of connectors to connect a 

device to your TV.

Tip


After connection, for easy access to your device, add 

it to the home menu: press  , then select 

[Add new 

device]

Back connections

a

  TV ANTENNA

Signal input from an antenna, cable or 

satellite.


TV ANTENNA

EN

Summary of Contents for 22PDL49 Series

Page 1: ...r your product and get support at www philips com welcome EN User manual 47PFL4606H 46PFL5606H 42PFL4x06H 42PFL3x06H 40PFL5xx6H 37PFL4606H 32PFL5x06H 32PFL4606H 32PFL3x06H 26PDL49x6H 22PDL49x6H DesignLine Tilt ...

Page 2: ...blázatában nem jelenik meg előnézeti kép IT Integrazione Quando si seleziona un canale dalla relativa griglia l anteprima non viene visualizzata KK Қосымша Арналар кестесінен арна таңдалғанда алдын ала қарау мүмкіндігі болмайды HR Dodatak Kada odaberete kanal s mreže kanala pretpregled se ne prikazuje FR Addenda Lorsque vous sélectionnez une chaîne dans la grille des chaînes aucun aperçu n est dis...

Page 3: ...i prikazan predogled SR Dodatak Kada izaberete kanal iz mreže kanala pregled se ne prikazuje SV Tillägg När du markerar en kanal i kanalöversikten visas ingen förhandsgranskning UK Додаток Під час вибору каналів з таблиці каналів попередній перегляд не відображається TR Ek Kanal ızgarasından bir kanal seçtiğinizde bir önizleme görüntülenmez AR الملحق عندما تختار قناة من قائمت شبكت القنواث ال يتم ع...

Page 4: ...v PCM ADPCM A law PCM u law PCM MPEG1 Layer1 2 MP3 MPEG2 AAC LC MPEG4 AAC LC HE AAC AC3 WMAv8 mp4 mov and 3gpp extensions are not supported MP4 Container File Extensions Video codec XviD Maximum resolution 1920x1080 MPEG1 768x576 Max Frame Rate fps MPEG2 MP HL 1920x1080 1920x1080 30 30 30 30 mp4 avi AVI wav MKV aac mp4 m4a AAC YES YES YES YES DLNA YES YES YES YES USB Max Bit Rate Mbps 40 Mbps 1 8 ...

Page 5: ...t us 45 10 Index 46 Contents 1 Notice 2 2 Important 4 3 Your TV 7 TV controls 7 Remote control 8 Remote control usage 9 4 Use your TV 10 Switch yourTV on 10 Switch yourTV to standby 10 Switch yourTV off 11 Switch channels 11 Watch connected devices 12 AdjustTV volume 12 Use teletext 13 5 Use more of your TV 14 AccessTV menus 14 Add device to the home menu 14 Rename devices from the home menu 14 Re...

Page 6: ...ce the mains fuse this must be replaced with a fuse of the same value as indicated on the plug example 10A 1 Remove fuse cover and fuse 2 The replacement fuse must comply with BS 1362 and have the ASTA approval mark If the fuse is lost contact your dealer in order to verify the correct type 3 Refit the fuse cover 1 Notice 2012 TPVision Netherlands B V All rights reserved Specifications are subject...

Page 7: ...t the world Manufactured under licence from Dolby Laboratories Dolby and the double D symbol are trademarks of Dolby Laboratories HDMI the HDMI logo and High Definition Multimedia Interface are trademarks or registered trademarks of HDMI licensing LLC in the United States and other countries All other registered and unregistered trademarks are the property of their respective owners EN ...

Page 8: ...ct remote control may contain a coin type battery which can be swallowed Keep the battery out of reach of children at all times Risk of overheating Never install theTV in a confined space Always leave a space of at least 4 inches or 10 cm around theTV for ventilation Ensure curtains or other objects never cover the ventilation slots on theTV 2 Important Read and understand all instructions before ...

Page 9: ...urs The condensation moisture will not harm theTV or cause malfunction Risk of damage to the TV Before you connect theTV to the power outlet ensure that the power voltage matches the value printed on the back of theTV Never connect theTV to the power outlet if the voltage is different If you need to store theTV disassemble the stand from theTV Never lay theTV on its back with the stand installed R...

Page 10: ...nk compliant devices you can switch them off Disposal of your old product and batteries Your product is designed and manufactured with high quality materials and components which can be recycled and reused When this crossed out wheeled bin symbol is attached to a product it means that the product is covered by the European Directive 2002 96 EC Please inform yourself about the local separate collec...

Page 11: ...on your purchase and welcome to Philips To fully benefit from the support that Philips offers register yourTV at www philips com welcome TV controls a Adjust volume b Home Access the home menu c CH Switch channels d Power Switch the TV on or off 1 2 3 4 xxPFL5xx6 1 2 3 4 xxPFL4xx6 EN ...

Page 12: ...or selection o Navigation buttons Navigate through menus and select items p ADJUST Access the menu to adjust settings q Colour buttons Select tasks or options Remote control a Standby On Switch theTV on or to standby b Play buttons Control video or music c FIND Access the menu to select aTV channel list d Home Access the home menu e CH CH Previous Next Switch channels or navigate through menu page...

Page 13: ...ote control hold it close to theTV and point it at the remote control sensor Make sure that the line of sight between the remote control andTV is not blocked by furniture walls or other objects 5m 30 xxPFL5xx6 xxPFL4xx6 5m 30 xxPFL3xx6 5m 30 DesignLineTilt EN ...

Page 14: ...ndby On on the remote control again The remote control sensor on theTV switches to red DesignLineTilt 4 Use your TV This section helps you perform basicTV operations Switch your TV on Press the power switch on theTV There is a short delay before theTV responds xxPFL5xx6 xxPFL5xx6 xxPFL4xx6 xxPFL3xx6 EN ...

Page 15: ...ch a channel select it then press OK xxPFL3xx6 DesignLineTilt Switch your TV off Press the power switch on theTV again The remote control sensor on theTV switches off For xxPFL5xx6 theTV no longer consumes energy For xxPFL4xx6 xxPFL3xx6 and DesignLineTilt though theTV consumes very little power when in standby energy continues to be consumed When not in use for an extended period of time disconnec...

Page 16: ...estore the sound xxPFL5xx6 xxPFL4xx6 xxPFL3xx6 DesignLineTilt Watch connected devices Note Before you select a device as a source switch the device on Select a device from the source list 1 Press SOURCE The source list appears 2 Press to select a device 3 Press OK to confirm your choice TheTV switches to the selected device EN ...

Page 17: ...e Numeric buttons to enter a page number Press or to view the next or previous page Press the Colour buttons to select a colour coded item Press BACK to return to a previously viewed page 3 Press TEXT to exit teletext Note For UK users only Some digitalTV channels offer dedicated digital text services for example BBC1 EN ...

Page 18: ...device then press OK A text input box appears 5 For each character in the device name select a character then press OK to confirm Press Aa to change uppercase letters to lowercase letters and vice versa 6 When the new name is complete select Done then press OK 5 Use more of your TV Access TV menus Menus help you to install channels change picture and sound settings and access other features 1 Pres...

Page 19: ...home menu If a device is no longer connected to theTV remove it from the home menu 1 Press 2 Select a device to remove 3 Press OPTIONS 4 Select Remove device then press OK 5 Select Remove then press OK The selected device is removed from the home menu Change picture and sound settings Change picture and sound settings to suit your preferences You can apply pre defined settings or change settings m...

Page 20: ...Contrast Adjust the intensity of backlight areas while the video contents are kept unchanged Brightness Adjust the intensity and details of dark areas Colour Adjust colour saturation Hue Compensate for colour variations Sharpness Adjust sharpness in the image Noise reduction Filter and reduce noise in an image Tint Adjust the colour balance in an image Custom tint Customise tint setting Only avail...

Page 21: ...r games DRAMA Ideal settings for drama programmes Sports Ideal settings for sports programmes Change picture format 1 Press ADJUST 2 Select Picture format then press OK 3 Select a picture format then press OK Summary of picture formats The following picture settings can be configured Note Depending on the format of the picture source some picture settings are not available EN Auto format For selec...

Page 22: ...d volume Adjust the volume of visually impaired audio Key beep Switch on audio feedback when buttons are pressed on the remote control orTV Tip Press the colour buttons on the remote control to enter the options Manually adjust sound settings 1 Press 2 Select Setup TV settings Sound then press OK The Sound menu appears 3 Select one of the following settings then press OK Smart sound Access predefi...

Page 23: ...5 is broadcast by a channel it is switched on by default 1 Press 2 Select Setup TV settings Preferences Teletext 2 5 3 Select On or Off then press OK to confirm Use advanced teletext features Access the teletext options menu Access the teletext features through the teletext options menu 1 Press TEXT The teletext screen appears 2 Press OPTIONS The teletext options menu appears 3 Select one of the f...

Page 24: ...isplaying information about the scheduled programmes Note Programme guide data is available only in selected countries and can take some time to load Create and use lists of favourite channels You can create a list of your preferredTV channels so that you can find those channels easily View only the list of favourite channels 1 While you watchTV press FIND The channel matrix menu is displayed 2 Pr...

Page 25: ... priority Display the TV clock 1 While you watchTV press OPTIONS The options menu is displayed 2 Select Clock The clock is displayed 3 Press OK Note To disable the clock repeat the procedure Change programme guide options You can set or clear reminders change the day and access other useful options in the programme guide options menu 1 Press 2 Select Programme guide then press OK 3 Press OPTIONS T...

Page 26: ...off 4 Press OK to switch on the sleep timer TheTV switches to standby after the specified time Change the clock mode 1 Press 2 Select Setup TV settings Preferences Clock Auto clock 3 Select Automatic or Manual then press OK Change the time zone Note This option is only available if you select Auto clock Automatic in countries with clock transmission data 1 Press 2 Select Setup TV settings Preferen...

Page 27: ... Set parental ratings Some digital broadcasters rate their programmes according to age You can set your TV to display only programmes with age ratings lower than your child s age 1 Press 2 Select Setup Channel settings Child lock Parental rating A code setup screen appears 3 Enter your code using Numeric buttons The rating menu appears 4 Select an age rating then press OK 5 Press to exit Lock unsu...

Page 28: ...btitles On during mute When audio is muted display subtitles Note Repeat this procedure to enable subtitles on each analogue channel Select Subtitles Subtitles off to disable subtitles View Scenea You can display a default picture as the wallpaper on yourTV You can also load another picture as the wallpaper If the sleeptimer is off the wallpaper is displayed for 240 minutes Otherwise it is display...

Page 29: ...V wallpaper see View Scenea on page 24 3 To return press Note Rotate image and Show info appear only when the slideshow is paused Select a subtitle language in digital channels Note When you select a subtitle language in a digitalTV channel as described below the preferred subtitle language set in the installation menu is temporarily overruled 1 While you watchTV press OPTIONS 2 Select Subtitle la...

Page 30: ... avoid damage to your USB storage device 1 Press to exit the USB browser 2 Wait for five seconds then disconnect the USB storage device Listen to music 1 In the USB browser select Music then press OK 2 Select a music track or album then press OK to play 3 To control play press the play buttons to play to pause or to play the previous or next track or to search forward or backward to stop Change mu...

Page 31: ... update file to the root directory of your USB device 7 Disconnect the USB storage device from the computer Listen to digital radio channels 1 Press FIND The channel matrix menu is displayed 2 Press OPTIONS then select Select list Radio The radio channel grid appears 3 Select a radio channel and press OK to listen Update the TV software Philips continuously tries to improve its products and we rec...

Page 32: ...tup Software settings Local updates 6 Select the file that you downloaded then press OK to update theTV software manually 7 Follow the on screen instructions to complete the update 8 To exit press B Update when prompted through digital broadcasts If you receive digital broadcasts DVB T your TV can automatically receive software updates When yourTV receives a software update it will prompt you to u...

Page 33: ...h theTV to standby after a pre defined duration Location OptimiseTV settings for your location home or shop E sticker For shop mode only Switch the e sticker on or off Volume bar Display the volume bar when you change the volume Auto switch off To conserve energy set theTV to switch to standby automatically after a period of inactivity ThisTV is also designed with other energy efficiency settings ...

Page 34: ...rn press 6 Install channels The first time you set up yourTV you are prompted to select a menu language and to installTV and digital radio channels if available Afterwards you can re install and fine tune channels Automatically install channels You can search and store channels automatically Step 1 Select your menu language 1 Press 2 Select Setup TV settings Preferences Menu language then press OK...

Page 35: ...s OK 6 When the name is complete select Done then press OK Tip Press Aa to change an uppercase letter to a lowercase letter and vice versa Manually install analogue channels You can search and store analogueTV channels one at a time Step 1 Select your system Note If your system settings are correct skip this step 1 Press 2 Select Setup Channel settings Channel installation Analogue Manual antenna ...

Page 36: ...rearrange then press OK The selected channel is highlighted 5 Move the highlighted channel to its new location then press OK 6 Press OPTIONS 7 Select Done reordering then press OK Access CAM services 1 Insert and activate the CAM see Insert and activate a CAM on page 37 2 Press OPTIONS 3 Select Common interface Applications provided by the digitalTV service operator are displayed Note This menu op...

Page 37: ...s section describes how to connect devices with different connectors For the location of these connectors on yourTV see the quick start guide More examples of connections with other devices are provided in the Quick Start Guide Note You can use different types of connectors to connect a device to yourTV Tip After connection for easy access to your device add it to the home menu press then select A...

Page 38: ...video input from analogue or digital devices such as DVD players or game consoles e PC IN VGA and AUDIO IN Audio and video input from a computer f HDMI 1 ARC Digital audio and video input from high definition digital devices such as Blu ray players Also outputsTV audio to other EasyLink compliant devices such as home theatre systems Connections via DVI orVGA require an additional audio cable see C...

Page 39: ...ers e Headphone Stereo audio output to headphones or earphones f COMMON INTERFACE Slot for a Conditional Access Module CAM Side connections a AUDIO L R Audio input from analogue devices connected to VIDEO b VIDEO Composite video input from analogue devices such asVCRs c USB Data input from USB storage devices EN ...

Page 40: ...er Before you connect a computer to the TV Set the screen refresh rate on your computer to 60Hz Select a supported screen resolution on your computer Connect a computer with one of the following connectors Note Connections via DVI orVGA require an additional audio cable HDMI cable DVI HDMI cable DVI AUDIO IN LEFT RIGHT VGA DVI EN ...

Page 41: ...tation from your service operator on how to insert a smart card into the Conditional Access Module Insert and activate a CAM Caution Be sure to follow the instructions described below Wrong insertion of a CAM may damage both the CAM and yourTV 1 Switch off theTV and disconnect it from the power outlet 2 Following the directions printed on the CAM gently insert the CAM into the COMMON INTERFACE at ...

Page 42: ...cted HDMI devices switch to standby Use Philips EasyLink Get the most out of your HDMI Consumer Electronic Control CEC compliant devices with Philips EasyLink enhanced control features If your HDMI CEC compliant devices are connected through HDMI you can control them at the same time with yourTV remote control To enable Philips EasyLink you need to Connect at least two HDMI CEC compliant devices t...

Page 43: ...urTV picture quality is affected by the picture processing features of other devices switch on Pixel Plus Link 1 Press 2 Select Setup TV settings EasyLink Pixel Plus Link On then press OK Set TV speakers to EasyLink mode If you connect an HDMI CEC compliant device that includes speakers you can choose to hear theTV from those speakers instead of theTV speakers When you play content from an EasyLin...

Page 44: ...vice is connected through an HDMI ARC connector see Back connections on page 33 2 Press 3 Select Setup TV settings EasyLink HDMI1 audio out then press OK 4 Select one of the following then press OK On Hear theTV audio through the connected EasyLink device You cannot hear theTV audio through theTV speakers or through devices connected through the digital audio out connector Off Hear theTV audio thr...

Page 45: ...ng normal household use IEC 62087 Ed 2 The maximum power rating stated between brackets is used for electrical safety IEC 60065 Ed 7 2 8 Product information Product information is subject to change without notice For detailed product information go to www philips com support Supported display resolutions Computer formats Resolution refresh rate 640 x 480 60 Hz 800 x 600 60 Hz 1024 x 768 60 Hz 1280...

Page 46: ... 5 x 683 x 236 4 mm Weight 14 2 kg Supported TV mounts To mount theTV purchase a PhilipsTV mount or a compatibleTV mount Warning Follow all instructions provided with theTV mount TPVision Netherlands B V bears no responsibility for improperTV mounting that results in accident injury or damage Before you mount perform these steps 1 To prevent damage to cables and connectors leave a clearance of at ...

Page 47: ...xD 946 x 577 5 x 40 mm Weight 12 3 kg WithTV stand Dimension WxHxD 946 x 631 x 243 6 mm Weight 15 kg 37PFL4606H WithoutTV stand Dimension WxHxD 912 3 x 577 1 x 84 1 mm Weight 10 3 kg WithTV stand Dimension WxHxD 912 3 x 625 2 x 236 4 mm Weight 12 8 kg 32PFL5x06H WithoutTV stand Dimension WxHxD 761 x 473 x 39 9 mm Weight 7 2 kg WithTV stand Dimension WxHxD 761 x 525 5 x 221 mm Weight 8 9 kg 32PFL46...

Page 48: ...nfluence reception quality If possible try to improve the reception quality by changing the antenna direction or moving devices away from theTV 9 Troubleshooting This section describes commonly encountered issues and accompanying solutions General TV issues The TV does not switch on Disconnect the power cable from the power outlet Wait for one minute then reconnect it Check that the power cable is...

Page 49: ... product or void your warranty Note Make a note of yourTV model and serial number before you contact Philips These numbers are printed on the back of theTV and on the packaging If reception on only one channel is poor fine tune this channel There is poor picture quality from connected devices Check that the devices are connected properly Check that the picture settings are correctly set The TV did...

Page 50: ...me menu 14 home mode 29 I install install channels install channels automatic 30 K kensington lock 40 L language audio 24 menu 24 10 Index A age rating 232323 analogue channels language change 24 audio language 24 C CAM enable 37 Insert 37 care 5 channels channel list 11 favourites 20 install automatic 30 rearrange 32 rename 31 reorder 32 switch 11 update 30 child lock 2323 clock 21 common interfa...

Page 51: ...lume 12 W wall mount 42 subtitles 24 location home or shop 29 M multimedia 25 multimedia play files 25 mute TV speakers 3940 P PC display resolutions 41 picture format 17 picture settings 1516 Pixel Plus link 39 position the TV 29 power 41 R recycle 6 reinstall TV 30 remote control onscreen 38 overview 8 rename channels 31 reorder channels 32 S Scenea see screen saver 24 Scenea switch on 24 screen...

Page 52: ...itchover in the UK Digital UK provides im partial information on what people need to do to prepare for the move to digital and when they need to do it How the switchover affects your TV equipment Your new TV has a digital tuner built in which means it is ready to receive the Freeview signal by simply plugging it into your aerial socket check if you can get digital TV through your aerial now or whe...

Page 53: ... Search for channels and press OK 4 Select Reinstall channels and press OK 5 Select your country UK and press OK 6 Select Antenna DVB T and press OK 7 Select Start and press OK The installation can take several minutes When the installation is complete press OK Your TV is now retuned If you are missing any channels it may be that they are not available in your area or that your aerial needs upgrad...

Page 54: ... tarifiem Lithuania Lietuva 8 5 214 0293 national Gali būti taikomas papildomas Jūsų mobiliojo operatoriaus mokestis Luxembourg Luxemburg 24871100 national Additional cost may be ap plied by your mobile network provider Netherlands Nederlands 0900 202 08 71 0 10 min Additionele kosten kunnen in rekening worden gebracht door uw mobiele netwerk provider Norway Norge 22 97 19 14 Poland Polska 22 397 ...

Page 55: ... 2012 TP Vision Netherlands B V All rights reserved Document order number ...

Reviews: