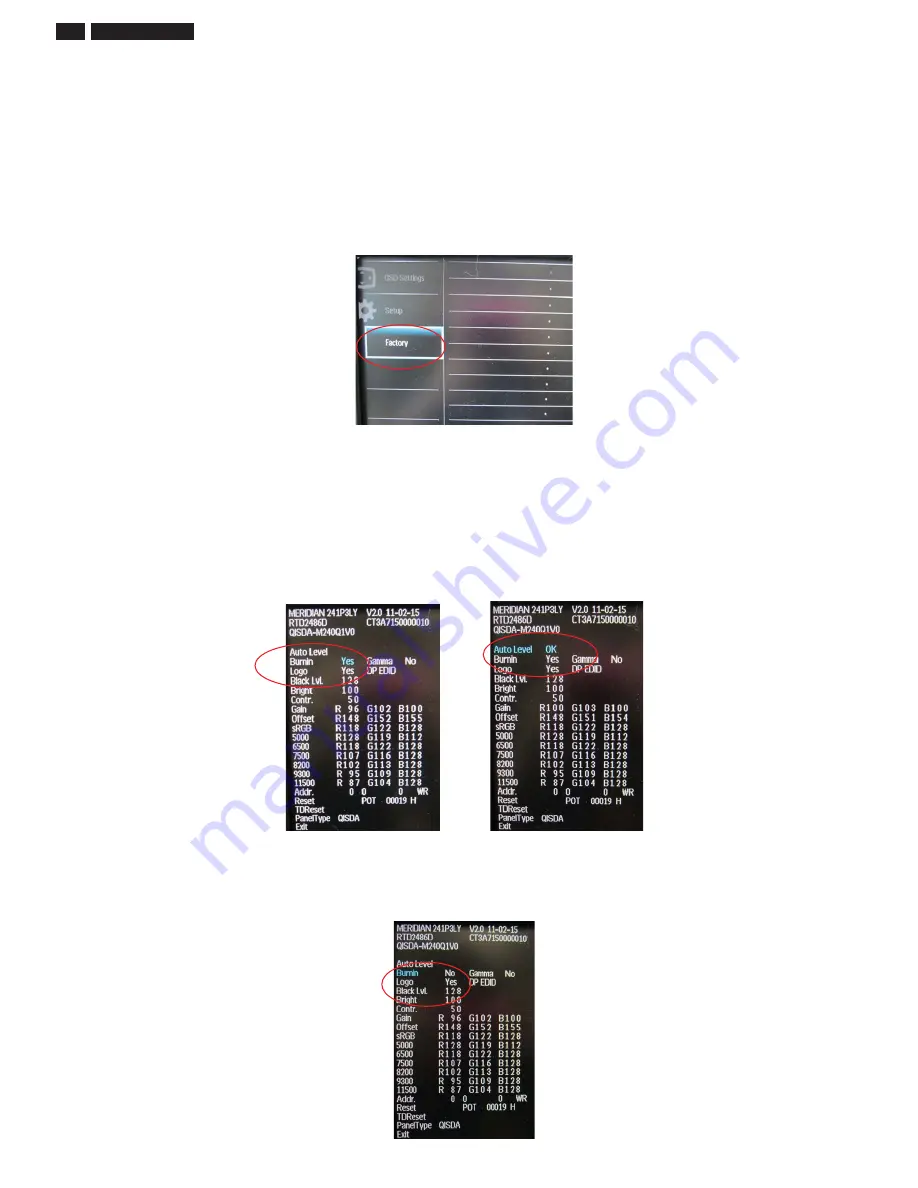
Philips M3/M4 Series Auto Color SOP
Step 1:
Setup input timing
(1280*1024@75Hz)
and enter factory mode (press
“Menu
”
& “
Down
” & “
Power
” buttons at the same time to turn on monitor).
Step 2:
Move cursor into “
Burn-in Mode
” and select “
Yes
” to enable burn-in mode.
Move cursor into “
Auto Level
” and press
“Menu
” button. It will show “
ok
”
meaning “AUTO COLOR” OK
Step 3: Before you leave the factory mode, please remember to move cursor
into “
Burn-in Mode
” and select “
No
”
78
228C3LH LCD
Summary of Contents for 228C3LHSB/00
Page 7: ...228C3LH LCD 7 Troubleshootingʳ ...
Page 8: ...8 228C3LH LCD Troubleshooting ...
Page 17: ...228C3LH LCD 17 FAQs Frequently Asked Questions ...
Page 18: ...18 228C3LH LCD FAQs Frequently Asked Questions ...
Page 21: ...228C3LH LCD 21 Service tool Hardware PCM code 12NC 5E L8215 001 996510019769 ...
Page 26: ...26 228C3LH LCD DDC Instructions Step 2 Press Open File then choose 228C3LH DDC FILE Fig 5 ...
Page 33: ...228C3LH LCD 33 Firmware Upgrade for CPU Step 4 Press Auto to upgrade FW Step 5 Upgrade OK ...
Page 35: ...228C3LH LCD 35 LULQJ LDJUDP ...
Page 36: ...36 228C3LH LCD ORFN LDJUDP ...
Page 43: ...228C3LH LCD 43 S calar Diagram C B A ...
Page 45: ...LED Driver Diagram C B A 228C3LH LCD 45 ...
Page 46: ...LED Driver Diagram C B A 46 228C3LH LCD ...
Page 48: ...Control Diagram C B A 48 228C3LH LCD ...
Page 50: ...LED Diagram C B A 50 228C3LH LCD ...


