background image

8

Cravates

A er a big collapse or a er a badly executed full stall, a part of the wing might be tangled up in the lines, and wonʼt reopen

automatically. This is what you call a cravate. During our extensive test flights with the MAESTRO 2 light we never experienced a

cravate but this situation can not be eliminated for any paraglider.
In case of a cravate we recommend the following actions:

1.

Counter steer:

Probably the wing wants to turn to the side of the cravate. In some cases, the turning happens quickly

and will end in a stable deep spiral without the pilotʼs action. So it is important to react quickly by counter steering.

2.

Opening the cravate by applying the brake with an impulse movement:

Some cravats can be opened with this

method. It is important to keep the wing in straight flight by pulling the other brake all the time.

3.

Pulling the stabilo line:

Some cravats can be opened by strongly pulling the stabilo line. (It is the orange line on the

B-riser. Have a look at it or grab it every once in a while and you will be able to react quicker in a moment of danger.)

4.

Induce a collapse on the side with the cravate.

Sometimes this helps as well to get rid of the cravate.

5.

Full stall:

Many cravats can be opened by using the Full Stall. But of course you have to have solid experience with this

maneuver to be able to use it properly.

6.

Reserve:

If you lose control or if you are not absolutely sure that you have enough height for further attempts to recover,

immediately use your reserve!

Many pilots wait way too long before using their reserve. Some donʼt use the reserve at all if they lose control of their glider. We

strongly recommend to at least mentally practice the use of the reserve from time to time: Grab the handle of the reserve in flight,

like you would do it in case of an emergency. Many clubs or schools offer to throw the rescue for example in a gym. The most

realistic way of training is to use the reserve in real flight. Many SIV Clinics offer that as part of their training.

Please use these possibilities: There are already too many pilots, who almost forgot that they have a reserve they could use, which

is a very bad precondition to use it without hesitating in a dangerous moment.

Winch launch

The MAESTRO 2 light is very easy to launch on the winch. You should start to climb at a flat angle.
We recommend the use of a towing adapter. This is connected on top of the main carabiner and connects it with the tow release.

 Speed system

Mounting of the speed system

Most harnesses have two pulleys on each side, some (light) harnesses instead have two simple rings. The two accelerator cables

supplied with the harness are guided from top to bottom through the two pulleys / rings and fixed on the speed bar.
Important is the correct adjustment of the length. If you set it too short, the glider might fly accelerated all the time, which

definitely has to be avoided. If you set it too long, you might not be able to use the full accelerator travel.
We recommend that you set the accelerator slightly too long during the first assembly to estimate the free travel in flight. You can

then shorten the accelerator if necessary.

Using the accelerator in flight

Before take off, when hooking the risers into the main carabiners, be sure to connect the speed system rope with the speed

system on the risers: connect the “brummel hooks” or the ball / loop system.
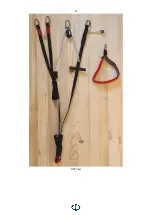
Overview of available risers:

https://phi-air.com/project/risers/

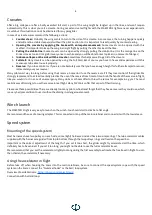
Connection with ball and loop:

Summary of Contents for MAESTRO 2 light

Page 1: ...1 Manual Version 1 02 vom 19 09 2022 ...

Page 2: ...as much weight out of the wing as possible without compromising on the pleasant feeling from MAESTRO 2 Technical description The MAESTRO 2 light has 78 cells across the entire span of which 9 cells each on the Stabilo are designed as closed cells This creates a very stable and homogeneous wing The profiles used combine high performance with a very forgiving flight behavior 4 levels of lines on the...

Page 3: ...e of delivery The PHI MAESTRO 2 light comes with a pack sack inner pack sack packing tape and repair kit Modifications to the paraglider The specifications on delivery match those the wing has been certified with Any unauthorized modification such as changing the length of the lines changing the riser will most likely result in a loss of certification Only the main brake line can be adjusted to a ...

Page 4: ...ally it is advisable to practice regularly on the training hill or by ground handling in the wind Straight on flight The MAESTRO 2 light has the best glide performance at trim speed with fully released brakes In calm air the glider is reaching the greatest distance at a given altitude In headwinds or sinking air masses you fly at maximum glide when you push the accelerator In turbulent air you sho...

Page 5: ...the maneuver the pilot must constantly control the altitude above ground Big ears Applying big ears is extremely effective and easy to perform with the MAESTRO 2 light Initiate the outer A risers red orange by grabbing at the top of the shackle on both sides and pulling symmetrically down The brake handles remain in the hand without additional wrapping As long as the risers are held down the wingt...

Page 6: ... the wing wants to reduce its bank rapidly The actual spiral movement begins with the leading edge nearly parallel to the horizon At this moment the harness banks and the pilot is pushed to the outside of the rotation movement The pilot should allow this movement to avoid a stable spiral situation see below Now the sink values can be varied by inner and outer brake If the pilot weight shifts to th...

Page 7: ...Fullstall is a complex maneuver whose correct technique can not be fully explained in this manual Those who want to learn this maneuver should do so under the supervision of a pilot who masters this maneuver perfectly the best way during a safety training The available brake travel down to the stall point depends on the wing size In turbulent air the stall can occur much earlier or significantly l...

Page 8: ...We strongly recommend to at least mentally practice the use of the reserve from time to time Grab the handle of the reserve in flight like you would do it in case of an emergency Many clubs or schools offer to throw the rescue for example in a gym The most realistic way of training is to use the reserve in real flight Many SIV Clinics offer that as part of their training Please use these possibili...

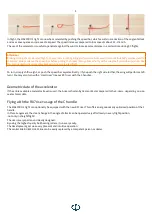
Page 9: ... bar asymmetrically If you push the right side further the wing will perform a left turn You may also turn with a smart riser like our R07 riser with the C handles Geometric data of the accelerator If the entire available accelerator travel is used the A risers shorten by 18cm or 20cm compared to the C risers depending on size see technical data Flying with the R07 riser usage of the C handle The ...

Page 10: ...de rods at the leading edge more as necessary If you pack the glider when it is wet or just damp it has to be dried later Don t leave it packed in a wet condition When you practice ground handling avoid crashing the glider hard on the ground with the leading edge as this might lead to damage Avoid unnecessary dirt or sharp stones touching the lines and the cloth Don t step on the lines if they are...

Page 11: ...ommercially used equipment school gliders tandems must always be checked every year This is also recommended for gliders under heavy load e g with more than 150 flight hours in two years or with regularly flown acro maneuvers We also recommend an annual check if there is a lot of flying in terrain that puts a plenty of strain on the material in rocky areas in salty air or especially after salt wat...

Page 12: ...12 PHI PHI eine Marke der Papesh GmbH Grillparzerstrasse 10 6067 ABSAM Österreich ...

Page 13: ... range kg 80 85 85 90 95 100 103 108 110 115 130 135 certified weight range kg 55 75 60 85 65 90 75 100 83 108 90 115 105 135 certification EN LTF B B B B B B B ext weight range motor kg 50 150 70 150 65 150 75 150 83 170 90 170 105 170 max brake travel cm 55 60 60 60 65 65 65 distance main carabiner cm 40 2 44 2 44 2 44 2 48 2 48 2 48 2 certification DGAC i A i A i A i A i A i A i A material Porc...

Page 14: ...14 Overview risers ...

Page 15: ...15 R07 riser ...

Page 16: ...16 Superlight riser RZ3 The mounting of the softlink riser line connection is demanding It should be done by an expert service workshop or flying instructor ...

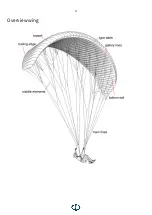
Page 17: ...17 Overview wing ...

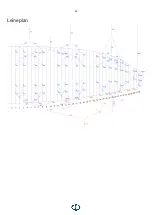
Page 18: ...18 Leineplan ...

Reviews: