background image

Page 1a

Page 1b

DONNEES TECHNIQUES DE LA MACHINE

1.

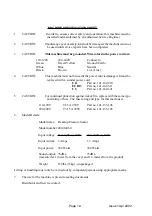
ATTENTION:

Afin de garantir un fonctionnement en toute sécurité, cette machine
doit être installée et entretenue par un technicien agréé.

2.

ATTENTION:

Si le couvercle ou le mécanisme de blocage de sécurité est endom-
magé, ne pas utiliser la machine tant que les réparations n’ont pas été
effectuées.

3.

ATTENTION:

Cette machine doit être raccordée à la terre. Les fils de couleur du
câble d’alimentation sont:

110-120V

220-240V

Connecté:

Vert

Vert/Jaune

à la terre (masse).

Blanc

Bleu

au neutre.

Noir

Brun

à la tension.

4.

ATTENTION:

Cette machine ne doit pas être utilisée si le câble d’alimentation est
endommagé. Il y a lieu de le remplacer par un câble similaire:

UK

N° de pièce 162-210

EURO

N° de pièce 162-311

US

N° de pièce 162-321

5.

ATTENTION:

Pour ne pas compromettre la protection contre les risques d’incendie,
remplacer par un fusible de même type at de mêmes caractéristiques
nominales:

110-120V

T6.3A 250V

N° de pièce 135-106

220-240V

T3.15A 250V

N° de pièce 135-103

6.

Spécifications:

Nom du modèle:

Desktop Pressure Sealer

Numéro du modèle:

4040/4060

Tension d’entrée:

110-120V à 60Hz

220-240V à 50 Hz

Courant d’entrée:

3A

1,5A

Puissance d’entrée:

360W

360W

Niveau de bruit:

75 dBA

75 dBA

(mesuré en insérant un seule feuille dans une enveloppe à une distance
de 1 mètre du capot le plus proche et à 1,6 mètre du sol).

Poids:

72kg (158lbs) déballée

Le levage ou la manipulation de la machine ne peut être effectué que par des personnes quali-
fiées utilisant l’outillage approprié.

7.

Cette machine est conçue tout spécialement pour fermer avec la pression les documents.

Issue 1 Apr 2002

Summary of Contents for AS700

Page 1: ...iew Section 6 Setting up the Machine 6 1 Loading the Paper Hopper 6 2 Setting the Fold Plates 6 2 1 Fold Plate 1 6 2 2 Fold Plate 2 6 2 3 Using the No Fold Guide 6 2 4 Fold Options 6 3 Double Document...

Page 2: ...UK Part no 141 162 210 EURO Part no 141 162 311 US Part no 141 162 321 5 CAUTION For continued protection against risk of fire replace with the same type and rating of fuse The fuse rating and type f...

Page 3: ...i ce 162 210 EURO N de pi ce 162 311 US N de pi ce 162 321 5 ATTENTION Pour ne pas compromettre la protection contre les risques d incendie remplacer par un fusible de m me type at de m mes caract ris...

Page 4: ...x 120gsm 32lbs bond Min 90gsm 24lbs bond Hopper Capacity Up to 250 sheets Form Type Pressure seal forms with fold assist perforations MIN FORM LENGTH MAX FORM LENGTH MIN FORM WIDTH MAX FORM WIDTH US 7...

Page 5: ...s per hour A4 Physical Dimensions Length 390mm 15 5 tray retracted 535mm 21 tray extended Width 470mm 18 5 Height 465mm 18 5 to top of hopper tray Footprint 345mm 13 5 long x 470mm 18 5 wide Electrica...

Page 6: ...e than one form is fed eg two together these will be diverted into a tray in the top of the machine before reaching the sealing rollers The form used for calibration will also be diverted into this tr...

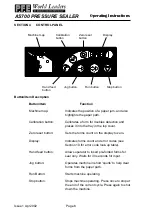
Page 7: ...ALER SECTION 3 DIAGRAM OF PARTS Shown below are the main sections of the AS700 Desktop Pressure Sealer Receiving tray Top cover Fold plate 2 Paper hopper Control panel Fold plate 1 On Off Switch Fold...

Page 8: ...tion and places it into the tray in the top cover Zero reset button Sets the forms count on the display to zero Display Indicates forms count and error codes see Section 10 for error code look up tabl...

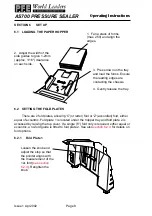
Page 9: ...d form n a 5 4 Set the fold plates to the required positions 6 2 5 5 Calibrate for double document only required once or if the paper type changes Check that only one form has been fed 6 3 5 6 Press t...

Page 10: ...de 6 2 SETTING THE FOLD PLATES There are 2 fold plates allowing C or letter fold or Z accordian fold either equal of eccentric Fold plate 1 is located under the hopper tray and fold plate 2 is accesse...

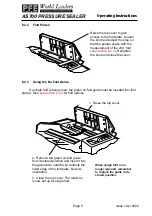
Page 11: ...ld Guide If a single fold is being used the green no fold guide must be inserted into fold plate 2 Also see section 6 2 4 for fold options 2 Remove the green no fold guide from its stored position and...

Page 12: ...e paper should be stacked on the tray normally the address will be on the same side and at the same end as the arrow Use the ruler on the top cover for measuring the folds Letter or Wallet C Fold Acco...

Page 13: ...rnal Panel Trailing 7 9 16 3 13 16 Down Eccentric Z 11 4 1 4 4 1 4 2 1 2 Address Panel Down Trailing 4 1 4 4 1 4 Down Eccentric Z 11 2 1 2 4 1 4 4 1 4 Address Panel Up Leading 2 1 2 4 1 4 Up Z 14 4 2...

Page 14: ...in the top cover 4 Press the button again for each document as required 6 3 DOUBLE DOCUMENT CALIBRATION The first time the machine is run or if the paper type changes the form must be calibrated to m...

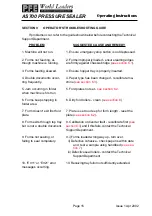
Page 15: ...om the power source first To gain access raise the top cover and clean the full width and circumference of the three rollers Although difficult to roll they may be rotated by hand 8 2 Cleaning the Sen...

Page 16: ...emove the paper If it cannot be dislodged close the cover and press the jog button which will operate the machine in short bursts Jams occurring in fold plate 1 can be cleared by removing the fold pla...

Page 17: ...rror messages occurring 1 Ensure emergency stop button is not depressed 2 Forms improperly loaded ensure leading edges are firmly against chassis bridge see section 6 1 3 Ensure hopper tray is properl...

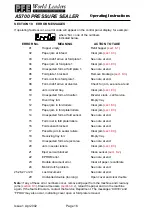
Page 18: ...end Open cover and clear double Hopper empty Paper jam at infeed Form didn t arrive at fold plate 1 Paper jam at fold plate 1 Unexpected form at fold plate 1 Fold plate 1 blocked Form lost from fold...

Reviews: