in
Parking and access control equipment manufactured in the UK
Automatic Sliding Gates
Manual Operation & Maintenance
7
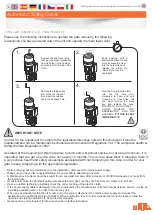
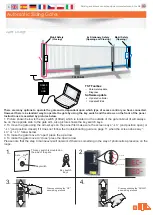
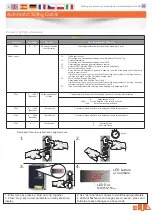
Please use the following instructions to operate the gate manually, the following
is assuming you have powered down the unit and opened the main tower door:
IMPORTANT NOTE
In order for the equipment to comply to the legislation/directives noted in this document it must be
maintained and have a maintenance schedule as documented in Regulation 5 of “The workplace health &
Safety Welfare Regulations 1992"
As stated at the beginning of this manual we recommend a bi-annual service, but at a bear minimum, it is
imperative that you get a service done once every 12 months. This is not a sales tactic in disguise, there is
a very serious health and safety issues/risks associated with not complying to this. Also in order for your
gate to keep complying with the appropriate legislation.
Ÿ
Before carrying out any maintenance to the installation, disconnect the mains power supply.
Ÿ
Make sure you have disconnected/Isolated the power before attempting any work.
Ÿ
A Maintenance Contract should be sought from a specialist company after a maximum of 5000 manoeuvres or 1year from
the install date.
Ÿ
Occasionally clean the photocell optical components and make sure they are free from dirt, water, rain, soil etc..
Ÿ
Have a qualified technician (installer) check the correct setting of the electric clutch.
Ÿ
If the power supply cable is damaged, it must be replaced by the manufacturer or its technical assistance service, or else by
a suitably qualified person, in order to prevent any risk.
Ÿ
When any operational malfunction is found, and not resolved, disconnect the mains power supply and request the
assistance of a qualified technician (installer). When automation is out of order, activate the manual release to allow the
opening and closing operations to be carried out manually.
Ÿ
Gearbox drive unit is “sealed” for life and requires no further lubrication.
Remove the release key
from holder on the door
then insert the release
key in the exposed hole.
3.
4.
Now the Key is inserted fully
into
the
top
hole
turn
clockwise to open and anti-
clockwise to close. After this
you must remove the brake
key and replace the bung.
FAILURE TO DO THIS WILL
ALLOW
DAMAGE
THE
BRAKE/MOTOR
AND THE
GEARBOX.
!!!!!! THIS IS VERY
IMPORTANT!!!!!!
1.
2.
Remove the dust cover plug
then get the brake release key
from its holder in the cabinet
and insert it into the top of the
motor.
Keep pushing with a
downwards pressure and
turn clockwise to screw
into the hole which will
release the brake. Do
this until you feel it is
hand tight.
10 mins
60 5
10
15
20
25
30
35
40
45
50
55
!
!


