background image

E

12

•  When using a number of lifting clamps at the same time, provide lifting slings or chains of a sufficient length to 

ensure that the angle between the slings or chains never exceeds 60°

•  When simultaneously operating a number of lifting clamps, use a lifting beam (equaliser) and lifting slings or 

chains of sufficient length to ensure that the lifting shackles on the clamps are never subjected to lateral load

•  Do not place the clamp on conical sections of the plate or structure to be lifted
•  Remove all grease, oil, dirt, corrosion and mill scale from the plate at the point where the clamp is to be attached
•  The surface hardness of the plate must not exceed 37 HrC (345 Hb, 1,166 N/mm

2

). With regard to the VUW-R, 

VEUW-R, VCW-R, VCEW-R lifting clamp please note that the surface hardness of the plate must not exceed 30 
HrC (283 Hb, 945 N/mm

2

)

All clamps are only suitable for use in normal atmospheric conditions. 

Warning

•  As far as applicable, make sure that the lifting shackle (used with VCW/SVCW/VCEW) or MP support joint (used 

with VMPW/VEMPW) is never subjected to lateral load

•  A free fall or uncontrolled swaying at the crane hook resulting in objects being struck may cause damage to the 

clamp. If this occurs check whether the clamp is in good working order before using it

•  Lifting clamps are not suitable for creating permanent joints
•  The clamp should be subjected to preventive maintenance on a monthly basis; see Chapter 6 – Maintenance.
•  Do not modify the clamp (by welding, grinding, etc.), as this can adversely affect its operation and safety, thereby 

nullifying any forms of warranty and product liability

•  Use only original pewag components and accessory parts
•  Any improper use of the clamp and/or failure to observe any directions and warnings in these safety instructions 

concerning the use of this product may endanger the health of the user and/or bystanders

Special note for application of VUW-R, VEUW-R, VCW-R, VCEW-R clamps

The clamp is only to be used for for lifting stainless steel plates and structures. Despite the considerable resistance 
to wear, the clamp must be handled with extreme care! Possible damage due impacts, falling etc. must be avoided.

5. Lifting

•  Check whether the working load limit (WLL) of the clamp is not exceeded.
•  Attach the lifting clamp to the hoisting mechanism, by one of the following means:
  - safety shackle directly to a crane hook,
  - coupling link or D-shackle,
  - sling or chain, if necessary in conjunction with a coupling link or D-shackle
•  Ensure that all attachments have been tested and are of the correct tonnage. Make sure that coupling links and 

shackles are of sufficient dimensions to allow the clamp to move freely in the hook

•  Check whether the clamp shows any visible damage
•  Operate the lever to check whether the clamp opens and closes smoothly
•  Check whether the teeth of the cam are free from dirt and if necessary clean with a wire brush. The cam of the 

VUW-R, VEUW-R, VCW-R, VCEW-R lifting clamp should only be cleaned with a brass brush!

•  Remove any grease, dirt and mill scale from the plate at the site of the lifting clamp
•  Use the lever to open the clamp
•  Place the jaws as far as they will go over the plate, making sure that the clamp is positioned so as to balance the 

load when it is being lifted

•  Close the clamp by turning the lever fully back
•  Lift gently to allow lifting force to be applied; check whether the clamp is slipping
•  If the load is slipping, read Chapter 5 – Lifting again
•  If the load continues to slip, see Chapter 6 – Maintenance
•  Make sure that the load is in a stable position before taking the clamp off the plate

6. Maintenance

Once a month the clamp needs to be checked for damages and/or contamination.
Stop using the clamp if:
•   the clamp is difficult to open or closed
•   the body is split or deformed, in particular in way of the corners of the jaws
•   the lifting shackle and/or support joint is arevisibly deformed
•   the cam and/or pivot teeth are no longer sharp
•   the spring has become stretched or broken
•   the lever locking mechanism has become inefficient or has ceased to work
•   the shackle pins are visibly deformed
•   any retaining pins are missing

Summary of Contents for SVCW

Page 1: ...our plaques pewag VCW SVCW VEUW A VHPW VMPW SVMPW VUW SVUW VUW R VHPUW VJPW VJPUW VCW R VCEW R VEUW R E Owner s Manual pewag safety plate lifting clamp VCW SVCW VEUW A VHPW VMPW SVMPW VUW SVUW VUW R V...

Page 2: ...opment activities product specifications are subject to change without notice Lisez attentivement ce mode d emploi avant d utiliser la pince En cas de doute demandez conseil votre fournisseur Nos mode...

Page 3: ...9001 zertifiziertes Unternehmen und verb rgt sich aufgrund jahrelanger Erfahrung f r optimale Qualit t und Sicherheit pewag Hebeklemmen werden aus hochwertigen Stahlsorten gefertigt und entsprechen al...

Page 4: ...nstruktionen konzipiert Unter bestimmungsgem er Verwendung der Klemme versteht man das Heben und Transportieren von Stahlblechen aus senkrechter Position waagerechter Position Beim Heben aus nicht sen...

Page 5: ...n etc kann die Funktion und Sicherheit des Produkts beeintr chtigt werden In diesem Fall verf llt die Garantie und es wird keinerlei Haftung bernommen Es sind ausschlie lich Originalersatzteile und Zu...

Page 6: ...ng entfernt werden kann Kran se 5 und Segmentachse 2 entfernen Demontage des Spannhebels 4 Spannstift 10 entfernen Spannachse 3 aus der Klemme entnehmen Zwinge 8 mit Hilfe eines Sechskantstift und Rin...

Page 7: ...die Montage ffnung entfernt werden kann Kupplung 18 und Segmentachse 2 entfernen Demontage des Spannhebels 4 Spannstift 10 entfernen Spann achse 3 aus der Klemme entnehmen Zwinge 8 mit Hilfe eines Sec...

Page 8: ...en Verfahren und Ma nahmen Heben von anderem Hebegut als auf der Klemme oder in der Bedienungsanleitung angegeben Modifikationen nderungen an der pewag Klemme Unsachkundiger Gebrauch der Klemme und Ni...

Page 9: ...en die Ursache des Defekts zu ermitteln die vollst ndige Liste finden Sie in Kapitel 10 Derartige Besch digungen sind von der Garantie ausgeschlossen Um Ihre Sicherheit und die Sicherheit Ihrer Kolleg...

Page 10: ...elevant standards and product requirements including European standard EN 13155 Australian standard AS 4991 US standard ASME B30 20 2010 and machinery directive 2006 42 EG 2 Description of Functions p...

Page 11: ...W R has been exclusively designed for the lifting of steel plates steel plates and structures featuring a flat point of contact Avoid using the clamp for stainless steel plates if simultaneously used...

Page 12: ...be used for for lifting stainless steel plates and structures Despite the considerable resistance to wear the clamp must be handled with extreme care Possible damage due impacts falling etc must be av...

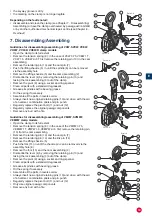
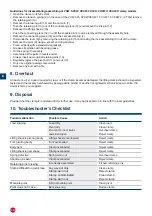
Page 13: ...mmer combination pliers and pin punch Regularly replace the pivot bolt 11 and nut 12 Regularly replace the original pewag components Remove any burr with a file Guidelines for disassembling assembling...

Page 14: ...h a file 8 Overhaul At least once 1x a year required by law or if the clamp becomes damaged the lifting clamp should be inspected tested and if necessary overhauled by pewag austria GmbH or another re...

Page 15: ...d in the user s manual When maintenance and or revision has not been carried out by an authorised pewag distributor The producer is not responsible for incidental damage or damage due to incorrect use...

Page 16: ...de s curit qui se compose d un dispositif de blocage d un ressort de tension et d un levier Apr s avoir actionn le levier ce m canisme innovant se charge d une pr contrainte constante du segment sur...

Page 17: ...ticales voir le diagramme de charge la page 29 la capacit de charge est r duite VUW VEUW VEUW H VEUW R SVUW VUW R VHPUW Les VUW VEUW VEUW H VEUW R SVUW VUW R VHPUW ont t pourvues d une oreille de leva...

Page 18: ...fonctionnement et la s curit De ce fait toutes les formes de garantie et de responsabilit des produits viennent ch ance Utilisez toujours des composants et des pi ces pewag d origine L utilisation ina...

Page 19: ...vers l int rieur de sorte que l axe de l oreille de levage 6 puisse tre enlev par le trou de montage Enlevez l oreille de levage 5 et l axe de segment 2 D montez le levier 4 en enlevant la goupille d...

Page 20: ...roche de charni re 17 Enlevez l oreille de levage 16 Faites coulisser le raccord 18 le plus loin possible vers l int rieur de sorte que l axe de l oreille de levage 6 puisse tre enlev par le trou de m...

Page 21: ...fait que durant la totalit de la p riode de garantie l outillage est inspect contr l et entretenu suivant les instructions du fabricant et du revendeur La p riode de garantie est de 5 ans compter de...

Page 22: ...notez la date de mise hors service de la pince de levage Essayez de d terminer la cause du d faut voir liste compl te au chapitre 10 Ces cas de dommages ne sont pas couverts par la garantie Vous deve...

Page 23: ...timale kwaliteit en veiligheid pewag hijsklemmen zijn vervaardigd uit hoogwaardige staalsoorten en voldoen aan alle standaarden en productieeisen waaronder Europese norm EN 13155 Australische norm AS...

Page 24: ...assing VUW VEUW VEUW H VEUW R SVUW VUW R VHPUW De VUW VEUW VEUW H VEUW R SVUW VUW R VHPUW zijn uitgevoerd met een universeel scharnierend hijsoog waardoor men de last vanuit elke richting kan aanslaan...

Page 25: ...e veiligheid nadelig be nvloeden Ook vervallen hierdoor alle vormen van garantie en productaansprakelijkheid Gebruik te allen tijde uitsluitend originele pewag onderdelen en componenten Het onoordeelk...

Page 26: ...8 met behulp van een inbus en ringsleutel Reinig alle onderdelen met behulp van een standaard ontvettingsmiddel Vet alle assen in met een lagervet Olie de veer in indien nodig Monteer alle onderdelen...

Page 27: ...rvanging altijd originele pewag onderdelen Verwijder eventuele bramen met behulp van een vijl 8 Revisie Minimaal eenmaal 1x per jaar of als schade aan de klem dit nodig maakt dient de klem gecontrolee...

Page 28: ...ershandleiding staan Wanneer onderhoud en of revisie beurten niet door een geautoriseerde pewag dealer zijn uitgevoerd De producent is niet aansprakelijk voor incidentele schade of schade voortvloeien...

Page 29: ...29 Lastaufnahmediagramm Zul ssig Winkel und Tragf higskeits reduktion Load Diagrams Working load limits Diagrammes Plan de charge Belastingsdiagrammen veilige Werklast...

Page 30: ...30 Gefahrlos Heben Safe lifting Lever en s curit Veilig hijsen...

Page 31: ...e is that the operating instructions have been read and understood D claration de conformit En conformit avec l annexe II A de la directive Machines 2006 42 CE pour lingues Personne autoris e constitu...

Page 32: ...pewag austria GmbH A 8041 Graz Gaslaternenweg 4 Phone 43 50 50 11 0 Fax 43 50 50 11 100 saleinfo pewag com www pewag com DS 17 00063...

Reviews: