57
EN
RU
NO
DA
SV
FI
Replacement flaps available online
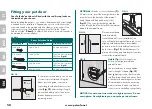
Optional Tunnel Fitting
If required, the optional tunnel should be fitted at this stage. Use the
tunnel to bridge the gap between the external and internal frames to form
a short extension for your pet door.
Measure the thickest part
(T)
of your cut-
out. Note this measurement
(
Fig. 5
)
.
Depending on the thickness of your door,
you may not need the tunnel template and
tunnel extension pieces or the tunnel
extension pieces may need to be trimmed
for your installation. Use the “Tunnel
Extension Pieces Cutting Guide” (
Chart 1
)
to determine this.
Tunnel Template
Tunnel
Extension Pieces -
Short and Long
FIG. 5
Tunnel Extension Pieces Cutting Guide
Cut-Out Thickness (T)
Tunnel Extension Pieces Cutting Instructions
5 mm to13 mm
DO NOT use tunnel extension pieces and tunnel template.
13 mm to 44 mm
If cut-out thickness
(T)
does not line up with a groove
on the tunnel extension then cut to next groove that is
smaller than the cut-out thickness
(T)
(See Fig. 6)
. Use
tunnel template and tunnel extension pieces.
44 mm to 51 mm
No cutting of tunnel extension pieces is needed. Use
tunnel template and tunnel extension pieces.
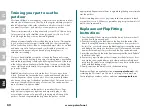
Insert the long tunnel extension into channel of “U”-shaped section of
tunnel template. Insert the short tunnel extension into channel of straight
section of tunnel template
(
Fig. 7
)
.
Turn over assembled tunnel and insert tunnel extension pieces of
assembled tunnel between frame posts and lip on flap opening of
external frame (frame without the flap). Tunnel template should be facing
up
(
Fig. 8
)
.
OPTIONAL:
Use duct tape in the corners of tunnel extension pieces to
help secure in place and to improve weather resistance
(
Fig. 9
)
.
FIG. 8
FIG. 9
FIG. 6
cut to
next
smaller
line
Tunnel Extension
Pieces
FIG. 7
CHART 1
Optional tunnel


