background image


© Pertronic Industries Ltd 

FAAST LT Loop-Based Installation & Maintenance Guide  Iss 1.0, 201701


2

3

1

3

4

5

6

2

1

IO

N

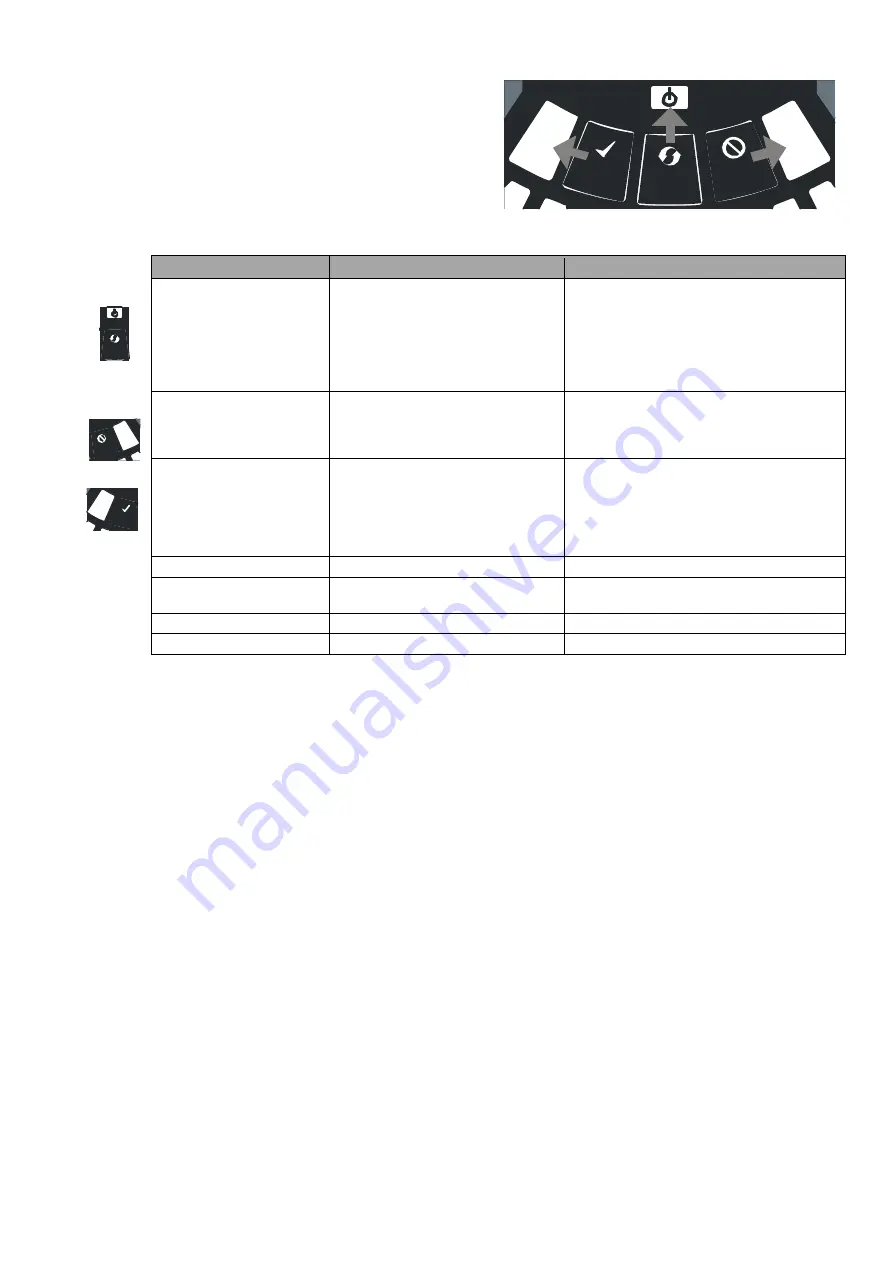
Front Panel Buttons 

The front panel has three (3) user buttons: 
 

TEST

RESET

 and 

DISABLE


These buttons are used to enter the pass-code which then 
allows


simple test functions to be performed. 

Note: In Remote Maintenance and Service Mode these 
buttons


are disabled. 


Table 5: Front Panel Buttons 

BUTTON 

NORMAL Mode 

MAINTENANCE Mode 

RESET 

Press for 2s to start PASSWORD


PROCEDURE to enter 
MAINTENANCE


mode 

Press for 2s to Reset latched Alarms, Faults 
and


sounders (relays).   

Alarm controlled by panel: if the


Alarm 

persists, set again immediately after the Reset 
In DISABLE Mode, press for 2s to exit from


DISABLE Mode (but remains in 
MAINTENANCE Mode) 

DISABLE 

Use to increment  Password digits in


PASSWORD PROCEDURE 

Press for 2s to enter DISABLE Mode for


60 

minutes (default).   
Alarms, Alerts and Faults not reported 
(To exit DISABLE Mode see RESET) 

TEST 

Use to confirm password in 
PASSWORD


PROCEDURE.  

Default Password = 3111 

Press for 2s then release - both detectors will


simulate Alarm 
Press for 4s then release 

– Detector #1 will


simulate Alarm 
Press for 6s then release 

– Detector #2 will


simulate Alarm 

COMBINATIONS 


RESET + DISABLE 

Press for 2s to show Fan Speed


(on 

Smoke Level scales) for a preset time 

Press for 2s to show Fan Speed


(on Smoke 

Level scales) for a preset time 

RESET + TEST 

No action 

Press for 2s to turn Sounders OFF 

RESET + TEST + DISABLE  No action 

Press for 2s to exit MAINTENANCE mode 


Password Sequence to Enter MAINTENANCE mode 

a)  press and hold 

RESET

; Left Flow indicator turns yellow, then green 

b)  release 

RESET


and

  FAULT

  indicator  turns  ON  (green).  The


left  Flow  indicator  blinks  green  indicating  the 

device is ready for


the first digit 

c)  press 

DISABLE


to increment the LEDs 1…9; press 

TEST

 to select a digit 

The flashing airflow segment turns ON (green) and the next segment begins to flash indicating set the next digit. 
When the 4th digit is selected, all 4 airflow segments turn OFF.  
-  if the password is accepted the 

FAULT


indicator  remains green and


the unit enters 

MAINTENANCE

 mode.  

-  if the password is incorrect, the 

FAULT

 indicator flashes yellow and the unit remains in 

NORMAL

 mode.  

The default Password is 

3111


If no button is pressed for 10s during the password sequence, the


unit returns to 

NORMAL

 mode.  

If  there  is  no  activity  in 

MAINTENANCE

  mode  for  5  minutes  (default),  the 

FAULT

  indicator  blinks  green  for 

15secs and then the unit returns to the 

NORMAL

 state. 

TESTING: 

Note that the Laser detector LEDs, which are controlled by the Fire Panel, must be turned ON to activate the front 
panel Alarm


indicators 

Magnet Test: 

The  alarm signalling  can  be  tested  for  functionality  by  placing  a


test  magnet  in  the  position  shown  in  Figure  10 

(refer Page 4). This method does not test the air flow in the pipe-work 

Smoke Testing: 

The  system  alarm  response  can  be  tested  for  functionality


using  smoke.  The  choice  of  smoke  source  is 

dependent on the


installation but Pertronic industries recommends the use of a Smoke Pen (PN: SMOKEPEN)  

In all cases the smoke must be present for the


duration of the test.  

Smoke  pellets  or  matches  can  be  used  close


to  the  sampling  point  to  introduce  smoke  particulates  into  the


system. It is recommended that smoke with a particulate life cycle


of greater than 120 seconds should be used 

– 

standard aerosol sprays for


point detector testing do  not  work well  on  aspirated  systems and therefore a re not 

recommended. 

Fault Testing: 

Simulate a fault on the detector (for example, block the outlet pipe)


and check that a fault is signalled on both the 

front panel of the unit


and at the Fire Panel. 


Summary of Contents for SYSTEM SENSOR FAAST LT Series

Page 1: ...mum Number of Holes See Table 1A Pipe Spec EN54 20 Compliance to EN61386 Crush 1 Impact 1 Temp 31 Outside Pipe Diameter 25mm or 27mm nom Shipping Weight 6 5kg incl detectors Colour Code Key refer to back page Black applies to both FL01nn and FL20nn Series Blue refers to Important Settings which should be verified Figure 1 Dimensions and Knock Outs PARTS LIST Description Quantity FAAST LT Unit 1 Mo...

Page 2: ...e front panel labels fitted This allows the installer to select the language required from the Front Panel Labelling Pack Figure 2 shows where to place the labels Figure 2 Front Panel Label Locations When label A is in place remove the protector from the bottom of the clear cover to stick the cover down as shown in Figure 3 Figure 3 Remove backing tape to stick cover down Cable Access Knock out ca...

Page 3: ...ation Figure 8 Pipe Holes Table 1 Pipe Holes Used for Each FAAST LT Model FAAST LT Model Inlet Pipe Hole Outlet Pipe Hole FL2011EI 1 2 or 1 OR 2 5 FL2012EI 1 2 or 1 OR 2 6 FL2022EI Channel 1 1 2 or 1 OR 2 5 Channel 2 3 4 or 3 OR 4 6 Notes a Unused Pipe Holes MUST be kept sealed b Do NOT glue pipes into Pipe Holes Table 1a Maximum Number of Pipe Holes Allowed Per Channel All figures quoted using hi...

Page 4: ...ulations b Loop wiring must observe the recommendations of the panel manufacturer Notes use the PipeIQ BOM Report to order the Pipe components required to assemble the system use the PipeIQ Pipe Layout Report to assemble the pipe layout Important follow the Pipe Layout report as closely as practical ensure Pipe Lengths are correct ensure Sampling Point holes are drilled at the stated positions ens...

Page 5: ...Set ON in ALARM default Setting the Sensor Addresses Each aspiration channel uses loop communications to report its status information to the CIE Fire Panel As a factory default the unit will report Smoke Alarm and sensor information at an associated Detector address and general Alerts and Faults on a different Module address The default addresses are Channel 1 01 Channel 2 02 Figure 11 Address Sw...

Page 6: ...ed see USB Connection section later in this guide for more information on this and the FAAST LT Advanced Setup and Control Guide EXTERNAL RESET The default setting for the configurable external input is Device Reset terminal block T8 A short circuit connection between these terminals will cause the FAAST LT unit to perform a Reset FRONT PANEL The front panel differs depending on which of the 6 x F...

Page 7: ...ault check filter check pipe network for blockages INPUT 1 Blink External Input fault Not used with default settings SENSOR 2 Blinks Detector communication fault Check detector addresses and installation replace detector ASPIRATOR ON Air Flow sensor fault Try to restart device 1 Blink Flow initialization fault Check filter check pipe network for blockages try to restart device 2 Blinks Fan fault T...

Page 8: ... device is ready for the first digit c press DISABLE to increment the LEDs 1 9 press TEST to select a digit The flashing airflow segment turns ON green and the next segment begins to flash indicating set the next digit When the 4th digit is selected all 4 airflow segments turn OFF if the password is accepted the FAULT indicator remains green and the unit enters MAINTENANCE mode if the password is ...

Page 9: ...ed inside the cabinet at the top of the unit see Figure 10 displayed on Page 4 and are removed as shown in the following sequence Either replace the filter assembly or carefully brush off the accumulated dust Note if replacing the filter remove the foam gasket from the old filter and place onto the new filter When placing the new filter into the slot ensure that the gasket is correctly aligned Ref...

Page 10: ...ctor or available from http www faast detection com contact us download pipeiq Connection to the FAAST LT a Open PipeIQ v2 or greater on the PC by default PipeIQ opens in Configuration mode b Open a project file mdf to continue use one of the following methods i open an existing project configuration mdf file for the FAAST LT or ii start a New Config and add a FAAST LT detector of the type to be i...

Page 11: ...sure Specify the atmospheric pressure in Pascal Both supplies monitored By default the first power supply is monitored to signal a low power Select Yes to monitor the second power supply Power Restart Alert Alert for The device signals the power restart alert for this period Alert till Reset Select to enable alert until the reset is performed Disable Select to disable the power restart alert Trend...

Page 12: ...er ON to reach the configured reference flow Manual the device uses the configured manual speed Fan Speed Drag and set the speed scale for the fan Note The fan speed set here is considered for the calculations of the built network when the fan speed mode is selected as Manual Reference Flow Specify the flow value in litre per minute l min Filter Due Date Specify the due date for the air filters Th...

Page 13: ...activated until a reset is performed No The device automatically deactivates the relay Auxiliary Relay used for Channel 2 Fault Select either of the following Yes The device activates the general fault relay for the faults of channel 1 and faults common to both channels the auxiliary fault relay for faults of channel 2 and for the faults alerts configured to activate auxiliary relay No The auxilia...

Page 14: ...tically change the device real time clock date when the date is in the daylight saving period 1 hour is added No Select No to disable the daylight saving option Auto Select Auto to automatically set the start date as last Sunday of March 02 00 and the end date as the last Sunday of October 02 00 Start Date Select the start date of daylight saving period End Date Select the end date of daylight sav...

Page 15: ... each Sampling Point then use the appropriate Alarm Level as assigned during the PipeIQ Design Calculation f Generally the FAAST LT ALARM level will be 3 4 or 5 The PRE ALARM level may be selected from 1 to a setting less than the ALARM level selected g Use the following Table to determine the appropriate Sensitivity setting to use on an F100 or F120 panel h Configure the Module addresses as Type ...

Page 16: ...Note Click Refresh to obtain the current state of all the relays D1b Smoke Test to perform Smoke Tests a Click Monitoring on the left pane b Select the device to set the actions The Actions tab appears on the right pane c Under Smoke Test set the time for the following two options i Start at a set time Select Start at and select the time to schedule a start time for the smoke test Click Schedule i...

Page 17: ...ce to set the actions The Actions tab appears on the right pane c Under Restart set the following options i Normal select to restart the device in Normal mode ii Maintenance select to restart the device in Maintenance mode d Click Set to apply the restart settings D1g FAAST LT Clock to set the FAAST Clock a Click Monitoring on the left pane b Select the device to set the actions The Actions tab ap...

Page 18: ...og tab click the Events List tab i Select Show All Events to view all the events of the device ii Select Period to view all the events within the specified date From and To dates are available from the drop down calendar iii Click Show The list of events appears Note the Show Last drop down list to select the latest 20 50 100 500 events Below the list of events click First Previous Next and Last t...

Page 19: ...tivity Alarm thresholds are correctly set to ensure that the sensitivity of individual holes meets the minimum performance requirements for individual points Note that this may require reference to the approval compliance notes for the particular ASD system and should also take into account any potential automatic adjustments of the Sensitivity Threshold settings which may occur after commissionin...

Page 20: ...is the Transport Time for this Sample Point the Maximum Transport Time shall be less than the maximum time specified within the design documentation engineering specifications but must not exceed 90 seconds NZS4512 2010 Where an Alarm indication is used it does not generally include any Alarm delays which are temporarily set to zero for the measurement of Transport Time Measured Transport Time sho...

Page 21: ...y Class vs Detection Requirements Colour Code Key When using this manual apply the information which applies to the particular FAAST LT model being installed Black applies to both FL01nn and FL20nn Series FAAST LT detector Blue refers to Important Settings which should be verified While all settings are important many can justifiably remain as the default value but items in Blue should be checked ...

Page 22: ...Humidity Other Power Supply Installed correctly Yes No Pipe Network Installed in Accordance with the PipeIQ design per Pipe Layout Report Yes No Pipe Network Labelled correctly Yes No Describe Any Variations Sensor 1 Module 1 Sensor 2 Module 2 Loop Address L M L M L M L M Sensitivity circle one VEWFD EWFD SFD Class A Class B Class C VEWFD EWFD SFD Class A Class B Class C Threshold Time Delay Day A...

Reviews: