
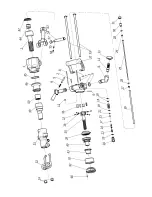


Disassembly of the flushing valve:
Screw off the plug (20) with the ring (19) from the cylinder head (3). Remove the spring (23), starting rod
(16) and the starting pin (15). If necessary, remove inner piece (14) with rings (17, 18).
Disassembly of the starting lever and air inlet:
Press out the pins (7) and remove balls (6) through the free holes – 20 pieces on the starting lever, 21 pieces on
the air inlet (8). Remove the starting lever and the air inlet.
Remove the arresting pin (5) and spring (4) from the starting lever.
Disassembly of the flushing pipes:
Screw out the nut (31) and the plug (30), remove the sealing (28), the inner piece (29), the water flushing pipe
(25) with its sealing (28), inner piece (27) and the air flushing pipe (26).
Disassembly of the air leg stirrup:
Press in the pin (58), remove ring (54) from the pin (57). Pull out the pin (58) and spring (55) from the pin (57).
Press out the pin (57) from the cylinder and release the stirrup (53).
ASSEMBLY OF THE VK23 ROCK DRILL
GENERAL INSTRUCTIONS
• Before assembling the rock drill, clean all the parts thoroughly, dry them up and carefully inspect for signs of
wear.
• Lubricate all moving parts with the recommended oil (see Lubrication).
• Replace all the rubber parts and plastic pins (7) – if removed.
• Apply a thin film of O-ring lubricant to all O-rings before final assembly.
Assembly is made the opposite way to disassembly. When inserting the distribution body (41) be careful not to
place it facing in the opposite direction. The O-ring (45) must be placed between the impact sleeve (46) and the
cylinder (1) and a pin (60) must be present between the cylinder (1) and the bottom distribution cover (42).
Nuts (34) should be tightened step by step on both sides.
After the assembly, check if the pawl mechanism is working correctly by rotating the drill bushing (49).
Run in the assembled rock drill for a short time using lower air pressure and increased lubrication.
Summary of Contents for VK 23
Page 6: ......


