background image

Grey 0.75

Black 0.75

Red 0.75

Blue 0.75

Orange Elcuflex 0.22

Blue FKUX 0.25

Red Elcuflex 0.22

Yellow Elcuflex 0.22

Green Elcuflex 0.22

Brown Elcuflex 0.22

Black Elcuflex 0.22

Orange FKUX 0.25

K8

K7

K6

K4

K5

K3

SW4

SW2

SW3

K2

K1

SW1

Grey RKKB 4x0.75

Brown Elcu mini 2x0,22

Black Elcu mini 2x0,22

Blue RKKB 4x0.75

Black RKKB 4x0.75

Red RKKB 4x0.75

Yellow

Orange

Blue

Brown

Red

Violett

Green

Blue

Yellow

Violett

Blue

Green

Orange

Grey

Green

Grey

Violett

Orange

Black Elcuflex 0.22

Brown Elcuflex 0.22

Blue

Orange

Violett

Green

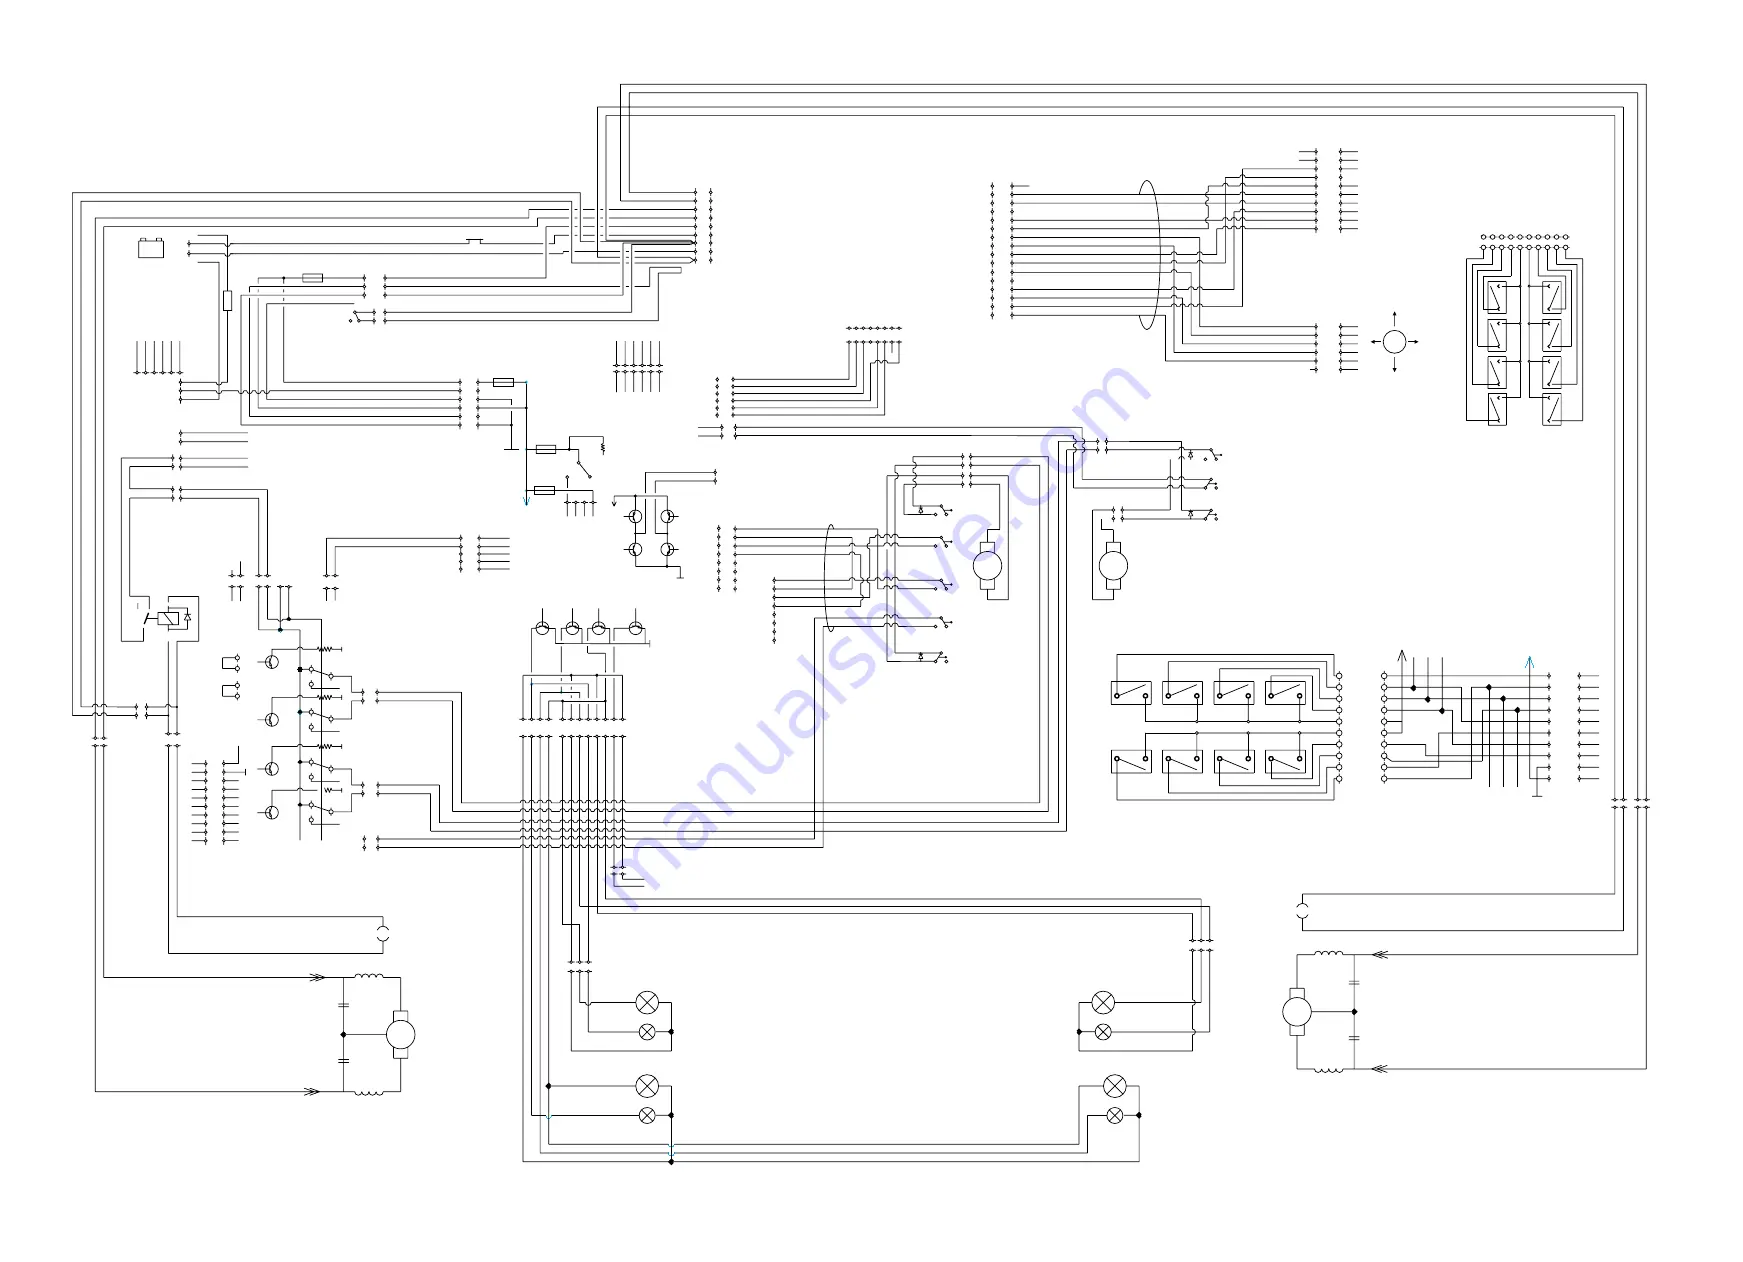
Wiring Diagram Robo CS

Summary of Contents for Chairman Robo PG8

Page 1: ...SERVICE MANUAL Chairman Robo PG8 US ...

Page 2: ......

Page 3: ...SERVICE MANUAL Chairman Robo PG8 Produced and published by Permobil AB Sweden Edition no 1 9905 Order no 201019 US 0 PAB no 1019 1 ...

Page 4: ...12 Removal 12 Fitting 13 Changing the drive motor 15 Removal 15 Fitting 17 Changing the carbon brush in the drive motor 19 Removal of the carbon brush 19 Fitting the carbon brush 20 Changing the seat lift adjustment device 21 Removal 21 Fitting 23 Changing the control unit 25 Removal 25 Fitting 26 Changing the control panel 27 Changing the joystick 28 Changing the printed circuit board 29 Changing...

Page 5: ...to ensure that the correct information is provided Technical Support In the event of Technical Problems you should contact your dealer or Pemobil Inc at 800 736 0925 Spare parts Spare parts must be ordered through your dealer The spare parts catalogue for the Chairman Basic chassis is PAB 1212 and is available from Permobil Inc Warranties Contact your nearest dealer or Permobil Inc for information...

Page 6: ...6 Rating plates Chairman Robo Panel Rating plates Identity marking Art no Serial no Modification no Identity marking Chassis no ...

Page 7: ...e the seat can be raised manually 1 Remove the plug on the left side of the cover 2 Unscrew the adjustment device with the enclosed special key NB Block up the seat at the front before the screw is unscrewed The seat is heavy and may fall forwards 3 Carefully fold the seat forwards NB Check that the cables are not too taut 4 Remove the upper cover 5 Refit the adjustment device screw ...

Page 8: ...hassis cover It is held in place by four screws 4 Open the electronics box and disconnect the contact for the rear light 5 Finally remove the two front covers They are each held in place by two screws Fitting 1 First fit the two front covers 2 Then reconnect the cable for the rear light and close the electronics box 3 Fit the chassis cover 4 Refit the top cover Press the Velcro tape firmly in plac...

Page 9: ... the batteries 9 Changing the batteries NB Use protective goggles when working with batteries Removal 1 Raise the seat to its highest position se page 7 2 Remove the covers See removing the covers page 7 3 Remove the rear cover and the battery covers See page 8 4 Disconnect all battery connections the positive poles first and then the negative poles 5 Lift out the batteries Use lifting straps Chan...

Page 10: ...A see the figure at the bottom of the page 3 Pull the wheel off the axle Use the removal tool 304103 99 0 if the wheel cannot be removed by hand Fitting 1 Fit the wheel onto the axle 2 Fit the rim locking washer A the washer B and the center screw C and tighten to secure the wheel NB The screw has a locking coating which is sufficient for refitting 3 4 times Then the screw must be replaced with a ...

Page 11: ...facilitate removal 3 Loosen the locking nut 1 4 Screw the adjusting screw 2 all the way in 5 Loosen the wire at the magnetic brake and at the brake release mechanism Fitting 1 Fit the wire first at the magnetic brake and then at the release lever 2 Adjust the length of the wire sleeve using the adjusting screw 2 so that the wire is tensioned but does not pull on the release clamp 3 Check that the ...

Page 12: ... Remove the covers See page 8 3 Disconnect the electrical connection of the magnetic brake 4 Detach the brake release wire from the brake 5 Unscrew the three screws which hold the brake and remove the brake with the extensible cover brake disc and cover 6 Note the position of the brake release arm Changing the magnetic brake ...

Page 13: ...heck the setting of the brake Follow the instructions on the decal on how the two Allen screws are adjusted 2 Place the magnetic brake s brake disc in the brake assembly 3 Put on the cover Changing the magnetic brake ...

Page 14: ... connection 14 4 Insert a screw to align the parts and screw the magnetic brake in place using all three screws 5 Attach the magnetic brake s electrical connection 6 Fit the chassis cover See Covers page 8 Changing the magnetic brake ...

Page 15: ...covers See page 8 3 Remove the positive pole from one battery 4 Block up the appropriate side of the wheelchair 5 Remove the wheel See Changing the drive wheel page 10 6 Detach the electrical connections for the motor and magnetic brake 7 Detach the brake release wire from the magnetic brake Changing the drive motor ...

Page 16: ...ach the nuts on the rear The reinforcement is held in place by four screws 9 Remove the three screws which hold the motor 10 Turn the motor sideways so that the wheel axle turns freely Pull the motor straight forwards NB To facilitate removal press the battery as far back as possible Changing the drive motor ...

Page 17: ...to place Turn it a little so that the wheel axle can turn freely without being obstructed by the chassis 2 Screw the motor in place with the three screws 3 Refit the chassis support Press the cover in place Changing the drive motor ...

Page 18: ...e 5 Attach the electrical connections for the motor and magnetic brake NB Ensure that the contacts are fully interlocking 6 Fit the wheel See page 10 7 Remove the blocks 8 Connect the battery poles 9 Fit the covers See page 8 Changing the drive motor 18 ...

Page 19: ...tion against both ends with a small mark before loosening the nuts It is important for the function of the motor that the parts are assembled precisely without being moved away from the original position 5 Loosen two nuts and pull off the motor end Press the cable gland off the motor end 6 Remove the brush holder completely Changing the carbon brush in the drive motor Marking Do not divide here ...

Page 20: ...e the parts according to the marking made earlier It is important for the function of the motor that the parts are assembled precisely without being moved away from the original position 3 Insert the mounting plate cover and brake disc Ensure that you position the holes correctly for fitting the brake Turn the brake so that the brake arm is in the correct position 4 Screw the motor cables to the p...

Page 21: ...lift again 3 Cut off the cable ties which hold the cables to the adjustment device 4 Disconnect the connections to the adjustment device Note how the cables are attached 5 Unscrew the rear bolt of the adjustment device 6 Unscrew the front bolt of the adjustment device NB Work on the left adjustment device is facilitated if you manually push the chair forwards Check that no cables are too taut Chan...

Page 22: ...22 Changing the seat lift 7 Remove the clamping ring of the limit switch 8 Loosen the screws which hold the limit switch Pull away the adjustment device ...

Page 23: ...as far back as possible before the sleeve is fastened on the adjustment device NB Check that the clamping ring of the limit sleeve clamps against the frame 2 Fit the clamping ring of the limit sleeve 3 Tighten the front screw of the adjustment device Changing the seat lift ...

Page 24: ...24 Changing the seat lift 4 Fit the rear screw of the adjustment device 5 Reattach the cables of the adjustment device 6 Fit the covers See page 8 ...

Page 25: ...sition 2 Connect the DP1c programming unit Read off and note the drive parameters See page 32 3 Remove the top cover and rear cover 4 Disconnect the power connections from the electronics unit 5 Unscrew the two screws which hold the electronics unit in place Changing the electronics Disconnect these three cable connections ...

Page 26: ...w the electronics unit to the frame with the two screws 3 Connect the three cable to the electronics unit 4 Fit the wheelchair s rear cover and top cover 5 Connect the DP1c programming unit and switch the chair on See page 32 6 Check and compare the drive parameters Adjust as required See page 32 Changing the electronics Connect these three cable connections ...

Page 27: ...rt of the control panel four screws 4 Disconnect the upper cables in the panel 5 Open the new panel and connect the upper cables 6 Assemble the panel and screw it to the panel bracket NB The panel cover and base cover are marked with ID numbers and modification numbers and belong together 7 Connect the upper cables to the electronics Anyone opening the panel must be ESD protected with a wristband ...

Page 28: ... the two mounting screws of the joystick 5 Pull out the joystick ball and then remove the whole mechanism 6 Screw the new joystick in place and connect it to the printed circuit board Turn the joystick so that the pointed side is to the left 7 Assemble the control panel using the screws 8 Connect the upper cables to the electronics Anyone opening the panel must be ESD protected with a wristband co...

Page 29: ...er cables in the panel 4 Unscrew the printed circuit board from the panel four screws 5 Remove the old printed circuit board and fit a new one 6 Screw the new printed circuit board in place and reconnect the cables 7 Assemble the control panel using the screws 8 Connect the upper cables to the electronics Anyone opening the panel must be ESD protected with a wristband connected to earth CAUTION ...

Page 30: ...ble 306858 00 0 Loop cable 308737 00 0 NB The loop must not be removed Changing the fuses In order to be able to change the fuses you must remove the rear cover Unscrew the five screws and lift off the cover Ensure that the rear light cables in the rear cover are firmly attached to the electronics connector Main fuse The main fuse must only be changed by persons with good knowledge of the wheelcha...

Page 31: ...ng fuse is placed on the narrow red cable which goes to the positive pole of the battery Cable fuse on cable 308737 00 0 The cable fuse protects the cable in the event of a short circuit in the contact If this fuse blows there is a faulty connection in the contact in the card in the fuse box 20 A cable fuse ...

Page 32: ... instrument The arrow keys are used to step to the various programming positions and to make the necessary changes in these positions The key can be used to obtain help in the respective programming positions Enter is used to confirm programming and to jump to programming positions from the menu The Traffic Light is used to prepare the chair for driving testing No Yes Enter DP1c Custom Programmer ...

Page 33: ...he arrow keys and press Enter It is possible to step through the service menu using the arrow keys as in the root menu The service menu is used to set special drive parameters for a user and to read erase the fault log The following positions are available in the service menu To go from the menu to the respective program positions press Enter Read Fault Log In the fault log it is possible to read ...

Page 34: ...tion between 0 and 100 Then press Enter See the table for the normal value NB Adjust with great care Speed State States whether the maximum speed setting is possible Answer Yes or No and press Enter Normal setting Yes Response State Possible future parameters Answer Yes or No and press Enter Normal setting No Present Unit Resets all parameters to the most recent basic settings Answer Yes or No and...

Page 35: ... Speed State Turning Speed Reverse Speed Erase Fault Log Acceleration Deceleration Turn Accel n Turn Decel n Forward Speed Reserved Reserved Hexior 8 LS Acceleration Deceleration Turn Accel n Turn Deccel n Forward Speed Reverse Speed Turning Speed Speed State Response State Set Inhibit Set Sleep Mode Part Brake Trip Chairman Robo 8 LS Chairman Robo 8 GS Value 50 70 20 25 100 30 60 25 8 Yes No No N...

Page 36: ...y and the drive motor There is an interruption to the right motor Short circuit between the battery and the drive motor Charger connected to charging socket Joystick fault Control unit fault Interruption in brake circuit Too high voltage in the battery Check the condition of the battery to see whether it needs replacing Check the contact between the battery and the control unit Check the connectio...

Page 37: ...SW1 K5 K6 K3 K1 K4 K2 MEMBRANSWITCH 6061 3 Black RK 1 0 Red RK 1 5 Green UL1061 0 56 ACTUATOR CONTROLLER BOARD 7131 10 SW1 T3 24V PIN SW3 T4 T1 RE3 4 SW2 J6 4 RE4 4 RE1 SW1 J5 5 3 5 3 5 3 J3 0V 24V J4 T2 4 RE2 5 3 15A 24V 0 20A Black RK 1 0 Red RK 1 5 7 8 3 6 4 5 2 1 3 6 5 4 2 1 6 4 5 3 2 1 15A 15A 3 4 1 2 24V 15A Prog 5 6 1 2 3 4 4 3 2 1 6 5 24V CABLE CHARGE CONNECTOR 8737 2 1 24V 10 8 9 4 6 5 2 ...

Page 38: ...22 Orange FKUX 0 25 K8 K7 K6 K4 K5 K3 SW4 SW2 SW3 K2 K1 SW1 Grey RKKB 4x0 75 Brown Elcu mini 2x0 22 Black Elcu mini 2x0 22 Blue RKKB 4x0 75 Black RKKB 4x0 75 Red RKKB 4x0 75 Yellow Orange Blue Brown Red Violett Green Blue Yellow Violett Blue Green Orange Grey Green Grey Violett Orange Black Elcuflex 0 22 Brown Elcuflex 0 22 Blue Orange Violett Green Wiring Diagram Robo CS ...

Page 39: ......

Page 40: ......

Reviews: