background image

VisuNet IXD

Product Description

 2

0

2

0

-0

4

9

Marking

Mass

panel with DC: 22 kg , panel with AC: 23 kg , 
system housing AG1: 19 kg

Dimensions

panel with DC: 542 mm x 460 x 132 mm
panel with AC: 542 mm x 460 mm x 149 mm 
panel with housing: 582 mm x 490 mm x 224 
mm

Mechanical specifications

Note

For more technical information such as electrical data and connection details, refer to the 
manuals and instruction manuals of the individual components: 

Display Unit DPU2100-J1*

AC Power Supply Unit PSU1100-J1-AC-N0

DC Power Supply Unit PSU1100-J1-DC-N0

Thin Client Units TCU1100-J1-*

Computing Units PCU1100-J1-*

ATEX

RM-IXD2100-J1-* / PC-IXD2100-J1-*

 II 2G Ex eb q ib [ib] IIC T4 Gb 

 II 2D Ex tb [ib] IIIC T85

°

C Db

IECEx

RM-IXD2100-J1-* / PC-IXD2100-J1-*

Ex eb q ib [ib] IIC T4 Gb  
Ex tb [ib] IIIC T85

°

C Db

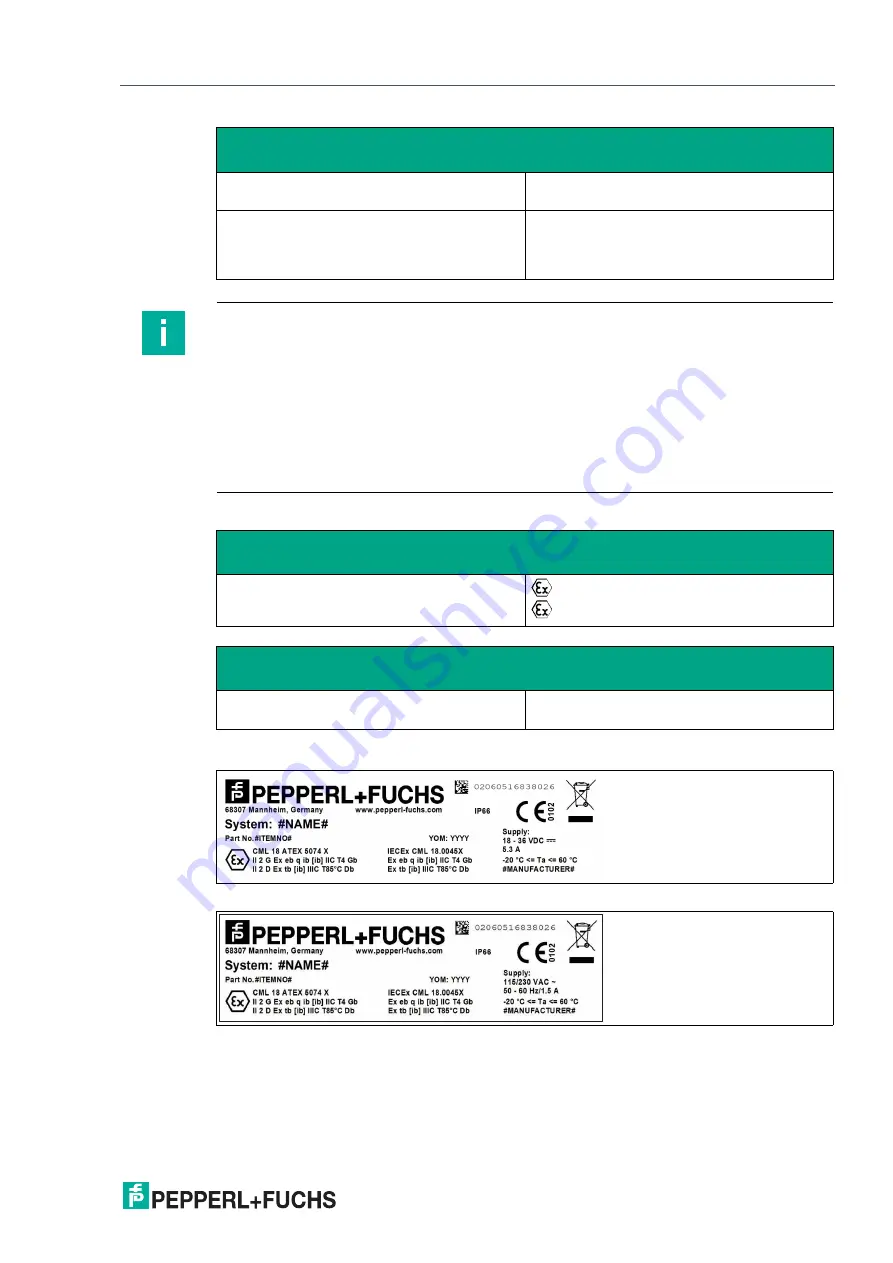
DC Version Label

AC Version Label

Summary of Contents for VisuNet IXD PC-IXD2100-19U

Page 1: ...VisuNet IXD RM IXD2100 19U PC IXD2100 19U Manual...

Page 2: ...ion as well as the supplementary clause Expanded reservation of proprietor ship Worldwide Pepperl Fuchs Group Lilienthalstr 200 68307 Mannheim Germany Phone 49 621 776 0 E mail info de pepperl fuchs c...

Page 3: ...lation with Pedestal 15 3 5 1 Preparation for Floor Mounting 15 3 5 2 Preparing the Pedestal 16 3 5 3 Attaching the IXD to the Yoke and Pedestal 17 3 5 4 Installing the Keyboard Tray Kit 24 3 5 5 Inst...

Page 4: ...ontrol drawings Additional documents 1 2 Target Group Personnel Responsibility for planning assembly commissioning operation maintenance and dismount ing lies with the plant operator Only appropriatel...

Page 5: ...This symbol indicates a paragraph with instructions You are prompted to perform an action or a sequence of actions Danger This symbol indicates an imminent danger Non observance will result in person...

Page 6: ...s a display panel with optional 10 finger multi touch sensors The display and touch sensors are optically bonded with the hardened front glass The thin client unit TCU1100 is a computing unit that run...

Page 7: ...ata RM IXD Technical Data PC IXD Technical Data RM IXD and PC IXD Note For a description of the product model nomenclature view the VisuNet IXD PC or RM product datasheet on www pepperl fuchs com Hard...

Page 8: ...neous devices and peripherals Ex i 1 x RS 232 Ex e 1 x RS 485 Ex e 1 x Ethernet 100 1000Base TX Ex e Electromagnetic compatibility Directive 2014 30 EU EN 61326 1 2013 industrial locations EN 61000 6...

Page 9: ...l information such as electrical data and connection details refer to the manuals and instruction manuals of the individual components Display Unit DPU2100 J1 AC Power Supply Unit PSU1100 J1 AC N0 DC...

Page 10: ...VisuNet IXD Product Description 2 3 Dimensions Panel Dimensions with Bezel Figure 2 1 Panel cut out dimensinons with bezel Label for DC Version in AG1 Housing Label for AC Version in AG1 Housing 542...

Page 11: ...04 11 Yoke Mount Dimensions Figure 2 2 Yoke mount dimensions with optional sunshield and keyboard tray Dimensions with AG1 Housing and Pedestal Figure 2 3 Dimensions with AG1 housing and pedestal 663...

Page 12: ...the mechanical installation chapters in this manual as well as the IXD and component datasheets on www pep perl fuchs com for information about available options 2 5 Disposal Follow all local and any...

Page 13: ...n accordance with the instruc tions National laws and regulations must be observed The building installation must provide a 20 A overcurrent protection The installer must make a readily accessible dis...

Page 14: ...sure to saltwater or associated vapor and mist To maintain the specified operating temperature install the device in a shaded environ ment Avoid direct sunlight on the IXD display components and housi...

Page 15: ...er resulting from scratched display unit screen Scratches on a display unit front screen weaken the glass structure and may result in broken glass Explosion protection is no longer ensured if a displa...

Page 16: ...set screws out of the pedestal in case of IXD hex wrench size 3 mm Preparing the Pedestal for Connection 1 Bend the grounding cable and place it within the pedestal tube 2 Remove the cable glands at...

Page 17: ...y for connection 3 5 3 Attaching the IXD to the Yoke and Pedestal Warning Pinched cables Ensure that cables do not get pinched or damaged during installation Warning Risk of personal injury and equipm...

Page 18: ...luding 2 x button head locking screws and 1 x spring plunger Preassembled gland plate with loose O ring Required Installation Tools 5 mm hex key for attaching screws to coupling and gland plate 4 mm h...

Page 19: ...lled in the correct orientation the large treaded hole on the top portion of the yoke bracket 2 must be on the right side 3 Insert 2 x additional socket head screws 3 to secure the yoke frame to the p...

Page 20: ...lift the IXD on each side and slide the inner washer into the yoke frame using a flat head screwdriver or similar 5 Tighten the knobs on each side while keeping the IXD positioned vertically 6 Insert...

Page 21: ...on Installation Steps 1 Orient the gland plate assembly to match the guide pin 1 with the corresponding hole in the yoke frame 2 Guide the cables that have been routed through the pedestal up through...

Page 22: ...ert 4 x socket head screws and 4 x flat washers 3 Tighten the screws in a diagonal pattern to 6 Nm Apply a small amount of Loctite 243 to the screws prior to installation 5 Adjust the length of the ca...

Page 23: ...e ground hardware to 4 Nm Figure 3 4 Factory assembled ground connection from PSU to DPU Warning Connection to the ground bolts Connection to the ground bolts is mandatory Warning Customer responsibil...

Page 24: ...board tray kit with loose hardware to be assembled to the yoke frame by the customer Required Installation Tools 3 mm hex key for attaching screws to the yoke bracket Flat head screwdriver Loctite 243...

Page 25: ...for the shoulder screws 2 between the keyboard tray and the yoke Start to thread the shoulder screws on each side 4 Apply a small amount of Loctite 243 to the shoulder screws prior to installation Ti...

Page 26: ...ponents Sunshield kit with loose hardware to be assembled to the yoke frame by the customer Required Installation Tools 4 mm hex key for attaching screws to the yoke frame Flat head screwdriver Attach...

Page 27: ...ws 2 between the sunshield and the yoke frame Start to thread the shoulder screws on each side 4 The screws are threaded into locking nuts Tighten the screws until a slight amount of friction is evide...

Page 28: ...with loose hardware to be assembled to the IXD by the customer Required Installation Tools 4 mm hex key for clamping screws 5 mm hex key for attaching panel mount brackets to the IXD Loctite 243 Panel...

Page 29: ...ighten the screws to 6 Nm 6 Tighten the clamping screws in a uniform criss cross pattern until the gasket is fully compressed Torque will vary 7 If the panel is made out of thin or soft material use t...

Page 30: ...upward 5 Attach 4 x flat head socket screws and tighten the screws to 4 5 Nm Apply a small amount of Loctite 243 to each screw prior to installation 6 Mount the two piece assembly to the wall with 4...

Page 31: ...location with sufficient strength to hold the equipment It is the installer s responsibility to select the proper screws based on the installa tion conditions Warning Distance between housing and wal...

Page 32: ...rdLine Pedestal Pedestals are shipped with an attached ground wire and screws for mounting the IXD housing to the pedestal 6 x M8 countersunk screws and 2 x M6 countersunk screws StandardLine Pedestal...

Page 33: ...VisuNet IXD Mechanical Installation 2020 04 33 StandardLine Pedestal 1 Pre installed ground wire 2 Top cable opening 3 Cable glands 1 2 3...

Page 34: ...gland nut and ferrule of the cable gland on the cable and slide them down the cable away from the pedestal Keep the nut and ferrule on the cable to tighten them in a later installation step 4 Attach t...

Page 35: ...the cable through the cable entry and out the top of the pedestal 6 Pull the cable through the pedestal so that 50 cm of cable is hanging out of the top of the pedestal 7 Repeat the preceding steps fo...

Page 36: ...from the top of the pedestal through the openings in the bottom of the housing 3 Align the mounting holes on the top of the pedestal with the mounting holes on the back of the housing Warning Risk of...

Page 37: ...VisuNet IXD Mechanical Installation 2020 04 37 4 Tighten the 6 x M8 screws in a criss cross pattern to 20 Nm 5 Tighten the 2 x M6 screws to 12 Nm...

Page 38: ...with a crane or the help of another person 2 Mount the pedestal onto the floor using suitable screws 3 Remove the protective foam blocks Warning Proper floor mounting It is the installer s responsibil...

Page 39: ...and gaskets Loose screws and washers Required Installation Tools 5 mm hex key for attaching screws from AG1 housing into IXD Loctite 243 Figure 3 7 IXD assembly into AG1 housing configuration Warning...

Page 40: ...the 14 x screws to 6 Nm Apply a small amount of Loctite 243 to each screw prior to installation 3 8 5 Opening the AG1 Housing The AG1 housing is hinged and opens to the left Opening the Housing 1 Loos...

Page 41: ...alled ground wire that is connected from the inside top of the housing to the inside back of the housing The pedestal comes with a pre installed ground wire that you must route from the pedestal into...

Page 42: ...Wires 1 Remove the nuts and washers from the PE stud on the inside back of the AG1 housing 2 Connect the pre installed ground wires from the the housing and pedestal to the ground bolt 3 Replace the...

Page 43: ...VisuNet IXD Mechanical Installation 2020 04 43 Figure 3 8 Grounding Concept 1 Housing 2 Ground bolt hexagon socket 3 Contact washer 4 Nut 5 Cable lug 6 Flat washer 7 Spring washer 8 Nut...

Page 44: ...nfiguration Tighten the ground hardware to 4 Nm Figure 3 9 Factory assembled ground connection from PSU to DPU Ground Connection between IXD System and AG1 Housing The ground connection between the IX...

Page 45: ...04 45 3 8 7 Mounting the Keyboard 1 Remove the plug and screws from the bottom of the housing 2 To remove the plug open the housing see chapter 3 8 5 Hold the inside nut while removing the plug from...

Page 46: ...re through the plug and tighten the screws to 4 5 Nm Note The keyboard is an intrinsically safe device Refer to the control drawings and relevant installation requirements For proper electrical termin...

Page 47: ...T IXD WALLMOUNT 19U Wall mount kit 548327 KIT IXD PM 19U Panel mount kit 548266 AG1 19S 304A NN NN N0 AG1 housing 548392 KIT IXD19 KBT1 Keyboard tray for yoke mount 548393 KIT IXD19 KBT2 Keyboard tray...

Page 48: ...Pepperl Fuchs Quality Download our latest policy here www pepperl fuchs com quality www pepperl fuchs com Pepperl Fuchs Subject to modifications Printed in Germany DOCT 6258B...

Reviews: