background image

25


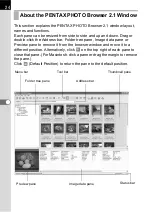
Address bar

The address of the currently displayed folder appears here.
Double-click the address bar to remove it from the browser window and 
move it to a different position. (For Macintosh, click the Address bar or 
drag the margin to remove the Address bar.)


Folder tree pane

Internal data on your computer appears here as a folder tree. Select the 
folder containing saved image files here.
Also, the Folder tree pane handles operations such as creating new 
folders, deleting folders and moving/copying folders.
Double-click or drag the top bar to remove the Folder tree pane from the 
browser window and move it to a different position. (For Macintosh, click 
the Folder tree pane or drag the margin to remove the pane.)


Thumbnail pane

Files in the folder selected in the Folder tree pane appear here. Select 
from five file display methods. When a thumbnail image is selected in the 
Thumbnail pane, the image appears in the Preview pane and the image 
data appears in the Image data pane.


Preview pane

An image selected in the Thumbnail pane appears in this pane.
Double-click the top bar to remove the Preview pane from the browser 
window and move it to a different position. (For Macintosh, click the 
Preview pane or drag the margin to remove the pane.)


Image data pane

The image data for the image selected in the Thumbnail pane appears here.
Double-click the top bar to remove the Image data pane from the browser 
window and move it to a different position. (For Macintosh, click the Image 
data pane or drag the margin to remove the pane.)
Place the cursor over a cell dividing line at the top of the pane and drag it 
to resize the cell. (For Macintosh, drag at the desired position to resize the 
cell.)
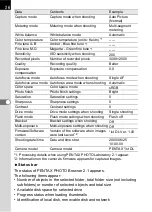
The following items appear:

Data

Contents

Example

Lens name

Shows lens type

smc PENTAX-
FA 50mm F1.4

Focal length

Focal length when shooting (in mm)

50mm

Shutter speed

Shutter speed when shooting 
(in seconds)

1/250sec

Aperture

Aperture value when shooting

F8.0

Summary of Contents for Pentax Photo Browser 2.1

Page 1: ...Operating Manual...

Page 2: ...of use of the copyright as laid out in the Copyright Act and care should be taken here also Regarding trademarks PENTAX and smc PENTAX are trademarks of PENTAX Corporation PENTAX PHOTO Browser PENTAX...

Page 3: ...owser 2 1 22 About the PENTAX PHOTO Browser 2 1 Window 24 Main Image Window 33 Viewing Images 38 Saving a List of Image Data 48 Continuous Image Playback in a Slideshow 49 Printing an Image 52 Changin...

Page 4: ...tible printer using the USB cable Not available on w Direct Print Connect your camera to a TV DVD recorder or other audiovisual equipment using an AV cable to view and or record images View and record...

Page 5: ...to print images transferred to your computer Some printers can print directly from memory cards For details see the operating manual of the printer you are using Images transferred to the computer ca...

Page 6: ...can perform the following tasks Save image files under the same or a new name change file names and file types copy cut paste rotate and delete Create new folders change folder names copy cut delete a...

Page 7: ...Application Software PENTAX PHOTO Browser 2 1 and PENTAX PHOTO Laboratory 2 1 9 languages English French German Spanish Italian Russian Chinese traditional and simplified Korean Japanese OS Windows M...

Page 8: ...5 or later Mac OS X 10 1 3 or later CPU PowerPC G3 or later G4 1 0 GHz or higher recommended Memory 256MB minimum 512MB or higher recommended Monitor 1024 768 1280 1024 or better resolution recommende...

Page 9: ...rights before installing the software 1 Turn your computer on Close any other software that is open 2 Place the provided CD ROM S SW34 into the CD ROM drive on your computer The PENTAX Software Insta...

Page 10: ...ty 5 Select your applicable language in the Select Language screen and click OK 6 The installer starts Click Next Some operating environments select the language automatically Continue with the instal...

Page 11: ...files are to be installed Click Next if no need to change 8 Click Next to begin the installation Copying of the program files begins 9 A message appears after installation of the software is finished...

Page 12: ...played If your PC is connected to the Internet click the displayed country or region and then follow the instructions to register your product Thank you very much for your cooperation Product Registra...

Page 13: ...D ROM drive on your Macintosh 3 Double click the CD ROM S SW34 icon The contents of the CD ROM are displayed 4 Double click the PENTAX Installer icon The PENTAX Software Installer screen appears 5 You...

Page 14: ...step 6 p 12 A world map for Internet Product Registration is displayed If your Macintosh is connected to the Internet click the displayed country or region and then follow the instructions to register...

Page 15: ...ack menu appears 2 Press the four way controller 5 to display the H Set up menu 3 Use the four way controller 23 to select Transfer Mode 4 Press the four way controller 5 A pull down menu appears 5 Us...

Page 16: ...han that of the camera an error may occur when transferring data If this occurs set the Transfer Mode to PC F This sets the transfer speed to the USB 1 1 data transfer rate thereby reducing the possib...

Page 17: ...Double click the DCIM icon The XXXPENTX XXX is a three digit number folder appears The camera image files are in this folder 4 Drag and drop the XXXPENTX folder into any desired folder such as the des...

Page 18: ...B Mass Storage Device is selected and then click Stop The Stop a Hardware device screen appears 3 Select USB Mass Storage Device and click OK A message appears indicating that the hardware can be safe...

Page 19: ...and then click Stop The Stop a Hardware device screen appears 3 Select USB Mass Storage Device and click OK A message appears indicating that the hardware can be safely removed 4 Click OK 5 Turn off...

Page 20: ...peed USB compatible PC F USB 1 1 When printing with a printer PictBridge only for compatible printers 6 Press the 4 button on the camera Saving Images by Connecting Your Camera and Macintosh For Macin...

Page 21: ...your camera 3 Turn your camera on Your camera is recognized on the desktop as NO_NAME or the volume label of the SD Memory Card if one is registered You can change the folder name When the iPHOTO scre...

Page 22: ...icon on the desktop 2 Double click the DCIM icon The XXXPENTX XXX is a three digit number folder appears The camera image files are in this folder 3 Double click the Macintosh HD icon on the desktop...

Page 23: ...ktop to the trash can 2 Turn off the camera and disconnect the USB cable from your camera and Macintosh Use a card reader or card adapter to send image files directly to your computer from a memory ca...

Page 24: ...and explains its functions 1 Select the start menu on the desktop 2 Select PENTAX PHOTO Browser from PENTAX Digital Camera Utility in the program menu PENTAX PHOTO Browser 2 1 is opened and the PENTA...

Page 25: ...the hard disk 2 Double click the PENTAX PHOTO Browser program icon PENTAX PHOTO Browser 2 1 is opened and the PENTAX PHOTO Browser 2 1 window appears Closing PENTAX PHOTO Browser 2 1 Select Quit PENTA...

Page 26: ...ew pane to remove it from the browser window and move it to a different position Alternatively click on the top right of each pane to close that pane For Macintosh click a pane or drag the margin to r...

Page 27: ...the Thumbnail pane the image appears in the Preview pane and the image data appears in the Image data pane Preview pane An image selected in the Thumbnail pane appears in this pane Double click the to...

Page 28: ...1 Fine tune M G Magenta Green fine tune 1 Sensitivity ISO sensitivity when shooting 200 Recorded pixels Number of recorded pixels 3008 2000 Quality Recording quality Better Exposure compensation Expo...

Page 29: ...The properties of the selected file or folder appear p 74 Exit This closes PENTAX PHOTO Browser 2 1 For Macintosh select Quit PENTAX PHOTO Browser Edit menu Undo This undoes the previous file operati...

Page 30: ...t by This specifies the order in which objects appear in the Thumbnail pane and specifies ascending or descending order You can select from File Name File Size File Date Time File Type Shooting Date T...

Page 31: ...n the Thumbnail pane of PENTAX PHOTO Browser 2 1 p 76 PENTAX REMOTE Assistant 1 This starts PENTAX REMOTE Assistant PENTAX REMOTE Assistant can be used by installing it in the same folder as PENTAX PH...

Page 32: ...the previously opened folder 2 Forward This opens the folder which was open before using the Back button 3 Up This moves up one folder in the directory tree 4 Rename All This changes the names of all...

Page 33: ...AX camera Other Image Images other than those captured with your PENTAX camera JPEG TIFF BMP PNG PICT Folder Folders Other Files not compatible with PENTAX PHOTO Browser 2 1 13 Sort by Click to select...

Page 34: ...mage files into one CSV format file p 48 22 PENTAX PHOTO Laboratory This starts PENTAX PHOTO Laboratory 2 1 Specify the applicable image files within the Thumbnail pane of PENTAX PHOTO Browser 2 1 p 7...

Page 35: ...lect the file to open If a check mark is next to Open in new window a new Main image view window opens and the selected image appears when a file is selected and Open is clicked p 38 Save as This save...

Page 36: ...deshow Selected or checked images appear in order p 49 Fit to Window This fits the image to the window size p 42 Enlarge This doubles the view magnification of the image appearing in the image view ar...

Page 37: ...tation of an unprocessed JPEG image the Save File dialog opens before the image appears p 46 Options This sets various settings for PENTAX PHOTO Browser 2 1 p 60 Help menu Help Topics This shows PENTA...

Page 38: ...previous image appears when there are multiple images in the main image view window This button cannot be selected if there are no images to view 7 Next Image The next image appears when there are mu...

Page 39: ...pull down list or by directly inputting the magnification p 42 14 Rotate View Counterclockwise 90 This rotates the image appearing in the image view area 90 to the left counterclockwise p 41 15 Rotat...

Page 40: ...38 Display the images saved on your computer 1 Open PENTAX PHOTO Browser 2 1 Viewing Images...

Page 41: ...w The image is framed in blue Hold down the Ctrl key or Shift key to select multiple images For Macintosh hold down the Command key or Shift key to select multiple images Check O the image to view Mul...

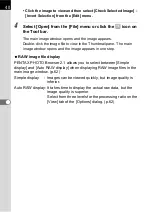
Page 42: ...ge window opens and the image appears in one step RAW image file display PENTAX PHOTO Browser 2 1 allows you to select between Simple display and Auto RAW display when displaying RAW image files in th...

Page 43: ...t counterclockwise 1 Select Rotate View Clockwise 90 or Rotate View Counterclockwise 90 from the View menu in the main image window Alternatively click the or icon on the Tool bar The image appears ro...

Page 44: ...he image view area 1 Select Fit to Window Enlarge Reduce or Life size from the View menu in the main image window Alternatively click the or icon on the Tool bar The image view magnification can be ad...

Page 45: ...43 Reduced view You can also enlarge or reduce the view by directly inputting the numerical value of the magnification in the View Magnification box on the Tool bar...

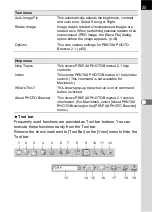
Page 46: ...age window and uncheck the item The Tool bar or image data pane is hidden You can display file data for the image file appearing in the main image window p 74 Hiding the Tool Bar and Image Data Pane T...

Page 47: ...out image data PICT PICT image without image data 1 Select Save as from the File menu in the main image window or click the icon on the Tool bar The Save as dialog appears If RAW data is viewed in Sim...

Page 48: ...te Image Counterclockwise 90 or Clockwise 90 from the Tool menu in the main image window or click on the right of the icon and then click the or icon The image data appears rotated When performing los...

Page 49: ...47 3 Specify Save in File name and Save as type and then click Save The image is rotated and saved...

Page 50: ...OTO Browser 2 1 window or click the icon on the Tool bar The Save Image Data List dialog appears 2 Specify the file name and save destination and then click Save The image data is saved in CSV format...

Page 51: ...mage or folder in the PENTAX PHOTO Browser 2 1 window 2 Select Slideshow from the View menu or click the icon on the Tool bar The Slideshow screen and Slideshow control panel open Continuous Image Pla...

Page 52: ...og p 65 Number Icon button Content 1 First Image Returns to the first image When this is pressed during a slideshow the first image appears and the slideshow pauses 2 Rewind Rewinds slideshow When thi...

Page 53: ...l screen select the display pattern for images on the primary and secondary monitors Slideshow A A Single window Single full screen Secondary B Primary A B A Dual window Dual full screen n 2 n 2 n 3 n...

Page 54: ...he Tool bar The Print dialog appears Printing an Image Print Index Prints a thumbnail and image data for an image Print photo Prints a high quality print of an image You can print multiple images on o...

Page 55: ...the number of images to print on one page Caption The caption settings are explained below The contents that appear depend on the selected layout Position Select the image caption position from the li...

Page 56: ...int from the File menu Alternatively click the icon on the Tool bar The Print dialog appears The image size is calculated automatically from the margins number of images and caption size Click the Pag...

Page 57: ...inting Layout 3 Partition printing printing one image on multiple pages Images per page From the list select the number of images to print on one page Multi page printing Select the number of partitio...

Page 58: ...e list The default setting is the standard system font Print Time Select from Do Not Print Default or Print HH MM 24 hour format only Separator Sets dividers in text Format Sets date format Text color...

Page 59: ...cription Margins Left Right Upper Lower The default setting is 25 mm on each side Header Footer The default setting is 15 mm from the top and bottom edges Number of copies Specify the number of copies...

Page 60: ...etup dialog appears Position Sets header footer position Select from Do Not Print Default Align left Align center and Align right Font Select a font from the list The default setting is the standard s...

Page 61: ...iption Name Select the printer to use from the list Click Network to select a printer on the network Click Properties to make advanced printer settings Paper Size Select paper size Source Select paper...

Page 62: ...the initial image view size thumbnail caption viewing and RAW file view format 1 Select Options from the Tool menu in the PENTAX PHOTO Browser 2 1 window Alternatively click the icon on the Tool bar...

Page 63: ...top Always use this folder Click Browse to specify a folder Status at Startup Set PENTAX PHOTO Browser 2 1 status at startup Status at last exit When the next session of PENTAX PHOTO Browser 2 1 is st...

Page 64: ...pane height to be the same as the previous height when the main image view window opens Auto The height is automatically adjusted Fixed The number of lines may be specified Main Image Window Size Set...

Page 65: ...ain RAW File Image Sets view when opening a new RAW image file Simple display The compressed image data in the RAW image file appears The image data appears more quickly but there is quality loss due...

Page 66: ...ltiple attributes may be selected Zoom View magnification rate is maintained Position Position is maintained Direction Direction is maintained View Order Selects ordering for frame advance Slideshow i...

Page 67: ...hows Single window View slideshow in a single window Dual window View slideshow in two windows primary and secondary Single full screen View slideshow full screen on a single monitor Dual full screen...

Page 68: ...imary and secondary windows With the first image starting at zero even number images are shown on the primary window and odd number images are shown on the secondary window Advance two frames Frames a...

Page 69: ...lect the thumbnail image to move or copy 2 Select Cut or Copy from the Edit menu Alternatively click the or icon on the Tool bar 3 Specify the destination folder for moving or copying in the Folder tr...

Page 70: ...68 4 Select Paste from the Edit menu Alternatively click the icon on the Tool bar...

Page 71: ...the destination folder To copy hold down the Ctrl key while you drag and drop the file For Macintosh hold down the Option key while you drag and drop the file Use the same procedure to move or copy a...

Page 72: ...bnail image to delete Alternatively select the folder to delete in the Folder tree pane 2 Select Delete from the Edit menu Alternatively click the icon on the Tool bar A delete confirmation screen app...

Page 73: ...the folder to be renamed in the Folder tree pane 2 Select Rename from the File menu Alternatively directly click the file or folder name in the Thumbnail pane or Folder tree pane The file or folder n...

Page 74: ...ed Renaming All File Names Item Description Base file name Specify name to add to file names IMGP is added by default Number of digits Specify the number of digits to add to file names 1 to 5 digits m...

Page 75: ...e New Folder from the File menu A new folder is created under the specified folder or in the Thumbnail pane Start number Sets the start number When files exist in the folder with the same specified ba...

Page 76: ...r which properties are to be shown 2 Select Properties from the File menu The XXX Properties dialog appears 3 Confirm the content 4 Click OK The Properties dialog closes Displaying Properties of Image...

Page 77: ...ct the folder for which properties are to be shown 2 Select Properties from the File menu The XXX Info dialog appears 3 Confirm the content 4 Click the button The Information dialog closes Displaying...

Page 78: ...s section describes opening and closing PENTAX PHOTO Laboratory 2 1 and viewing the PENTAX PHOTO Laboratory 2 1 window and explains its functions 1 Select the start menu on the desktop 2 Select PENTAX...

Page 79: ...boratory program icon PENTAX PHOTO Laboratory 2 1 is opened and the PENTAX PHOTO Laboratory 2 1 window appears Closing PENTAX PHOTO Laboratory 2 1 Select Quit PENTAX PHOTO Laboratory in PENTAX PHOTO L...

Page 80: ...the View menu to align the panels Four panels not including the main panel can be hidden or shown About the PENTAX PHOTO Laboratory 2 1 Window When the processing mode is set to Full Auto Processing...

Page 81: ...e Other settings panel Adjust characteristics such as sensitivity contrast color depth and edges p 90 Menu bar This executes functions or sets various settings of PENTAX PHOTO Laboratory 2 1 File menu...

Page 82: ...Next Image When multiple images are selected the preview of one image back in order of registration appears Last Image When multiple images are selected the preview of the last image in order of regis...

Page 83: ...in pixels when saving processed images p 91 Options This sets various settings for PENTAX PHOTO Laboratory 2 1 p 94 Help menu Help Topics This shows PENTAX PHOTO Laboratory 2 1 help contents Index Thi...

Page 84: ...conditions set in Custom Processing mode as an adjustment file p 93 6 Undo When in Custom Processing mode use this function to cancel the previous operation You can undo up to five operations 7 Redo...

Page 85: ...the image data in the preview from the pull down menu Select from Small Medium Large or Full Size 2 Enlarge Area When this is turned on a red frame appears in the preview area The Enlarge area window...

Page 86: ...ltiple images are selected the preview of the first image in order of registration appears 6 Previous Image When multiple images are selected the preview of one image ahead in order of registration ap...

Page 87: ...wser 2 1 use the following methods for viewing image files Select RAW image files in PENTAX PHOTO Browser 2 1 then start PENTAX PHOTO Laboratory 2 1 RAW image files can also be selected in PENTAX Phot...

Page 88: ...he following seven Image modes when using L Easily Modifying RAW Images Natural Elaborates images with natural colors Bright Elaborates sharp bright images Picture Portrait Elaborates images with beau...

Page 89: ...balance panel Tone panel and Other settings panel appear Setting RAW Image Data Processing Conditions To close the White balance panel Tone panel or Other settings panel select Full Auto Processing fr...

Page 90: ...on your camera Override Use White Balance Setting to select the white balance to apply Select from Daylight Shade Cloudy Daylight fluorescent light Neutral white fluorescent light White fluorescent li...

Page 91: ...nsity and contrast Change the tone curve using the pointer Move the curve up to brighten and move the curve down to darken the image Click a point on the tone curve to fix the curve at that point A bl...

Page 92: ...he image becomes darker Contrast Adjusts the contrast between light and shadow Increases contrast between light and shadow Decreases contrast between light and shadow Saturation Adjusts the strength o...

Page 93: ...lect the save format Select the quality and file format when saving RAW images For JPEG files image data is compressed and saved Select from Highest Compression High Compression Medium Quality High Qu...

Page 94: ...or click on the right of the icon to select the save size 3 Select Save from the Tool menu or click the icon on the Tool bar The Save as dialog appears 4 Specify the file name and save destination and...

Page 95: ...og appears 2 Specify the file name and save destination and then click Save The current settings are saved as an adjustment setting file INI 1 Display a RAW image file in the Preview panel 2 Click Rec...

Page 96: ...ent RAW image is processed by the recalled adjustment 1 Select Options from the Tool menu on the Main panel or click the icon on the Tool bar The Options dialog appears 2 Click the General tab Change...

Page 97: ...used are arranged Display size is set to Small default setting and other settings are displayed with the status at last exit Default The status for each panel is returned to the default status Show S...

Page 98: ...ting for tasks such as making detailed adjustments on images or commercial printing When viewing images processed with AdobeRGB in an sRGB environment the saturation may appear lower than when process...

Page 99: ...processing conditions to the preview image after all changes are made to Custom Processing settings upon clicking the Refresh button Saving Multiple Files Select the saving method when processing mul...

Page 100: ...ng fields and separates them with a comma Generally character strings are indicated with double quotation marks in CSV format Some software include data input and output functions in CSV format as par...

Page 101: ...lor images and prevents quality loss even when re edited PNG files however cannot be viewed on older browsers Internet Explorer 3 0 or earlier or Internet Explorer 4 5 on Macintosh In addition thumbna...

Page 102: ...Memo...

Page 103: ...Memo...

Page 104: ...95106 Argenteuil Cedex FRANCE PENTAX Benelux B V for Netherlands Spinveld 25 4815 HR Breda NETHERLANDS http www pentax nl for Belgium Luxembourg Weiveldlaan 3 5 1930 Zaventem BELGIUM http www pentax...

Reviews: