background image

EN-2

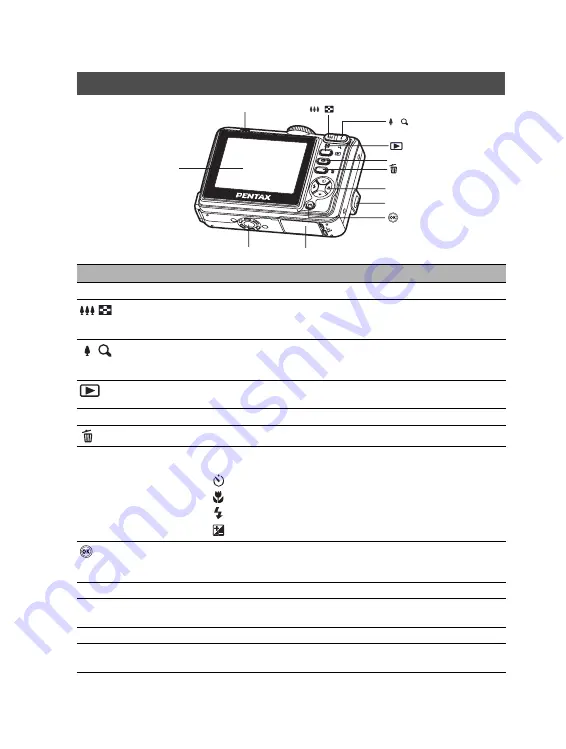
Rear View

Name

Description

LED indicator

Indicates the camera’s current state.

/


button

Zooms the lens to wide-angle position.
Changes the display into nine images (thumbnail) in the 
playback mode.

/

 button

Zooms the lens to telephoto position.
During zoom playback, it changes the size of the Zoom Display 
image displayed on the LCD monitor.


button

Switches to Playback mode. The latest image and information 
appear on the LCD monitor.

MENU button

Switches to Menu settings.

 button

Allows you to delete the picture.

Four-way controller

Allows you to scroll through menus and pictures, and then 
select choices.

 / 

S

Selects the drive and self-timer modes in capture mode.

 / 

X

Selects the focus mode in capture mode.

 / 

W

Selects the flash mode in capture mode.

 / 

T

Adjusts the EV compensation value.

/DISPLAY button

Confirms the menu item selection.
DISPLAY  - Turns the LCD monitor display and live view on and 
off.

Strap holder

Camera strap attachment.

Battery/card cover

Allows you to access to the battery and insert or remove the SD 
memory card.

Tripod socket

Allows tripod mounting.

LCD monitor

Provides menu information to operate the camera, and 
previews the picture before taking it and review it afterwards.

LED indicator

MENU

 button

button

button

Battery/card cover

Tripod socket

Strap holder

DISPLAY

 button

/

button

/

button

Four - way controller

LCD monitor

MENU

Summary of Contents for Optio E10

Page 1: ...Self timer LED Blinks blue during self timer mode until picture is taken Microphone Allows you to record sound with the recorded movie clips PC AV terminal Allows you to connect a USB cable or an AV...

Page 2: ...pictures and then select choices SSelects the drive and self timer modes in capture mode XSelects the focus mode in capture mode WSelects the flash mode in capture mode TAdjusts the EV compensation v...

Page 3: ...Lets you take portrait type pictures Landscape Lets you take landscape views Sport Lets you take sport pictures Night Scene Lets you take dark scenes such as night views Setup Lets you select the came...

Page 4: ...the battery in the correct orientation as shown on the right 3 Close the battery card cover You can use 2 AA size batteries alkaline or Ni MH rechargeable to power the camera Due to the characteristi...

Page 5: ...y card in the correct orientation as shown on the right Hold the SD memory card with its metal contact end surface facing the rear side of the camera and then insert the card as far as it can go 3 Clo...

Page 6: ...mode dial to and turn your camera on by pressing the power switch 2 Set up1 is displayed 3 Use the four way controller T to select Language then press the button 4 Use the four way controller ST to s...

Page 7: ...to select Date Adjust and the four way controller WX to switch the date types then press the button 4 Press the four way controller WX to select Day Month Year and Time fields To increase a value pres...

Page 8: ...at the same time 5 Press the shutter release button down fully to take the pictures Playing Back Still Pictures 1 Press the button The last image appears on the screen 2 Use the four way controller W...

Page 9: ...ack the recorded movie clips on the LCD monitor However the sound recorded with movie clips can only be played back on a TV or a computer 1 Press the button 2 Use the four way controller W X to go thr...

Page 10: ...the image you want to delete 3 Press the button 4 Use the four way controller ST to select This Image or All Images by your preference then press the button 5 When the delete message appears use the f...

Page 11: ...ded in the CD ROM S SW47 is exclusively for Windows 98 98SE For more details on driver installation process you can refer to your Operating Manual Setting the USB Connection Mode to PC 1 Rotate the mo...

Page 12: ...e camera the images stored in the internal memory will be transmitted to the computer 2 Turn the camera on 3 Look for a new Removable Disk icon appearing in the My Computer window Your recorded images...

Page 13: ...drive For Computers Running Windows Open the removable disk by double clicking on it Double click on the folder containing your recorded images movie clips Select the images movie clips that you pref...

Page 14: ...camera function is not supported for Mac platforms 2 Rotate the mode dial to and turn your camera on by pressing the power switch 3 Press the four way controller X to select the Set up2 menu then use...

Page 15: ...utton to view live video 3 Click the Place Call button 4 Type the e mail address or the network address of the computer that you are calling 5 Click Call The person that you are calling must also have...

Reviews: