background image

.

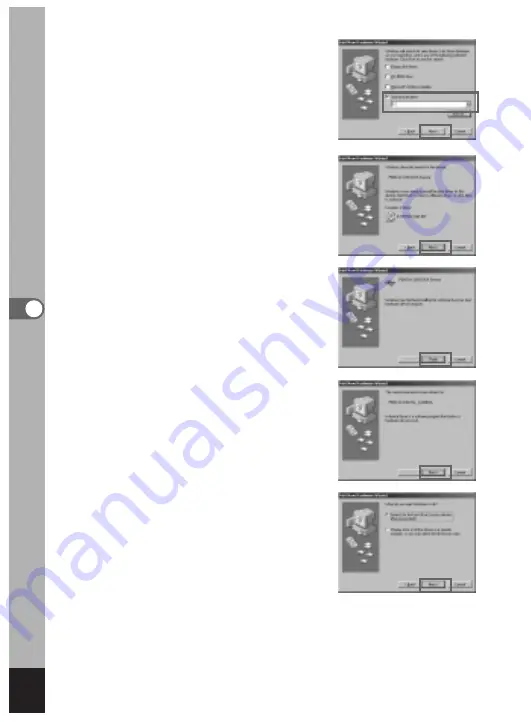
Make sure that the specified drive
is displayed and click [Next].

⁄0

Make sure that [PENSSTOR.INF]
is displayed and click [Next].

Installation of the driver starts.

⁄1

Click [Finish].

When installation is finished, installation of
the driver for the new hardware starts.

⁄2

Click [Next].

⁄3

Select [Search for the best driver
for your device] and click [Next].

106

Pla

ybac

k/Er

asing

Summary of Contents for Optio 450

Page 1: ...Digital Camera Operating Manual To ensure the best performance from your camera please read the Operating Manual before using the camera...

Page 2: ...ns industrial enterprise or as items for display Images taken with the purpose of obtaining copyrights also cannot be used outside the scope of use of the copyright as laid out in the Copyright Act an...

Page 3: ...ly swallowed Use an AC adapter that are of the power and voltage specified for exclusive use with this product The use of an AC adapter other than that specified exclusively for use with this product...

Page 4: ...properties of the liquid crystal and is not a fault Remove dust from the lens and viewfinder using a blower or clean off dust using a lens brush Periodic checks are recommended every 1 to 2 years in o...

Page 5: ...al panel used in the LCD display is manufactured using extremely high precision technology Although the level of functioning pixels is 99 99 or better you should be aware that 0 01 or fewer of the pix...

Page 6: ...tings 20 Setting the Display Language 20 Setting the Home Town 21 Setting the D S T Mode 21 Setting the Date and Time 22 Quick Start 24 Taking Still Pictures 24 Playing Back Still Pictures 26 Playing...

Page 7: ...Taking Pictures with Digital Filters Digital Filter Mode 69 Using Preset Function Settings User Mode 71 Recording Sound Voice Recording Mode 72 EV Compensation 73 Using the Zoom 74 Using the Self Time...

Page 8: ...amera Settings 124 Formatting a SD Memory Card MultiMediaCard 124 Changing the Sound Settings 125 Setting the Date Style 127 Changing the Date Time 128 Setting the World Time 128 Changing the Start up...

Page 9: ...ck Erasing and Editing Settings chapters Taking Pictures This chapter explains the various ways of capturing images and how to set the relevant functions Playback Erasing This chapter explains how to...

Page 10: ...ed with are also available as optional accessories For other optional accessories refer to the list on page 150 Type of AC plug cord D CO2A Australia D CO2B United Kingdom D CO2E Europe D CO2H Hong Ko...

Page 11: ...tput terminal DC input terminal Battery lock lever Battery chamber card cover Tripod socket Name of Parts Front Back Remote control receiver Shutter release button Self timer lamp Power switch Autofoc...

Page 12: ...digital zoom and magnified playback Four way controller DISPLAY button Four way controller DPOF button Four way controller button Menu Fn button button Shutter release button OK button Diopter adjustm...

Page 13: ...11 Getting Started Pass the narrow end of the strap through the strap lug and pass the other end through the loop Getting Started Attaching the Strap...

Page 14: ...ropriate ambient temperature range for charging the battery is 0 C 40 C 32 F to 104 F The charging time may vary depending on the ambient temperature and charging conditions When the battery reaches t...

Page 15: ...se the battery by using your finger to press the battery lock lever in the same direction as when you inserted the battery and pull the battery out If you intend to use the camera continuously for a l...

Page 16: ...en the camera is used in a cold environment keep this product warm by holding it in some protection against cold or inside the clothes Battery performance once deteriorated due to low temperature will...

Page 17: ...camera c Connect the AC plug cord to the AC adapter v Plug the AC plug cord into the power outlet Make sure that the camera is turned off when connecting or disconnecting the AC adapter Make sure that...

Page 18: ...er card cover To remove the card eject the card by pressing it in the direction indicated by the arrow and pull it out Approximate Number of Recordable Images and Recorded pixels Quality levels Qualit...

Page 19: ...edia Cards or SD Memory Cards MultiMedia Cards that have been used on another camera Refer to Formatting a SD Memory Card MultiMediaCard p 124 for instructions on formatting Never remove the SD Memory...

Page 20: ...ned on it automatically performs a card check If no SD Memory Card MultiMediaCard has been inserted appears on the LCD monitor And if the write protect switch is set to LOCK will be displayed instead...

Page 21: ...1 to 1 m 1 per meter z Aim the camera at the bright subject While looking through the viewfinder move the diopter adjustment lever to the left or right until the subject appears in the sharpest focus...

Page 22: ...the correct date and time Setting the Display Language You can choose the language in which the menus error messages etc are displayed from the following English French German Spanish Italian and Jap...

Page 23: ...e the setting after it has been made Refer to Setting the World Time p 128 Setting the D S T Mode You can choose whether or not to display the Daylight Saving Time mode z Use the four way controller t...

Page 24: ...r way controller and will be displayed above and below the year v Repeat Step c to change the year hour and minutes b Use the Display button to select the 12 hour or 24 hour display format Date Adjust...

Page 25: ...es 00 seconds to return to capture mode For an accurate time setting when you have finished the settings press the OK button when the clock reaches 00 seconds When the initial settings screen is displ...

Page 26: ...rea in the middle of the LCD monitor indicates the zone of automatic focusing You can change the size of the subject by pressing the Zoom button makes the subject bigger makes the subject smaller You...

Page 27: ...the following information on the LCD monitor the status lamp and the flash lamp Autofocus area If the subject is in focus the frame will light green If the subject is out of focus the frame will not...

Page 28: ...be displayed on the LCD monitor Playing Back Previous or Next Images Still images can be played back one at a time proceeding either forward or backward z Press the Playback button after taking a pict...

Page 29: ...tend in Playback Only mode this feature is useful when you want to pass the camera to someone and show them the picture you have just taken To switch to the Capture mode turn the camera off and then t...

Page 30: ...a One of the advantages of a digital camera is that it enables you to view your pictures immediately after you have taken them You can check the composition and focus and take the picture again if you...

Page 31: ...rd MultiMediaCard into the card adapter and inserting the card adapter into the card slot Viewing Images with your PC p 103 Viewing Images with your Macintosh p 117 Printing images by a printing servi...

Page 32: ...rture priority You can set the aperture manually and p 54 the shutter speed is set automatically Program The shutter speed and aperture are set p 53 automatically when taking still pictures Picture Yo...

Page 33: ...ges the shooting mode as follows Using the self timer p 76 Using the remote control unit p 77 Continuous shooting p 78 Multiple exposure shooting p 82 Interval shooting p 80 When the Capture mode is s...

Page 34: ...p 56 54 Sets the shutter speed in mode p 55 Selects the type of filter in mode p 69 Selects Picture mode in mode p 58 OK button Sets the selected menu item p 34 When pressed in mode the function on th...

Page 35: ...or p 88 Playback button p 30 Switches to Capture mode Four way controller Displays images one by one p 26 OK button Saves the function selected by the menu item p 34 When pressed in Normal Playback mo...

Page 36: ...an item Use the four way controller to move the frame up or down v Use the four way controller to change the setting v If there is a select screen use the four way controller to move to the select sc...

Page 37: ...3sec Off Exit MENU Ok OK Set up Format Sound Date Style mm dd yy 1 1 2003 Off Date Adjust World Time Language English 1 3 Exit MENU Ok OK Set up menu Playback menu Rec Mode Wide AWB Auto Recorded Pixe...

Page 38: ...For setting the sensitivity p 49 Auto Bracket For setting the shooting conditions such as exposure p 84 saturation and sharpness Digital Zoom For taking digital zoom pictures p 75 Instant Review For...

Page 39: ...ime p 128 Language For changing the language in which menus and p 130 messages are displayed Start up screen For setting the Start up screen when the camera is p 131 turned on Video Out For setting th...

Page 40: ...rightness distribution of the image is displayed The x axis shows the brightness darkest at the left end and brightest at the right end and the y axis shows the pixel numbers q Recorded pixels w Quali...

Page 41: ...mode is displayed If any of the modes are changed such as Flash mode the mode you have changed is displayed for a few seconds LCD Monitor Off Turn off the LCD monitor The LCD monitor is not turned of...

Page 42: ...tant objects mode Move focusing area The position of the autofocus area is changed Manual focus Adjust focus manually by the four way controller mode z Press the or button in Capture mode The focus mo...

Page 43: ...ure is enlarged to full screen on the LCD monitor Adjust the focus with the four way controller while looking at the image on the monitor For distant focus For closer focus After the focus is set pres...

Page 44: ...nd Auto flash Red eye Reduction modes cannot be selected when the Capture mode is set to The flash is off when the Capture mode is set to continuous shooting infinity landscape fireworks in picture mo...

Page 45: ...320 240 pixels in the movie picture mode If you select a large size the picture may appear distinct when it is printed out Selecting a small size reduces the volume of data This is useful for attachin...

Page 46: ...ta z Select Quality Level on the Rec Mode menu x Use the four way controller to change the image quality c Press the OK button The camera is ready to take the picture Rec Mode Wide AWB Auto 2288 1712...

Page 47: ...der fluorescent light Light Choose the type of fluorescent light from W white 4200 K N neutral white 5000 K and D daylight 6500 K Manual Use this mode when taking pictures by adjusting the white balan...

Page 48: ...ng z Select manual on the white balance screen x Point your camera at a blank sheet of paper so that it fills the screen c Press the Display button The white balance is automatically adjusted Complete...

Page 49: ...setting c Press the OK button The camera is ready to take the picture The AF area does not appear in the viewfinder Always check the focusing area on the LCD monitor z c x Rec Mode Wide AWB Auto Reco...

Page 50: ...sure is determined by the small area in the center of the screen only z Select AE Metering on the Rec Mode menu x Use the four way controller to change the metering mode c Press the OK button The came...

Page 51: ...ed in manual exposure mode Saving the Sensitivity p 86 z c x Rec Mode Wide AWB Auto Recorded Pixels Quality Level White Balance Focusing Area AE Metering Sensitivity 1 3 Exit MENU Ok OK 2288 1712 Rec...

Page 52: ...ether you want the image to have sharp or soft outlines z Select Sharpness on the Rec Mode menu x Use the four way controller to change the setting from Normal to Hard or Soft c Press the OK button Th...

Page 53: ...ontrast You can set the image contrast z Select Contrast on the Rec Mode menu x Use the four way controller to change the setting from Normal to Hard or Soft c Press the OK button The camera is ready...

Page 54: ...52 Memo...

Page 55: ...tures However you can select other functions such as the flash mode or continuous shooting mode z Set the mode dial to x Press the shutter release button The picture will be taken Using the Shutter Re...

Page 56: ...r release button The picture will be taken Playing Back Still Pictures p 26 The aperture value will be saved when the camera is turned off When the focus mode is set to manual the four way controller...

Page 57: ...e taken Playing Back Still Pictures p 26 The set shutter speed will be saved when the camera is turned off When the focus mode is set to manual the four way controller becomes the manual focus button...

Page 58: ...e value If the combination of shutter speed and aperture value do not give an appropriate exposure a warning will be displayed Lit If the deviation from the appropriate exposure is between 0 3 EV and...

Page 59: ...d when the camera is turned off EV compensation is not available in this mode When the focus mode is set to manual the four way controller becomes the manual focus button and cannot be used to change...

Page 60: ...aits with spatial effect by emphasizing the person Surf Snow Enables to take clear photos at dazzling places like beaches and snow covered mountains Autumn Colors Enables you to take colorful photos o...

Page 61: ...he focus mode is set to manual the four way controller becomes the manual focus button and cannot be used to change the picture mode To change the picture mode press the OK button once and then use th...

Page 62: ...l be displayed on the LCD monitor Flash OFF Movie Picture mode icon Remaining shooting time Remaining number of sets x Press the shutter release button Shooting will start You can change the size of t...

Page 63: ...take a finger off from the shutter release button Playing Back Movie Pictures p 90 The flash will not discharge in Movie Picture mode Continuous shooting interval shooting and multiple exposure shooti...

Page 64: ...Joins the images at the left Joins the images at the right Joins the images at the top Joins the images at the bottom The example shows the images when is selected c Take the first picture Press the...

Page 65: ...nnot join the images Use the panorama software ACD photostitcher provided with the camera Continuous shooting Multiple Exposure mode and interval shooting are not possible in Panorama assist mode A co...

Page 66: ...rallel If you do not need to switch to Cross go to Step b z Press the Menu Fn button The Rec Mode menu will be displayed x Press the four way controller to select 3D Mode c Use the four way controller...

Page 67: ...ton or change the 3D image mode to another Capture mode A clear three dimensional effect will not be achieved if the two images are taken in widely different positions heights or are not straight When...

Page 68: ...e This principle is applied to taking and viewing 3D pictures 3D pictures can be viewed by the parallel method where the left and right lines of vision are virtually parallel as when looking at a dist...

Page 69: ...d right eyes differs from person to person some people may have difficulty obtaining a three dimensional effect even when looking at prints that are the same size It may be especially difficult if the...

Page 70: ...68 Taking Pictures Example of a 3D picture...

Page 71: ...ter that produces a fuzzy effect Color filters Eight colors black and white sepia red pink violet blue green and yellow are provided for the color filters When you select a color filter in the Digital...

Page 72: ...ess the shutter release button The picture will be taken Playing back still pictures p 26 When the focus mode is set to manual the four way controller becomes the manual focus button and cannot be use...

Page 73: ...s are activated enabling you to take pictures immediately with your own camera settings z Set the mode dial to x Press the shutter release button The picture will be taken Registering Functions in Use...

Page 74: ...isplayed on the LCD monitor Remaining time Recording time x Press the shutter release button Recording starts The self timer lamp and flash status lamp blink during recording c Press the shutter relea...

Page 75: ...a negative level Four way controller increases the EV compensation to a positive level The set level is displayed on the LCD monitor Saving the EV Compensation p 86 If you press or one time or set to...

Page 76: ...rger Wide makes the subject smaller When the digital zoom function is disabled you can take pictures at up to 5 magnification using the optical zoom When the digital zoom is enabled you can further en...

Page 77: ...ure Saving the Digital Zoom Function Setting p 86 When you turn the LCD monitor off the digital zoom is disabled even if the digital zoom function is set to On When shooting an image using the digital...

Page 78: ...ess the shutter release button The self timer is engaged and the self timer lamp lights The picture is taken approximately three seconds after the self timer lamp starts to blink Playing Back Images a...

Page 79: ...re that the remote control unit is no more than 5 meters away from the front of the camera When taking pictures against the light the distance at which the remote control unit operates may be reduced...

Page 80: ...continuously while the shutter release button is pressed Shooting stops when you take a finger off from the shutter release button Playing Back Still Pictures p 26 The interval will vary according to...

Page 81: ...oting in Fast Forward Movie mode starts n Press the shutter release button Shooting in Fast Fwd Movie mode ends Playing Back Movie Pictures p 90 Off 1 is the normal setting for movie pictures 15 frame...

Page 82: ...s of 1 minute Intervals of less than 10 seconds cannot be set The number of pictures can be set in the range of 2 to 99 pictures The start time can be set between 0 min and 23 hr 59 min in units of 1...

Page 83: ...nutes 2 Use the four way controller to change the minutes then press will be displayed above and below the seconds 3 Use the four way controller to change the seconds then press 4 Press the four way c...

Page 84: ...ubject and choose the exposure method with the four way controller Priority is given to the brighter image Priority is given to the darker image The average exposure is obtained v Press the shutter re...

Page 85: ...Press the shutter release button The Instant Review screen will be displayed and you will be asked whether you want to continue shooting If you select Continue and press the OK button the picture you...

Page 86: ...etting will be displayed v Use the four way controller to select the conditions for bracket shooting If you selected Sharpness Saturation or Contrast skip to step m b Press the four way controller to...

Page 87: ...whether you want to continue shooting or not To continue shooting in auto bracket mode select Continue and press the OK button Playing Back Still Pictures p 26 Check the pictures you have taken using...

Page 88: ...is saved AE Metering The AE Metering setting on the Rec Mode Off menu is saved Sensitivity The Sensitivity setting on the Rec Mode Off menu is saved Focus Mode The focus mode setting is saved Off Zoo...

Page 89: ...rogram manual exposure aperture priority shutter priority picture or digital filter mode Settings made for functions marked with an asterisk are reflected in other modes as well as User mode Function...

Page 90: ...e and choose the image you want to magnify with the four way controller x Press on the Zoom button The image will be magnified 1 to 8 The following operations can be performed while the magnified imag...

Page 91: ...with the four way controller If the image has no voice memo the screen for recording a voice memo is displayed on the LCD monitor x Press the OK button Recording starts You can record for up to 30 se...

Page 92: ...troller Reverse playback Four way controller Forward playback Four way controller Pause Zoom button Increases the volume Zoom button Reduces the volume Display button Changes the Display mode The foll...

Page 93: ...during playback Four way controller Rewinds and plays back the recorded sound Four way controller Advances and plays back the recorded sound Zoom button Increases the volume Zoom button Reduces the v...

Page 94: ...he image is displayed The x axis shows the brightness darkest at the left end and brightest at the right end and the y axis shows the number of pixels Histogram Recorded pixels Quality level White bal...

Page 95: ...ttom right image is selected the next nine images will be displayed and if you press the four way controller while the top left image is selected the previous nine images will be displayed Similarly i...

Page 96: ...the playback interval Choose from the following 3 sec 5 sec 10 sec 20 sec 30 sec b Press the OK button Playback will start at the set interval If you press the four way controller or any buttons such...

Page 97: ...will be displayed c Select Delete with the four way controller v Press the OK button You can also delete images from Instant Review p 25 You cannot erase protected images with the symbol If Quick Dele...

Page 98: ...emo that you want to erase with the four way controller x Press the button The Sound Delete screen will be displayed c Select Sound Delete with the four way controller v Press the OK button Select Del...

Page 99: ...rased z Enter the Playback mode and press the button twice The Delete screen will be displayed x Select Delete All with the four way controller c Press the OK button If Quick Delete is set to On in th...

Page 100: ...image is protected the symbol is displayed when the image sound is played back Protecting All Images Sound You can protect all the images sound z Enter the Playback mode x Press the button twice The...

Page 101: ...cable x Connect the sound terminal white and image terminal yellow of the AV cable to the sound terminal white and image input terminal yellow of the TV c Turn the TV and camera on Changing the Video...

Page 102: ...number of prints up to a maximum of 99 Date Specify whether you want the date imprinted on the print or not z Enter the Playback mode and use the four way controller to choose the image for which you...

Page 103: ...tings If DPOF settings have already been made for an image the previously set number of prints and On Off date setting will be displayed To cancel DPOF settings set the number of prints to 00 and pres...

Page 104: ...controller to select On or Off The date will be printed The date will not be printed b Press the OK button Prints can be made according to the settings The setting for a single image will be cancelled...

Page 105: ...viewing software ACDSee ACD Photostitcher ACD photostitcher is only for the English and the Japanese version System environment OS Windows 98 98 SE 2000 Me Windows XP Home Edition Professional CPU Pen...

Page 106: ...XP you do not need to install the USB driver When you connect the camera to your computer with the USB cable your computer will automatically detect the camera as Removable Disk z Turn your computer o...

Page 107: ...your device and click Next m Select Specify a location in the box on the left and click Browse If another item has been selected click the box to deselect it Click the CD ROM drive icon and click OK T...

Page 108: ...at PENSSTOR INF is displayed and click Next Installation of the driver starts 1 Click Finish When installation is finished installation of the driver for the new hardware starts 2 Click Next 3 Select...

Page 109: ...s been selected click the box to deselect it 5 Click the CD ROM drive icon and click OK The figure on the right is displayed when the CD ROM is set as the F drive 6 Make sure that the specified drive...

Page 110: ...108 Playback Erasing 8 Click Finish When installation is finished the Wizard window is exited 9 Double click My Computer on the desktop A removable disk will be added...

Page 111: ...ting manual for your computer for instructions on how to login Installing the ACDSee When installing the ACDSee recorded images can be viewed and edited on your computer z Turn on your computer x Inse...

Page 112: ...to your CD ROM drive The PENTAX Software Installer screen will appear If the PENTAX Software Installer screen is not displayed Follow the procedure below to display the screen 1 Double click the My Co...

Page 113: ...era on ACDSee starts up automatically and the list of images is displayed Go to Step b v If ACDSee fails to start up automatically double click the ACDSee icon on the desktop Your camera can be found...

Page 114: ...splayed Joining panorama images using ACD photostitcher The ACD photostitcher is only for the English and the Japanese version When you have installed ACDSee and ACD photostitcher you can join images...

Page 115: ...t mouse button and moving the images one by one to the desired position When you have finished correcting the position click the STITCH button v Select the type of panorama picture you want to create...

Page 116: ...dotted line When you have finished trimming click the TRIMMING button n Save the picture When you are satisfied with the trimmed picture click the SAVE button to save the picture To cancel trimming cl...

Page 117: ...ttom right of the desktop The Unplug or Eject Hardware screen will appear x Make sure that PENTAX USB DISK Device is selected and click Stop The Stop a Hardware device screen will appear c Make sure t...

Page 118: ...ENTAX USB DISK Device and click OK v A message permitting removal of the hardware will appear Turn the camera off and unplug the USB cable from your computer and camera Disconnecting your camera from...

Page 119: ...required CPU Power PC 266MHz or higher Memory 8MB or more Hard disk space 6MB or more Standard equipped USB port When you connect the camera to your Macintosh you are recommended to use the AC adapte...

Page 120: ...ias icon The PENTAX Software Installer screen will appear n Click the applicable language The screen for selecting the software you want to install will be displayed Install ACDSee When you have insta...

Page 121: ...Your camera can be found on the desktop as untitled You can change the folder name v Click the ACDSee folder on the hard drive b Double click the ACDSee program icon n Open the camera folder Camera im...

Page 122: ...el on the SD Memory Card MultiMedia Card the name on the volume label will be displayed instead of untitled If the card is unformatted the manufacturer and type of card may be displayed Disconnecting...

Page 123: ...iginal image z Press the Menu Fn button x Press the four way controller The Playback menu will be displayed c Press the four way controller to select Resize v Press the four way controller The Resize...

Page 124: ...s the OK button 1 Press the four way controller to select Overwrite or Save as 2 Press the OK button The image will be resized Movie pictures cannot be resized You cannot select a larger size than tha...

Page 125: ...button Changes the size of the image Display button Switches between horizontal and vertical Four way controller Moves the trimming position up down right and left Menu Fn button Returns to the screen...

Page 126: ...e the card is being formatted The card may be damaged and become unusable SD Memory Cards MultiMedia Cards formatted on a PC or device other than the camera cannot be used Be sure to format the card w...

Page 127: ...the Set up menu x Press the four way controller The Sound screen will be displayed c Use the four way controller to change the volume v Press the OK button twice The camera is ready to capture or pla...

Page 128: ...ect Startup Sound and choose 1 2 3 or off with the four way controller v Change the Shutter sound and Operation Sound in the same way b Press the OK button twice The camera is ready to capture or play...

Page 129: ...le on the Set up menu x Use the four way controller to change the date style c Press the OK button The camera is ready to capture or play back images with the selected date style The style in which th...

Page 130: ...ettings p 20 serve as the Home Time setting You can display the time in a city other than the Home Time city World Time when shooting or playing back z Select World Time on the Set up menu x Press the...

Page 131: ...ew York NYC b Use the four way controller to select the World Time city and press the four way controller n Select DST On or Off with the four way controller m Press the four way controller Tokyo TYO...

Page 132: ...oller to choose the image you want to display as the start up screen n Press the OK button three times The camera is ready to take or play back images Once the start up screen has been set it will not...

Page 133: ...he OK button The camera is ready to take or play back images Changing the Video Output Format You can select the output format NTSC or PAL for taking or playing back images on a TV monitor z Select Vi...

Page 134: ...ing the USB cable and when the camera is operated by optional AC adapter Setting Auto Power Off You can set the camera to turn off automatically when no operation is performed for a fixed time z Selec...

Page 135: ...troller to select On or Off c Press the OK button The camera is ready to capture or play back images Setting the Quick Zoom Function When the Quick Zoom function is set to On images can be displayed a...

Page 136: ...way controller to choose the function you want to register If you do not want to register a function select Off b Press the OK button twice The camera is ready to capture or play back images Only one...

Page 137: ...ange the setting c Release the Menu Fn button The setting is saved and the camera is ready to take the picture Checking the status z Press the Menu Fn button and the Display button at the same time Th...

Page 138: ...us Limiter on the Set up menu x Press the four way controller to select On or Off c Press the OK button The camera is ready to capture or play back images Rec Mode Wide AWB Auto Recorded Pixels Qualit...

Page 139: ...te style z Select Reset on the Set up menu x Press the four way controller button The Reset screen will be displayed c Use the four way controller to select Reset v Press the Playback OK button The ca...

Page 140: ...oller The list of alarms will be displayed Active alarms are indicated by b Press the OK button twice If any alarms are enabled the camera will be turned off and the alarms will be set Setting the Ala...

Page 141: ...s the OK button 0 Press the OK button 3 times The camera will turn off Turning the Alarm Off When the camera is turned off and the set time is reached the alarm will ring for one minute The camera wil...

Page 142: ...Kuala Lumpur NYC New York VTE Vientiane SCL San Diego SIN Singapore CCS Caracas PNH Phnom Penh YHZ Halifax SGN Ho chi Minh BUE Buenos Aires JKT Jakarta SAO Sao Paulo HKG Hong Kong RIO Rio de Janeiro P...

Page 143: ...Area Wide AE Metering Sensitivity Auto Auto Bracket Digital Zoom On Instant Review 2 sec Interval Shooting Fast Fwd Movie Off 3D Mode Parallel Memory Sharpness Normal Saturation Normal Contrast Normal...

Page 144: ...t Setting Format Sound Date Style mm dd yy Date Adjust 2003 01 01 World Time Off Language English Start up Screen On Video Out NTSC Sleep Timeout 1 min Auto Power Off 3 min Quick Delete Off Quick Zoom...

Page 145: ...Area AE Metering Sensitivity Auto Bracket Digital Zoom Instant Review Interval Shoot Fast Fwd Movie 3D Mode Memory Sharpness Saturation Contrast USER Settings for items marked with an can be changed o...

Page 146: ...its dedicated battery charger or replace with a charged battery p 12 p 13 Shooting and playback are impossible due to a problem with SD Memory Card MultiMediaCard Try displaying on a PC The SD Memory...

Page 147: ...e created The SD Memory Card MultiMedia Card you have inserted is unformatted or has been formatted on a PC or other device and is not compatible with this camera p 124 This card is not formatted Comp...

Page 148: ...MultiMediaCard Insert SD Memory Card MultiMediaCard with available space or delete unwanted images p 16 95 When flash lamp blinks red flash is charging and no pictures can be taken Lamp lights red wh...

Page 149: ...n fully Subject is not in focusing area Position subject in AF frame focusing area in middle of LCD monitor If the subject is outside the focusing area aim the camera at the subject and lock focus pre...

Page 150: ...lity Level Storage Medium Auto Daylight Shade Tungsten Light Fluorescent Light W Fluorescent Light N Fluorescent Light D Manual White Balance Image Storage Capacity 2288 1712 1024 768 1600 1200 Approx...

Page 151: ...ntrol after 3 Seconds Remote Control Continuous Interval Multiple Exposure Self timer Electronic control type delay time approx 10 sec Time function World Time setting for 62 cities 28 time zones Vide...

Page 152: ...amera Lithium ion battery D LI7 Battery charger D BC7 AC adapter D AC7 AC Plug Cord D CO2A Australia D CO2B United Kingdom D CO2E Europe D CO2H Hong Kong D CO2J Japan D CO2K Korea D CO2U North America...

Page 153: ...ipment can be returned to you owing to the complicated customs procedures required If the equipment is covered by warranty repairs will be made and parts replaced free of charge and the equipment will...

Page 154: ...rference to radio communications However there is no guarantee that interference will not occur in a particular installation If this equipment does cause harmful interference to radio or television re...

Page 155: ...ndards Records maintained continue to reflect the equipment being produced can be expected to be within the variation accepted due to quantity production and testing on the statistical basis as requir...

Page 156: ...NETHERLANDS http www pentax nl for Belgium Luxembourg Weiveldlaan 3 5 1930 Zaventem BELGIUM http www pentax be PENTAX Schweiz AG Widenholzstrasse 1 Postfach 367 8305 Dietlikon SWITZERLAND http www pe...

Reviews: