


– 1 –
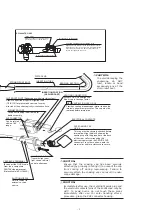
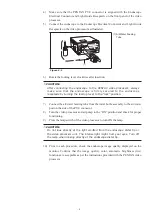
Push to freeze an image.
Push to activate the hardcopy system.
MODEL DESIGNATION
SUCTION CONTROL VALVE (OF-B120)
Depress to remove fluids or air through
the instrument channel.
AIR/WATER FEEDING VALVE (OF-B188)
Covering of hole in the top of the valve delivers
pressurized air. Covering of the hole and fully
depressing the valve delivers pressurized water.
UP/DOWN ANGULATION LOCK LEVER
When this lever is in the “F position, turned clockwise,
the bending section moves freely. When turned fully counterclockwise,
the bending section becomes progressively more stabilized.
Push to activate the Video for recording live procedures.
STRAIN RELIEF BOOT
INLET SEAL
Allows passage of accessories while
preventing escape of fluids and air.
CONTROL BODY
INSTRUMENT
CHANNEL INLET
For introduction of
biopsy forceps
and other accessories.
RIGHT/LEFT ANGULATION
CONTROL KNOB
UP/DOWN ANGULATION
CONTROL KNOB
RIGHT/LEFT ANGULATION LOCK KNOB
Functions similar to Up/Down lock
UMBILICAL CORD
LIGHT GUIDE PLUG
Transmits light from
light source to distal
end of endoscope.
SUCTION NIPPLE
For attachment to
external suction
source.
PVE CONNECTOR
Can be rotated
within a 180˚
range.
AIR/WATER PORT
To connect feeding tube from water
bottle assembly.
BENDING SECTION
VENTILATION CAP OF-C5
Provides venting of endoscope interior to equalize
internal and external pressures. This cap must be
removed before immersion.
VENTING CONNECTOR
Accepts “RED” Ventilation cap.
Also accepts Leakage Tester.
PVE SOAKING CAP
OE-C9
ELECTRICAL CONTACTS
INSERTION PORTION
(APPLIED PART)
RED
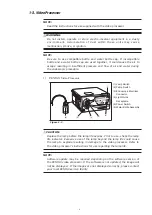
REMOTE BUTTON 1
REMOTE BUTTON 4
MAGNIFICATION CONTROL LEVER (
EG-2990i
)
See detail Information on section 2-2.7) on page 22.
This cap must be securely attached before
immersion. Align the black arrow on the
soaking cap with the green dot at the base
of the silver collar surrounding the
electrical contacts on the PENTAX PVE
connector. Press the cap down onto the
metal collar and turn clockwise to secure.
Allows connection of special irrigation tube
(OF-B113) for pressurized source of a spray
directed at the endoscopically visualized surface.
WATER JET PORT (Endoscopes with water jet system)
STRAIN RELIEF BOOT
To connect the OL-Z3 cable
From the a compatible
PENTAX video processor.
(Not available in EG-1690K)
FEEDBACK TERMINAL
INSERTION TUBE
DISTAL END
REMOTE BUTTON 2
REMOTE BUTTON 3
REMOTE BUTTON 3
REMOTE BUTTON 1
REMOTE BUTTON 2
REMOTE BUTTON 4
MAGNIFICATION CONTROL LEVER (EG-2990i)
Model Name
Minimum Instrument
Channel Width
CAUTION:
To avoid damaging the
endoscope, do NOT
twist, rotate or bend
excessively any of the
strain relief boot.
CAUTION:
Ensure that the soaking cap has been securely
attached (by properly rotating it) to prevent the cap
from coming off during reprocessing. Failure to
securely attach the soaking cap can result in endo-
scope damage.
CAUTION:
Immediately after use, the metal light guide plug and
the electrical contacts/pins of the endoscope may be
HOT. To avoid burns, do not touch these areas
immediately after use. For safer handling after a
procedure, grasp the PVE connector housing.
EG-3890TK ONLY
INLET SEAL
Allows passage of accessories while
preventing escape of fluids and air.
“B” identifies a small channel
“A” identifies a large channel
SUCTION CHANNEL SELECTOR OF-B161
Alignment of the indicator to the prescribed positions
allows the user the choice of suction capability through
either channel (2.8mm or 3.8mm) or simultaneous
suction through both channels
1. NOMENCLATURE AND FUNCTION
1-1. Video Endoscope
•
EG-2990i, EG-2790i, EG-1690K, EG-2490K, EG-2790K, EG-2990K, EG-3490K, EG-3890TK
NOTE:
Function of each remote button depends upon the video processor. The
function can be changed. For more details, refer to the instructions for use
supplied with the video processor.
Endoscope Model
EG-2990i
EG-2790i/1690K/2490K/2790K
EG-2990K/3490K/EG-3890TK
*Remote Button 1
Freeze
Freeze
*Remote Button 2
Copy
Copy
*Remote Button 3
Video
Video
*Remote Button 4
-
Enhance
**Magnification Control
Lever
Magnification(electronic)
-
*Setting at factory
**Not applicable to PENTAX Video Processor, model EPK-i5020