background image


Remote Control


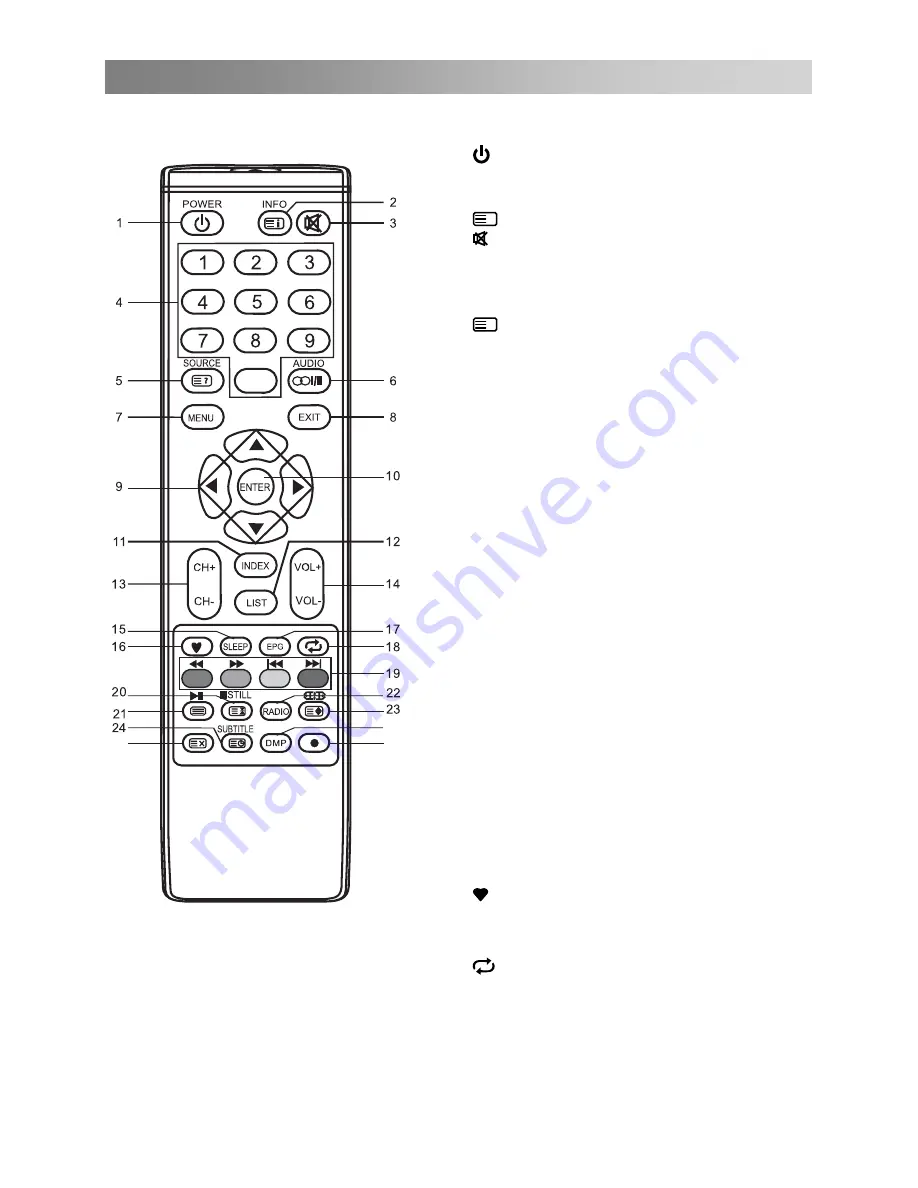
The buttons of the original remote control are as following:


1. 

: Power, switch on or off TV set. 

2.  INFO: Press to display the current 

program information on the screen.   

i

: Go to the index page. 

3. 

: Press to mute or restore sound. 

4.  NUMBER BUTTONS: Choose channels 

or password importation. 

5.  SOURCE: Press to select signal source. 

?

: Reveal the hidden information of 

some teletext pages.     

to switch between NICAM DUAL

NICAM DUAL

/ NICAM DUAL

+

/MONO and switch Audio language in 

DTV mode. 

7. 

8. 

: Return to last viewed program. 

9. 

for various optional adjustable settings.

10.

EXIT

11.

  ENTER: Press to execute the selected 

item in the menu screen or enter the 
desired value in any input mode. 

13.

VOL+/VOL-: Press to adjust the volume 
level up or down. 

14.

CH+/CH-: Press to select channels in 

ascending or descending order. 

15. SLEEP: Press to set the sleep timer. 

When the preset length of time has 

16.

LIST: Press to call up the channel list. 
Press again to exit it. 

17.  EPG: Electronic Program Guide, use in 

the DTV mode. 


0

25

26
27

: Exit OSD Menu . 

12.  

/

/

/

:

 To select the direction. 

      INDEX: Press to enter the Recorded list. 

(In DTV mode)

: Switch on/off the favorite programs list. 

18.

MENU: Press to enter the menu screen

6. AUDIO 

(

I/II

): The button can be used 

passed, the TV set enters standby mode. 


8

Summary of Contents for PNDLFHTU40

Page 1: ......

Page 2: ...responsible for compliance could void the user s authority to operate the equipment CAUTION DO not attempt to modify this product in any way without written authorization from supplier Unauthorized mo...

Page 3: ...branch circuits Do not overload wall outlets Overloaded wall outlets loose or damaged wall outlets extension cords frayed power cords or damaged or cracked wire insulation are dangerous Any of these...

Page 4: ...ring both the furniture and the television to a suitable support e Not standing the televisions on cloth or other materials placed between the television or its controls g The television must to be po...

Page 5: ...heat source such as radiators heat registers stoves or other apparatus including amplifiers that produce heat 6 Clean only with a dry cloth 9 Do not defeat the safety purpose of the polarized or grou...

Page 6: ...y cord or plug is damaged liquid has been spilled or objects have fallen into the apparatus the apparatus has been exposed to rain or moisture does not operate normally or has been dropped ON DISPOSAL...

Page 7: ...nd you will need to replace the batteries Notes on Using Batteries The use of the wrong type of batteries may cause chemical leakage and or explosion Please note the following Always ensure that the b...

Page 8: ...the VGA port on computer connect the other end of the VGA cable with the VGA port on the TV and tighten the bolts clockwise on the each end of VGA cable NOTE While connecting the 15 pin VGA please do...

Page 9: ...ous optional adjustable settings 10 EXIT 11 ENTER Press to execute the selected item in the menu screen or enter the desired value in any input mode 13 VOL VOL Press to adjust the volume level up or d...

Page 10: ...or subpage 23 RADIO Press to interchange Radio and DTV programs when there is Radio program In DTV mode 24 Cancel the teletext but not to exit teletext press again to exit 25 Press button to start re...

Page 11: ...for long periods of time It is best to unplug the set from the mains and aerial No signal There is No Signal menu on screen when there is no input signal In ATV DTV mode set will automatically turn of...

Page 12: ...tton to display the main menu 2 Press the button to cycle through the main menu 3 Press the button to select the desired sub item 4 Press the ENTER button to access the submenu 5 Press the button to s...

Page 13: ...els Color Temp Select the color temperature of the picture Aspect Ratio You can select the picture size which best corresponds to your viewing requirements PC Setting In PC mode Auto Adjust Adjust the...

Page 14: ...ich frequency band need to be adjusted make small adjustment with certain frequency band at a time Suggest NOT making too large changes AVL AVL automatically remains on the same level of volume if you...

Page 15: ...Manual Scan then press the ENTER button to enter sub menu Analog Scan Press the button to select Analog Scan Channel to Save Press the button to select channel Color System Press the button to select...

Page 16: ...elect Parental Rating then press button to select t from being used by young children or other unexpected usage Channel Locks Keypad are available when Enable is On Channel Locks Press to sele to lock...

Page 17: ...ton to select Mode then press button to select On or Off Press the arrow button to select the Subtitle Primary Language and Subtitle Secondary Language Press the button to select Hearing Impaired then...

Page 18: ...o set the parameters for sch Press the ENTER button to set the parameters for recording Delete One Press the green button to delete a video Delete All Press the yellow button to delete all video D 1 I...

Page 19: ...avi MPEG 1 MP MPEG 2 MPEG 4 SP MPEG 4 ASP MPEG 4 XVID DivX AVC H 264 MP Level 4 el 4 HP Lev MPEG mpeg mpg dat vob MPEG 1 MP MPEG 2 MP MPEG 4 mp4 MPEG 1 Layer 2 1 MPGE1 MPEG2 M MPEG 4 SP MPEG 4 ASP MPE...

Page 20: ...e ze 1280x1024 Progressive Mod Si File Size 10MB Text txt TF 8 UNICODE U ASCII File Size 1MB No x 500 files su d each folder te Ma pporte N ot be or well be supported by the USB orted OTE l algorithm...

Page 21: ...light a file and then press the button to play Press the to stop the playing files Press the EXIT button to back to the previous menu ovie e button to select Movie in the main menu then press ENTER bu...

Page 22: ...ext date s guide Press the yellow button to display the EPG Schedule List Press the blue button to book program Press the EXIT button to exit Channel List Press LIST button to display the Channel List...

Page 23: ...t When a page is displayed you can double the size of the text to make it easier to read 1 Press the button to enlarge the top half of the page 2 Press the button again to enlarge the bottom half of t...

Page 24: ...tuned with auto activated Picture appears slowly after switching on This is normal the image is muted during the product startup process Please contact your service center if the picture has not appe...

Page 25: ...it air dry before you turn on your TV Cleaning the cabinet To remove dirt or dust wipe the cabinet with a soft dry lint free cloth Please be sure not to use a wet cloth Extended Absence If you expect...

Page 26: ...ze the TV doing so may cause the TV to tip over causing serious injuries or death Follow all safety precautions provided on the included Safety Flyer For added stability install the anti fall device f...

Page 27: ...and the two brackets must be fastened with screws to the left and right corners of the flat panel s rear cover respectively 2 The above figures are for reference only and the physical flat panel shall...

Reviews: