background image

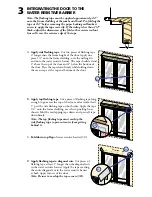
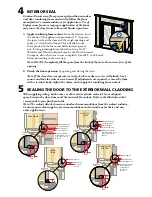
A.  Apply side flashing tape. Cut two pieces of flashing tape 

4" longer than the frame height of the door. Apply one 

piece 1/2" onto the frame cladding, over the nailing fin 

and onto the water resistive barrier. The tape should extend 

2" above the top of the door and 2" below the bottom of 

the door. Press the tape down firmly while folding down 

the excess tape at the top and bottom of the door.

B.  Apply top flashing tape. Cut a piece of flashing tape long 

enough to go across the top of the door and extend at least 

1" past the side flashing tape on both sides. Apply the tape 

1/2" onto the frame cladding, over the top nailing fin as 

shown. Fold the overlapping tape down, and press all tape 

down firmly.

Note: The top flashing tape must overlap the 

side flashing tape to prevent water from getting 

behind it.

C.  Fold down top flap

 of water resistive barrier (3C).

3

INTEGRATING THE DOOR TO THE 

WATER RESISTIVE BARRIER

Note: The flashing tape must be applied approximately 1/2" 

onto the frame cladding at the jambs and head. Pre-folding the 

tape at 1/2" before removing the paper backing will make it 

easier to apply the tape correctly. If the siding is less than 1/2" 

thick, adjust the dimension of the fold so the exterior sealant 

line will cover the exterior edge of the tape.

D. Apply flashing tape to diagonal cuts. Cut pieces of 

flashing tape at least 1" longer than the diagonal cuts 

in the water resistive barrier. Apply the tape covering 

the entire diagonal cut in the water resistive barrier 

at both upper corners of the door. 

Note: Be sure to overlap the top corners (3D).

Exterior 

3A

Exterior 

3B

1" 

Exterior 

3D

3C

Summary of Contents for 801V0101

Page 1: ...hod different from these instructions and additional care Determining the appropriate installation method is the responsibility of you your architect or construction professional Always read the Pella...

Page 2: ...ity knife Sealant Gun Drill Screwdrivers 2 Phillips small flat blade B Verify the door will fit the opening Measure all four sides of the opening to make sure it is 3 4 larger than the door in width a...

Page 3: ...shown 1E so it overhangs 1 to the exterior Note The tape is cut 12 longer than the width so that it will extend 6 up each side of the opening 2 SETTING AND FASTENING THE DOOR F Tab the sill flashing...

Page 4: ...ove all shipping spacers Note Be sure to remove the spacers from the bottom edge of the door panel I Insert and attach shims directly above the astragal in the center of the unit J Center hinge double...

Page 5: ...The top flashing tape must overlap the side flashing tape to prevent water from getting behind it C Fold down top flap of water resistive barrier 3C 3 INTEGRATING THE DOOR TO THE WATER RESISTIVE BARR...

Page 6: ...oor Insulation Foam by the Dow Chemical Company allow the foam to cure completely usually 8 to 24 hours before proceeding to the next step Note DO NOT completely fill the space from the back of the fi...

Page 7: ...per DO NOT use steel wool BE CAREFUL NOT TO SCRATCH THE GLASS Remove sanding dust Pella products must be finished per the below instructions failure to follow these instructions voids the Limited Warr...

Page 8: ...ems The determination of the suitability of all building components including the use of Pella products as well as the design and installation of flashing and sealing systems are the responsibility of...

Reviews: