background image

Thank you for choosing a product of the Pelitt brand. 

On the official website of the Pelitt Group SE: http://

www.pelitt.com

 are available all supporting 

certificates and declarations. 

Charging a Battery 

Attention! 

Improper connection of charger may result in serious damage to the car DVR and battery. 

Before the first use of the device, it is recommended to fully charge the battery. For charging, connect 

the car power adapter into the socket and insert the plug into the micro-USB slot of the device 

(12)

. In 

case of the successful beginning of charging process, blue LED 

(14) 

on the car holder will activate. If 

the device already has the required initial charge of the battery, it turns on automatically. You can see 

the power icon on the screen 

(8)

 of the device also. When device fully charged, the battery power icon 

is filled. It is recommended not to disconnect the power adapter until the charging process is finished. 

Charger is not equipped with the power switch and to stop charging process it has to be removed 

manually. 

Switching on and off, start and stop of the recording. 

To switch on or off the device, press and hold the button 

“On/Off/OK” (4) 

for 3 seconds. 

The operating system loading or switching off will take a few seconds as it can be judged from the 

appearance of the screen saver or fading of the display. 

Language setting 

You can set the language of operating system in the sub-menu Language of the Settings menu. Press 

two times on the “Menu” button 

(3)

 go to 

“Language”

 and set any preferable language and confirm 

your choice by 

“On/Off/OK”

 button 

(4)

Photo mode and preview mode

To enter the photo mode, press and hold the 

"Menu" 

button

 (3)

 within 2 seconds. To take a photo 

press the button 

“On/Off/OK” (4)

. To move to the file browser mode, press and hold the "Menu" 

button

 (3)

 for 2 seconds. Press the scroll button 

(5)

, select the desired file to view and run the viewing 

by pressing the 

“On/Off/OK” 

button 

(4)

. To return to the video recording mode press

 “On/Off/OK” (4) 

again and hold 

"Menu" 

button 

(3)

 for 2 seconds.

Reset of the settings

In case of unstable operation of the device, it is recommended to make soft reset or return to the 

original settings. To perform a soft reset (without loss of settings), press the 

"Reset" 

button

 (7) 

on the 

device body. To return the device to factory settings, double-click the 

"Menu"

 button 

(3)

 go to the 

"Default settings"

 and confirm your choice by pressing the 

“On/Off/OK” (4)

 in the next menu confirm 

your choice one more time. 

Attention!

 We kindly ask you to use this function carefully, as all settings of the device will be deleted. 

Warranty terms 

Warranty does not cover any damages and defects, caused by ignorance of the recommendations for 

usage of the device and related accessories. 

Pelitt Group SE does not guarantee compatibility of the products with any accessories and devices by 

3rd party manufacturers.

7

ENG

Summary of Contents for VDrive

Page 1: ...English 6 Device Specification 4 Deutsch 8 e tina 10 Sloven ina 12 Polski 14 6 1 Table of contents 3...

Page 2: ...6G G sensor 3 axis Viewing Angle 150 diagonal Video resolution FHD 1920x1080 30 fps Video format AVI H 264 Photo resolution up to 12 MP 4032x3024 by interpolation Photo format JPG Expansion slot micr...

Page 3: ...6 RoHS RoHS relates to Consolidated Test Report by Shenzhen ZCT Technology Co Ltd Report No 16ZCTC062003RR Date of Issue June 20 2016 Do not throw away Send it to the special item for disposal Recycla...

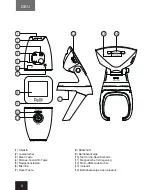
Page 4: ...button 4 On Off OK button 5 Scroll buttons 6 Microphone 7 Reset button ENG 6 8 9 11 10 11 1 12 14 13 2 5 4 3 7 6 8 Screen 9 DVR operation LED 10 SD card slot 11 Magnetic lock 12 Power socket 13 Ionize...

Page 5: ...Language setting You can set the language of operating system in the sub menu Language of the Settings menu Press two times on the Menu button 3 go to Language and set any preferable language and con...

Page 6: ...Lautsprecher 3 Men Taste 4 Ein Aus Taste OK Taste 5 Navigationstasten 6 Mikrofon 7 Reset Taste 8 Bildschirm 9 Betriebsanzeige 10 Slot f r die Speicherkarte 11 Magnetische Verriegelung 12 Micro USB Lad...

Page 7: ...enu Taste 3 zwei Mal mit Hilfe der Navigationstaste 5 w hlen Sie die gew nschte Sprache Die ausgew hlte Sprache best tigen Sie mit der Ein Aus OK Taste Foto und Wiedergabemodus Halten Sie die Men Tast...

Page 8: ...3 4 5 6 7 8 9 10 11 12 13 14 Fotoapar t Reproduktor Tla tko Menu Tla tko On Off OK Tla tka pro posuv Mikrofon Tla tko reset Obrazovka Opera n LED dioda DVR Slot pro SD kartu Magnetick z mek Nab jec z...

Page 9: ...ete nastavit v podmenu Jazyk v nab dce Nastaven Stiskn te dvakr t tla tko Menu 3 p ejd te na Jazyk Nastavte libovoln jazyk a volbu potvr te tla tkem ON OFF OK 4 Re im Foto a Re im n hled Chcete li p...

Page 10: ...1 2 3 4 5 6 7 8 9 10 11 12 13 14 Fotoapar t Reproduktor Tla idlo Menu Tla idlo On Off OK Tla idl pre posunutie Mikrof n Tla idlo reset Obrazovka LED dioda DVR Slot pre SD kartu Magnetick z mok Nab ja...

Page 11: ...u m ete nastavi v podmenu Jazyk v ponuke Nastavenia Stla te dvakr t tla idlo Menu 3 prejdite na Jazyk Nastavte ubovo n jazyk a vo bu potvr te tla idlom ON OFF OK 4 Re im Foto a Re im n h ad Ak chcete...

Page 12: ...7 8 9 10 11 12 13 14 Kamera G o nik Przycisk Menu Przycisk W Wy OK Przyciski przewijania Mikrofon Przycisk Reset Wy wietlacz Wska nik pracy wideo rejestratora Gniazdo karty SD Zamek magnetyczny Styki...

Page 13: ...miany j zyka nale y wcisn 2 razy przycisk Menu 3 przej do pola J zyk Language i wybra odpowiedni j zyk zatwierdzaj c wyb r naci ni ciem przycisku W Wy OK 4 Tryb zdj i przegl dania W celu przej cia urz...

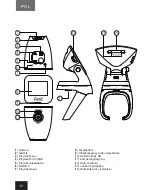
Page 14: ...RUS 16 8 9 11 10 11 1 12 14 13 2 5 4 3 7 6 1 2 3 4 5 6 7 8 9 10 11 12 13 14 OK SD...

Page 15: ...Pelitt Pelitt Group SE http www pelitt com micro USB 12 14 8 OK 4 3 OK 4 3 5 OK 4 3 2 OK 4 3 2 5 OK 4 3 2 7 3 5 OK 4 Pelitt Group SE 17 RUS...

Page 16: ......

Reviews: