9
Thank you for choosing a Peg-Pérego
product.
WARNING
IMPORTANT: Read these instructions carefully and
store them in the holder provided throughout the
lifecycle of the product. The child’s safety could be
put at risk if these instructions are not followed.
_ WARNING Never leave your child unattended.
_ Assembly and preparation of the item must be carried out
by adults.
_ Do not use the product if there are missing or broken parts.
_
Before use make sure that all of the attachment
mechanisms are connected properly.
_ Do not insert fingers into the mechanisms.
_ Do not use near heat sources, open flames or dangerous
objects that are within reach of the child.
_ It could be dangerous to use accessories which are not
approved by the manufacturer.
_ This product is only suitable for children who are unable to
sit up by themselves.
_ This product is designed for children from birth up to a
weight of 9 kg.
_ Only use the product on surfaces that are hard, horizontal
and dry.
_ Do not leave other children playing unattended near the
carriage.
_ Take care when adjusting the mechanisms (handle, backrest)
with the child present.
_
Regularly check the handle (or the handles) and the
bottom of the carriage to make sure that there are no
signs of breakage or damage.
_ When using the pram with a Peg Perego stand, check
the maximum pram length allowed on the stand.
_ The pram is intended for transportation purposes and
should not replace the cot at home.
_ Do not add any mattress are not approved by the
manufacturer.
The images referring to the textile details may differ
from the collection purchased.
INSTRUCTIONS FOR USE
Using the pram
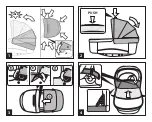
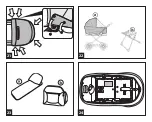
1 HOOD: Lift the hood until it clicks. Fasten the 6 buttons
on the lower profile.
2 To lower the hood, press on the handle and lower it
simultaneously.
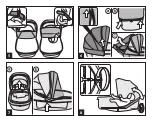
3 FOOT MUFF: Slide on the foot muff (fig_a), unfasten the
external buttons of the hood (fig_b), fasten the double
buttons of the foot muff (fig_c) and finally refasten the
hood (fig_d).
4 Fasten the velcro straps as illustrated.
5 The velcro straps can be used to fasten the foot muff to
the hood, so as to protect the child even more against
the elements. Unfasten the sides of the foot muff
(arrow_a), unfold it upwards (arrow_b) and fasten it to
the hood with the velcro straps (arrow_c).
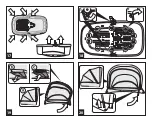
6 turn the pram into a cradle, remove the foot muff, open
the zip on the hood (fig_a), unbutton the hood at the
back (fig_b) and finally remove the flap of fabric (fig_c).
7 Remove the insect screen from the foot muff (fig_a) and
stretch it over the hood, fastening it to the side button
(fig_b).
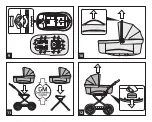
8 BACKREST ADJUSTMENT: pull the handle outwards and
rotate it clockwise to raise the backrest or anticlockwise
to lower it.
9 FOUR SEASONS SYSTEM: as shown in the figure, it is
possible to adjust the product’s air circulation from the
base in order to prevent condensation.
Move the lever to blue for a cool, well-ventilated
environment (summer), or to red to limit the intake of
air (winter).
10 CARRY HANDLE: this is built into the hood. To carry the
bassinet, lift the hood (if lowered) until it clicks and hold
the handle placed above it.
_
Before lifting the bassinet, ensure the built-in hood is
correctly fastened.
_
Before lifting the bassinet, make sure the hood is in the
correct position for transport.
_ Before unfastening and lifting the bassinet from the
frame, adjust the backrest to its lowest position (figure 8).
Summary of Contents for Primonido Elite
Page 1: ...primonido elite Instructions for use ...
Page 2: ...1 2 3 click 1 2 3 4 1 PUSH 2 ...
Page 3: ...a b c 5 6 7 8 ...
Page 4: ...1 2 9 11 10 12 ...
Page 5: ...1 2 1 2 2 13 15 14 16 ...
Page 6: ...1 20 17 19 18 ...
Page 7: ...21 22 23 24 ...


