10
must only be carried out by adults. Keep all moving parts
clean and if necessary lubricate them with light oil. Clean
the plastic parts periodically with a damp cloth. Do not
use solvents or similar substances. Brush the fabric parts
to remove dust. Do not clean the polystyrene shock
absorbing device with solvents or other similar products.
Protect the product from atmospheric agents: humidity,
rain or snow. Extended exposure to sunshine can cause
colour changes in many materials. Store the product in
a dry environment. Remember to regularly ventilate the
interior of the carrycot.
ACCESSORIES
22 RAIN COVER: rain canopy made of clear (fig_a).
BASSINET STAND: Practical, compact support base
(fig_b).
23 COMPLETO TRASPIRANTE: mattress plus cushion (fig_a).
BORSA: diaper-changing bag with pad for changing
baby’s diaper (fig_b.
SERIAL NUMBERS
24 Information about the production date of pram can be
found under the base.
_ Product name, production date and serial number.
PEG-PÉREGO S.p.A.
Peg-Pérego S.p.A. is an ISO 9001 certified
company. This certification is a guarantee
for customers and consumers of the
transparency and trustworthiness of the
company's procedures and working
methods. Peg-Pérego can make changes
at any time to the models described in this publication
for technical or commercial reasons. Peg-Pérego is at
the disposal of its customers and consumers to ensure
that all their demands and queries are fully satisfied. It
is a key part of our policy to ensure we are always
aware of our customers' views and requirements. We
would therefore be very grateful if, after using a Peg-
Pérego product, you take the time to fill in our
CUSTOMER SATISFACTION QUESTIONNAIRE, making a
note of any comments or suggestions you might have.
GANCIOMATIC SYSTEM
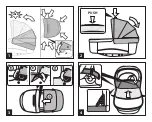
11 The Ganciomatic System enables you to fasten the
bassinet quickly and easily, with one simple operation,
to the Ganciomatic base of the Bassinet Stand and the
Classic Chassis (purchased separately).
To attach the pram, put it on the chassis and press with
both hands until it clicks into place.
Always apply the brakes on the chassis before attaching
and removing the pram.
IMPORTANT: Check that the pram is properly attached.
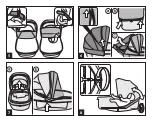
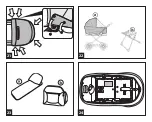
12 To release it, press the lever under the bassinet and lift it.
13 REMOVING THE LINING: To remove the lining of the
hood, unfasten the 6 buttons on the lower profile.
14 Press the buttons on the two fasteners and remove the hood.
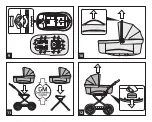
15 Pull out the flap of fabric under the handle of the hood
and pull out the two rigid supports.
16 Raise the backrest (fig_a) to make it easier to remove the
mattress (fig_b).
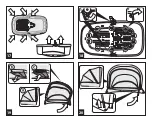
17 Unfasten the 6 buttons on the outside of the bassinet
and remove the inner lining.
18 Finally, unfasten the 10 elastic bands on the bottom
of the bassinet and the other 4 positioned close to the
hood fasteners, and remove the outer lining.
To replace the lining of the bassinet, do the opposite.
19 When placing the lining on the hood, ensure you insert
the rigid supports correctly. Insert the tube bearing the
carry handle into the hood’s front slot, ensuring the
handle is centered correctly (fig_a). Pull the flap of fabric
out from the opening on the hood (fig_b) and slide it
under the handle (fig_c).
20 Finally, slip the second metal support into the hood’s
inner slot.
21 Fasten the hood to the appropriate supports and fasten
the 6 buttons.
PADDING CLEANING INSTRUCTIONS:
Brush the fabric
parts to remove dust. When washing, closely follow the
instructions stated on the label sewn into the cover. Do
not use chlorine bleach, do not iron, do not dry clean, do
not remove stains with solvents and do not tumble dry.
PRODUCT CLEANING:
This product requires a small
amount of maintenance. Cleaning and maintenance
Summary of Contents for Primonido Elite
Page 1: ...primonido elite Instructions for use ...
Page 2: ...1 2 3 click 1 2 3 4 1 PUSH 2 ...
Page 3: ...a b c 5 6 7 8 ...
Page 4: ...1 2 9 11 10 12 ...
Page 5: ...1 2 1 2 2 13 15 14 16 ...
Page 6: ...1 20 17 19 18 ...
Page 7: ...21 22 23 24 ...


